Video Editor

Use free video software to create and edit videos of any complexity from a family greeting card to a company presentation. Cut, merge video files, apply visual and audio effects, use filtration and image correction, make slideshows and add an appropriate soundtrack. Use multi-color Chroma Key and advanced parameters settings to give your video a professional look. All popular video and audio formats are supported.

Read more about Video Editor...

Video Converter

This program is intended for converting video files from one format to another. Nearly all popular video formats are supported (both reading and saving). In addition, the program drastically simplifies the task of converting videos for playback on specific multimedia devices, such as iPhone, Samsung Galaxy or Huawei P30 Pro. The program is extremely easy to use, has a modern interface and all necessary video processing functions.

Read more about Video Converter...

Audio Converter

The audio converter will help you convert audio files from one format to another. All key audio formats and codecs are supported. The program also allows you to manage playlists and meta tags, extract audio from video files and save these tracks on your computer in any format.

Read more about Audio Converter...

Audio CD Grabber

This audio tool is intended for grabbing audio tracks from compact discs and saving them to the user’s computer in any format. Nearly all popular audio formats and codecs are supported. The program can also extract track details from the FreeDB server for automatic file renaming and updating meta tags.

Read more about Audio CD Grabber...

Multifunctionality

Multifunctionality

A wide array of multimedia processing tools in one free video software suite.

High speed

High speed

Our programs use fast
and high-quality algorithms optimized for single and multi-core CPU’s.

Affordability

Affordability

VSDC video software is freely available for download to Windows OS-based PCs and laptops.

Getting creative with text for video in VSDC. Beautiful titles, subtitles and more
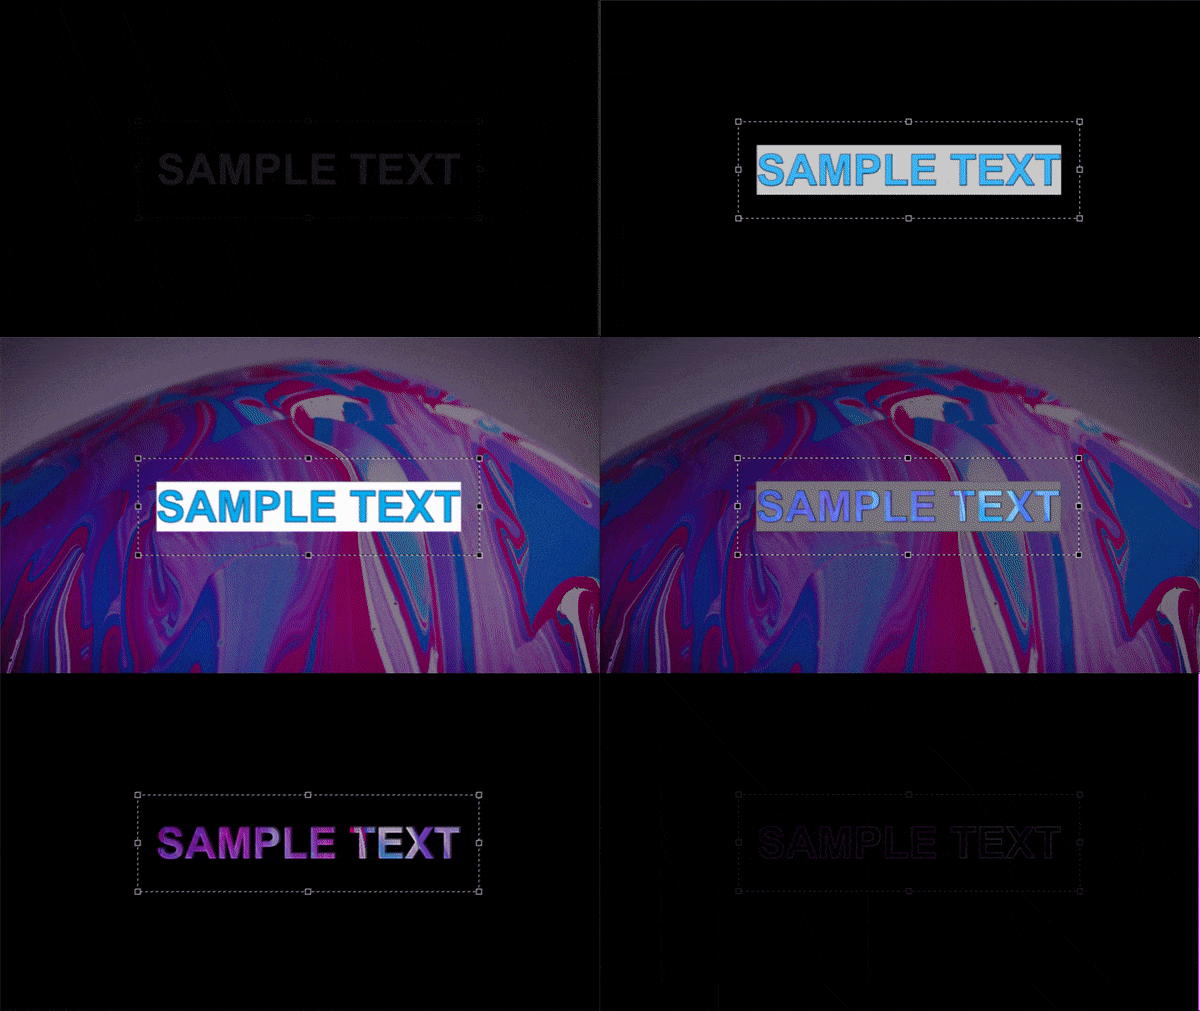
VSDC is a free video editor with text editing features

Most times when you edit a video, you need to add a piece of text to the scene. It can be scene titles, subtitles, opening or closing credits, watermarks, or tooltips. In this tutorial, we’ll show you how to use VSDC Free Video Editor to add text to your clip, make it look stylish and authentic.

Download VSDC Free Video Editor for Windows

Let’s start with the basics. VSDC offers a built-in text editor, a tool to add subtitles from an external text file, and a tool to create tooltips. The latter can be useful if you’re working on a video tutorial and need explanation elements for the viewers. Most times, however, users need to add a short piece of text to their videos, so we’ll cover that first.

How to add text in a video editor

  • Launch the program and import your footage. If this is your first time, you can use the round green “Add object” button located in the top menu.
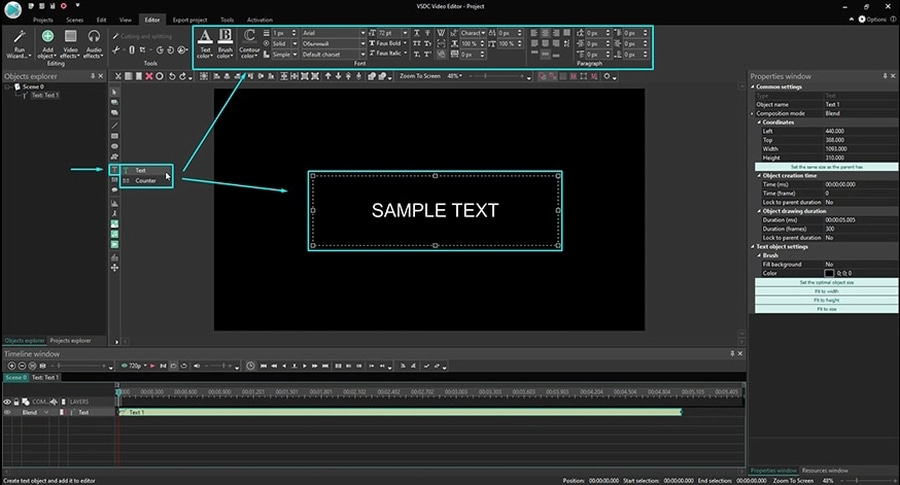
  • Select the “T” icon from the left-side menu and choose Text. In the pop-up window click OK to proceed.
  • Place the crosshair rectangle where you want the text object to be located. You’ll be able to relocate it any time.
  • Double-click inside the rectangle-shaped frame and you’ll see a cursor.
  • Type your text. Note, it may look very small, but that what the built-in text editor is for. In the next paragraph, we’ll show you how to make it look exactly the way you want.
How to create stylish text for video

How to change the look of the text in a video, make it contoured or transparent

As you may have noticed, as soon as you added the text to the video, a corresponding toolbar appeared at the top of the program. That’s the built-in text editor and it allows you to change anything about your text: font, size, color, thickness, alignment, the level of transparency, and even the contour borderline.

Just play with each feature and see it for yourself.

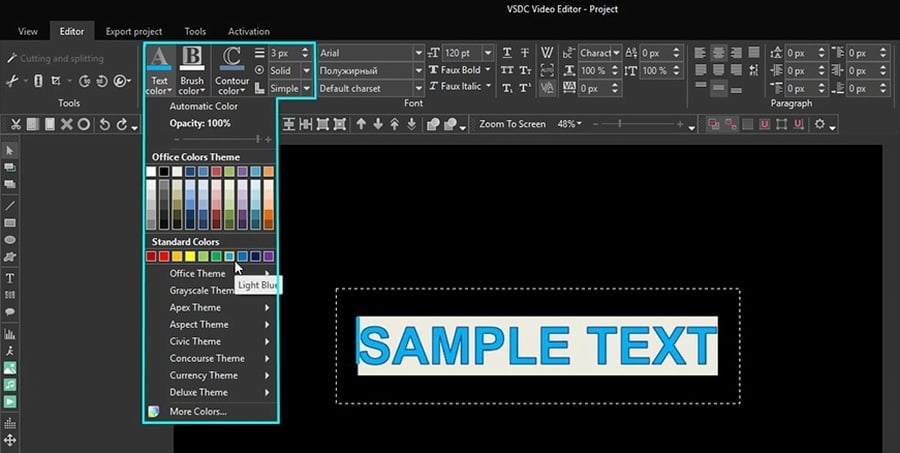
For starters, select your text or a part of it with a mouse and change its color, font, font size, font style. You can underline or cross out your text, use caps and scripts, change horizontal and vertical scale, select an appropriate alignment, specify other paragraph settings if needed. You can make any word or letter transparent. To do that select the symbols with a mouse, open the “Text color” drop-down list and move the “Opacity” slider. As you’ve probably guessed, opacity settings can be used for creating watermarks.

One of the most demanded video text styles is a contoured half-transparent text, and you can apply it in VSDC too.

  • Select the text you want to modify.
  • Adjust the contour style and its thickness.
  • Change the contour color if appropriate.
  • Open the “Text color” drop-down menu and move the opacity slider to achieve the desired effect.
Add contoured text to a video

How to change the text in video duration and its position on the timeline

Finally, you may want to have the text object to be displayed throughout the entire video, or you may want to have it appear once for a particular moment. Below, we’ll explain to you how to do it.

Go to the timeline and find the green “Text” object there. Place your mouse over it – you’ll notice you can stretch and move it easily. Now, if you want the text to be visible all the time, stretch the “Text” object to the length of your video file on the timeline.

If you need the text to be shown at a particular moment for a selected period of time, use the same stretching and dragging mouse movement to place it on the timeline.

How to use VSDC free video editor to add text to a movie

If you need higher precision when it comes to the duration time, click on the text object and open the Properties window on the right. You’ll find “Object creation time” and “Object drawing duration” parameters. The former defines the moment text appears in the scene. You can fine-tune its appearance up to milliseconds. The latter defines the exact period your text in a video will be seen.

Now that you’ve mastered the way to work with simple text in a video editor, you’ll be able to work with tooltips and subtitles too. To add the former, go to the left-side menu and choose the tooltip icon. Place it in the scene and adjust text, font, margins, and style using the Properties window. On how to work with subtitles, we’ll briefly talk in one paragraph.

Note that because you’re working with text in a video editor, you can apply various effects to it including fade-in and fade-out. You can also make it move, create reflections, add new fonts, and more. We recommend checking out our video tutorials on how to use VSDC Video Editor to work with text.

Using VSDC video editor to add text: how to upload subtitles

Technically, there are two ways to add subtitles to your video in VSDC.

The first one involves using a specifically formatted .srt file with the text. Usually, these files are created in subtitle editing software, not manually.

However, if you’re struggling with this task and don’t have lengthy subtitles to upload, you can create subtitles right in the video editor. See the tutorial below to find out how.

Other tutorials you may be interested in checking out:

How to create a picture-in-picture effect

How to add an audio spectrum visualizer

How to create a “video inside text” intro


You can get more information about the program on Free Video Editor' description page.

How to edit GoPro videos in VSDC Free Video Editor

So, you have an awesome piece of footage you’ve shot with your GoPro and you need to make few adjustments before showing it to the world? You’re on the right page, because we’ll show you how to edit GoPro videos using a free software named VSDC. In the tutorial below, we’ll go over rotating, splitting, speed effects (slow motion, playing the video backwards), and adding music.

We’ll be working in VSDC free video editing software for Windows. VSDC is completely free, and it has actually been recommended by the GoPro team after their own video editor, Studio stopped being supported.

Download VSDC Free Video Editor

What’s great about VSDC, when you compare it to other video editors, it opens and processes GoPro files very well (full 120fps support, 4K resolution, and HEVC/H.265 codec support, if we must be more specific). In other words, you won’t have to convert your files before editing them, and you’ll be able to keep the high quality at the export.

How to open and rotate a GoPro video?

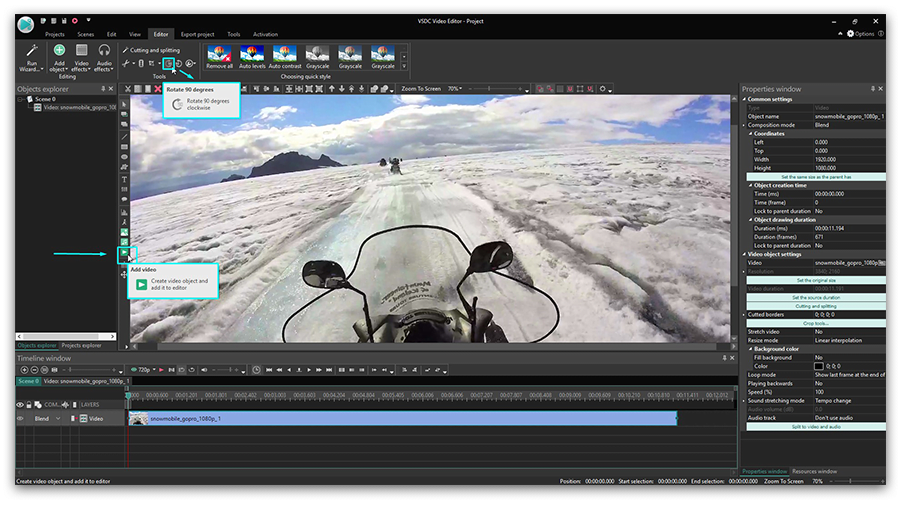
Once you’ve launched the program, start a new project and import your footage to the timeline. Use the round green “Add object” button, choose “Video” and select the file from your PC.

How to edit GoPro videos in free video editing software

The first task many action camera owners have when they start editing GoPro videos is the rotation. Well, because sometimes you simply can’t keep that perfect angle when you’re shooting.

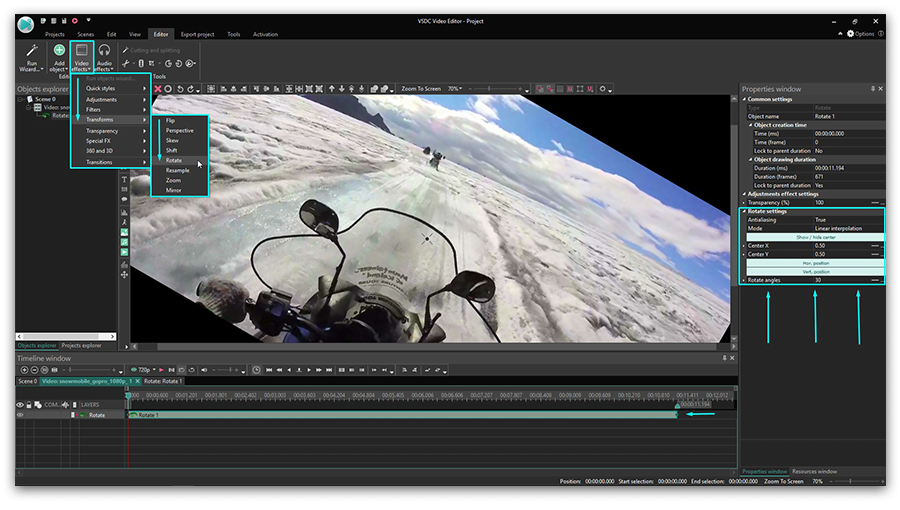
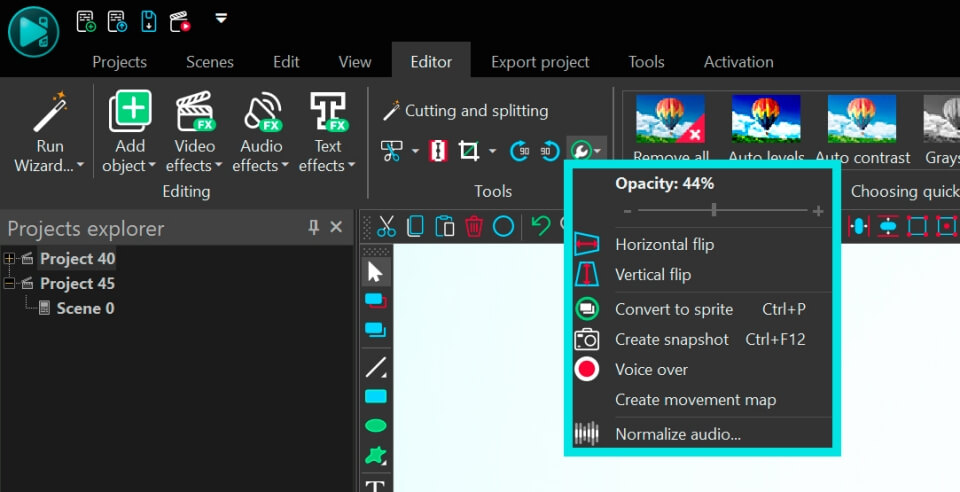
You can rotate footage at 90 degrees clockwise and counterclockwise in a single click using the quick menu at the top (see the illustration above). However, if you need to rotate the video at a custom angle, you can do that too:

  • Go to the Video effects tab located in the top menu.
  • From the drop-down menu choose “Transform” – “Rotate”.
  • In the popup window, there will be “Whole parent duration” already selected. Just click OK.
  • A new tab will appear on the timeline with the “Rotate” effect placed on it.
  • Click on it with the right mouse button and select Properties.
  • In the Properties window, scroll down to “Rotate angles” and set the parameters according to your needs. See the illustration below.

How to rotate GoPro videos in VSDC

How to edit GoPro videos: cropping and splitting your footage

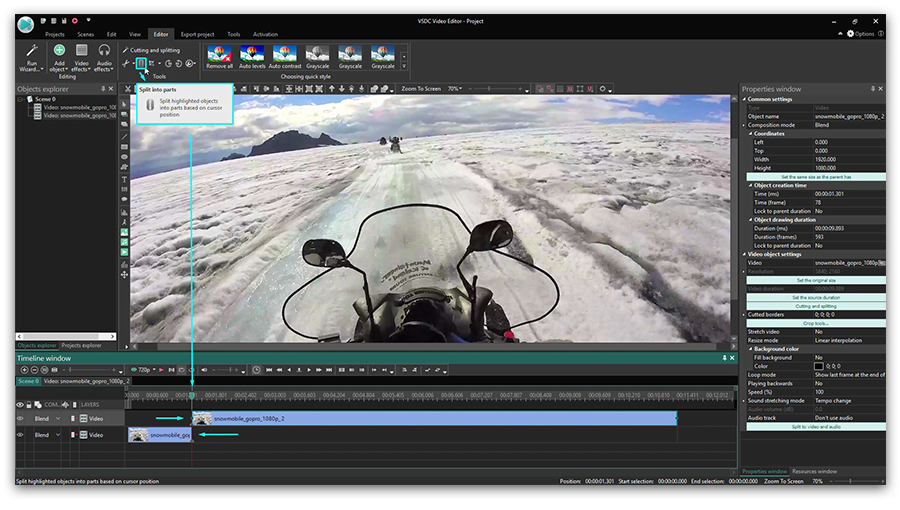
Cutting, cropping, and splitting tools are all located in the quick access menu named “Tools” at the top of the program interface, and you’ll easily get a hang of them.

First, if you need to crop the borders of your video, just click the corresponding icon – a new window will pop up where you’ll be able to manually choose what’s left in the scene. Cropping is a great way to get rid of the excessive space around the object and narrow the focus for the viewers.

Second, splitting.

  • Simply place the cursor to the point where one episode is supposed to end, and another one should begin.
  • Click the “Split into parts” icon as illustrated below.
  • See how your video is instantly divided into 2 parts placed consequently on the timeline tracks.
  • Repeat to break the video into even more fragments if needed.

Splicing GoPro footage

How to edit GoPro videos: applying slow-motion effect and playing videos backward

We’ve finally got to the most popular part. Applying a “slo-mo” effect to GoPro videos is a must if you want to savor some of the best moments and make the video look more spectacular. Here is how to do it:

  • Split the video into fragments using the instruction above and choose the one you want to slow down.
  • Go to the Properties window located on the right side and scroll down to the “Speed %” section.
  • Manually adjust the speed you want the video to be played at.

If you choose 50%, it will be twice as slow as the original. If you choose 25%, it will be 4 times slower than the original video. We always recommend testing this parameter and previewing the result as you go. Because depending on the action and the desired result, the sweet spot may be found somewhere between 32% and 47%.

How to apply a slow-motion effect to a GoPro video

You know what else will produce a great impression on the viewers? If you choose some breathtaking moments of the video and play them backward. Notice, that’s a parameter right above the “Speed %” field. Just select a video fragment and switch No to Yes in front of the “Play backward” option.

How to edit GoPro videos: adding music

Ready to spice up your clip with the right atmospheric music? Let’s do this!

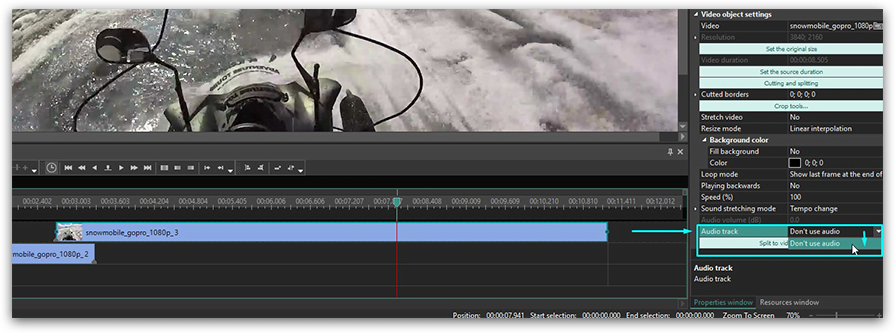
First, if you want to remove the original audio track of the video, go to the Properties window and choose the “Don’t use audio” option from the “Audio track” drop-down menu. Your footage will now be muted.

How to mute the original audio track in a GoPro video

Then click the round green “Add object” button and choose “Audio”. Select the file that you think suits the mood of your footage. You’ll be able to split and adjust it too if needed.

When you’re done with editing your GoPro video, go to the Export project tab and choose the export profile depending on your goals. For instance, if you’re planning to upload your clip to YouTube, Facebook, or Instagram – there are special pre-configured profiles for that. When you choose one of them, your video is exported according to these social media platforms requirements. If you, however, want to save the video on your PC in the maximum quality, you can go with the AVI format and the H.265 codec (click the “Edit profile” button to choose the codec and other custom parameters).

Now that you know how to edit GoPro videos on a basic level, we recommend the following tutorials to help you make even more attention-grabbing clips:


You can get more information about the program on Free Video Editor' description page.

How to blend clips or images in VSDC Free Video Editor

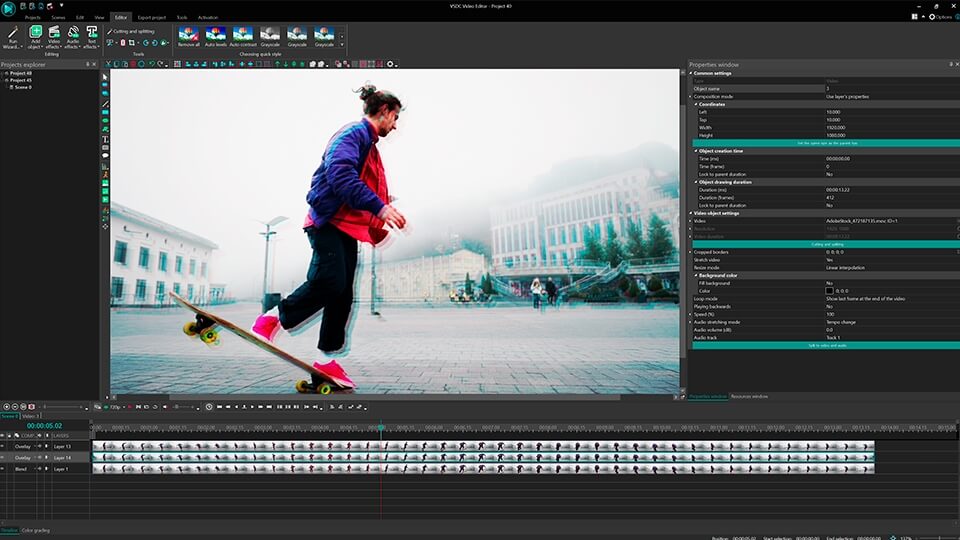
Using ‘Blending Modes’ you can create your own visual effects and filters. For example, let’s see how to create the so-called Ghost Effect.

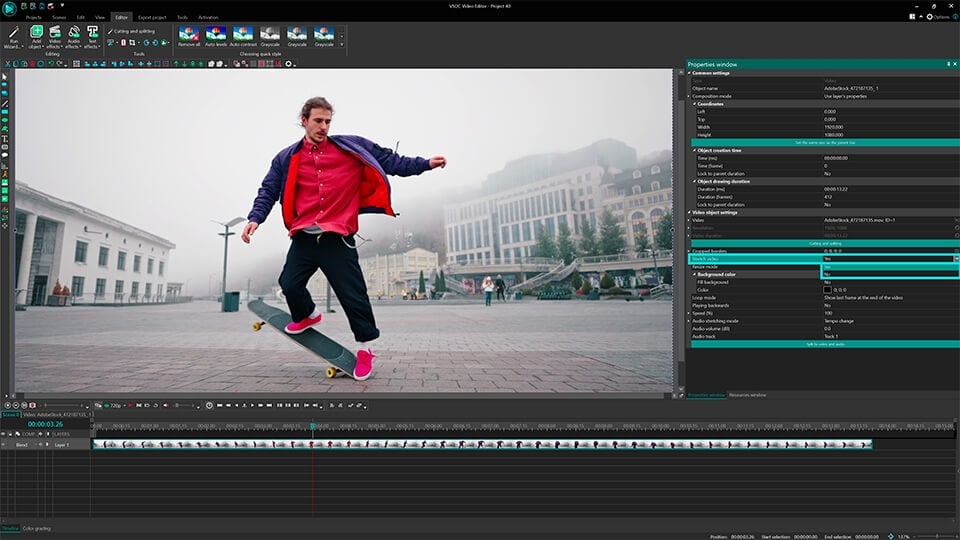
Add a video, where you’d like to apply a Ghost Effect. To make it perfectly fit the scene, select “Yes” in the “Stretch Video” option.

Tip: to make a video perfectly fit the scene size, add a video with the help of Import Content option

Due to a ghost effect an object obtains several contours of different types and colors. To achieve this effect, we need to add as many identical video layers as we want for our object to have contours.

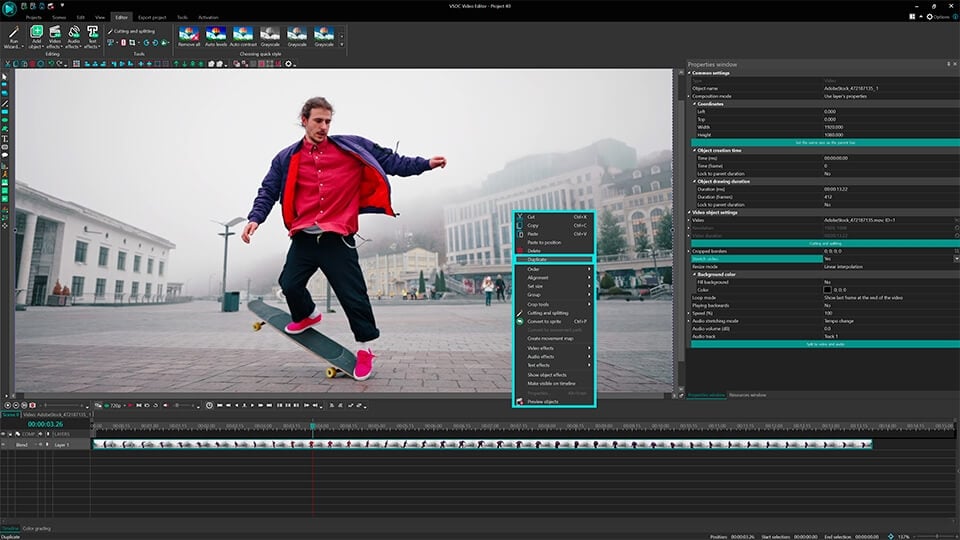
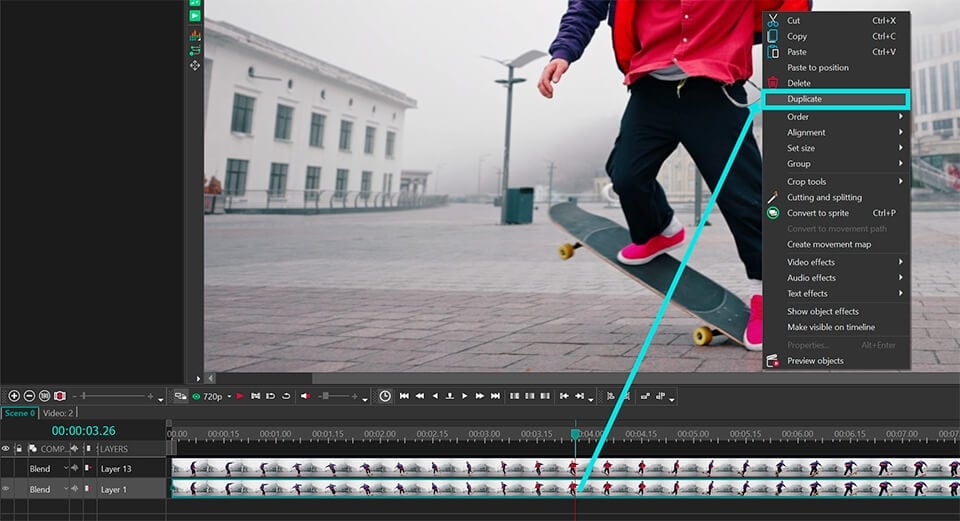
All of the added videos should be exactly of the same size. For this reason we recommend to make a duplicate of every inserted video. Click the original video on the scene with a right mouse button and select the “Duplicate” option. The duplicated layer will instantly appear on the timeline.

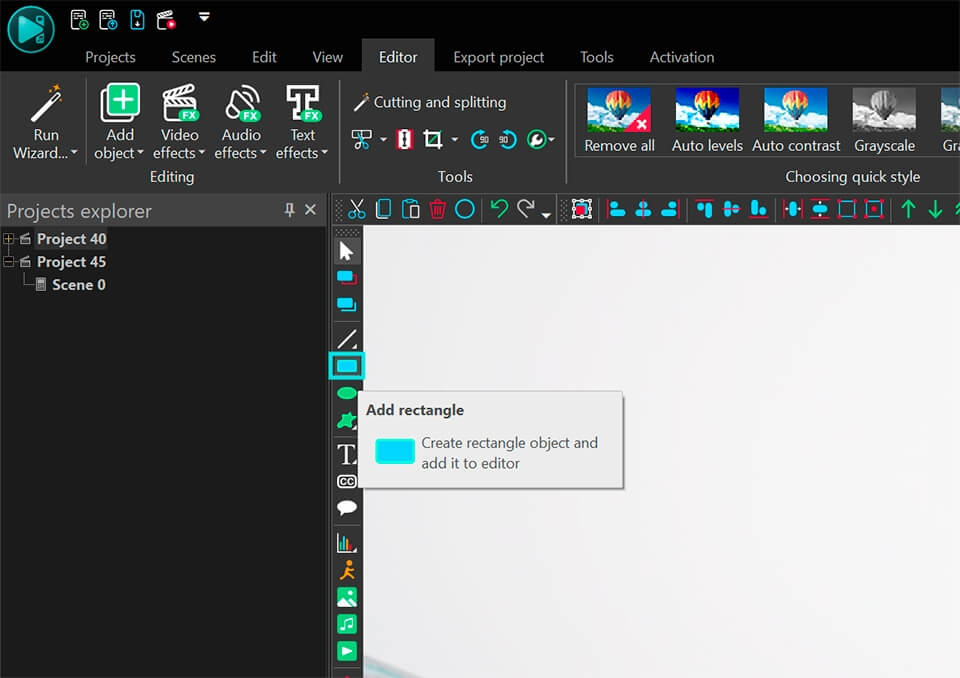
Now comes the most interesting part: we’re going to apply a blending mode to one of our video layers. Make a double click on the layer you are going to apply a filter to (on the timeline) and select the “Rectangle” tool.

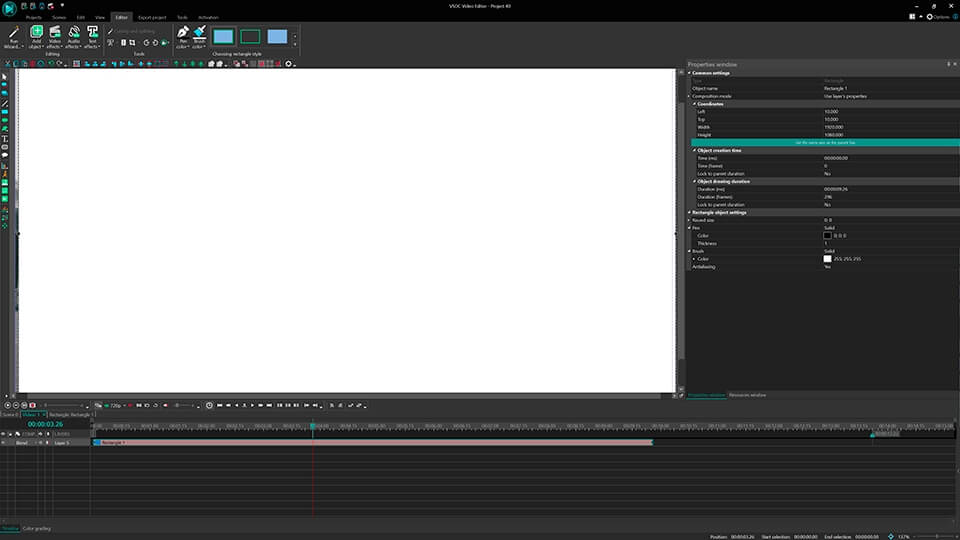
Place the rectangle over the whole scene

Tip: Choose a rectangle with no frames and filled with a color (3-rd type):

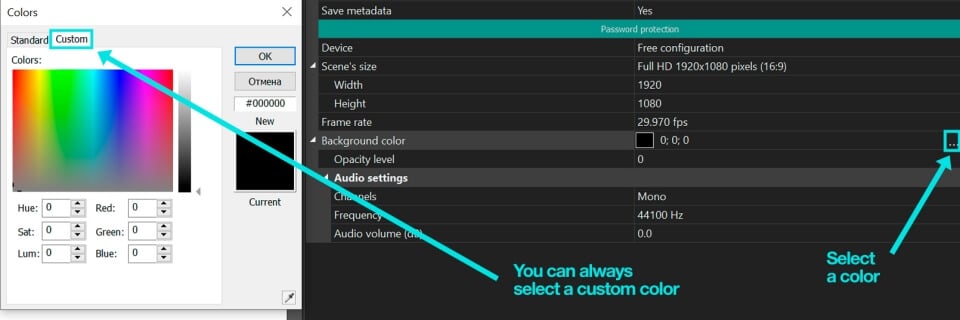
Go to the “Properties” window and choose a color for your rectangle.

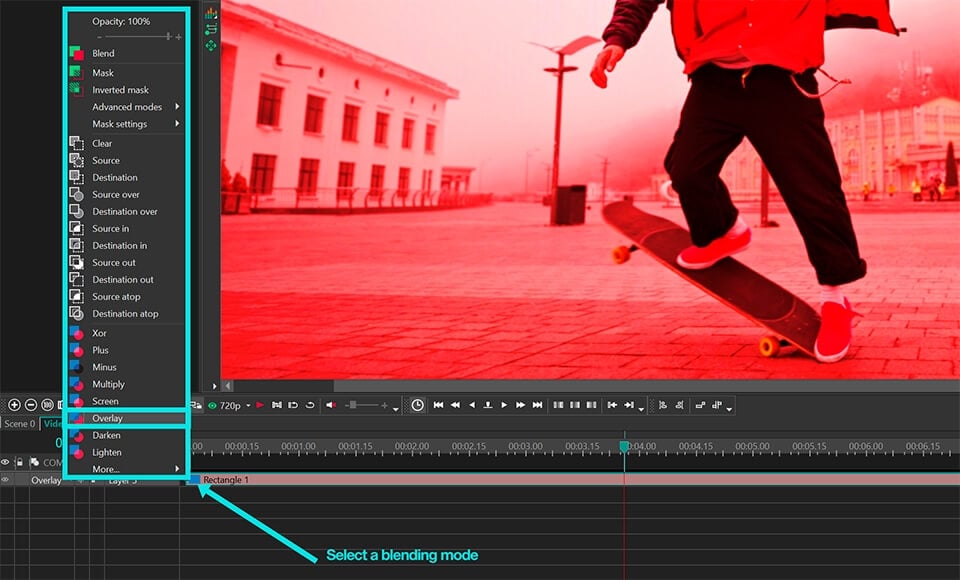
To change the type of a blending mode, select the appropriate blending type in the “Composition mode” tab.

To make a ghost effect more impressive, let’s add one more layer (contour). Go to the main scene, make a duplicate of the blended layer and stretch it following the scene size.

Make a double click on the duplicated layer and change the color of the rectangle. (Why do we have a rectangle here? That’s simple – we’ve made a duplicate of the blended layer where we have previously added a rectangle)

Tip: try to use contrast colors for different layers to achieve the best effect

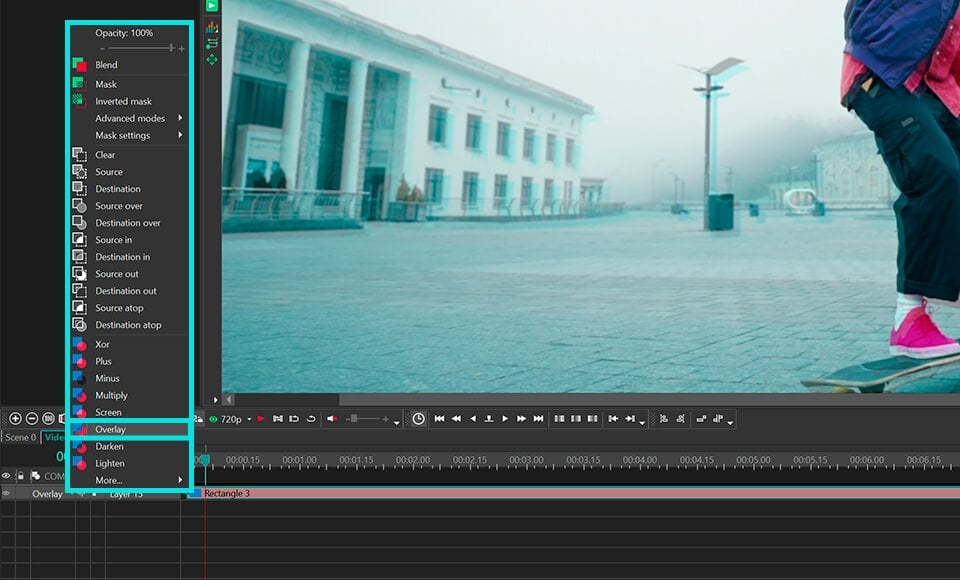
Select one of the blending modes of the “Composition mode” menu on the timeline:

To make our blended layers more phantom, let’s adjust it transparency. Make a double click on one of the blended layers and decrease opacity of the rectangle.

Now let’s shift our blended layers to achieve a multi-contour effect of the main video. Go to the main scene and change layers’ positions simply dragging and dropping layers with a mouse.

Tip: Vary blending modes and opacity on the main scene to achieve the best result.


You can get more information about the program on Free Video Editor' description page.

How to Mask Videos in VSDC Editing Software

Video masking is an advanced technique used for creating eye-catching effects. Technically, when you apply a mask, you outline an area in the picture you want to modify and work with it independently. If you’ve ever used a graphic editor, you’re surely familiar with the idea.

VSDC Video Editor includes a wide set of tools for creating precise clipping masks, inverted masks, and text masks. In the tutorial below, we’ll show you how to apply an inverted mask. For this scenario, we’ll be pixelating a face of a person as if we needed to hide it from the viewers.

In the second part of this tutorial, we’ll also talk about how to make the mask follow the object’s movements.

Download VSDC for Windows

Please note that while VSDC is a free video editor, masking is included in the Pro package available for $19,99 per year. If you just need to quickly blur a face in a video, however, you can do it for free following our instructions.


How to mask a video (pixel masking example)

Once you’ve added a video to the scene, go to the Video Effects tab, select Filters and choose “Pixelize”. Your entire scene will get pixelated, but don’t get confused - it’s a part of the process. Use the Properties window on the right to adjust the pixelation level and set up the intensiveness of the mask.

Next, we’ll need to select a masking area. You can do it using pre-designed mask shapes such as ellipse and rectangle, or you can create a custom shape using a tool called “free shape”. For this example, we’ll be using an ellipse shape to cover a person’s face.

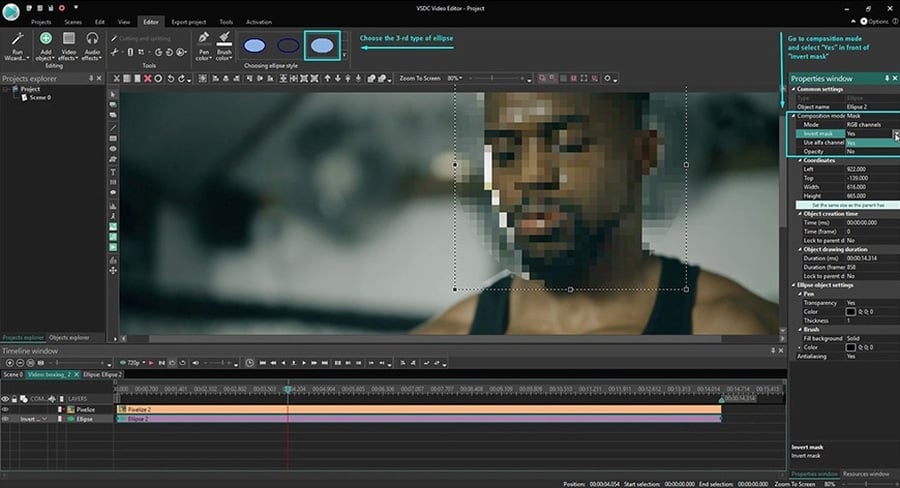
Double-click on the “Pixelize” layer and add an Ellipse object to the scene (go to the left-side menu to find the Ellipse icon). You’ll notice that the area inside the borders of the shape is not pixelated anymore, meanwhile, we need it to be the other way around.

Inverted mask example

To do that, apply an Inverted Mask:

  1. Open the Properties window – located on the right. If you don’t see the Properties window, use the right mouse button to click on the Ellipse object on the timeline and select Properties.
  2. Open the Composition mode dropdown menu and select Mask.
  3. Then find Inverted mask and switch its mode from No to Yes.
  4. Once you do that, the face will stay blurred, while the surrounding area will reverse to its original look.

This is it. You’ve just applied a video mask. The same way, you’ll be able to use other effects instead of pixels. The examples are numerous: you can change the color of a certain area in the video, you can cut out an object and replace it, you can create a see-through clipping mask – and much more. Here is a quick link to video masking tutorials on our YouTube channel. Don’t forget to subscribe!

How to make a video mask follow object’s movements

By default, a video mask follows the camera focus and doesn’t move in the scene. In our case, this means if the person moves, they may “lose” the mask. To prevent it, you’ll need to apply motion tracking. This way, the mask will follow the movement of the person and their face will remain hidden.

Here is how to apply motion tracking to the mask:

  1. Go back to the main timeline tab and right-click on the video. From the context menu, select the option “Create a movement map”.
  2. In the pop-up window, the program will indicate where on your PC the movement map will be saved and stored. Just click OK.
  3. Once you do that, the Motion Tracker mode will be activated. How to apply motion tracking to a mask in a video
  4. Place the tracking frame to cover the face completely. Ideally, the red dot should be in the middle of the object you’ll be tracking. Once ready, press Start analysis and watch the software draw the movement map.
  5. Once ready, click Apply editing. In the pop-up window, select Yes to save the changes in the map.
  6. You’ll be brought back to the main timeline tab. Double-click on the video layer, then double-click on the Pixelize filter layer to get to the ellipse shape again.
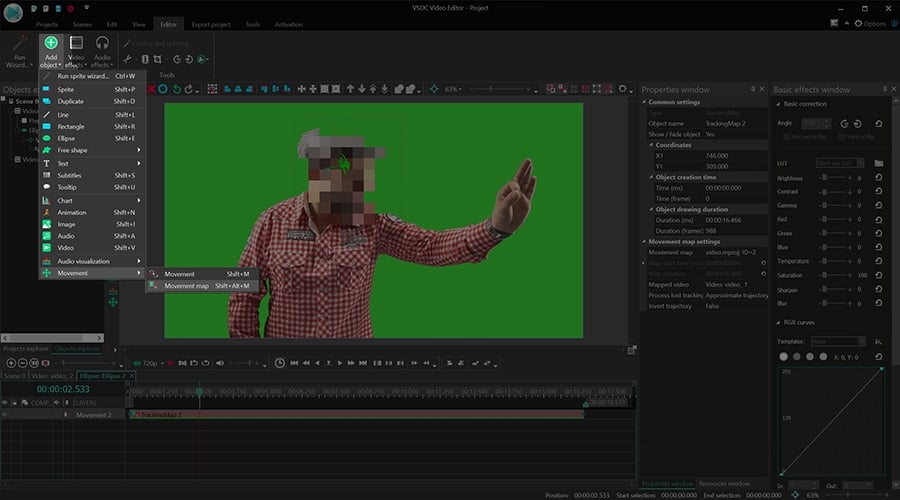
  7. Double-click on the ellipse shape layer and open the Add object menu at the top. Select Movement -> Movement map. How to create a censorship mask for a moving object
  8. In the pop-up window, confirm that you want to apply the suggested map (if you have several maps on your PC, you’ll have a list to select from).
  9. Adjust the position of the mask if needed and hit Preview to see the result. The pixelated mask should be moving along with the face.

If you’re creating a motion-tracked mask, feel free to consult with the following video tutorial. The sequence of actions in the video is different, but the result is the same. See if it works for you:

Other video editing tutorials you may be interested in:


You can get more information about the program on Free Video Editor description page.

How to rotate a video using VSDC Free Video Editor

It happens to everybody: wrong camera angle while shooting a video. Neither smartphone users, nor action camera owners are immune to that. And if you’re looking for a way to rotate a video right now, you probably know the feeling.

In this quick tutorial, we’ll show you how to fix the little slip-up and perform video rotation on a Windows PC. We’ll also show you how to rotate a video at custom angles and how to make a video rotate while playing.

To recreate all that on your footage, you’ll need to download VSDC Free Video Editor first. VSDC is a mighty program to have if you happen to work with videos often because it includes a versatile feature-set amateur shooters and experienced users will benefit from.

Download VSDC Free Video Editor

How to rotate a video at 90 degrees

So. VSDC offers two options: a standard video rotation – with 90-degree increments clockwise and counterclockwise – and a video rotation at custom angles. Let’s start with the first one.

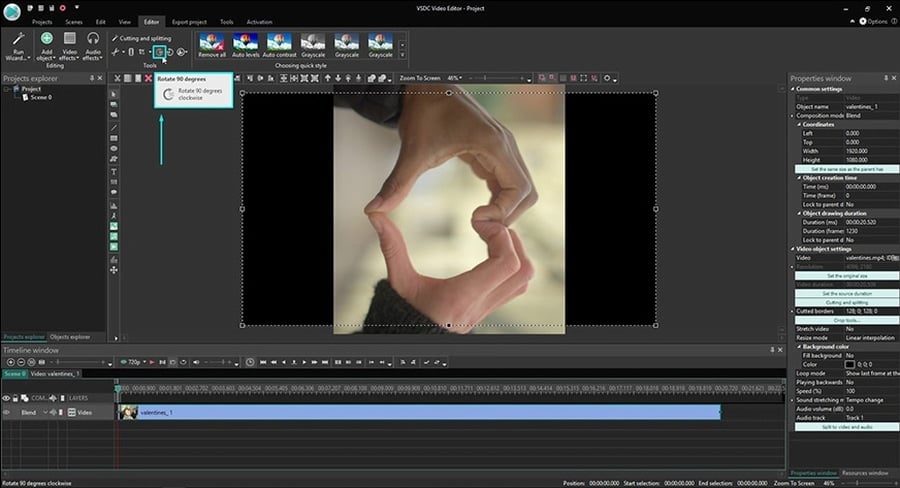
Open a video or an image file in the program. While having it selected on the timeline, click one of the corresponding “Rotate” buttons in the top “Cutting and Splitting” toolset menu. These buttons allow you to rotate the entire file 90 degrees clockwise or counterclockwise.

How to rotate a video at 90 degrees counterclockwise

Custom angle video rotation

Sometimes you need to rotate a video at a particular angle, whether it’s to align a scene or to achieve the desired effect of a titled video. Here is how to do it in VSDC:

  1. Add a video to the scene.
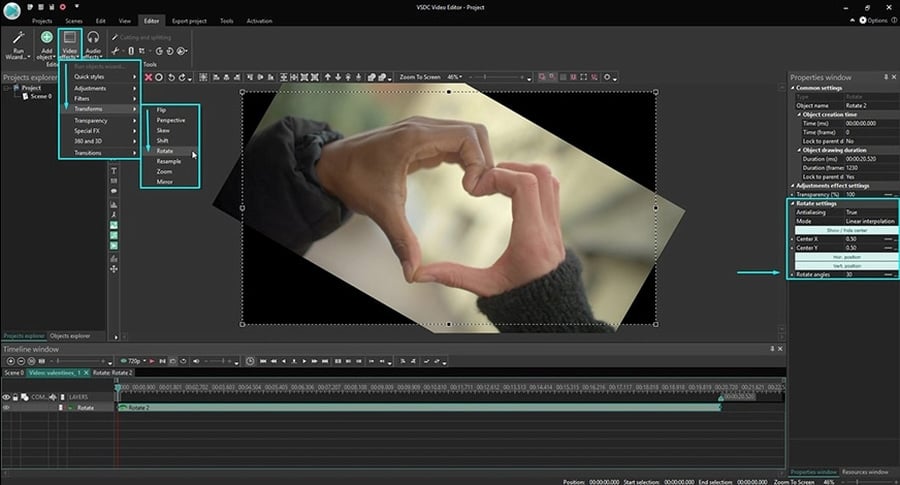
  2. Go to Video Effects, proceed to Transforms and choose Rotate.
  3. In the popup window, there will be “Whole parent duration” already selected. Just click OK.
  4. A new tab will appear on the timeline with the “Rotate” effect placed on it.
  5. Click on it with the right mouse button and select Properties.
  6. In the Properties window, scroll down to “Rotate angles” and choose the desired angle as illustrated below.

How to rotate a video in VSDC at a custom angle

How to make a video rotate at a particular moment in time

If you want to make your video rotate at a chosen angle while playing, use the Rotation effect:

  1. Place the cursor on the timeline exactly at the point where the rotation should happen.
  2. Go to the Video Effects tab and select Transforms > Rotate.
  3. When you see a popup window asking you to set the object position, select “From cursor position”.
  4. Go to the Properties window to select the rotation angle just like we did in the previous example.

Now the video will rotate automatically while playing at the moment you’ve chosen.

How to apply the advanced video rotation effect  

Finally, in VSDC, you can apply an advanced rotation effect to your video, so that it will be continuously rotating around a single point in any direction.

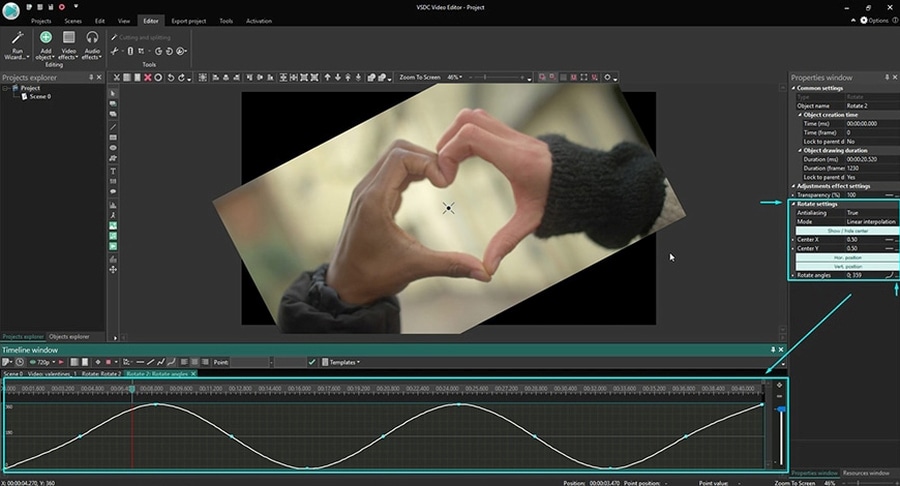
Again, you’ll need to apply the “Rotate” effect from the Video Effects tab and open the Properties window. In the properties window, click on the “…” button next to the “Rotate angles” field. A new tab will be opened on the timeline. called “Rotate angles”. That’s where you’ll be able to adjust the rotation trajectory and chose whether rotation will go clockwise or counterclockwise.

Video rotation effect in VSDC

Now, select the trajectory type – it’s a small icon between “Rotate angles” and the “…” button. On the working area, you’ll see a line – that’s the trajectory. To modify it, set new trajectory points by double-clicking above or below the line. You can click any of the existing points and drag them to appropriate positions. To delete the unnecessary points, use the “Remove” button on the toolbar.

Use the “Preview” button to see the result of your editing and adjust the effect as you go.

Now that you know how to rotate a video, here are three other video editing tricks you can perform in VSDC:

Subscribe to our YouTube channel and message us on Facebook if you have any questions!


You can get more information about the program on Free Video Editor' description page.

News

New Transition Addition Methods, RAW/BRAW Files Support and Free Waveform

Welcome to the next level of video editing with VSDC's latest release, Version 9.1! Packed with an array of fresh features and enhancements, this update is designed to make your video editing experience...

VSDC 8.3 – 100+ New Templates, Key Editor Window, AV1 and Enhanced GUI

Welcome to the latest VSDC update, Version 8.3! We've been working hard and we’re ready to present a feature-packed release for you to discover an exciting array of over 100 fresh free video templates,...

Free video editing in 2023: Unlock Your Creativity without Breaking the Bank

In today's digital world creativity reigns supreme. It offers endless possibilities for individuals and brands to captivate audiences and leave a lasting impression. With social media platforms at the...

The Best Online Video Editors in 2023: Benefits and Drawbacks

In today’s digital landscape, the popularity of video content is gaining momentum, with users increasingly turning to video creation both for personal advantage and professionally. When searching for...

VSDC 8.2 – Proxy File Support, Color Keyframes and Vectorscope

We are thrilled to unveil the highly anticipated VSDC video editor 8.2 update. Our team has been hard at work, ensuring that this release is packed with exciting features and enhancements to elevate your...

VSDC 8.1 Brings Multicam, Curve Line Object, Scrolling Text Effect, and More

We’re thrilled to introduce VSDC 8.1. The new version primarily caters to professional videographers, graphic designers, and artists, however, everyday video creators will benefit from the update as...

VSDC 7.2 Takes Its Color Correction Toolset to the Next Level (Plus, Other Updates)

It has been another productive couple of months for the VSDC team, and we’re thrilled to announce the release of VSDC 7.2 – the new version of our video editing suite. Although the majority of updates...

5 Free Pieces of Software for Video Color Correction

If you’re a video creator, there are three reasons why it’s crucial to learn color correction. First, it will help you enhance your videos and make them look professional. Second, it will allow you...

VSDC 7.1 Upgrades GUI and LUT Editor, Adds New Effects and Custom Shortcuts

The new version of VSDC includes two new video effects, expands the functionality of the LUT editor, and makes video editing more convenient by bringing an improved interface, optimized timeline, and custom...

10 Pieces of Truly Free Video Editing Software (with No Watermarks)

Seeing a watermark on your video after spending hours editing it feels infuriating. Yet a few video editing software developers are still using this practice to limit the free usage of their products....
 

Screen Recorder Box

This program allows you to capture the video of your desktop and save it on your PC in various formats. Coupled with a video editor, the program is a great tool for creating presentations, tutorials and demo videos.

Read more about Screen Recorder...


Video Capture Box

The program captures video from external devices and records it to computer in a free format. You can save video from video tuners, webcams, capture cards and other gadgets.

Read more about Video Capture...


Reviewed by


"VSDC Free Video Editor is a surprisingly powerful, if unconventional video editor"

- PC Advisor


"This video editor gives you tons of control and editing power"

- CNet


"The editor handles many common formats and boasts a good deal of capabilities when it comes time to alter lighting, splice video, and apply filters and transitions in post production"

- Digital Trends