 User Help Manual
  Learn FAQ
  Send us feedback
 ")


- Published by Amy Shao on June 30, 2026 Meet the new major update ...
- Published by Amy Shao on March 11, 2026 What is the best gift for...
- published Amy Shao 11/19/25 Meet the long-awaited VSDC 10.2 update: a new ve...
- Hi, I'm Mattea Wharton, a travel videographer from Seattle. For three years I ba...
How to fix a vertical video with VSDC Free Video Editor
Alright, let's face it. With mobile cameras taking over, the way we record video and the way we watch it have changed. You can love it or you can hate it, but vertical videos are everywhere today. It all started with people just being forgetful and holding their phones vertically when recording. Today, however, many brands create vertical videos on purpose because they look more authentic when published on social media which is (surprise!) consumed on mobile phones that are held vertically most of the times.
Who would have expected that back in 2014, huh?
But can I fix a vertical video if I don’t like the way it looks?
Yes, you can. You don't have to follow those modern media trends if you don't like them. And you certainly don't have to put up with two ugly black bars on either side of your footage, if you accidentally record it vertically - or what is called a portrait mode.
VSDC Free Video Editor offers several ways how to fix vertical videos, and below we'll show you what they are.
Download VSDC Free Video Editor for Windows
One of the most popular hacks is to blur the sides of a vertical video. This is an elegant way to get rid of the black side bars.
Vertical video fix #1 – blurring its sides
- Add your footage to the timeline. To do that, click ‘Add object’ >> ‘Video’ and select the required file from the explorer.
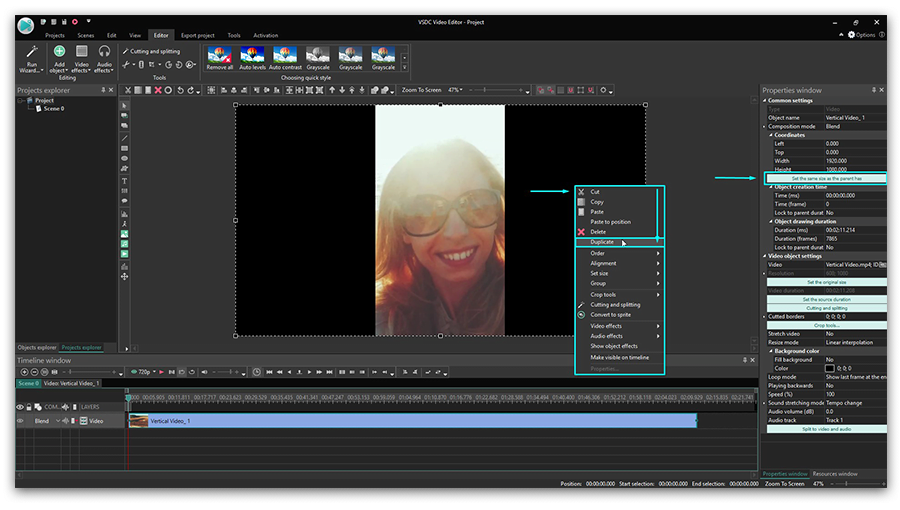
- Use the right mouse button to click on the video and select ‘Duplicate’.
- For the new video object, set the same size as the original video has. See the illustration below.
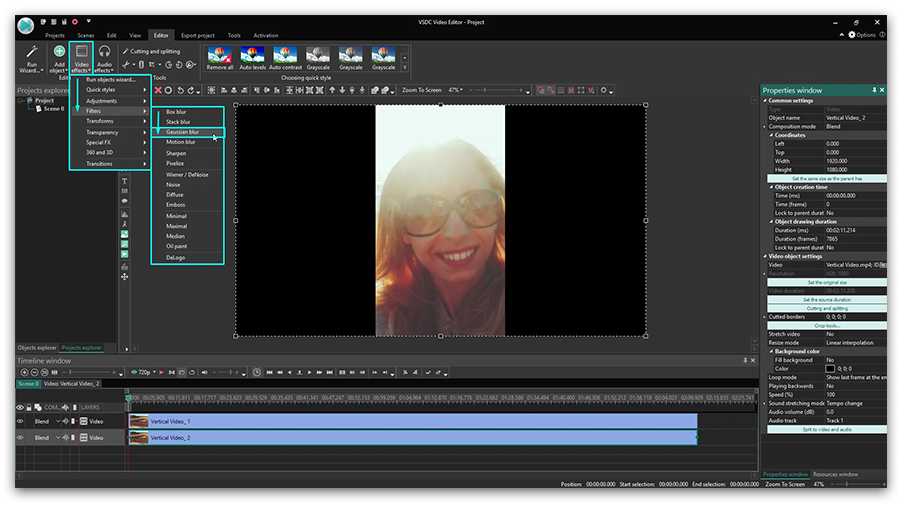
- Then go to the ‘Cutting and splitting’ tab at the top menu and choose ‘Auto cropping’. It will stretch the duplicated video to the size of the entire scene and create the effect of a background.
- Now, to finalize fixing your vertical video, you only need to blur its sides. To do that, in the ‘Video effects’ tab, select ‘Filters’ >> ‘Gaussian blur’. See the illustration below.
- Go to the Properties window and adjust the blur level to achieve the desired result. The Properties window tab can be found on the right side of the program interface.
- Enjoy the new look of your vertical video! By the way, you can use any other video or image for the blurred background effect if you don’t want to duplicate the original one.
Vertical video fix #2 – creating a project with the same resolution as in your original video
Blurring the sides of a vertical video is the most popular way to make it look decent but there is also a roundabout approach to it. You can just use the resolution the video is recorded in and create a project with the same size parameters. Technically, your video will remain in a “vertical format” but you’ll get rid of the black borders.
Here is how to do it:
- Add your vertical video to the timeline.
- Go to the View tab in the top menu – you’ll open a Project explorer.
- Click on your project name and go to the Properties window to find the scene’s size parameters.
- Reduce the scene’s width (and height if needed) to the size of your original video. See the video tutorial below.
- Now, click on the video object and go to the Properties window to use the “Set the same size as the parent has” button. This action will make the video perfectly fit the size of the scene.
Now you have a perfect vertical video without black bars on the sides. Note that once you perform it, all the objects – videos and images you add to the project – will be automatically adjusted to the new size of the scene.
Vertical video fix #3 – rotating a video that loads horizontally
Sometimes what happens is that we - the forgetful ones - start recording a video in a portrait mode and then rotate the phone to a landscape mode while the video is still being recorded. Or even the other way around! As a result, you can get a vertical video loading horizontally when played.
You can fix that too. In fact, it will literally require you a few seconds and a couple of clicks:
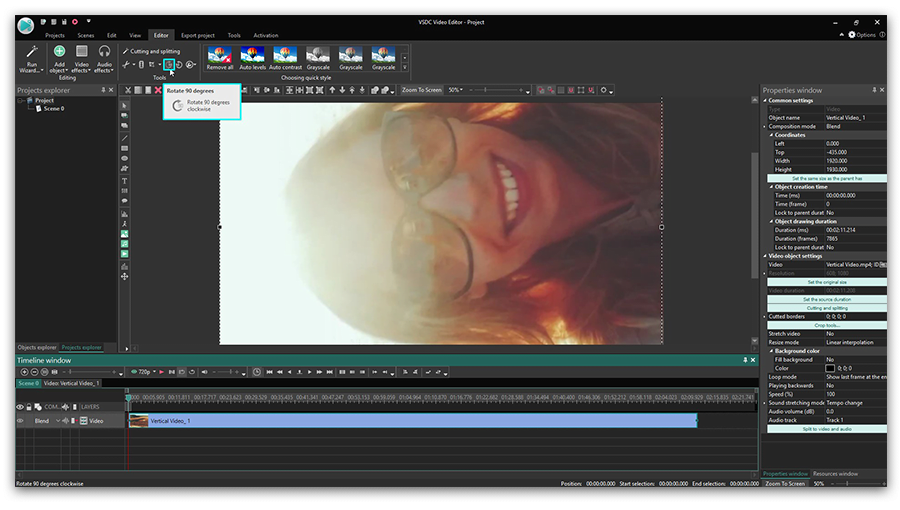
- Add your video to VSDC video editor timeline.
- Click ‘Rotate’ on the toolbar above the scene and preview the result.
- If your video appears to be larger than the scene size, you can manually reduce its size or adjust the parameters using the Properties window.
Now that you know how to use VSDC as a vertical video editor to blur the sides of the footage or change the scene size, you may want to check other guides for creating a great movie. We have over 200 of them on our YouTube channel. Don't forget to subscribe!
You can get more information about the program on Free Video Editor' description page.
Watch us on YouTube
 / @VSDCFreeVideoEditor
© 2011-2026, www.videosoftdev.com, FLASH-INTEGRO LLC. Privacy policy | Terms of use | About us
All trademarks referenced herein are the sole property of their respective owners.
Copying any materials from this site allowed only with written consent of Site Administration.