- published Amy Shao 11/19/25 Meet the long-awaited VSDC 10.2 update: a new ve...
- Hi, I'm Mattea Wharton, a travel videographer from Seattle. For three years I ba...
- published Amy Shao 6/10/25 The wait for something new and unusual is finally...
- This holiday season embraces new beginnings with the latest update of VSDC Video...
How to Blur Faces in a Video Using VSDC Free Video Editor: 2 Methods to Try
Blurring out a part of a video is a common task. You may need it to keep the identity of a person anonymous, to make sure the GPS coordinates or the car numbers stay unseen, or just to cover an object that accidentally got into the scene although it was not supposed to. However, 3 times out of 5 what you need is to blur faces in a video.
VSDC Video Editor offers two ways to do it for free. The first one literally takes a couple of seconds and creates an instant “blurred mask” in the shape of a rectangle. It’s also ideal if you just quickly need to blur out such parts of a video as logos, watermarks, numbers, and other small objects. The second way will suit those who need to accurately hide an oddly-shaped object – say, a car or a person – without blurring the surrounding area. It takes a bit more time but provides precise coverage of any object in the footage.
Looking for a way to blur a face in a video for free?
How to blur video parts in two clicks
For those searching how to censor a video quickly, there is a built-in filter called DeLogo. Technically it’s a ready-to-use blurred rectangle you place over the chosen object. Here is how to use it.
- Add a video to the scene
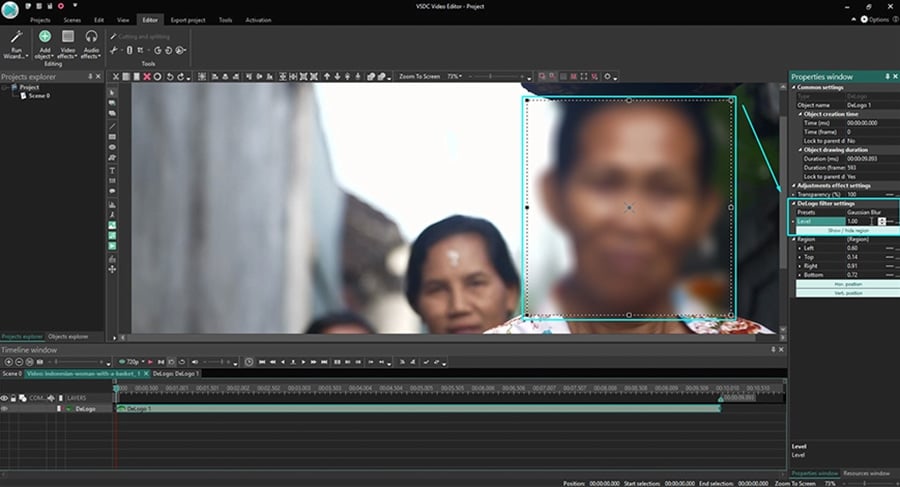
- Go to Video Effects, proceed to Filters and choose “DeLogo”. You’ll instantly get a blurred area in the video and a new tab on the timeline with the DeLogo filter – just as illustrated below.
- Click once on the DeLogo object on the timeline and you’ll notice the contour of the blurred filter.
- Move or resize the filter using its corners or the center point.
![]()
If you want to change the way the filter looks – for instance, you’d like to switch blur to pixels or mosaic – you can do that in the Properties window.
The Properties window is located on the right side. If you can’t see it, use the right mouse button to click on the DeLogo layer on the timeline and choose “Properties” – a window will slide in. Scroll down to “Delogo filter settings”. Choose mosaic, pixels, or any type of blur among filter presets and adjust the level of intensiveness according to your needs. See the illustration below.

This is it. Go to the Export Project tab and save the video to your PC in the required format.
Below, we’ll talk about how to blur faces in a video precisely following the shape of the object that needs to be covered.
How to blur video objects using a free shape tool
The Delogo filter we’ve talked about above has a pre-designed rectangle shape you can’t change. If you want to blur an custom shape area, you’ll need to use a tool called Free shape. Essentially, the Free shape tool allows you to create any shape manually using the vector drawing technique. Once you finish drawing, you’ll be able to apply the pixelized filter to the shape you’ve created and use it as a mask.
Here is how it works:
- Add a video to the scene.
- Select Free Shape from the menu on the left-hand side.
- Start outlining the object you want to blur by placing points on its border until you get the desired shape. Notice that you can drag control points around and adjust the shape at any moment.
- Once you finish, go back to the Scene 0 tab on the timeline. Use the right mouse button to click on the original video layer and select “Copy”. Then make a double-click on the Free Shape layer and paste the video in the Free Shape tab.
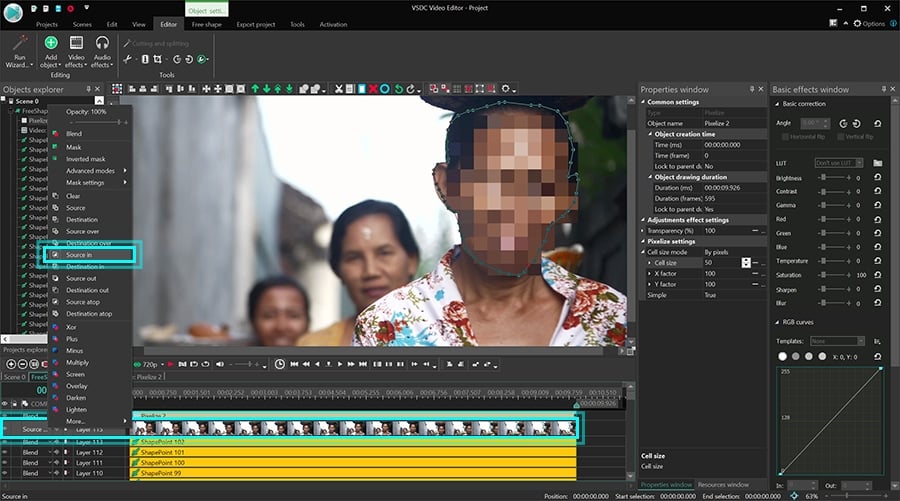
- Open the Blending mode menu for the video you’ve just pasted and select “Source in” – as illustrated below.

Congratulations, you’ve created an inverted mask. Now, you need to apply the filter to blur the face in the video you’ve created the mask for.
To do that, open the Video effects menu, proceed to Filters and select Pixelize. Click “Ok” in the window that pops up to confirm that you want to apply the effect to the selected video file. You’ll see the result right away.
However, if a person in the video is moving, and you need the blurred mask to follow their movements while keeping the face hidden, you’ll need to apply motion tracking. Motion tracking is a part of the VSDC Pro version available for $19,99 per year. To create a motion-tracked video mask, follow the instructions from this tutorial.
How to blur background in a video using VSDC Video Editor
Now that you know how to blur a face in a video using free software, you may want to check out other editing tutorials: