 User Help Manual
  Learn FAQ
  Send us feedback
 ")


- Published by Amy Shao on March 11, 2026 What is the best gift for...
- published Amy Shao 11/19/25 Meet the long-awaited VSDC 10.2 update: a new ve...
- Hi, I'm Mattea Wharton, a travel videographer from Seattle. For three years I ba...
- published Amy Shao 6/10/25 The wait for something new and unusual is finally...
How to use VSDC Free Video Editor: starting guide
When we talk about VSDC, we like to describe it as a professional-level video editing software. Partly because of the non-linear video editing technique it allows for using, and partly because of its mighty feature-set (have you checked our color correction tools yet? Masking? Animation?).
On the other hand, before you jump into exploring all these fancy video editing tricks, you’ll need to get familiar with the basics. Especially if you’ve never worked with a non-linear video editor before. And that’s exactly what we’ll cover below. We’ll show you how to perform the most essential basic actions in VSDC: cutting, cropping, rotating, and more. So, prepare yourself a large mug of coffee (or whatever helps you stay focused), sit back, and launch VSDC on your PC to practice new skills right away.
By the way, we encourage you to always make sure you’ve installed the latest version of VSDC from our official website. Here is where you can do it.
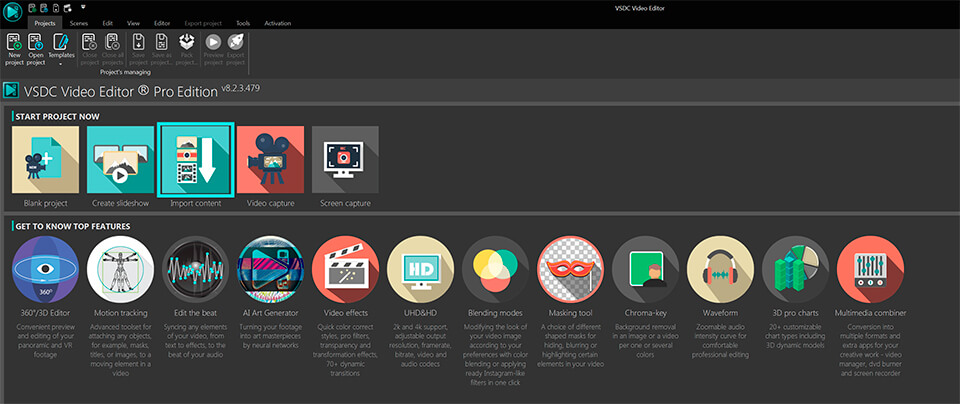
How to import a video to VSDC
There are several ways to import files to VSDC. First, you can use the “Import content” icon on the start screen when you launch the program (illustrated above). This is an optimal way because VSDC will automatically detect all the parameters of your video and adjust the project parameters accordingly. After you choose a file on your PC, a window will pop up asking whether you’d like to change resolution, framerate, or other parameters. Once ready, hit “Finish”.
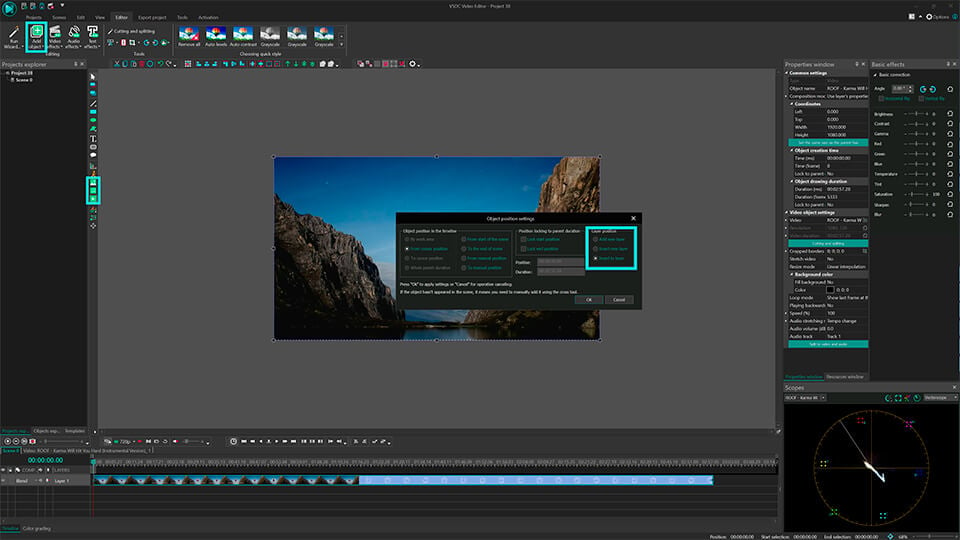
You can also add files to your project in real-time while working on it. To do it, use the dedicated “Add object” buttons located at the top and on the left-hand side of the program menu - see the illustration below. Note that when you add a new file this way, a window pops up to confirm object’s position settings and layer’s position. The latter allows you to choose whether the file should be added as a new layer or placed on the current one.
If you select “Add a new layer”, the new layer will be added at the very top. The “Insert new layer” option will add one right below the selected layer.
Finally, you can use hotkeys:
- Shift + I – to add an image
- Shift + A – to add an audio file
- Shift +V – to add a video
Each time you select a file on your computer, it’s automatically placed on the timeline. Keep in mind that you can have files on the same layer (linear sequence) or on different layers (non-linear sequence). Still feeling a bit confused? Check out this video tutorial to get a hang of VSDC timeline.
How to cut, split, crop, and rotate a video in VSDC
The reason these features are united in one chapter – they all are available in the same quick-access menu. It’s located at the top of the program interface and called “Cutting and Splitting tools” – see the illustration below.
The first icon is an image of scissors – the cutting tool. It’s especially convenient when you need to trim the beginning of a video or its ending. Place the cursor precisely where you need to make a cut, open the dropdown cutting menu (the little triangle near the scissors icon) and choose “Trim start” or “Trim end”.
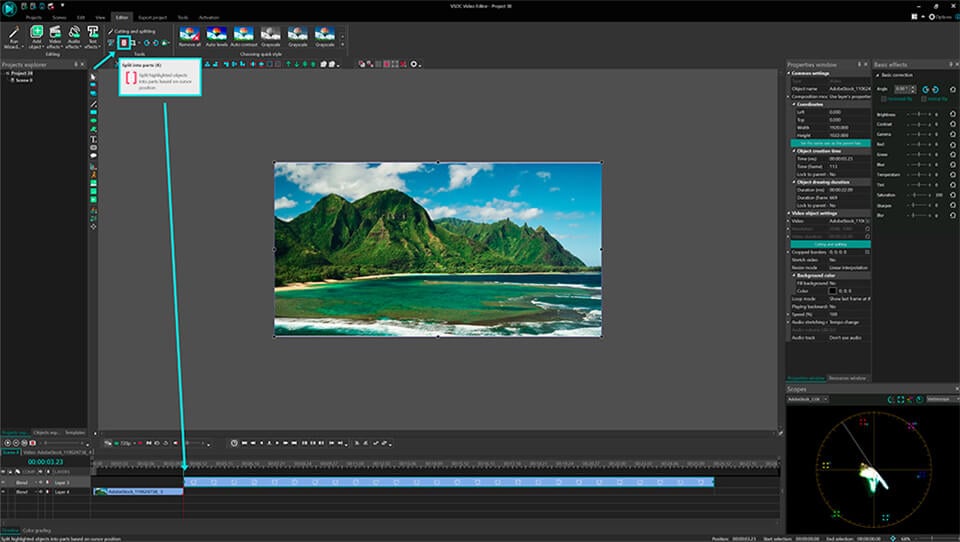
Now, if you need to split a video into parts, use the next icon – the one looking like a razor. Keep in mind, that when you need to delete a fragment, you should first click anywhere on the timeline to remove the selection from the entire file (otherwise you’ll delete the file entirely) and then select the fragment you want to get rid of. A very detailed guide on splitting videos into parts in VSDC is published here.
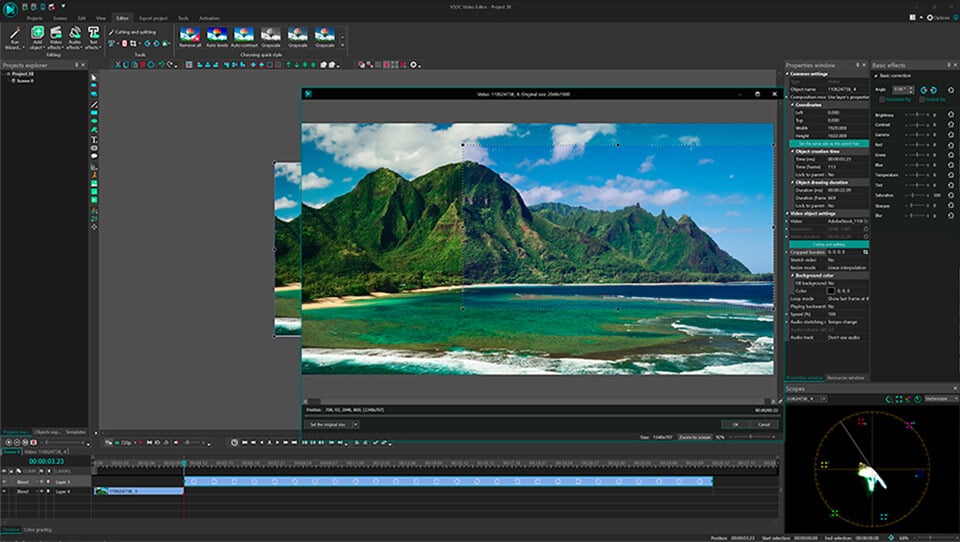
Cropping is quite easy too. If you have recorded too much extra space around the scene object, just click on the file you need to crop and use the cropping icon from the “Cutting and Splitting” menu. A new window will pop up where you’ll be able to select the area that should remain in the scene. Check out this tutorial on cropping borders of a video if you need further guidance.
Finally, the quick access menu includes two icons allowing you to rotate your footage 90 degrees clockwise or counterclockwise. This feature is quite intuitive: click on the file you need to rotate and choose the required direction. If your project requires custom angle rotation, check out this detailed instruction.
How to apply effects and transitions in VSDC
VSDC allows for creating dozens of eye-catching video effects. Some of them are applied in one click and require no experience. They are located on the “Video effects” tab at the top ribbon menu and include quick Instagram-style filters, basic color adjustments, transitions, transformational and transparency effects.
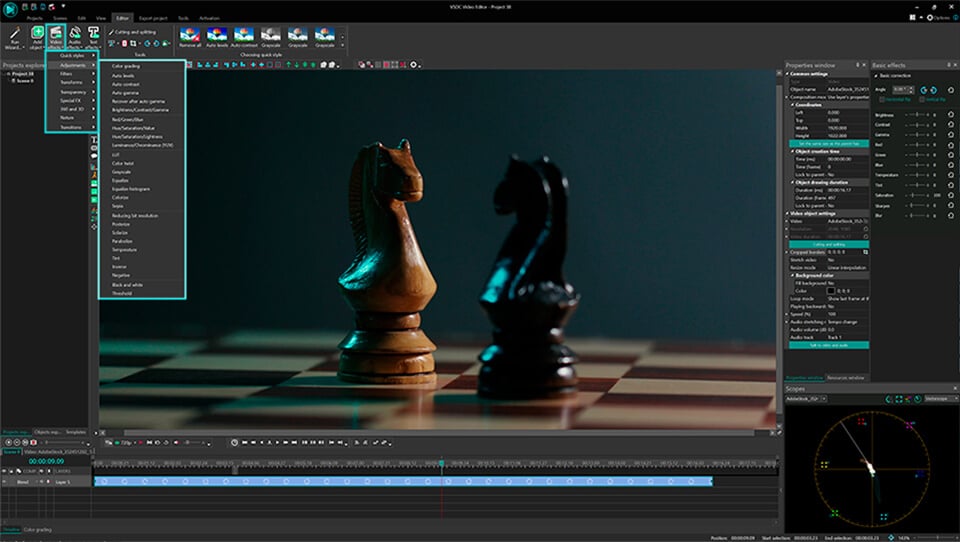
To apply one, select the video file you want to modify, go to the Video effects tab and choose the necessary effect. A new tab will be created on the timeline – it will contain all the effects applied to the selected object. There, you’ll be able to change the effect duration and its position timewise by dragging it with the mouse. Other parameters can be configured in the properties window located on the right-hand side.
The same rule applies to transitions. Place a cursor exactly where the transition should start, select the transition from the Video effects dropdown menu, and adjust its duration manually.
How to mute a video in VSDC
If you need to shut down the sound of a video completely, the easiest way is the following:
- Click on the video file with a right mouse button
- From the menu, select “Properties”
- Go to the Properties window on the right-hand side
- Scroll down and find “Audio track”
- Select “Don’t use audio”
Alternatively, you can use the button “Split to video and audio” (also located on the Properties window) and once the audio track is separated on the timeline, just delete it.
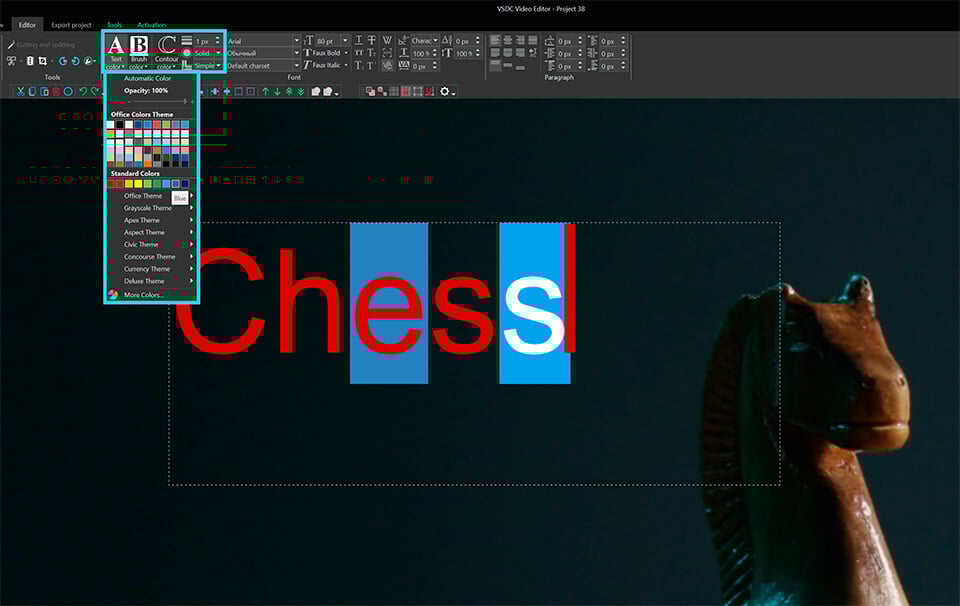
How to add a text to a video or an image in VSDC
VSDC offers a full-featured built-in text editor. It allows you to create beautiful titles and text-related effects. To add a text object in VSDC, go to the left-hand side of the program interface and hit the “T” icon. Select “Text” and place the cursor on the scene to specify title location. Then type your text and adjust its size, style, and color using the upper menu as you would do in a regular text editor.
Again, you can use the dragging motion and the Properties window to change the duration and other parameters of your text object. Here is a very detailed how-to guide on working with text in VSDC.
How to export a video in VSDC
Before exporting your video, make sure everything looks exactly the way you want. Use the red preview button and lower the preview quality if the video appears choppy. Lagging sometimes happens when the resources of the PC aren’t enough to process the video in real-time. Keep in mind, it doesn’t affect the outcome in any way.
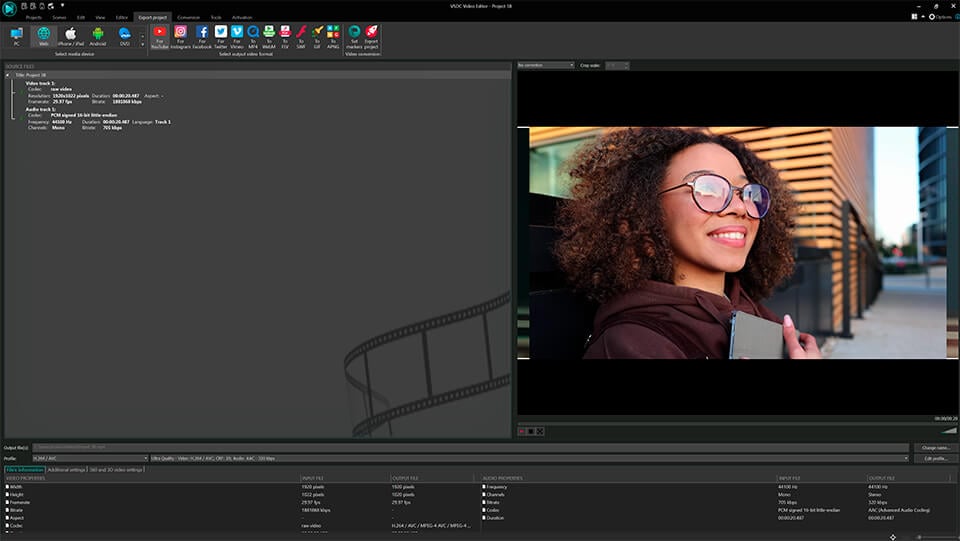
Once ready, go to the Export project tab and choose the output format. For your convenience, there are a few pre-configured export profiles available. Their settings are based on how you’re planning to use the video. For instance, if you want to upload it to YouTube, select “Web – For YouTube”. The output file is typically saved in the “C:\Users\Owner\Videos\” folder unless indicated differently. If you’d like to change the location, you can do that by clicking the “Change name” button (located right below the preview window).
Hit the red “Export project” button at the top of the menu and wait until the conversion process is over. If you see a Pro version upgrade popup, and you aren’t ready to upgrade, simply hit the Continue button at the bottom right corner.
Frequently Asked Questions
1. What should I do if the video lags during playback in the preview? Will this affect my video after export?
No, this will not affect the final video in any way. The lag only indicates that the computer lacks the resources to process such a large amount of information quickly. However, it does not affect the quality of the saved video.
If you are experiencing choppy playback, try the following solutions to improve performance:
Method 1: Lower the preview quality
Find the eye icon on the panel above the timeline. Next to it, the current preview quality is displayed, for example, 720p. Click on the arrow next to this value and in the menu that opens select an option with a lower resolution (for example, 360p).
Method 2: Enable Fast Preview Mode
This mode provides continuous playback by dropping frames, which may result in less smooth video but will prevent sudden stuttering.
To activate it, go to "Options" in the upper right corner of the video editor, select the "Player Options" section and set an appropriate value for the "Skip frames in the player" parameter.
Method 3: Create Proxy Files (Optimal for 4K and Resource-Intensive Footage)
If the first two methods didn't help solve the problem, the most effective solution is to use proxy files. These are lightweight copies of your original videos in low resolution, which are much more comfortable to work with during video editing. You don't need to worry about the quality of the final video: when you export the project, the program will automatically use the original quality of the files.
To start working with proxies, please follow these steps:
- Go to "Options" and in the "Proxy Options" section, select a suitable lower resolution for the "Proxy for preview" parameter.
- Then in the "Resources window" right-click on the desired video file and select the "Generate proxy media" option. Wait for the process to complete.
- After creating the proxy files, activate their use. On the panel above the timeline find and enable the very first option, "Show proxy files" (it is located to the left of the eye icon).
Now the lightweight version will be used for preview.
2. Why when adding files to the timeline one video ends up above another?
This happens because VSDC automatically places files on new layers if the previous layer is already occupied at that point on the timeline. If you need to place files on the same layer, simply drag and drop the desired video to the desired location by holding down the left mouse button.
3. I've deleted a part of the video, and a gap has formed between the remaining clips on the timeline. How do I shift them together?
To join the remaining parts of the video on the timeline layer, you can use one of two methods:
The first method is manual. Hold down the left mouse button on the third clip and drag it close to the first one.
The second method is automatic. Select all the clips on the layer that should follow sequentially. Then on the panel above the timeline find and click the icon for the "Remove gaps" option. The program will automatically shift the fragments together.
4. How to precisely find the moment to cut a video? Using the timeline slider doesn't let you land on the exact frame.
Use the arrow keys on your keyboard. Position the timeline slider roughly where you need it, then move frame by frame using the left arrow for one frame back and right arrow for one frame forward. This method allows for precise positioning on the timeline.
5. Does the "Split into parts" tool cut videos on all timeline layers at once? What if I need to cut only one object on a specific layer?
This tool is applied only to those objects that are selected on the timeline. Before using it, make sure you have selected the desired object and set the timeline slider to the split point. In this case only the selected layer will be processed and the others will remain untouched.
This rule applies to all tools: to perform any action, the objects you are working with must be pre-selected on the timeline.
Looking forward to learning more about VSDC capabilities?
Check out our How-to section, subscribe to our YouTube channel, and follow our Facebook page for the latest updates, tips and tricks.
Get VSDC Free Video Editor - powerful non-linear editing software with advanced features. Perfect for YouTube creators, social media videos, and professional projects. Learn more about features.
Watch us on YouTube
 / @VSDCFreeVideoEditor
© 2011-2026, www.videosoftdev.com, FLASH-INTEGRO LLC. Privacy policy | Terms of use | About us
All trademarks referenced herein are the sole property of their respective owners.
Copying any materials from this site allowed only with written consent of Site Administration.