 User Help Manual
  Learn FAQ
  Send us feedback
 ")


Why HDR video looks dull and how to fix it in VSDC
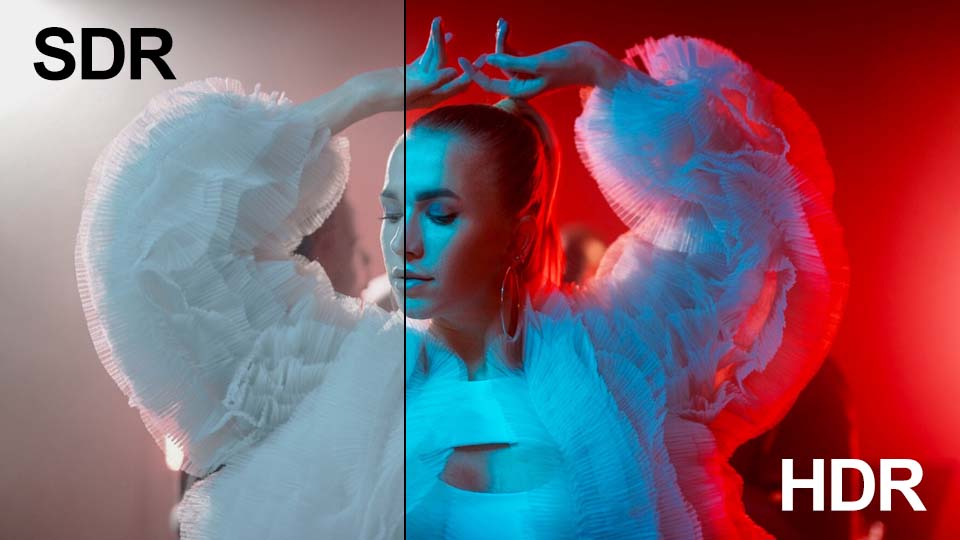
If you shoot video on an iPhone, GoPro or a professional camera, you've likely encountered this situation: you open your footage on your computer, expecting to see the vibrant sunset you wanted to capture, but on the screen there is a dull image lacking the brightness that made you frame the shot or record the video in the first place.
Why does it happen?
Your video or photos were recorded in HDR, but when you work with this type of footage on a standard (SDR) timeline or watch it on a regular monitor, the software has to figure out how to squeeze the expanded color and brightness range into the limited SDR format. Now you can take control of this process right in VSDC! Keep reading to find out how. We'll run a quick experiment and break down exactly what each setting does.
Make sure you have version VSDC 10.1 or higher installed

In this article:
- Display mode: auto detection, SDR, HDR
- Color profiles: standard and enhanced
- Brightness: adjusting nominal peak brightness
- Tone mapping: algorithms and levels
- Additional options for improving results
- Wrapping up
- Frequently asked questions about HDR
Display mode: auto detection, SDR, HDR
So, we've added an HDR video (learn how to add files to the editor here), clicked on it on the timeline and opened the properties window. Now expand the "Video object settings" section, then the "Video" parameter and find the "HDR mode" option.
There are three options here. Let's start with the simplest one: "Auto detect". You might think that after selecting this one, the editor would figure everything out on its own and give you the best result. But that's not what happens because you're still left with the same dull image. Why? VSDC automatically squeezes the expanded HDR range to fit the specs of a regular monitor. If your screen doesn't support HDR, auto mode simply cuts off all the extra information and leaves only the SDR data. Keep in mind that conversion to SDR only happens if the original file has the right metadata.
Next up, let's choose "Force SDR mode". What's changed? In this mode the editor ignores the color and brightness data your camera captured and only reads the part meant for standard (SDR) screens. In other words, VSDC treats your HDR file just like any regular video. This option works well if you're quickly putting together a rough cut.
Now let's activate "Force HDR mode". On the screen you'll see all the brightness and color that was captured in the original file. However, if you're using a standard monitor, you might run into a funny side effect: the image may look either oversaturated or way too dark. It happens because VSDC is now showing all the available data, but your screen simply doesn't know how to display it properly. To get the look right, you'll need to tweak a few additional settings.
Color profiles: standard and enhanced
Expand the "HDR mode" section by clicking the small triangle icon to the left of it. When you select either "Auto detect" or "Force HDR mode", additional options become available. The most important one is "Color profile".
Start with "Standard color profile". This is a universal and fairly straightforward mode. It works on any computer, but it's generally slower, and colors tend to look less natural.
Now choose "Enhanced color profile". This mode is more advanced and designed for modern PCs. It utilizes your graphics card to accurately convert HDR colors and brightness into standard SDR format. The resulting image will closely match the original.
If you select "Enhanced color profile" but your PC does not have a dedicated graphics card, the software will automatically fall back to "Standard color profile" to ensure compatibility.
Brightness: adjusting nominal peak brightness
When you select "Standard color profile", the "Nominal peak luminance" setting becomes available. It defines the maximum brightness level your screen is capable of displaying. The value can range from 0 to 10,000 units. By default, it is set to 100 which is considered standard for typical SDR screens. Don't forget to enable the toggle switch to apply the setting.
Let's look at the two extremes of this setting: minimum and maximum.
- Nominal peak luminance = 1
In this case, the video editor is forced to compress the entire brightness range of the original HDR video into a narrow spectrum from 0 (black) to 1 (maximum brightness within this artificial range). Anything in the source file that exceeds a value of 1 — which could be, for example, 99% of the brightness information — is simply clipped and replaced with the maximum allowable value of 1. As a result, all colors that were originally bright and varied blend into a single white wash. - Nominal peak luminance = 10,000
Here the editor assumes your screen can display brightness up to 10,000 units even if, in reality, the physical maximum of your screen is, say, only 500. The editor distributes all colors from dark to bright white across the specified range of 0 to 10,000. However, since your actual screen cannot output brightness beyond 500 units, all information in the 500–10,000 range is effectively lost. The result is an image that looks gray and dull.
Therefore, the key in this case is to find the right balance, taking into account your screen's capabilities and the desired visual outcome.
Tone mapping: algorithms and levels
Now let's look at the "Tone mapping" option. This setting controls how the program compresses bright colors and light from HDR video so they display correctly on a standard screen.
VSDC offers several built-in tone mapping algorithms. The way colors and brightness are redistributed in the frame depends on which algorithm you choose. The image on screen will look different with each option — you can select the one you prefer.
If you're not satisfied with the result after choosing an algorithm, try enabling the "Level" parameter. This option is available in "Force HDR mode" and "Auto detect" HDR modes. It allows you to make the color compression stronger or weaker.
When you enable "Level", a default value is automatically set for each algorithm. The image with the parameter turned off looks the same as when it's turned on with the default value.
To adjust the image, simply move the level slider away from the default setting. Increasing the value makes the video brighter, while decreasing it makes the image duller.
Additional options for improving results
Two additional options can help you fine-tune the color more precisely.
"Signal peak override" allows you to specify the maximum brightness present in your video. Let's see how this works together with the parameter we discussed earlier:
- Nominal peak luminance tells the program what brightness your monitor is capable of.
- Signal peak override tells the program what brightness is present in the video itself.
For example, set "Nominal peak luminance" to 40, meaning your monitor can only display 40 nits. Set "Signal peak override" to 20,000 because the video contains extremely high brightness. The software sees that your monitor can't handle that level, so it makes the image look duller and darker to fit the screen's capabilities.
Or set "Signal peak override" to 2 if the video has very little brightness. The software knows your monitor is capable of far more, so it artificially boosts the image to make it look brighter.
Important: both parameters can be enabled or disabled as needed. If they're turned off, the software reads the values from the video file's metadata (if present).
Another option that might be useful to you is "Desaturation intensity". If the colors still look dull after all the adjustments — which often happens at low peak brightness levels — just add +10–20% saturation. The lower the value set for this parameter, the less saturated the colors will be.
Wrapping up
Working with HDR in VSDC is easier than it seems. Once you understand the logic behind the settings, you'll never be left frustrated by dull, washed-out images — and more importantly, you'll be able to quickly restore the brightness and saturation that made your videos and photos worth capturing in the first place.
Frequently asked questions about HDR
1. Why does my HDR video look dull on my computer?
When playing HDR video on a standard (SDR) monitor, the software automatically compresses the expanded color and brightness range to fit within the narrower SDR limits. As a result, the image loses saturation.
2. Which HDR display mode should I choose?
If you want maximum brightness and vibrancy, select "Force HDR mode". For quick draft editing, "Force SDR mode" works well. "Auto detect" mode only functions when metadata is present in the file and often produces predictable results, though not always optimal.
3. What is "Enhanced color profile" and when should I use it?
"Enhanced color profile" uses your graphics card to more accurately convert HDR colors to SDR. It delivers an image that closely matches the original but requires a modern PC with hardware acceleration support.
4. How do I properly adjust peak brightness?
The "Nominal peak luminance" parameter defines the maximum brightness level your screen is capable of. Adjust this value based on your monitor's specifications and the desired visual outcome. Setting it too low will result in an overexposed image, while setting it too high will make the image look gray and dull.
5. Can I use these HDR settings for videos from a GoPro or iPhone?
Yes, VSDC supports HDR files from GoPro, iPhone and most modern cameras. All the settings described in this article work with any HDR video.
We hope you enjoyed exploring these settings with us! Don’t stop here: keep experimenting with your own projects. We’re sure you’ll achieve even better results that you’ll want to share.
If you have questions or creative ideas to share, we'd love to hear from you at This email address is being protected from spambots. You need JavaScript enabled to view it. or through our social networks: Facebook, X, Reddit or Discord. And remember to check out our YouTube channel for more inspiration!
Watch us on YouTube
 / @VSDCFreeVideoEditor
© 2011-2026, www.videosoftdev.com, FLASH-INTEGRO LLC. Privacy policy | Terms of use | About us
All trademarks referenced herein are the sole property of their respective owners.
Copying any materials from this site allowed only with written consent of Site Administration.