Video Editor

Use free video software to create and edit videos of any complexity from a family greeting card to a company presentation. Cut, merge video files, apply visual and audio effects, use filtration and image correction, make slideshows and add an appropriate soundtrack. Use multi-color Chroma Key and advanced parameters settings to give your video a professional look. All popular video and audio formats are supported.

Read more about Video Editor...

Video Converter

This program is intended for converting video files from one format to another. Nearly all popular video formats are supported (both reading and saving). In addition, the program drastically simplifies the task of converting videos for playback on specific multimedia devices, such as iPhone, Samsung Galaxy or Huawei P30 Pro. The program is extremely easy to use, has a modern interface and all necessary video processing functions.

Read more about Video Converter...

Audio Converter

The audio converter will help you convert audio files from one format to another. All key audio formats and codecs are supported. The program also allows you to manage playlists and meta tags, extract audio from video files and save these tracks on your computer in any format.

Read more about Audio Converter...

Audio CD Grabber

This audio tool is intended for grabbing audio tracks from compact discs and saving them to the user’s computer in any format. Nearly all popular audio formats and codecs are supported. The program can also extract track details from the FreeDB server for automatic file renaming and updating meta tags.

Read more about Audio CD Grabber...

Multifunctionality

Multifunctionality

A wide array of multimedia processing tools in one free video software suite.

High speed

High speed

Our programs use fast
and high-quality algorithms optimized for single and multi-core CPU’s.

Affordability

Affordability

VSDC video software is freely available for download to Windows OS-based PCs and laptops.

Use VSDC Free Editor for Cropping Video Borders

Accidentally recorded too much of the surrounding area? Need to focus on a particular object in the scene? Discovered a slip of your finger while previewing the footage? There can be many reasons you might want to crop a video or remove its borders. The important part is to be able to do it without losing quality, right?

While most mobile apps aren’t capable of fulfilling that task, most desktop video editors will help you crop video borders precisely, get rid of the black bars surrounding your video, and even set up particular width and length if needed. In this tutorial, we’ll show you how to crop video borders for free on a Windows PC using VSDC.
How to quickly crop video borders in VSDC

And if you’re into video editing, VSDC is capable of much more than just cropping. It provides you with a toolset for creating a movie of any complexity – be it a short clip based on your family vacation recordings, or a serious project involving video effects, color correction, and audio adjusting.

Download VSDC Free Video Editor

How to crop a video for free on a Windows PC

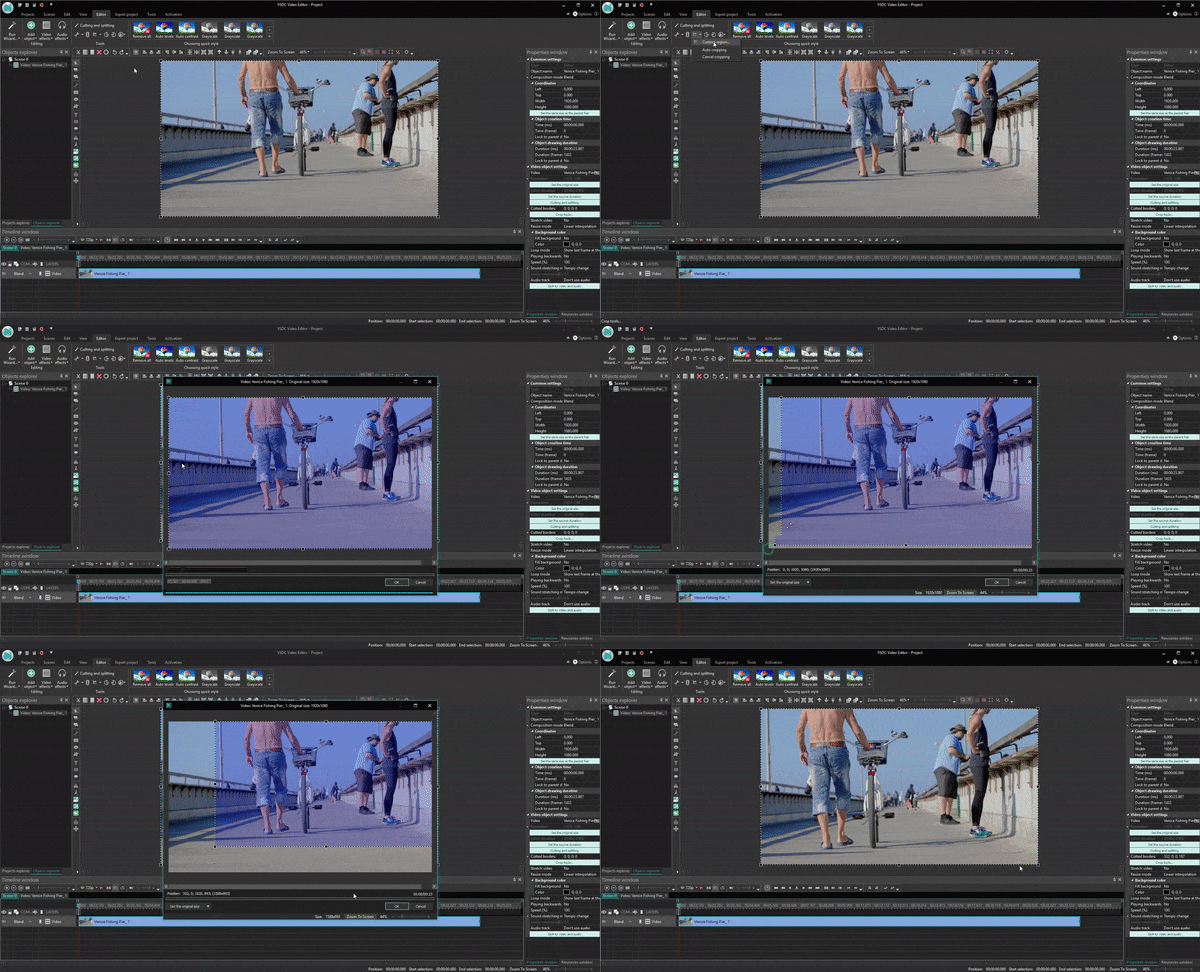
Once you’ve imported a video to VSDC, go to the top menu and click on the “Crop borders” icon located in the Cutting and Splitting menu as illustrated below. You can also access this menu by clicking the right mouse button on the video you need to crop.
Cropping a video for free

As you may have noticed, you’re offered to crop a custom region of a video or use an auto-cropping feature. The latter means the video size will be automatically adjusted to the size of the scene. Most users, however, need to crop video borders using custom settings. Let’s see how to do that.

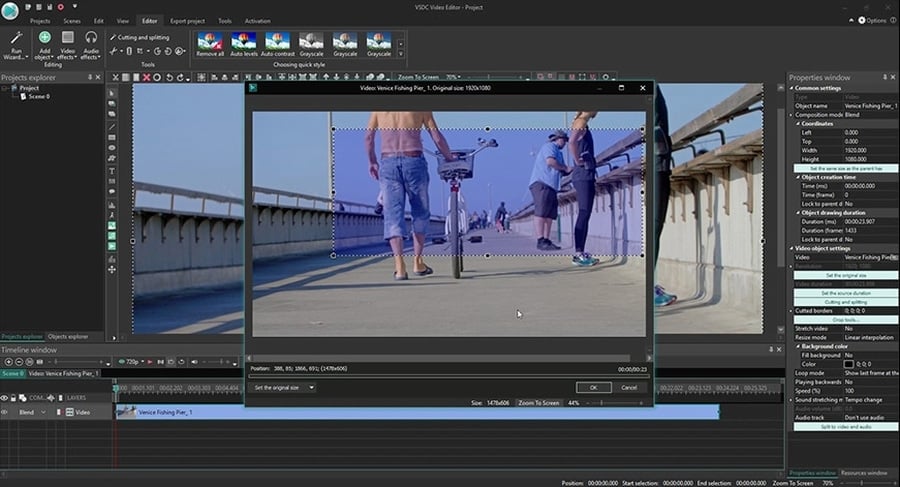
Once you choose “Custom region”, a new window will pop up for you to select the area on the video you want to crop. Here is what you can do there:

  1. Highlight, grab and drag a chosen region to define what will stay in the scene after cropping.
  2. Zoom in for higher precision when cropping a video with multiple objects.
  3. Scroll back and forward to see how the cropped area looks throughout the entire scene.
  4. Use the “Set the original size” button to apply alignment or set the size of a video in accordance with the scene’s, object’s, or image’s aspect ratio.
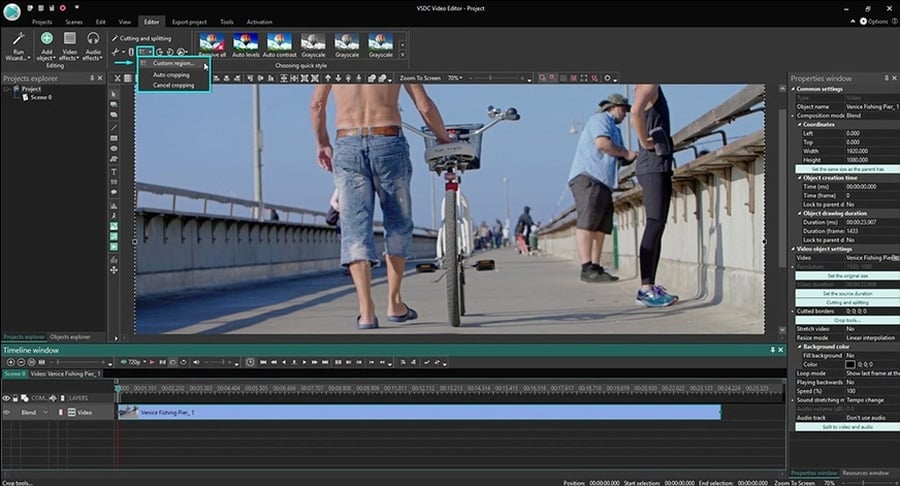
How to crop a custom region of a movie using free software

Finally, you can use the “Properties window” on the right to precisely crop each video border by manually changing their positions – see the illustration below. If the Properties window doesn’t appear automatically, use the right mouse button to click on the video and choose “Properties” from the menu.
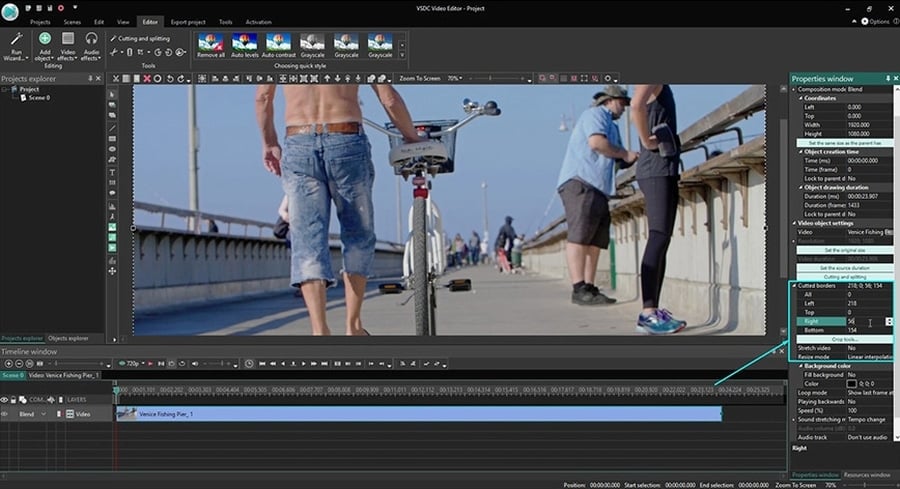
How to crop a custom region of a movie using free software

Once you’re done cropping the video borders, proceed to the Export project tab (top menu) and choose the required format. Use the preview button to make sure that the output video only contains the part you’ve defined, and the aspect ratio is correct. Note that video quality, resolution, its width, and height can be changed if you choose to edit the export profile. If everything looks the way you want, simply click “Export project” to save the file to your PC.

Other video editing instructions you may be interested in:


How to Cut out Fragments of a Video in Free Video Editor

Creating engaging video content often requires precise editing to ensure only the best fragments make the final cut. Whether you're a beginner or an advanced user, VSDC Free Video Editor offers a user-friendly platform to accomplish this task and numbers of others and does not require the latest hardware allowing for creating quality content without experiencing lag or crashes and not compromising on functionality. In this article, we'll walk you through three different methods to cut out specific fragments of a video using VSDC Free Video Editor.

Method 1: Cut out Fragment Tool

This method allows you to delete a part of the file directly in the timeline area.

  1. Launch VSDC Free Video Editor. Click on the Blank project icon on the start screen to create your own project. Adjust project’s settings in the pop-up window (if necessary) and click Finish. Then choose a file in the file explorer, drag it to the scene and drop the mouse button. If it's your first time opening VSDC, we recommend you to watch our quick start guide to familiarize yourself with the editor.
  2. First, set the Work area. The Work area is located on the timeline just above your footage and consists of two gray rectangles. To set it, put the mouse cursor on the right rectangle and, once the cursor becomes a bidirectional arrow, move it to the right holding the left mouse button down. When the end of the fragment is achieved, release the mouse button. Do the same with the left rectangle to mark the beginning of the fragment to be deleted. For this purpose, you can also use the corresponding buttons on the Timeline toolbar. In addition, by pressing the mouse button, you can move the area left and right along the footage. This area will correspond to the unwanted fragment you want to cut out.
  3. Once the Work area is set, click the Cut out fragment button which looks like scissors.There are several ways to reach it:
    • Go to the Editor tab. The tool you need is located just above the scene in the Tools section;
    • The same tool is also conveniently located on the Timeline toolbar;
    • You may also use the hotkey combination Ctrl + Del.

    Before applying this tool, make sure you have selected the file you want to cut on the timeline or on the scene. This is highly important; otherwise the effect will be disabled.
  4. When you click directly on the icon or use the hotkey, the Cut out fragment option is used by default. Apart from that, other cutting options are available in the dropdown menu. Here’s what you can apply:
    • Cut out fragment. This option cuts out the selected area and splits the file into parts afterwards. The cut out part will be indicated by a red marker. If you need to recover the deleted frames, move a splitted part of your footage to another timeline layer by pressing the mouse and dragging it downwards. Then hold the Shift key, grab the marker of the footage layer on the timeline, and drag it outwards.
    • Cut out content. This option cuts out the selected area without splitting the file. The cut out part will be indicated by a dark-red marker. To recover the removed part, simply double-click on the marker. Cut out content option doesn’t provide a hotkey, but you can set it to your convenience in a way described in our video guide How to Create Custom Keyboard Shortcuts.
    This menu also provides additional options to trim your footage with Trim start/end (the hotkey combinations are Ctrl + Shift + [ / Ctrl + Shift + ] respectively). They simply cut the beginning or end of the video without changing the file’s placement on the timeline or removing blank space and do not refer to the Work area. To do the trimming, place the playhead on the timeline where you want to trim part and select the Trim start/end option. To restore the trimmed frames, press the Shift key and drag the edge of the footage outwards.

  5. Once you've cut out all the unwanted fragments, click on the Export project tab at the top of the screen. Choose the output format for your video. VSDC supports a wide range of video formats such as AVI, DVD, VCD/SVCD, MPEG, MP4, M4V, MOV, 3GP/3G2, WMV, MKV, RM/RMVB, FLV, SWF, AMV, MTV, WebM and more. Then adjust the settings for the output video (if necessary), and click on the Export Project button.

It’s also possible to cut out parts of several videos at once. Select them all with a left mouse button and choose the option you need.

Method 2: Cutting by Using Cutting and Splitting Window

  1. Start with creating a new project as described above. Then you need to reach the Cutting and Splitting window. It can be done in one of the following ways:
    • The Cutting and Splitting option is located in the Tools section above the scene on the Editor tab. Click on it for the corresponding window to appear;
    • Select your video file on the timeline and navigate to the Properties window on the right of the scene. Then click on the green Cutting and splitting button;
    • Right-click on the video file on the timeline. Then select the Cutting and splitting option from the list.

  2. In the Cutting and splitting window you'll observe a timeline. To select a fragment, put the blue playhead to the beginning of the fragment you want to delete. When the mouse cursor becomes a bidirectional arrow, hold the left mouse button down to stretch the area of deleting. Once the end of the unnecessary fragment is highlighted, release the mouse button. You can always adjust the boundaries of this fragment moving the red lines to the left or to the right.
  3. Click the Cut region button to delete the selected fragment. The same way you can delete all the unnecessary segments of the video. You can also restore the deleted fragment by clicking the Restore region button or using the Remove Area of Deleting/Remove All Areas of Deleting buttons on the Cut Areas tab next to the preview window.
  4. Hit the Apply changes button for all the editing operations to take effect.

On the main timeline you’ll notice that the piece has been removed from the footage, and you’ll see dark-red markers indicating the cut out parts. You can double-click on it to restore the deleted part or open the Cutting and splitting window and restore the part from there.

Method 3: Cutting on the Export Stage

Sometimes you may need to cut out a fragment, save the video file on your PC and continue working with the file unchanged. In this case, we recommend to do the following:

  1. After you add a video file to the scene and perform all the editing you were planning to, go to the Export project tab on the ribbon command bar and find the Set markers button in the Video conversion section above the video preview.
  2. Then Cutting and splitting window will appear. Cut out the unwanted fragment as described in Method 2 and confirm. All changes will be applied to the resulting file after the conversion.
  3. Then adjust the settings of the output file in the tab below (if necessary) and click the Export project button on the ribbon command bar. As a result, you’ll get a video without unwanted fragments saved to your PC and the initial video for you to continue editing.

Wrapping Up

Cutting out fragments of a video in VSDC Free Video Editor is a convenient process that can greatly enhance the quality of your video content. By following the steps outlined above, you can tailor your videos to include only the best footage, thereby improving the viewer’s experience. With practice, these steps will become second nature, and you'll be able to perform them quickly and efficiently, taking your video projects to the next level.

Finally, cutting tools come closely together with splitting options. To learn how to deal with them, we advise you to take a glimpse at our tutorial on splitting or watch a video guide providing you with a brief outlook on both cutting and splitting tools. To learn more editing tricks for creating amazing video projects, subscribe to our YouTube channel and feel free to message us on Facebook. And if you have questions, our support team is here for you at This email address is being protected from spambots. You need JavaScript enabled to view it..

Here are 3 more tutorials you may be interested in:


You can get more information about the program on Free Video Editor' description page.

How to export video project from VSDC Free Video Editor and save it in a required format

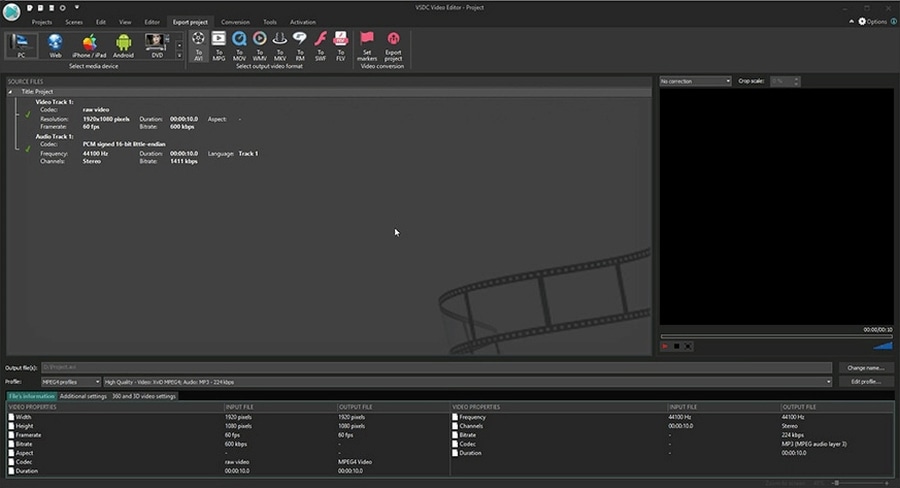
Once you have finished the work on your project, you will need to save it in one of standard file formats. Open the “Export project” tab on the ribbon command bar to choose one of the available formats and configure necessary parameters.

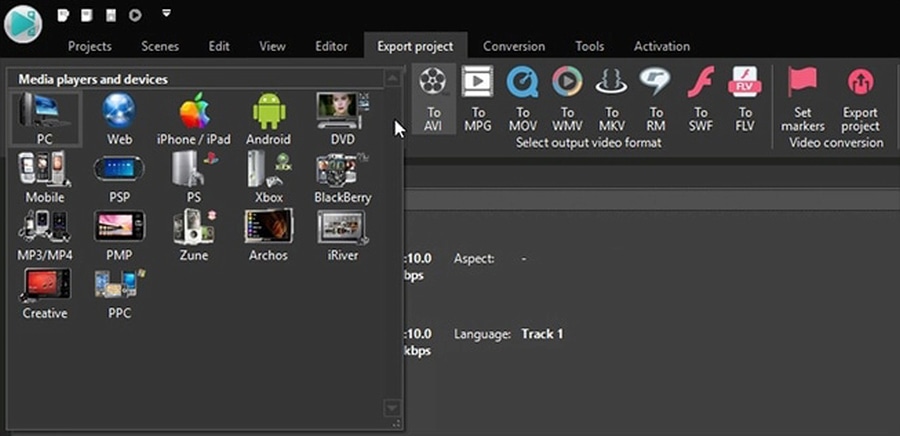
Here you can choose a device on which you plan to play the video, and a format supported by the chosen device.

Click the arrow specified on the image above to see the whole list of supported devices.

After you have chosen a video format, you need to choose a profile which sets the quality of resulting video. Click the arrow next to the Profile field and select one of the available profiles from the drop-down list.

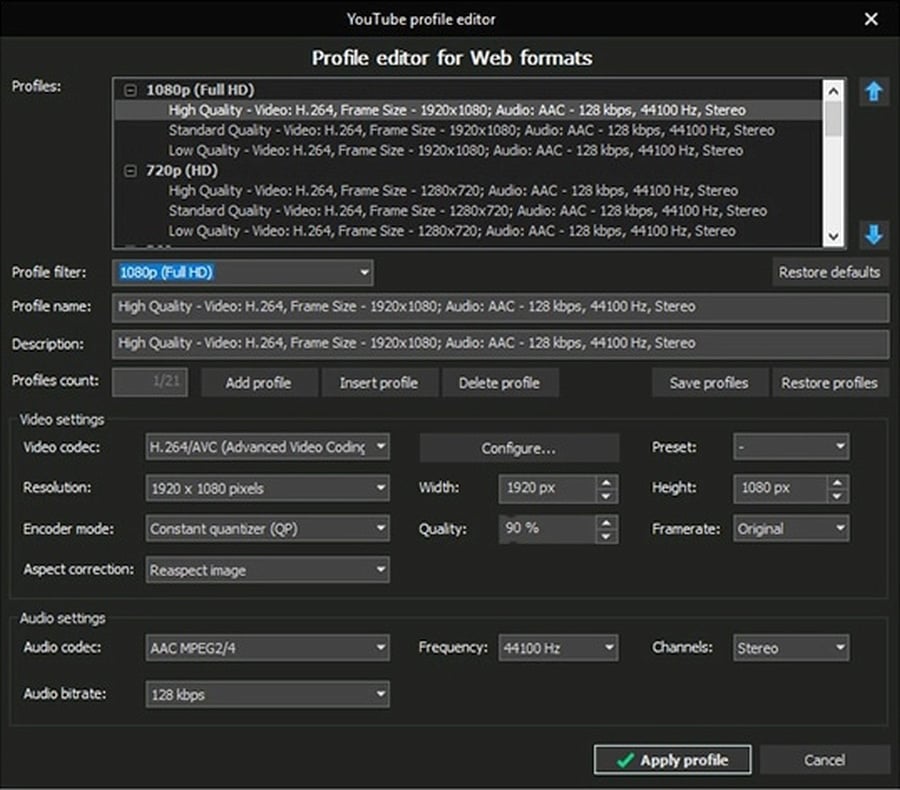
You can configure your own profile by clicking the "Edit profile…" button and setting properties of video and audio codecs. Use the “Apply profile” button to save changes.

You can also indicate the path to the resulting video on your computer.

Finally, click the “Convert files” button to start the exporting process.

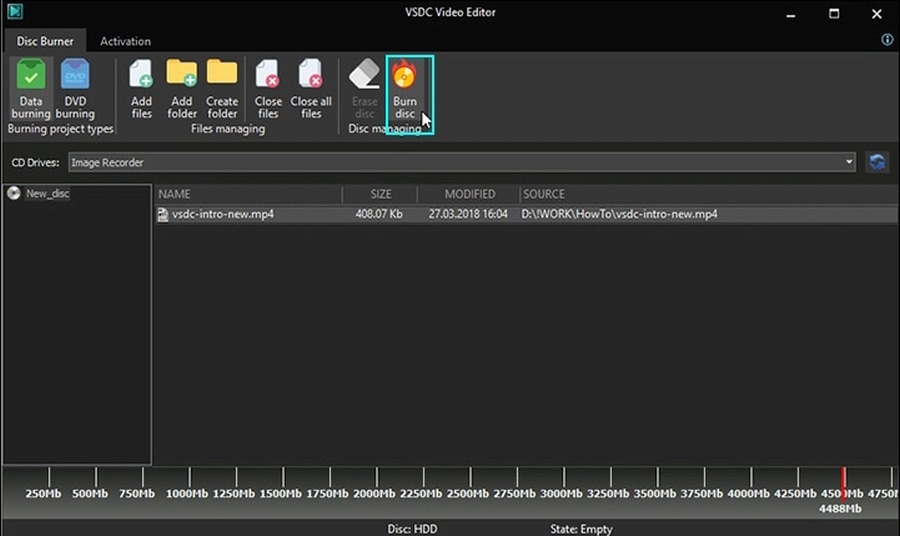
After the conversion is completed, you’ll get a video file of the chosen format and you’ll be able to save it on CD or DVD. Open the “Tools” tab and click the “Disc burner” button. A new window will be open allowing you to burn data to a compact-disc, make multisession discs, edit their content and make DVD video (for this purpose you need to export your video in DVD format).


You can get more information about the program on Free Video Editor description page.

How to split video files with VSDC Free Video Editor

Searching for an intuitive method to split your video seamlessly? VSDC's advanced split tool is here to assist. This option allows you to apply effects to particular fragments of your video, restructure them, cut out unwanted footage together with the Cut out fragment tool, export fragments of your video separately in any format you like (since VSDC provides various options) and tailor the perfect clip.

Depending on your goals, the task of splitting can be performed differently. Do you need extra high precision because you’re trying to catch a particular moment on the footage? Are you planning to export the fragments as separate files? Or are you splitting the footage to just apply different effects to its parts? In this tutorial, we’ll show you how to split a video for any purpose using VSDC Free Editor. Continue reading to master the art of video and audio splitting with VSDC!

Method 1: Split a video file into 2 parts in one click

Here is the simplest way that will suit you if you aren’t looking for high precision.

  1. To begin, launch VSDC Free Video Editor and create a new project. VSDC provides different options of how to do this. For example, you can use the Import content icon on the start screen when you launch the program. This is an optimal way because VSDC will automatically detect all the parameters of your video and adjust the project parameters accordingly. So, click on the Import content icon, choose a file on your PC and adjust parameters in the pop up window appearing automatically (if necessary). Once ready, hit Finish. If you are new to VSDC and want to learn more about how to get started, we advise you to watch our comprehensive video guide.
  2. Select the file you want to split by clicking on it either on the timeline or on the scene. This is highly important; otherwise the effect will be disabled.
  3. Place the playhead to the point on the timeline where the first fragment should end, and the second should begin. Then click the Split into parts razor-like looking button. There are several ways to find it:
    • Go to the Editor tab. The tool you need is located just above the scene in the Tools section;
    • The same tool is also conveniently located just above the timeline;
    • You may also use the hotkey combination Ctrl + K.

Video Split into parts

After that you’ll instantly see how your video file turns into two separate fragments placed one after another on the timeline.

Method 2: Splitting by Using Cutting and Splitting Window

  1. Start with creating a new project as described above. Then you need to reach the Cutting and Splitting window. It can be done in one of the following ways:
    • The Cutting and Splitting option is located in the Tools section above the scene on the Editor tab. Click on it for the corresponding window to appear.
    • Select your video file on the timeline and navigate to the Properties window on the right of the scene. Then click on the green Cutting and splitting button.
    • Right-click on the video file on the timeline. Then select the Cutting and splitting option from the list.

    Cutting and Splitting window

  2. In the Cutting and splitting window you'll observe a timeline. Click to the point on the timeline where you need to split fragments and use the Add marker button. This way you can set as many markers as you need at the points where you want the file to be split.
  3. Select Apply changes when ready.

Splitting a video into multiple parts

On the main timeline you will notice separate fragments placed one after another divided by red markers.

Method 3: Splitting by Segmentation Markers

Sometimes you may need to split a video into multiple parts after all the effects have been applied to the entire file to get separate video clips. In this case, we recommend using segmentation markers right before exporting.

  1. After you add a video file to the scene and perform all the editing you were planning to, you need to set segmentation markers. To apply segmentation markers, place the playhead where you want to split the project on the timeline. Then click on the Create maker icon located just above the timeline to set a mark where the project should be splitted while exporting.

  2. In the pop-up window select Segmentation marker in the Marker type field and click OK to confirm.
  3. Go to the Export project tab on the ribbon command bar, find the Additional settings tab (bottom menu) and check the Split file(s) By markers box.
  4. Then adjust the settings of the output file in the same tab (if necessary) and click the Export project button on the ribbon command bar. As a result, you’ll get as many video fragments saved to your PC as you’ve created using markers.

The way this method works is also briefly presented in our Youtube video (section “Segmentation markers”)

Wrapping Up

That’s it! Now you have an idea of how to split a video in VSDC Free Video Editor. With employing the video splitter, you are free to enrich your content and make it catching and professional-like. VSDC offers smooth transitions ensuring flawless movement between frames, numerous visual effects, options for creating dynamic animations, injecting voice-overs, thrilling sound filters and even synchronizing video effects with the beat of your audio. To learn more editing tricks for creating amazing video projects, subscribe to our YouTube channel and feel free to message us on Facebook. And if you have questions, our support team is here for you at This email address is being protected from spambots. You need JavaScript enabled to view it..

Here are 3 more tutorials you may be interested in:


You can get more information about the program on Free Video Editor' description page.

How to apply effects to video or image with VSDC Free Video Editor

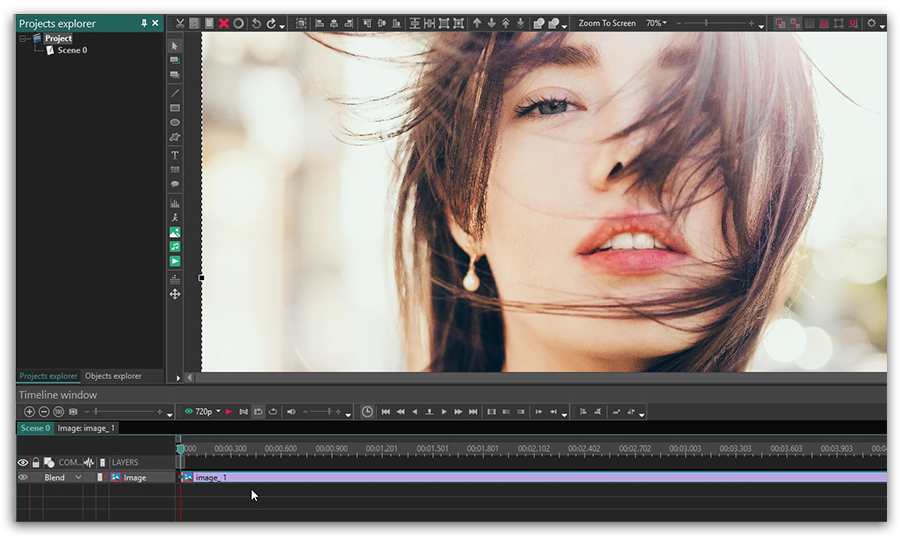
Add an image or video to the scene.

Adding image to scene

To add an effect you should double click the image on the timeline. A new tab with object name will appear.

Effects editing mode for image object

Now open the “Editor” tab on the ribbon command bar and click the “Video effects” (or “Audio effects”) button to see the list of the available effects.

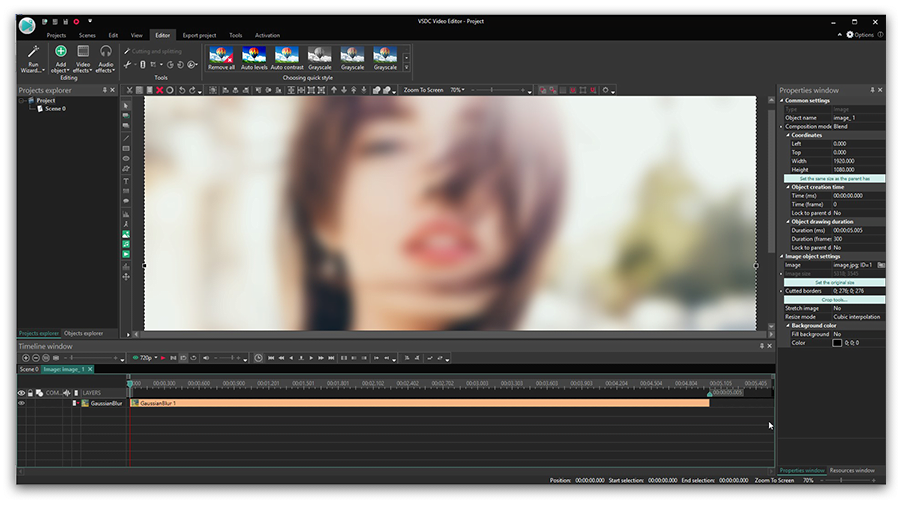
Let’s choose as an example a blur effect "Filters->Blur". A new window is open allowing you to set the object position in time. You can chose the point where the effect should start, its duration and dynamics depending on the parent object duration. The selected effect will appear on the timeline.

Editing blur properties for image object

The effect will be immediately applied to the image.

Blur effect for image object

You can configure other effect parameters in the properties window. Click the effect on the timeline and open the “Properties window” tab at the right of the scene area. For the Blur effect, the available parameters are the following: blur intensity, original and final blur levels which enable to make effect of stepless object blur or increasing of stepless contrasting effect.


You can get more information about the program on Free Video Editor' description page.

News

New Transition Addition Methods, RAW/BRAW Files Support and Free Waveform

Welcome to the next level of video editing with VSDC's latest release, Version 9.1! Packed with an array of fresh features and enhancements, this update is designed to make your video editing experience...

VSDC 8.3 – 100+ New Templates, Key Editor Window, AV1 and Enhanced GUI

Welcome to the latest VSDC update, Version 8.3! We've been working hard and we’re ready to present a feature-packed release for you to discover an exciting array of over 100 fresh free video templates,...

Free video editing in 2023: Unlock Your Creativity without Breaking the Bank

In today's digital world creativity reigns supreme. It offers endless possibilities for individuals and brands to captivate audiences and leave a lasting impression. With social media platforms at the...

The Best Online Video Editors in 2023: Benefits and Drawbacks

In today’s digital landscape, the popularity of video content is gaining momentum, with users increasingly turning to video creation both for personal advantage and professionally. When searching for...

VSDC 8.2 – Proxy File Support, Color Keyframes and Vectorscope

We are thrilled to unveil the highly anticipated VSDC video editor 8.2 update. Our team has been hard at work, ensuring that this release is packed with exciting features and enhancements to elevate your...

VSDC 8.1 Brings Multicam, Curve Line Object, Scrolling Text Effect, and More

We’re thrilled to introduce VSDC 8.1. The new version primarily caters to professional videographers, graphic designers, and artists, however, everyday video creators will benefit from the update as...

VSDC 7.2 Takes Its Color Correction Toolset to the Next Level (Plus, Other Updates)

It has been another productive couple of months for the VSDC team, and we’re thrilled to announce the release of VSDC 7.2 – the new version of our video editing suite. Although the majority of updates...

5 Free Pieces of Software for Video Color Correction

If you’re a video creator, there are three reasons why it’s crucial to learn color correction. First, it will help you enhance your videos and make them look professional. Second, it will allow you...

VSDC 7.1 Upgrades GUI and LUT Editor, Adds New Effects and Custom Shortcuts

The new version of VSDC includes two new video effects, expands the functionality of the LUT editor, and makes video editing more convenient by bringing an improved interface, optimized timeline, and custom...

10 Pieces of Truly Free Video Editing Software (with No Watermarks)

Seeing a watermark on your video after spending hours editing it feels infuriating. Yet a few video editing software developers are still using this practice to limit the free usage of their products....
 

Screen Recorder Box

This program allows you to capture the video of your desktop and save it on your PC in various formats. Coupled with a video editor, the program is a great tool for creating presentations, tutorials and demo videos.

Read more about Screen Recorder...


Video Capture Box

The program captures video from external devices and records it to computer in a free format. You can save video from video tuners, webcams, capture cards and other gadgets.

Read more about Video Capture...


Reviewed by


"VSDC Free Video Editor is a surprisingly powerful, if unconventional video editor"

- PC Advisor


"This video editor gives you tons of control and editing power"

- CNet


"The editor handles many common formats and boasts a good deal of capabilities when it comes time to alter lighting, splice video, and apply filters and transitions in post production"

- Digital Trends