")


Editeur Vidéo
A l’aide de l’éditeur vidéo, vous pourrez éditer les fichiers vidéo et créer des vidéo de divers niveaux de complexité. Vous aurez également la possibilité d’appliquer des effets vidéo et audio aux objets d’édition, les transformer, introduire la filtration et la correction des images. Le logiciel prend en charge tous les formats et codecs vidéo et audio populaires en lecture comme en enregistrement.
Convertisseur Vidéo
Ce logiciel sert à transformer les fichiers vidéo d’un format en un autre. Il prend en charge presque tous les formats vidéo populaires en lecture comme en enregistrement. En outre, il offre la possibilité de création des vidéos pour des dispositifs multimédia concrets, tels que iPhone, Microsoft Zune ou Archos. Le logiciel est très simple d’emploi, il est doté d’une interface moderne et fournit un ensemble de fonctions de base pour traiter les vidéos.
Convertisseur Audio
Grâce à ce convertisseur audio, vous pourrez convertir les fichiers audio d’un format vers un autre. Le logiciel prend en charge tous les formats et codecs audio répandus. Le logiciel permet également de traiter les sélections et les balises META des fichiers, offre la possibilité d’exporter des pistes audio depuis un fichier vidéo et d’enregistrer les pistes sur l’ordinateur au format voulu.
Animated Intro & Title Templates
Explore the VSDC Template Store with ready-made video templates for intros, animated titles, lower thirds, logo reveals, slideshows, glitch transitions, LUTs, and color grading presets. Drop a template into the VSDC Video Editor timeline, edit text, timing, and colors, and finish professional video projects in minutes.
Choose from 300+ exclusive packs of video transitions, LUT packs, text effects, GPS telemetry widgets, animated elements, and animated backgrounds for VSDC. All templates are fully customizable, support up to 4K resolution in 16:9, and help you build intros, wedding slideshows, travel videos, and tutorials much faster.
VSDC Cloud - Online video management
Keep your work safe, organized and always accessible! Back up your video projects, store media files online and access them from any device. Enjoy collaboration, share project updates and exchange files easily.
 Editeur Vidéo
 Convertisseur Vidéo
 Convertisseur Audio
 Store templates
 Cloud
Cloud

Multifonctionnalité
Un large éventail d'outils de traitement des fichiers multimédia dans un seul logiciel de montage vidéo gratuit.

Haute vitesse de fonctionnement
Les logiciels utilisent des algorithmes multiprocesseurs rapides optimisés.

Disponibilité
VSDC est un logiciel vidéo qu’on peut télécharger gratuitement sur les PCs et ordinateurs portables à base de système d'exploitation Windows
Actualités:
Comment appliquer l’instrument du remappage temporel dans VSDC
Si vous connaissez déjà la fonction du mouvement d'objet en VSDC, l’outil du remappage temporel peut aussi vous intéresser. Avec le remappage temporel on peut ralentir, accélérer ou inverser le mouvement de l'objet dans une partie sélectionnée de sa trajectoire. En conséquence, cet instrument peut créer des effets vraiment impressionnants, comme celui-ci :
La nouvelle fonctionnalité est disponible dans VSDC Pro à partir de la version 6.9. Nous allons vous montrer ces capacités ci-dessous.
Comment utiliser le remappage temporel dans VSDC
Actuellement l’instrument du remappage temporel ne s’applique qu’aux objets en mouvement. Cela inclut les images, les formes, les titres, les icônes ou tout autre objet tiers ajouté à la scène. Voici l’instruction pour commencer.
Créez un objet en mouvement
Au début, il faut ajouter un objet à la scène. Double-cliquez sur lui et ensuite cliquez sur l'icône de mouvement dans le menu de gauche. Placez le curseur sur le point de la destination du mouvement et ajustez le vecteur.
La fonction du mouvement d'objet est simple et conviviale pour les débutants, mais si cet outil représente une expérience absolument nouvelle pour vous, veuillez consulter notre guide détaillé.
Ouvrez le graphe du remappage temporel
Une fois la trajectoire du mouvement créée, cliquez avec le bouton droit de la souris sur le calque du mouvement, qui se trouve sur la timeline. Sélectionnez ensuite Propriétés. Dans la fenêtre Propriétés, recherchez Remappage temporel et appuyez sur l'icône à 3 points pour accéder au graphe.
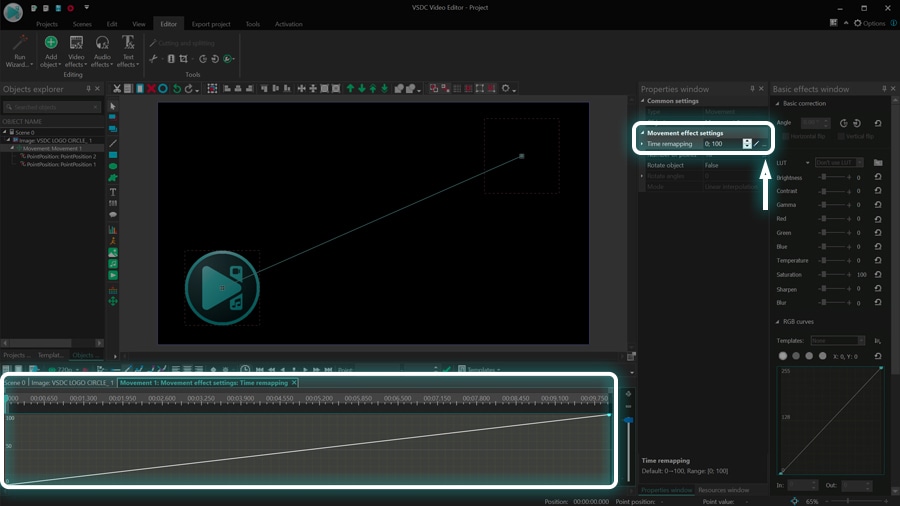
Ce graphe précise le mouvement de l'objet au cours du temps, et les deux axes en définissent les deux aspects différents. L'axe X reflète la durée de l'effet du mouvement : la partie gauche de la timeline est le début et la partie droite est la fin. L'axe Y reflète la trajectoire du mouvement de l'objet : la partie inférieure de la timeline est le début de la trajectoire et la partie supérieure est sa fin.
Avec la modification du graphe vous changez la progression du mouvement de l'objet. Par exemple, l'objet peut bouger plus lentement ou plus vite à travers certaines parties du chemin. Vous pouvez même l'envoyer dans la direction opposée : Il vous suffit de quelques images clés placées aux bons endroits ! Voyons comment peut-on les créer.
Le principe des images clés et de l'axe Y
Les images clés sont des points de contrôle qui divisent le graphe - et par conséquent, la trajectoire de mouvement - en sections afin d'éditer chaque section indépendamment. Vous pouvez créer des images clés manuellement en double-cliquant sur le graphe, ou vous pouvez appliquer les modèles du menu. Pour ce tutoriel nous avons choisi la première option.
Notez que la première image clé (Y:0) indique la position initiale de l'objet sur la trajectoire. La dernière image clé (Y:100) est la fin de la trajectoire.
A mesure que le graphe monte continuellement de 0 à 100, l'objet se déplace du point A au point B. Il suit le vecteur de mouvement que vous avez créé. Nous l'appelons le flux temporel original, non modifié.
Voyons maintenant ce qui se passe lorsque nous modifions le graphe.
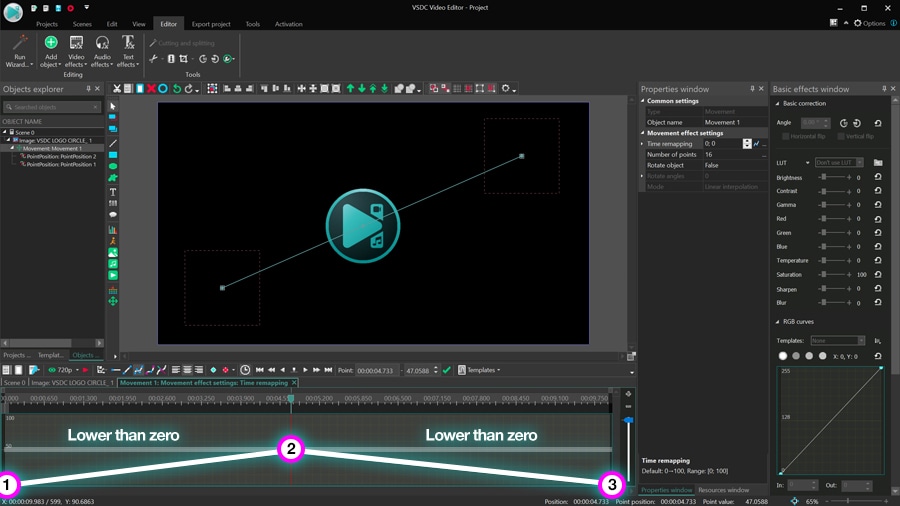
Nous avons déjà mentionné que l'axe Y indique le flux temporel de l'objet. Ci-dessous vous trouverez une illustration simple qui montre le moyen à l'aide duquel on peut l’inverser. Supposons, qu’il faut que l'objet parcourt la moitié du vecteur de mouvement, puis revienne au point initial à la même vitesse. Donc, vous créez une image clé au milieu du graphe et faites glisser la dernière image clé de 100 à 0.
Décomposons tout ce que nous avons fait. L'objet se déplaçait le long de la trajectoire jusqu'au point de rupture, i.e. à l'image clé que nous avons créée. Ensuite, l’objet ne continue pas le mouvement, mais commence à reculer car la deuxième partie du graphe redescend à Y:0 au lieu de continuer l’ascendance. Y:0 indique le point initial sur la trajectoire de mouvement de l'objet. En d'autres termes, selon l'axe Y, le début et la fin de la trajectoire sont les mêmes.
Voici une autre façon de le voir. Si l'angle entre deux images clés suivantes est supérieur à zéro degré, le flux temporel de l'objet dans cette section va dans la direction d'origine. Cependant, si l'angle entre deux images suivantes est inférieur à 0 degré, le flux temporel de l'objet va dans le sens inverse.
Par exemple, si vous appliquez le modèle ZigZag à partir du menu des modèles, vous obtenez un objet rebondissant entre les côtés de la scène.
Notez que l'effet de mouvement continue tant que l'objet sera présent dans la vidéo.
Le principe de l'axe X
Maintenant vous avez une idée de la direction temporelle de l'objet, et il est grand temps de revenir à notre schéma afin de voir comment peut-on modifier la vitesse de mouvement à un moment donné.
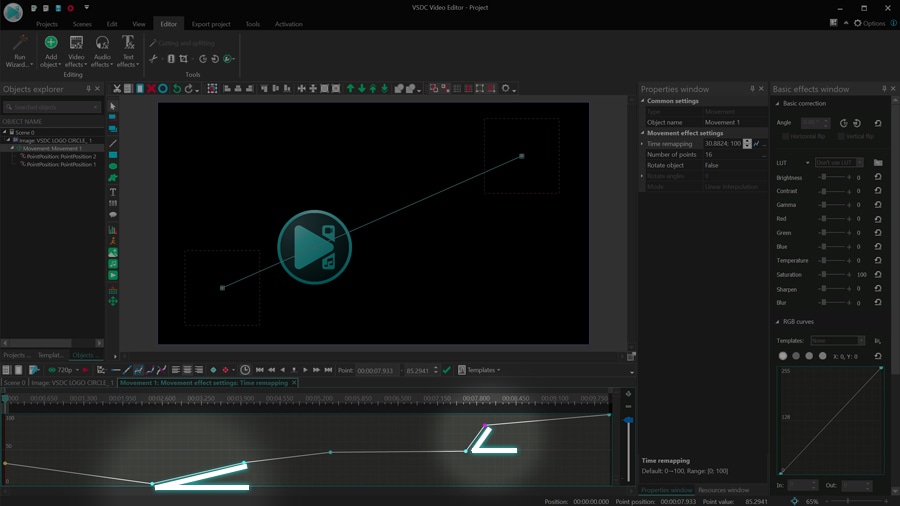
Par exemple, vous voulez que l'objet atteigne le milieu de la trajectoire, ralentisse pendant une seconde et continue à une vitesse légèrement plus élevée. Cependant, placez une image clé une seconde après la moitié du graphe et faites-la glisser vers le bas pour rendre ce segment du graphe plus plat. Voici à quoi ressemblera le résultat :
Voici comment cela fonctionne. Quand vous ajoutez une image clé, vous créez une nouvelle section sur le graphe. Quand vous faites glisser l'image clé vers le bas, vous diminuez la vitesse de mouvement pour cette section.
Vous voulez ensuite, que l'objet accélère brièvement au milieu de la trajectoire, puis revienne à la vitesse normale pour le reste du chemin. C'est facile! Faites glisser la nouvelle image clé jusqu'à l'angle souhaité et reflétez sa position avec l'image clé centrale pour créer des angles identiques sur le graphe.
Quelle est la conclusion de ces deux exemples ? L'angle entre deux images clés suivantes définit la vitesse de mouvement de l'objet. Avec l'angle plus grand la vitesse de mouvement devient élevée ; et par contre, avec l'angle plus faible, la vitesse devient faible.
Toutes nos félicitations! On espère, qu’à présent vous avez une bonne compréhension du remappage temporel pour une animation à un vector. Cependant, dans de nombreux cas, la trajectoire de mouvement de l'objet contient deux vecteurs ou plus. Voyons le graphe du remappage temporel dans ces cas.
Remappage temporel pour la trajectoire de mouvement multi-vecteur
Si vous avez créé une trajectoire de mouvement composée de plusieurs vecteurs, chaque vecteur sur le graphe du remappage temporel sera représenté par un rectangle gris clair. Ces rectangles servent à visualiser la position de chaque vecteur dans le temps et à créer des images clés en conséquence.
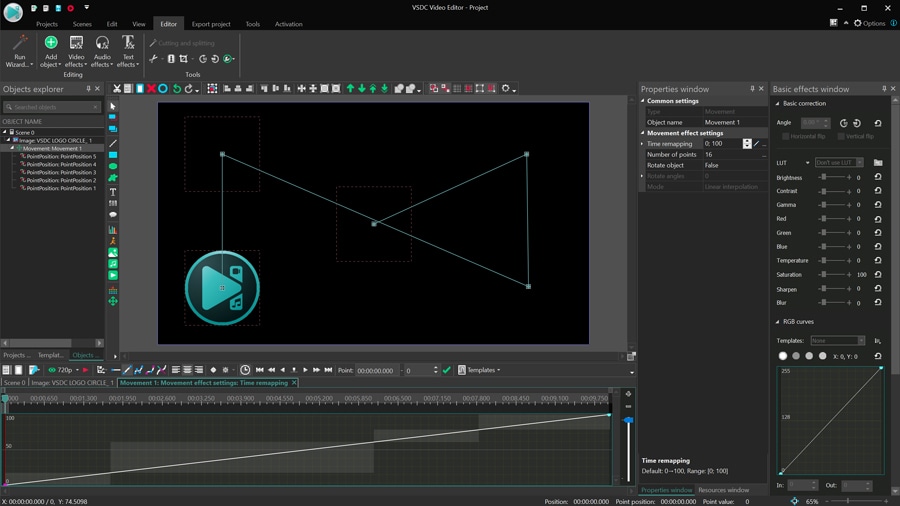
L'approche générale vers les trajectoires de mouvement multi-vecteurs ne diffère pas de ce que nous avons décrit ci-dessus. Cependant, il y a une partie délicate qu’il faut garder à l'esprit. Si vous envisagez de modifier toute position vectorielle à la scène, les rectangles gris se déplaceront en conséquence. Mais si vous avez déjà créé des images clés sur le graphe en fonction de ces vecteurs de mouvement, il faut les déplacer manuellement.
En fait, il faut se rappeler que les images clés ne sont pas attachées aux vecteurs de mouvement. Donc, si vous voulez que l'objet se déplace à travers un certain vecteur avec une certaine vitesse, et si vous déplacez ce vecteur, assurez-vous de revérifier les images clés.
Un contrôle total sur l'animation des objets avec le remappage
Le remappage temporel est un outil puissant, et nous sommes ravis de l'introduire dans la nouvelle version de VSDC. Au-dessus nous avons parcouru toutes les étapes de l'application de cette fonctionnalité, mais il y a beaucoup plus à découvrir. Par exemple, vous pouvez incorporer une rotation d’un objet, des effets de transition et même un suivi de mouvement.
Téléchargez VSDC 6.9 maintenant et essayez par vous-même !
Pour obtenir plus d'information sur le programme, consultez la page de description de Free Video Editor.


A l’aide de ce logiciel, vous pourrez faire des vidéos de votre bureau et les enregistrer sur l’ordinateur sous différents formats. Avec l’éditeur de vidéo, ce logiciel est une solution idéale pour créer des présentations et des bandes démos.

Le programme est pour le but de récupèrer le vidéo des périphériques et de l’enregistrer sur l’ordinateur dans n'importe quel format vidéo. Il vous permet de sauvegarder les vidéos des tuners vidéo, des caméras Web, des cartes de capture et d’autres unités.
VSDC Video Editor Reviews & Ratings (Trustpilot, Capterra & Media)
VSDC Free Video Editor is rated 4.5/5 by real users on Trustpilot and Capterra. Here are a few reviews and quotes from creators and tech media.
Overall rating: 4.5/5 based on 200+ reviews on Trustpilot and 89 reviews on Capterra.
★★★★⯪
VSDC Free Video Editor is the best free video editor for Windows I’ve used, from color grading to picture-in-picture and cinematic results.
— Ejikeme Eloka Augustine
Source:Trustpilot
★★★★☆
Easy-to-use interface and quick export to social media make VSDC a versatile video editing tool for everyday projects.
— Karen C., E-Learning
Source:Capterra
★★★★☆
A feature-packed non-linear video editor for Windows that can compete with many paid video editing solutions.
— TechRadar
Source:TechRadar review
★★★★★
The free VSDC editor saved my YouTube channel – a powerful video editing software for chroma key, text effects and picture-in-picture.
— Paul Roberts
Source:Trustpilot
★★★★★
Fast and simple for YouTube videos with green screen, zoom, color tools and creative effects in one app.
— Marie R., Media Production
Source:Capterra
★★★★★
One of the best free video editor options for Windows users, ideal for GoPro, YouTube and family videos.
— VidProMom, YouTube creator
Source:Media reviews
★★★★★
I’ve been using VSDC for years; editing is easy and the final videos look great for my personal and professional projects.
— Long-time VSDC user
Source:Trustpilot
★★★★★
Great value and faster than many other free tools; I quickly create videos for YouTube, Instagram and Facebook with features my audience loves.
— Rabika B., Marketing & Advertising
Source:Capterra
★★★★★
VSDC offers many features you don’t usually find in free editors, including picture-in-picture, stabilization and modern codec support with no watermarks.
— Tech media review
Source:Media reviews
Regardez-nous
 / @VSDCFreeVideoEditor
© 2011-2026, www.videosoftdev.com, FLASH-INTEGRO LLC. Politique de confidentialité | Conditions d'utilisation | Qui sommes nous
Toutes les marques commerciales citées sont la propriété exclusive de leurs propriétaires respectifs.
La copie de tout matériel de ce site n'est autorisée qu'avec le consentement écrit de l'administration du site.