Video Editor

Download and use the free video software to create and edit videos of any complexity from a family greeting card to a company presentation. Apply vsdc free video editor for light edit hdr-video, any raw-video formats from cams - BRAW, ProRes RAW, any high resolution 4k or more due to video proxies technologies in the editor.
Cut, merge video files, apply visual and audio effects, use filtration and image correction, make slideshows and add an appropriate soundtrack. Use multi-color Chroma Key and advanced parameters settings to give your video a professional look.
All popular video and audio formats are supported.

Read more about Video Editor...

Video Converter

This program is intended for converting video files from one format to another. Nearly all popular video formats are supported (both reading and saving). In addition, the program drastically simplifies the task of converting videos for playback on specific multimedia devices, such as iPhone, Samsung Galaxy or Huawei P30 Pro. The program is extremely easy to use, has a modern interface and all necessary video processing functions.

Read more about Video Converter...

Audio Converter

The audio converter will help you convert audio files from one format to another. All key audio formats and codecs are supported. The program also allows you to manage playlists and meta tags, extract audio from video files and save these tracks on your computer in any format.

Read more about Audio Converter...

Animated Intro & Title Templates

Explore the VSDC Template Store with ready-made video templates for intros, animated titles, lower thirds, logo reveals, slideshows, glitch transitions, LUTs, and color grading presets. Drop a template into the VSDC Video Editor timeline, edit text, timing, and colors, and finish professional video projects in minutes.

Choose from 300+ exclusive packs of video transitions, LUT packs, text effects, GPS telemetry widgets, animated elements, and animated backgrounds for VSDC. All templates are fully customizable, support up to 4K resolution in 16:9, and help you build intros, wedding slideshows, travel videos, and tutorials much faster.

Store catalog

VSDC Cloud - Online video management

Keep your work safe, organized and always accessible! Back up your video projects, store media files online and access them from any device. Enjoy collaboration, share project updates and exchange files easily.

Online video editing management capabilities

Multifunctionality

Multifunctionality

A wide array of multimedia processing tools in one free video software suite.

High speed

High speed

Our programs use fast
and high-quality algorithms optimized for single and multi-core CPU’s.

Affordability

Affordability

VSDC video software is freely available for download to Windows OS-based PCs and laptops.

Why HDR video looks dull and how to fix it in VSDC

опубликовано Редакция VSDC • 21 апреля 2026

Why HDR video looks dull and how to fix it in VSDC

If you shoot video on an iPhone, GoPro or a professional camera, you've likely encountered this situation: you open your footage on your computer, expecting to see the vibrant sunset you wanted to capture, but on the screen there is a dull image lacking the brightness that made you frame the shot or record the video in the first place.

Why does it happen?
Your video or photos were recorded in HDR, but when you work with this type of footage on a standard (SDR) timeline or watch it on a regular monitor, the software has to figure out how to squeeze the expanded color and brightness range into the limited SDR format. Now you can take control of this process right in VSDC! Keep reading to find out how. We'll run a quick experiment and break down exactly what each setting does.

Make sure you have version VSDC 10.1 or higher installed

In this article:

  • Display mode: auto detection, SDR, HDR
  • Color profiles: standard and enhanced
  • Brightness: adjusting nominal peak brightness
  • Tone mapping: algorithms and levels
  • Additional options for improving results
  • Wrapping up
  • Frequently asked questions about HDR

Display mode: auto detection, SDR, HDR

So, we've added an HDR video (learn how to add files to the editor here), clicked on it on the timeline and opened the properties window. Now expand the "Video object settings" section, then the "Video" parameter and find the "HDR mode" option.

There are three options here. Let's start with the simplest one: "Auto detect". You might think that after selecting this one, the editor would figure everything out on its own and give you the best result. But that's not what happens because you're still left with the same dull image. Why? VSDC automatically squeezes the expanded HDR range to fit the specs of a regular monitor. If your screen doesn't support HDR, auto mode simply cuts off all the extra information and leaves only the SDR data. Keep in mind that conversion to SDR only happens if the original file has the right metadata.

Next up, let's choose "Force SDR mode". What's changed? In this mode the editor ignores the color and brightness data your camera captured and only reads the part meant for standard (SDR) screens. In other words, VSDC treats your HDR file just like any regular video. This option works well if you're quickly putting together a rough cut.

Now let's activate "Force HDR mode". On the screen you'll see all the brightness and color that was captured in the original file. However, if you're using a standard monitor, you might run into a funny side effect: the image may look either oversaturated or way too dark. It happens because VSDC is now showing all the available data, but your screen simply doesn't know how to display it properly. To get the look right, you'll need to tweak a few additional settings.

Color profiles: standard and enhanced

Expand the "HDR mode" section by clicking the small triangle icon to the left of it. When you select either "Auto detect" or "Force HDR mode", additional options become available. The most important one is "Color profile".

Start with "Standard color profile". This is a universal and fairly straightforward mode. It works on any computer, but it's generally slower, and colors tend to look less natural.

Now choose "Enhanced color profile". This mode is more advanced and designed for modern PCs. It utilizes your graphics card to accurately convert HDR colors and brightness into standard SDR format. The resulting image will closely match the original.

If you select "Enhanced color profile" but your PC does not have a dedicated graphics card, the software will automatically fall back to "Standard color profile" to ensure compatibility.

Brightness: adjusting nominal peak brightness

When you select "Standard color profile", the "Nominal peak luminance" setting becomes available. It defines the maximum brightness level your screen is capable of displaying. The value can range from 0 to 10,000 units. By default, it is set to 100 which is considered standard for typical SDR screens. Don't forget to enable the toggle switch to apply the setting.

Let's look at the two extremes of this setting: minimum and maximum.

  • Nominal peak luminance = 1
    In this case, the video editor is forced to compress the entire brightness range of the original HDR video into a narrow spectrum from 0 (black) to 1 (maximum brightness within this artificial range). Anything in the source file that exceeds a value of 1 — which could be, for example, 99% of the brightness information — is simply clipped and replaced with the maximum allowable value of 1. As a result, all colors that were originally bright and varied blend into a single white wash.
  • Nominal peak luminance = 10,000
    Here the editor assumes your screen can display brightness up to 10,000 units even if, in reality, the physical maximum of your screen is, say, only 500. The editor distributes all colors from dark to bright white across the specified range of 0 to 10,000. However, since your actual screen cannot output brightness beyond 500 units, all information in the 500–10,000 range is effectively lost. The result is an image that looks gray and dull.

Therefore, the key in this case is to find the right balance, taking into account your screen's capabilities and the desired visual outcome.

Tone mapping: algorithms and levels

Now let's look at the "Tone mapping" option. This setting controls how the program compresses bright colors and light from HDR video so they display correctly on a standard screen.

VSDC offers several built-in tone mapping algorithms. The way colors and brightness are redistributed in the frame depends on which algorithm you choose. The image on screen will look different with each option — you can select the one you prefer.

If you're not satisfied with the result after choosing an algorithm, try enabling the "Level" parameter. This option is available in "Force HDR mode" and "Auto detect" HDR modes. It allows you to make the color compression stronger or weaker.

When you enable "Level", a default value is automatically set for each algorithm. The image with the parameter turned off looks the same as when it's turned on with the default value.

To adjust the image, simply move the level slider away from the default setting. Increasing the value makes the video brighter, while decreasing it makes the image duller.

Additional options for improving results

Two additional options can help you fine-tune the color more precisely.

"Signal peak override" allows you to specify the maximum brightness present in your video. Let's see how this works together with the parameter we discussed earlier:

  • Nominal peak luminance tells the program what brightness your monitor is capable of.
  • Signal peak override tells the program what brightness is present in the video itself.

For example, set "Nominal peak luminance" to 40, meaning your monitor can only display 40 nits. Set "Signal peak override" to 20,000 because the video contains extremely high brightness. The software sees that your monitor can't handle that level, so it makes the image look duller and darker to fit the screen's capabilities.

Or set "Signal peak override" to 2 if the video has very little brightness. The software knows your monitor is capable of far more, so it artificially boosts the image to make it look brighter.

Important: both parameters can be enabled or disabled as needed. If they're turned off, the software reads the values from the video file's metadata (if present).

Another option that might be useful to you is "Desaturation intensity". If the colors still look dull after all the adjustments — which often happens at low peak brightness levels — just add +10–20% saturation. The lower the value set for this parameter, the less saturated the colors will be.

Wrapping up

Working with HDR in VSDC is easier than it seems. Once you understand the logic behind the settings, you'll never be left frustrated by dull, washed-out images — and more importantly, you'll be able to quickly restore the brightness and saturation that made your videos and photos worth capturing in the first place.

Frequently asked questions about HDR

1. Why does my HDR video look dull on my computer?
When playing HDR video on a standard (SDR) monitor, the software automatically compresses the expanded color and brightness range to fit within the narrower SDR limits. As a result, the image loses saturation.

2. Which HDR display mode should I choose?
If you want maximum brightness and vibrancy, select "Force HDR mode". For quick draft editing, "Force SDR mode" works well. "Auto detect" mode only functions when metadata is present in the file and often produces predictable results, though not always optimal.

3. What is "Enhanced color profile" and when should I use it?
"Enhanced color profile" uses your graphics card to more accurately convert HDR colors to SDR. It delivers an image that closely matches the original but requires a modern PC with hardware acceleration support.

4. How do I properly adjust peak brightness?
The "Nominal peak luminance" parameter defines the maximum brightness level your screen is capable of. Adjust this value based on your monitor's specifications and the desired visual outcome. Setting it too low will result in an overexposed image, while setting it too high will make the image look gray and dull.

5. Can I use these HDR settings for videos from a GoPro or iPhone?
Yes, VSDC supports HDR files from GoPro, iPhone and most modern cameras. All the settings described in this article work with any HDR video.

We hope you enjoyed exploring these settings with us! Don’t stop here: keep experimenting with your own projects. We’re sure you’ll achieve even better results that you’ll want to share.

If you have questions or creative ideas to share, we'd love to hear from you at This email address is being protected from spambots. You need JavaScript enabled to view it. or through our social networks: Facebook, X, Reddit or Discord. And remember to check out our YouTube channel for more inspiration!

Quick start:

  • Import video
  • Add Telemetry (extract from GoPro или import GPX)
  • Pick a template (map/speed/altitude dashboard)
  • Sync to video + Time shift if needed
  • Export

Compatibility

Cameras: GoPro / Insta360 / Garmin / phone GPX export.

Every twist, jump and freefall moment in your footage is more than just a video: it's a story waiting to be told in a completely new way.

With the GPS visualization tool that first appeared in VSDC 10.1 and became even more functional starting from version 10.2, your action clips transform into eye-catching travelogues. Exclusively in VSDC, you get GPS functionality whose analogues are hard to find elsewhere!

Add routes, overlay them on maps, display a compass, speed via customizable gauges, altitude graphs and much more: all within VSDC! The process is intuitive and doesn't take much time.

Let's explore all the details of how it works. But first, the most important thing:

Ensure you have VSDC Video Editor version 10.2 or higher installed!

Adding GPS Data Files

The first step as usual is importing your GPS data into VSDC. The process is flexible and supports two primary methods.

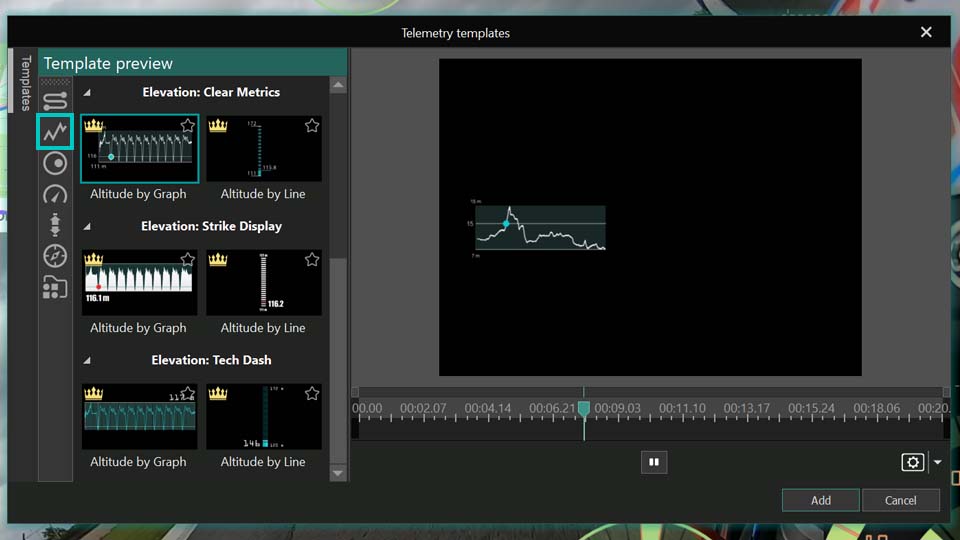
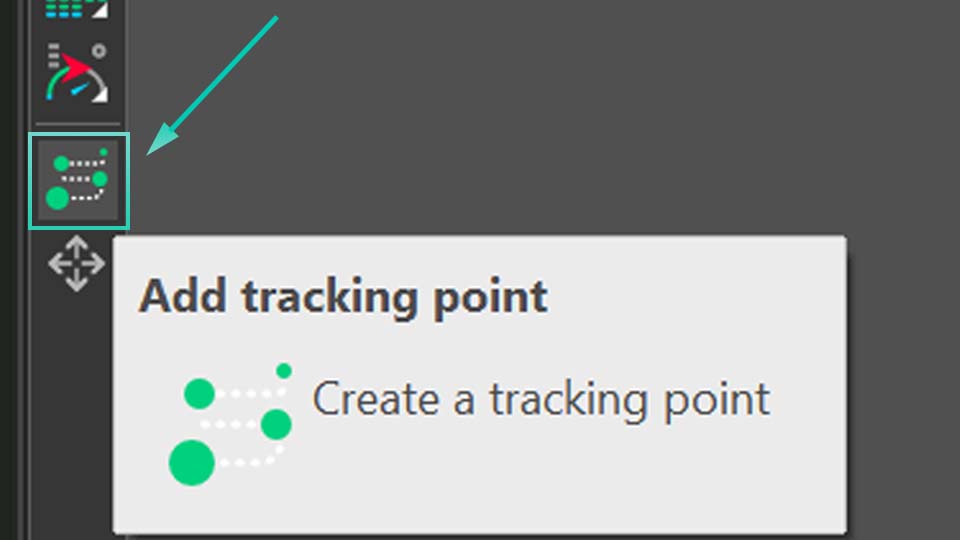
If you have a separate GPS data file, such as a .GPX export from your action camera or a dedicated tracking device, you can load it directly. Simply click the "Add telemetry" button on the toolbar to the left of the preview screen. It opens a menu with several options: GPS path, Telemetry widget, Telemetry text values and Telemetry templates.

VSDC interface showing the Add Telemetry menu with GPS visualization options
Accessing GPS and telemetry options in VSDC Video Editor.

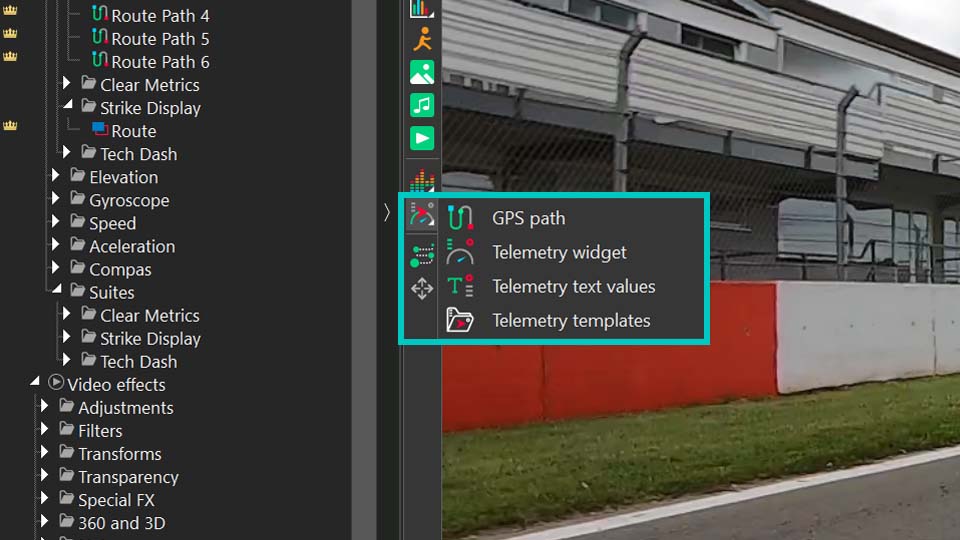
The GPS path option is the most straightforward way to visualize your route's track from a GPX file. Use this if your primary goal is to display the route itself and work directly with the path overlay. The next two options—Telemetry widget and Telemetry text values—allow for creating custom gauges and displays (please check out this video to see how to do it). Finally, Telemetry templates opens a gallery of pre-designed styles.

Note that when using templates, you first select your preferred visual style via this option, then double-click the generated object on the timeline and click on the dedicated GPS object. In its properties window you link the object to your GPX file via the Telemetry resource option, which will populate the template with your data.

How to connect GPS data to a template in VSDC video editor.

For GoPro and other action camera users with GPS enabled, the process is simpler. VSDC can automatically detect and extract the telemetry data embedded directly in the video file. Just import your clip as usual, and the editor will promptly ask if you'd like to extract the GPS data and place it in the Resources window. A simple confirmation is all it takes.

Once imported via either method, your telemetry data becomes a standalone asset. You can find it in the Resources window under the "Telemetry" section, where its icon indicates its origin. The moment you drag this telemetry object from the Resources window onto your scene, VSDC will present the "Telemetry templates" gallery. Here you can choose the visual style for your data, selecting from a range of ready-made gauges, graphs and maps that will overlay your video.

Automatic GPS data extraction from action camera footage in VSDC.

Setting Up Widgets

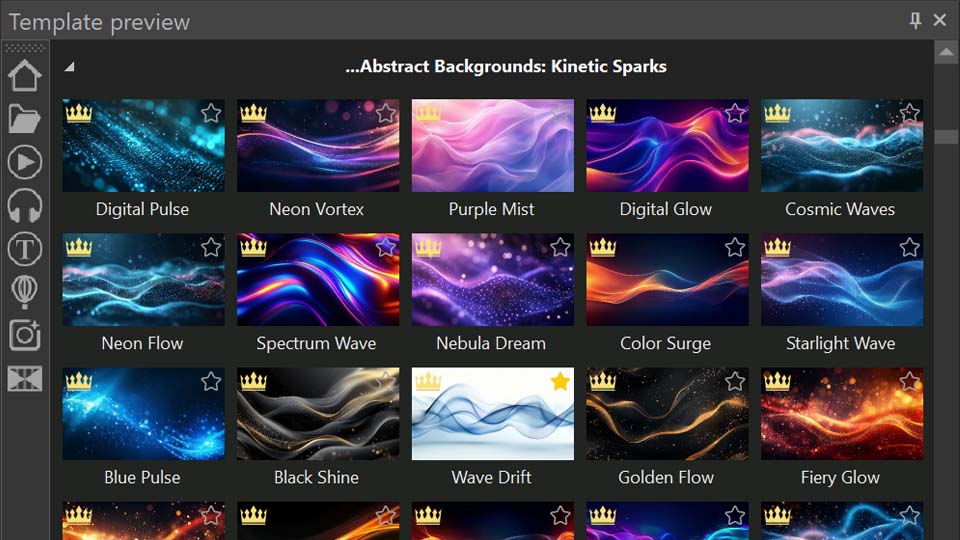
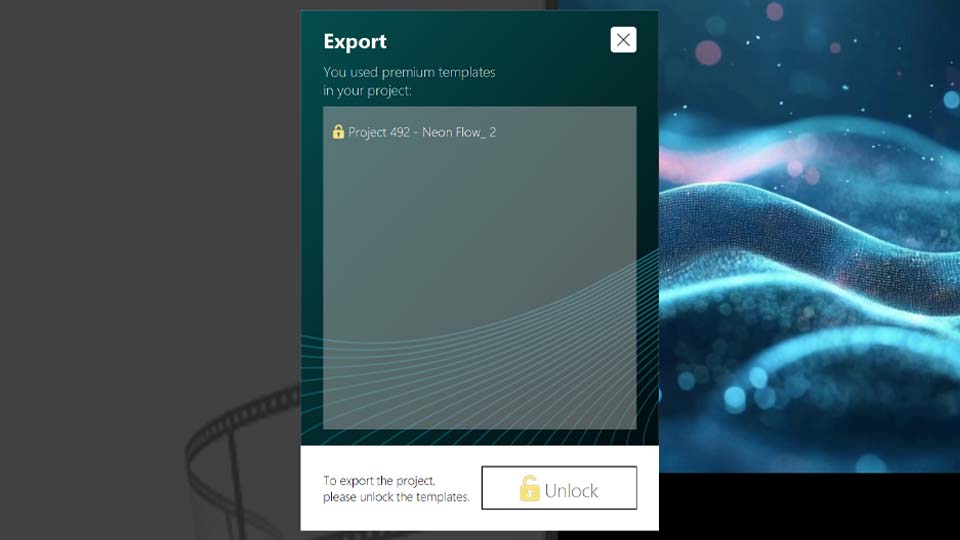
So, we've found ourselves in the telemetry template window. There are plenty of templates here for things like path tracking, speed, altitude and more. Just a quick heads-up: you can try all these features for free inside the editor, but exporting will require a VSDC Pro license. And if you're using Premium packs, you'll need to purchase the ones featured in your projects. You can buy packs individually or grab them all at once with the handy Bundle Offer.

Visit our Store to see all the collections available.

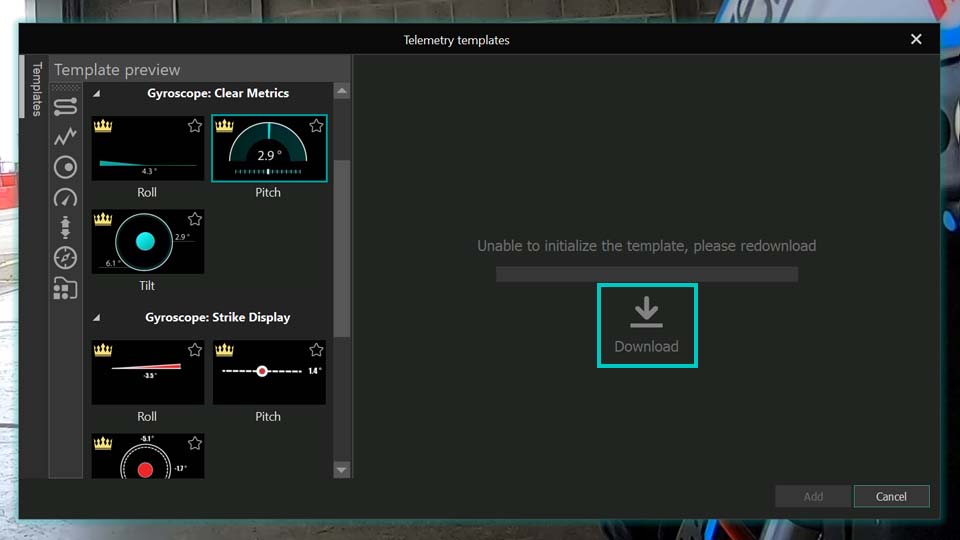
If you pick a template and find the "Add" option isn't available or you don't see anything in the preview, just click the "Download" button inside it. Once you're happy with how it looks here, go ahead and add it to your video.

VSDC telemetry template gallery showing various gauge and graph styles for adventure videos
Gallery of telemetry templates for speed, altitude, and route maps in VSDC.

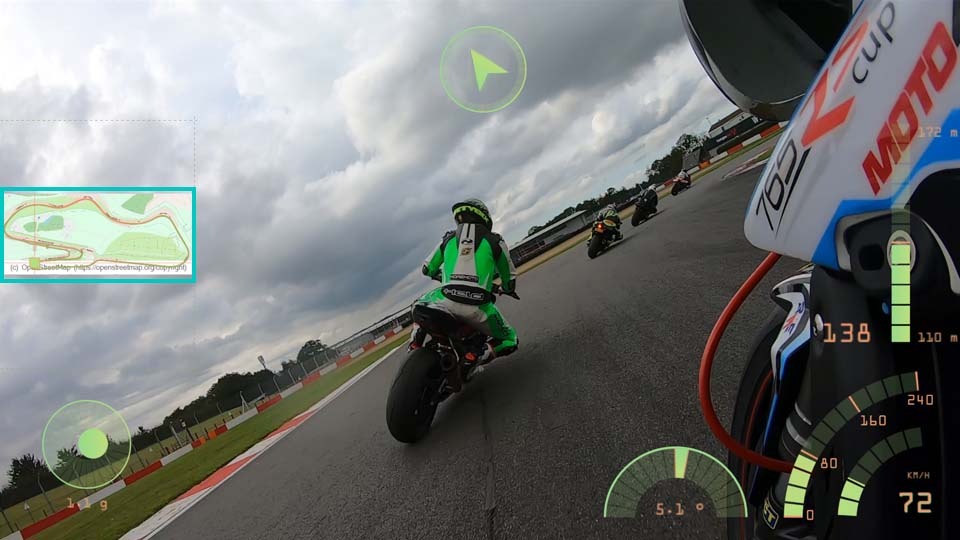
Remember, you're not limited to adding just one template at a time, you can add entire dashboards, as we mentioned earlier. For our walkthrough, we'll actually use a dashboard to better illustrate the different settings available for each type of template.

All the dashboards are located in the last option inside the telemetry templates window. Let's go with the "Mint" style. Now we have a whole set of different sensors right on the scene. Notice that each one is nested inside a Template object, with the actual GPS objects placed inside those templates. It's important to make sure these GPS objects are linked to the correct GPX files. Simply double-click each template, locate the GPS object inside, and using the Properties window, check or reassign the correct source (your video name) via the "Telemetry resource" option.

Configuring a complete telemetry dashboard for travel videos in VSDC.

Each type of template, whether it's a speedometer, path or something else, comes with its own set of customizable settings. Let's explore each one.

GPS Path

So, the first GPS object whose settings we'll explore is the Path. Let's double-click the template, then the GPS object on the timeline to open the Properties window for this widget. At the top we'll see the standard settings for duration, position, and so on. But what we're really interested in is the section dedicated specifically to telemetry settings.

As you can see, there's quite a lot you can do here to change how the path looks on the scene. The first option, Presets, lets you browse through different ready-to-use template variations for the path.

Telemetry resource is where you choose the source for your data. Just as important is the next option: Sync to video. It helps synchronize your data with the video, which is especially useful if the video or data file has been trimmed, moved on the timeline, or otherwise edited. But keep in mind that this option can be disabled if you are working with GPX file itself because it hasn't got any information about a video. If you notice any discrepancy in the timing, be sure to expand this option and adjust the Time shift value to match your specific situation. It may not be available for the path track, but it can always be used for other widgets.

Next, you'll find options for working with maps. You can generate a Google Maps link to locate where the footage or data was recorded. You can also load a map directly and place it underneath your path trajectory. Just keep in mind that some map features may require an API key.

GPS path settings panel in VSDC showing map overlay and route customization options
Customizing GPS route path with map overlay in VSDC video software.

After this come the settings dedicated to refining the path trajectory itself. This is where you can really tweak and adjust everything to your liking.

With Path mode you choose whether the path displays or its elevation as a simple line or as a filled graph. Stretch image controls whether the route image stretches to fit the designated frame.

If you want to avoid distorting the route image when it's resized, make sure "Stretch image" is turned off.

From there, you can adjust the line thickness, choose which point on the path is the starting point and set what percentage of the total path is displayed. These options are very important for creating drawing animation.

The Use embedded time option is useful if your .gpx file includes timestamp data. When activated, the marker will move along the route according to that timing: slower on some segments, faster on others. If it's inactive, the marker will move at a steady, uniform pace. If the option isn't available, it means your file either doesn't contain timing data or you've chosen not to use it.

Enable gradient lets you add a gradient fill to the route itself. You can set it to change over time or by the elevation of the route.

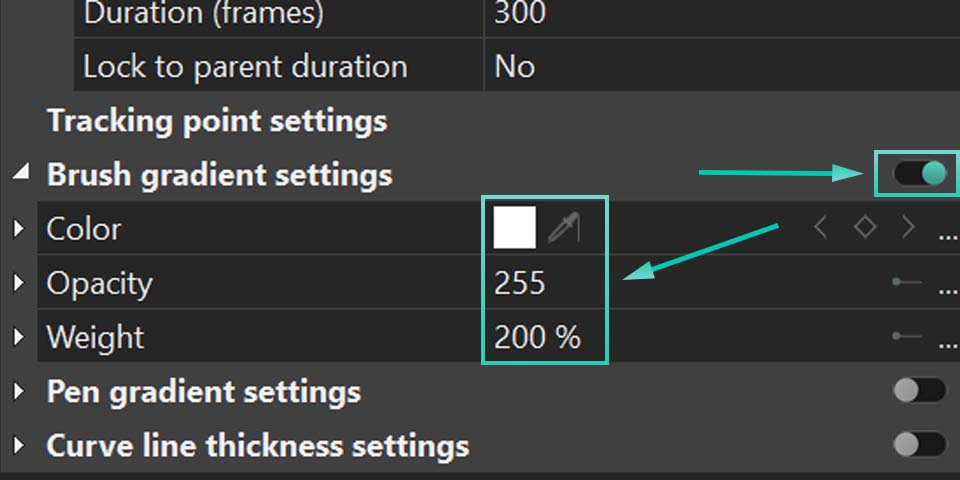
Don't forget to click the small triangular icons next to options whenever you see them, they often open up additional settings. For example, in the color settings that follow, you can expand options to adjust transparency.

When Enable gradient is set to None, the Front color controls the route's color, with Opacity determining how transparent it is (0 is fully transparent, 255 is fully opaque). Back color is useful when you're only displaying a segment of the route using "Start point of path" and "Length of path". It lets you color the inactive parts of the route, with its own opacity control. If you don't need this, just set the Back color Opacity to zero.

If Enable gradient is set to By time or By elevation, then Start color defines the route color at the beginning of the video (for "By time") or at low-elevation sections (for "By elevation"). End color defines it at the end of the video or for high-elevation sections.

Gradient settings open a separate window where you can choose from preset gradients or customize your own before applying it.

Marker settings let you adjust the appearance of the moving point along the path. There you can adjust its size, form, position, etc.

There's another interesting category of settings here: text settings. If your .gpx file contains any textual elements like waypoint names, this section allows you to configure what text is displayed on the route and how it appears.

Please see what we can achieve using these settings:

Advanced GPS path visualization for travel vlogs created in VSDC.

For a clearer, more detailed walkthrough, be sure to check out our YouTube video dedicated to exploring this tool.

Altitude (Elevation)

The next template type in our dashboard is about altitude. Here, you'll see a graph representing the elevation profile along your route.

Altitude graph widget displaying elevation data from a hiking or biking trip in VSDC
Altitude/elevation graph visualization for adventure sports footage.

To customize it, click on the template and then double-click the GPS object on the timeline or simply double-click the altitude graph right on the scene. This will open its specific settings window.

As you'll notice, many of the general settings overlap with what we've seen before, which keeps things consistent. One particularly interesting option here is Use 4th-order filter, which helps smooth out the data in case it was recorded inconsistently or contains irregularities.

But the real focus is on the settings specific to elevation data. With the Brush option you can choose how to fill the empty space behind the graph making it transparent or adding a solid background, for instance.

The Telemetry metric option lets you decide what data to display. While this template is set for altitude, you can actually switch it to show speed or another metric if you prefer. For altitude, speed, and any other metrics that involve units of measurement, the Units option becomes available, allowing you to choose your preferred measurement system.

Next, you'll find a set of options dedicated to refining your data further. You can apply smoothing, set custom thresholds, enhance the overall quality of the graph and merge any duplicate data points. There are also settings to choose your data source type whether you want to use pre-processed (raw) data, raw data with only GPS filtering applied or the original recorded data.

Additionally, there's an option to fine-tune an echo filter, which can help clean up signal noise or repeated readings for a clearer, more accurate graph.

Fine-tuning elevation data display for outdoor activity videos.

Inside a telemetry template on the timeline you'll also find a telemetry text object. Clicking on it opens a settings panel in the Properties window where you can customize the text within the template. It goes beyond basic text editing: you can adjust positioning, control how values are displayed (аccurate to tenths and hundredth), enable text effects and even use curve binding for dynamic animation.

Speedometer, Compass, Gyroscope, Acceleration

For these widgets the core settings are very similar to those of the altitude graph template. The real difference lies in their composition. Depending on the internal design of each template, the number of images, text objects and graphic elements: some may offer more customization layers than others. But each one gives you the creative freedom to tweak, adjust and personalize the original template, helping you craft something that feels uniquely yours.

Personalizing gauge widgets like speedometer and compass for travel videos.

You'll also notice effects that come as part of the template such as Zoom, Duotone, and others and these too can be customized! For a practical example, take a look at our video where we demonstrate how to import footage from a GoPro camera into the editor and enhance it with gauges. There you can see exactly how to work with the effects embedded within the template.

Unlock Your Creative Potential

Of course, the possibilities of these GPS tools are virtually limitless. With the right adjustments you can achieve a great deal, and all it takes is a willingness to experiment! We recommend starting with the ready-made presets, and once you feel comfortable, try your hand at creating your very own speedometer, compass or any other custom gauge you can imagine!

Looking for more inspiration? Subscribe to our YouTube channel for tutorials, tips and creative ideas!

And if you ever need direct support, our team is just a message away at This email address is being protected from spambots. You need JavaScript enabled to view it..

Frequently Asked Questions

Q1: Which versions of VSDC support GPS and telemetry features?

A: You need VSDC Video Editor version 10.2 or higher. The GPS visualization tool was first introduced in version 10.1, but version 10.2 offers expanded functionality.

Q2: Do I need a Pro license to use GPS features?

A: You can try all GPS and telemetry features for free inside the editor. However, exporting your final video with these overlays requires a VSDC Pro license. Additionally, some premium template packs may need to be purchased individually or as part of a bundle.

Q3: Can I add a map under my GPS route path?

A: Yes. In the GPS Path object settings you can load a map as a background for your route trajectory. Please note that some advanced map features (like dynamic Google Maps) may require you to provide your own API key.

Q4: Can I change what data is displayed in a template? For example, show speed on an altitude graph?

A: Yes. In the Properties window for widgets like the Altitude graph find the "Telemetry metric" option. You can use this to switch the displayed data, for instance, from altitude to speed. The "Units" option will also change accordingly.

Q5: Where can I find tutorials on creating custom gauges and dashboards?

A: Please visit our official YouTube channel. The article also references specific videos for creating custom widgets and working with GoPro footage.

How to Activate VSDC Premium Template Packs to Fix Export Issues

Solved: Learn how to properly activate your VSDC premium templates and remove export restrictions.

Understanding the Premium Template Activation Process

Have you purchased a VSDC premium pack but still can't export your project? Are you seeing the warning message again during export? This usually means the activation process wasn't fully completed.

But don't worry, things like this happen. Let's walk through the entire process step-by-step to ensure everything is set up correctly.

VSDC premium template notification screen

Initial Setup: Using Premium Templates

It all starts when you use a premium template in your project. A notification will appear, informing you that the content you used in the project requires a purchase. This happens in both the Free and Pro versions of VSDC, as these templates are a separate category created by our designers to speed up your editing.

When you see this message, you have two options: remove the premium template from your timeline or purchase the pack by clicking the "Unlock" button in the warning message that appears when you want to export your project.

VSDC purchase form and license key email

Receiving Your License Key

When making a purchase, you fill in a short form. Following a successful transaction, an email containing your license key in the format X-XXXXXX-XXXXXX-XXXXXX-XXXXXX and activation instructions is sent to the address you provided.

Therefore, at this stage, it is crucial to ensure you have access to the email address you use for the purchase.

VSDC license key activation methods

Two Methods to Activate Your Premium Pack

Let's review the two activation methods mentioned in the email and walk through the suggested steps together.

After purchasing, you must enter the received license key into the editor, as without this final step, you will still be unable to export your project using the premium template(s)!

Method 1: Activation via the Application Menu

This method provides a direct path to the software's licensing system and is the recommended approach.

  1. Open VSDC Video Editor and initiate either a new project or an existing one.
  2. Access the Activation Tab from the top menu bar.
  3. Select the Activate option from the dropdown menu. This action will launch a dialog box requesting your key.
  4. Paste or type your key carefully.
  5. Confirm the entry and restart the application for the changes to take full effect.

Method 2: Contextual Activation from the Templates Window

This method offers a convenient way to activate your pack directly from the resource you intend to use.

  1. Open VSDC Video Editor and initiate either a new project or an existing one.
  2. Find and right-click on any template that is part of the premium pack you need via the Templates window.
  3. Choose the Activate template option.
  4. A prompt will appear for you to input your license key. Paste or type your key carefully.
  5. After submitting the key fully restart VSDC to complete the activation sequence.

Verifying Successful Activation

Once you restart the software, the activation is complete. The absence of the restriction window will be the main confirmation that the license key has been successfully applied. The program will no longer display warning messages for the previously locked templates, and you will be able to export your projects without any limitations.

Frequently Asked Questions (FAQ)

I purchased a pack and entered the key, but I'm still getting the warning on export. What should I do?

This is almost always because the application wasn't fully restarted. Please close VSDC and then reopen it. The activation is only finalized after a restart. If that doesn't work, double-check that you copied and pasted the entire key correctly, without any extra spaces.

Do I need the VSDC Pro version to use premium template packs?

No. Premium template packs are a separate product and can be purchased and activated in both the Free and Pro versions of VSDC. The warning and activation process is the same for both editions.

I'm getting an "Invalid Key" error. What does this mean?

This usually means the key was entered incorrectly. Please ensure you are typing or pasting the key in the exact format: X-XXXXXX-XXXXXX-XXXXXX-XXXXXX, have not confused similar characters (e.g., the number 0 for the letter O or the number 1 for the letter l) and have not included any extra spaces at the beginning or end of the key.

Will my premium pack activation expire?

Yes, each license key is valid for one year, after that you need to renew it.

Where can I see the full catalog of available template packs and their descriptions?

You can browse the entire collection of premium template packs directly on our official website. There you'll find high-quality previews, descriptions of what's included in each pack (e.g., intro scenes, transitions, etc.) and the current pricing. You can find the catalog here: View the full catalog here.

Need Additional Help?

Couldn't find the answer you were looking for? Then please don't hesitate to contact our team at This email address is being protected from spambots. You need JavaScript enabled to view it..

Refund & Return Policy

This Refund & Return Policy explains how refunds and returns work for digital products purchased directly from videosoftdev.com, including VSDC Video Editor licenses, paid templates, LUT packs, GPS telemetry widgets, animated elements, and animated backgrounds (collectively, the “Products”).

1. Digital products and delivery

All Products offered on this website are delivered digitally. After completing your purchase, you receive an order confirmation and download information by email. Delivery is instant and performed online – no physical shipping or shipping fees apply.

2. 30-day money-back guarantee

We want you to be fully satisfied with your purchase. If you experience technical issues, the Product does not work as described, or you are otherwise not satisfied, you may request a refund within 30 days from the date of purchase.

Our team may first try to help you resolve the issue (for example, by providing troubleshooting steps, updated files, or usage guidance). If the problem cannot be resolved or you prefer not to continue, we will issue a refund in accordance with this Policy.

3. Eligibility for a refund

The following conditions generally apply to refund requests:

  • The request is submitted within 30 days of the original purchase date.
  • The purchase was made directly through videosoftdev.com or our official checkout provider.
  • The Product has not been used in a way that violates the license terms or applicable law.

We may ask you to provide additional information (such as a description of the issue, screenshots, or project details) to help us understand the problem and improve our Products.

4. Non-refundable cases

While we aim to be fair and flexible, we may decline a refund in the following situations:

  • The refund request is submitted more than 30 days after the purchase date.
  • The request concerns a feature or use case that is not included in the Product description or system requirements.
  • There is evidence of abuse of the refund policy, including repeated refund requests for different Products.
  • The purchase was made through a third-party reseller or marketplace. In that case, their own refund policy applies.

5. How to request a refund

To request a refund, please contact our support team and include the following information:

  • Your full name
  • The email address used for the purchase
  • Order number or transaction ID
  • The name of the Product you purchased
  • A brief description of the issue or reason for your request

You can reach us via the contact form on the website or by using the support email provided in your order confirmation. We review each request individually and typically respond within a reasonable time frame.

6. Refund method and timing

Approved refunds are issued to the original payment method used at the time of purchase. Processing times may vary depending on your bank, card issuer, or payment provider, but in most cases refunds are completed within several business days after approval.

We do not charge any additional fees for processing a refund. However, your bank or payment provider may apply their own fees in accordance with their terms and conditions.

7. Exchanges and replacement files

If you received a corrupted file, cannot access your download, or believe you have received the wrong Product, please contact us. In many cases we can quickly resolve the problem by providing new download links or updated files instead of a refund.

8. Changes to this policy

We may update this Refund & Return Policy from time to time to reflect changes in our Products, services, or legal requirements. The effective date of the latest version will be indicated at the top of this page. Continued use of our Products after any changes have been posted constitutes your acceptance of the revised Policy.

9. Contact us

If you have any questions about this Refund & Return Policy or need assistance with your order, please contact our support team using the email This email address is being protected from spambots. You need JavaScript enabled to view it. or contact form on videosoftdev.com.

Create Dynamic Background Images and Wallpapers in VSDC

published Heinz Neuhauser 9/1/25

How to create an animated gradient logo in VSDC

You’ve probably seen those mesmerizing, dynamic wallpapers where colors melt and swirl together, creating a hypnotic flow of motion and light. Often featured on smartphone lock screens they’re hard to ignore because they are so vivid, fluid and captivating. Surprisingly, you can recreate those stunning color flows yourself using VSDC PRO. All it takes is a bit of imagination because the rest is easily done with the VSDC tools!

And if you're working with the free version, you can still craft beautiful static designs which will be just like you wish them to be and what’s more, they will be only YOURS.

So don’t wait, dive into the article and start creating!

Static Color Designs (FREE)

To begin, let’s go over the features available in the free version of VSDC for this task. Start by creating a new project: either click "Blank Project" on the start page or select "New Project" from the top menu in the Projects tab. Since we’re designing a smartphone background, you’ll need to choose the appropriate resolution. If your desired resolution isn’t listed in the settings window that appears when launching the project, you can manually adjust the width and height right there.

Common smartphone resolutions include:

  • 1080x1920 (Full HD, standard for many devices)
  • 1440x2560 (Quad HD, for high-end phones)
  • 1242x2688 (iPhone Pro Max variants)
  • 1125x2436 (iPhone X/XS/11 Pro)

How to Set Project Size and ResolutionA guide to inputting the exact height and width for your project's dimensions

Next, use the Free Shape tool to create the background. Make sure the shape covers the entire scene. If you’re using VSDC version 10.1 or later, you can access the built-in gallery of premade shapes. Just left-click the Free Shape option, select "From gallery" and pick a shape that fits your design: in this case, we’ll use the square and stretch it to fill the scene completely.

To apply a point gradient to your shape, click it on the timeline to access its settings in the Properties window. Locate the Brush option and set it to "Point gradient".

After that double-click your free shape on the timeline to reveal its control points. These points will determine the gradient distribution. Select the first point, then go to the Properties window of the selected point. Enable "Brush gradient settings" and adjust the color as needed. Repeat this process for each point.

Preparing to select colors for a custom gradient background by enabling the correct mode.

In our example the free shape consists of four main points, so the gradient is based on four colors. If you need a smoother or more complex gradient with additional colors, you’ll need to create more points when initially designing the free shape.

If you notice that a certain color appears too bright or not bright enough, you can adjust it by selecting the corresponding point in the properties and modifying the "Weight" parameter to achieve the desired look.

Choosing your palette and using the Weight parameter to control color blending

Now that your gradient image is ready, it’s time to save it! Head over to the Editor tab and locate the green circle with a wrench icon (the repair tool), then select "Create a snapshot". Instantly, your image will appear in the Resources window, from where you can export it by right-clicking on it and choosing the corresponding option. Once saved, transfer it to your phone and set it as a wallpaper.

Exporting a Static Background with SnapshotUsing the snapshot tool to create a still image of your gradient design

Of course, such images can be created not just for smartphones, but for a wide range of other purposes as well.

How Your Gradient Wallpaper Looks on a Phone
Displaying the final static background as it appears on a mobile device

Make Your Images Dynamic Using Color Keyframes (PRO)

If you upgrade to the PRO version, you can enhance your image with dynamic effects. To achieve this, we'll need to define keyframes and assign specific color values to them. Let's create an animated gradient where each corner of the image cycles through a color sequence.

For this project the initial colors are set as follows: the top right corner is blue, the top left is yellow, the bottom right is purple and the bottom left is green.

Activating the keyframe functionality to start animating color changes over time

Click on any Free Shape point on the timeline and locate the Color option. Click on the three dots in the corner of this setting to launch the Key Editor.

For easier workflow in the Key Editor, let's rename the "Color*" tab to "1" (which corresponds to the color this point has). We'll repeat this sequence for each of the four points we have on the timeline. Since there are four points in total, you should end up with four tabs in the Key Editor.

Renaming and organizing editor tabs for a more efficient animation process

For each of these points, we’ll set three keyframes. Please keep in mind that the display time for the first keyframe is the same across all points: the second keyframe shares another uniform timing, and so on.

Take the point we named with number one as an example. For us it is a blur color. Let’s move the cursor to approximately the 2.5-second mark and click the diamond icon to add a keyframe in the Key Editor. Repeat the same steps for the 5-second and 7.5-second marks.

By default, all newly added keyframes for a given point retain the original color value assigned to that point (for us it is blue). The same process applies to the remaining points of the free shape.

Now let’s set the colors for each keyframe. Go to the tab 1 in the Key Editor, find the second keyframe, double-click it and choose, for example, yellow color. We’ll set the colors for keyframe in each tab like that:

The top-right corner (blue): blue → yellow → green → purple → blue.
The top-left corner point (yellow): yellow → green → purple → blue → yellow.
The bottom-right corner point (purple): purple → blue → yellow → green → purple.
The bottom-left corner point (green): green → purple → blue → yellow → green.

The Key Editor adjusts the position of each point based on your chosen color, allowing you to alter the shade or even the color itself by simply moving the point, though the final result ultimately comes down to personal preference.

Adding and manipulating color keyframes to create dynamic motion

Click the Play option and see the result! So nice, isn’t it?

The final result of smoothly transitioning colors in a dynamic background

If you want it to be more eye-catching, you can easily spice it up with the tracking point feature. Go to Scene 0 and double-click on the timeline. Locate the “Add tracking point” option in the Objects toolbar, click on it and position it anywhere in the preview window.

Adding a Tracking Point for Animated Effects
Using the add tracking point tool to attach and animate a light source

In the Properties window enable the Brush gradient settings and set the color value for the future running light, adjust its opacity and weight to your desire.

Configuring the Brush for Light Effects
Adjusting the Brush tool's Color, Opacity and Weight to design light streaks

After that you’ll need just to set the trajectory that your running light will follow. For that double-click your tracking point on the timeline and choose another tool from the Objects toolbar: Movement. Click this tool and choose the place where the running light should come by clicking on this place on the scene. If you want to continue the trajectory, choose the point you’ve just added, click the movement tool again and add another point. You can create as many trajectories as you wish. If you want to learn more about the Movement tool, please read this article.

And that’s the result, just an example of what can be done using VSDC!

Showcasing the completed effect with flowing colors and a moving light trail

Explore more VSDC tutorials and unlock the full potential of your creativity. If you have any questions, we are always happy to hear from you at This email address is being protected from spambots. You need JavaScript enabled to view it..

Don’t forget to watch our video tutorials on YouTube and follow us on other social media.

Page 1 of 41

News

VSDC 11.1 Adds Direct Insta360 Video Editing, GPS Overlays and Auto-Save

Published by Amy Shao on March 11, 2026 What is the best gift for a creative person? New possibilities, of course. With the VSDC 11.1 update, editing footage from Insta360 cameras becomes...

VSDC 10.2: GPS Gauges for GoPro and Other Action Cameras, Selective Export, Metadata Editing, Extended Codecs and Smarter Workflow

published Amy Shao 11/19/25 Meet the long-awaited VSDC 10.2 update: a new version packed with incredible features and significant enhancements designed to empower all of you, from hobbyists to professionals. GPS...

Major VSDC 10.1 Update: Advanced HDR, GPS Telemetry, New Effects, Great Variety of New Templates and Tools For Different Needs

published Amy Shao 6/10/25 The wait for something new and unusual is finally over! The update is here and it isn’t just another version: it’s VSDC 10.1! VSDC 10.1 Update: Advanced HDR, GPS Telemetry,...

VSDC Christmas Update 9.4: Enhanced Effect Management, 100+ Background Templates and Streamlined Editing

This holiday season embraces new beginnings with the latest update of VSDC Video Editor! We’ve listened to your feedback and decided to focus on enhancing the tools you love most—all while laying the...

How VSDC Free Became My Secret Weapon for Watermark (Free 4K Editing in 2025)

Hi, I'm Mattea Wharton, a travel videographer from Seattle. For three years I battled with video editors that slapped ugly watermarks on my videos until I found VSDC. This free no-subscription editor completely...

VSDC 9.3: 150+ Templates, Text Transformer, Sprite Auto-Detect and GUI Update

Change is all about improvement, and this process wouldn't be possible without your input. After carefully reviewing your feedback, we’ve addressed several key issues and introduced updates designed...

Best Special Effects Software

Intro In 2024 the options range for creating visual effects is incredibly diverse and it becomes more and more challenging to identify the top choices. Here you can find a guide to the top visual FX...

VSDC 9.2: AI Segmentation Models, 300+ Transitions, VSDC Cloud and New Templates Pack

Are you ready to explore new heights with the latest major VSDC update? Finally, Version 9.2 is here! Packed with groundbreaking features, including the new AI-powered Segmentation tool, this update offers...

How Black and White Movies Were Colorized

Are you a fan of classic black and white films? Ever been curious about how they would appear if they were in color? Many filmmakers have pondered the same, leading to numerous classic movies being colorized....

The Best Online Video Editors in 2025: Benefits and Drawbacks

May 15, 2025 published by Amy Shao In today’s digital landscape, the popularity of video content is gaining momentum, with users increasingly turning to video creation both for personal advantage and...
 

Screen Recorder Box

This program allows you to capture the video of your desktop and save it on your PC in various formats. Coupled with a video editor, the program is a great tool for creating presentations, tutorials and demo videos.

Read more about Screen Recorder...


Video Capture Box

The program captures video from external devices and records it to computer in a free format. You can save video from video tuners, webcams, capture cards and other gadgets.

Read more about Video Capture...

VSDC Video Editor Reviews & Ratings (Trustpilot, Capterra & Media)

VSDC Free Video Editor is rated 4.5/5 by real users on Trustpilot and Capterra. Here are a few reviews and quotes from creators and tech media.

Overall rating: 4.5/5 based on 200+ reviews on Trustpilot and 89 reviews on Capterra.

★★★★⯪

VSDC Free Video Editor is the best free video editor for Windows I’ve used, from color grading to picture-in-picture and cinematic results.

— Ejikeme Eloka Augustine

Source:Trustpilot

★★★★☆

Easy-to-use interface and quick export to social media make VSDC a versatile video editing tool for everyday projects.

— Karen C., E-Learning

Source:Capterra

★★★★☆

A feature-packed non-linear video editor for Windows that can compete with many paid video editing solutions.

— TechRadar

Source:TechRadar review

★★★★★

The free VSDC editor saved my YouTube channel – a powerful video editing software for chroma key, text effects and picture-in-picture.

— Paul Roberts

Source:Trustpilot

★★★★★

Fast and simple for YouTube videos with green screen, zoom, color tools and creative effects in one app.

— Marie R., Media Production

Source:Capterra

★★★★★

One of the best free video editor options for Windows users, ideal for GoPro, YouTube and family videos.

— VidProMom, YouTube creator

Source:Media reviews

★★★★★

I’ve been using VSDC for years; editing is easy and the final videos look great for my personal and professional projects.

— Long-time VSDC user

Source:Trustpilot

★★★★★

Great value and faster than many other free tools; I quickly create videos for YouTube, Instagram and Facebook with features my audience loves.

— Rabika B., Marketing & Advertising

Source:Capterra

★★★★★

VSDC offers many features you don’t usually find in free editors, including picture-in-picture, stabilization and modern codec support with no watermarks.

— Tech media review

Source:Media reviews