 User Help Manual
  Learn FAQ
  Send us feedback
 ")


Video Editor
Download and use the free video software to create and edit videos of any complexity from a family greeting card to a company presentation. Apply vsdc free video editor for light edit hdr-video, any raw-video formats from cams - BRAW, ProRes RAW, any high resolution 4k or more due to video proxies technologies in the editor.
Cut, merge video files, apply visual and audio effects, use filtration and image correction, make slideshows and add an appropriate soundtrack. Use multi-color Chroma Key and advanced parameters settings to give your video a professional look.
All popular video and audio formats are supported.
Video Converter
This program is intended for converting video files from one format to another. Nearly all popular video formats are supported (both reading and saving). In addition, the program drastically simplifies the task of converting videos for playback on specific multimedia devices, such as iPhone, Samsung Galaxy or Huawei P30 Pro. The program is extremely easy to use, has a modern interface and all necessary video processing functions.
Audio Converter
The audio converter will help you convert audio files from one format to another. All key audio formats and codecs are supported. The program also allows you to manage playlists and meta tags, extract audio from video files and save these tracks on your computer in any format.
Animated Intro & Title Templates
Explore the VSDC Template Store with ready-made video templates for intros, animated titles, lower thirds, logo reveals, slideshows, glitch transitions, LUTs, and color grading presets. Drop a template into the VSDC Video Editor timeline, edit text, timing, and colors, and finish professional video projects in minutes.
Choose from 300+ exclusive packs of video transitions, LUT packs, text effects, GPS telemetry widgets, animated elements, and animated backgrounds for VSDC. All templates are fully customizable, support up to 4K resolution in 16:9, and help you build intros, wedding slideshows, travel videos, and tutorials much faster.
VSDC Cloud - Online video management
Keep your work safe, organized and always accessible! Back up your video projects, store media files online and access them from any device. Enjoy collaboration, share project updates and exchange files easily.
 Video Editor
 Video Converter
 Audio Tools
 Store templates
 Cloud
Cloud

Multifunctionality
A wide array of multimedia processing tools in one free video software suite.

High speed
Our programs use fast
and high-quality algorithms optimized for single and multi-core CPU’s.

Affordability
VSDC video software is freely available for download to Windows OS-based PCs and laptops.
News:
- Published by Amy Shao on March 11, 2026 What is the best gift for...
- published Amy Shao 11/19/25 Meet the long-awaited VSDC 10.2 update: a new ve...
- Hi, I'm Mattea Wharton, a travel videographer from Seattle. For three years I ba...
- published Amy Shao 6/10/25 The wait for something new and unusual is finally...
How to Make Dynamic Curve Lines with Variable Thickness, Gradients and Animation in VSDC
published Amy Shao 7/29/25
Curve Line Tool: New Features You Need to Know!
One of the most exciting upgrades in VSDC 10.1 is the enhanced Curve Line tool, now featuring variable line thickness, rounded edges, soft borders, customizable blur settings and many more. This combination lets you achieve great effects from natural-looking handwriting with adjustable thickness to professional glows, smooth light trails and depth effects (similar to 3D) using soft edges and blur. Want to discover how these improvements can transform your videos? Keep reading for all the details!

New Curve Line Properties
Let's begin by exploring the upgraded curve line functionality. First, add a curve line to your scene and select it on the timeline to view all available properties in the right-hand panel. Among the familiar options (if you need more details, please, check out this article again), you'll find several new settings under the "Curve Line Extra Settings" section in the Properties window. These are what we'll focus on today.
If this section is inactive, toggle the nearby slider to enable it, then expand the section by clicking on the left arrow.
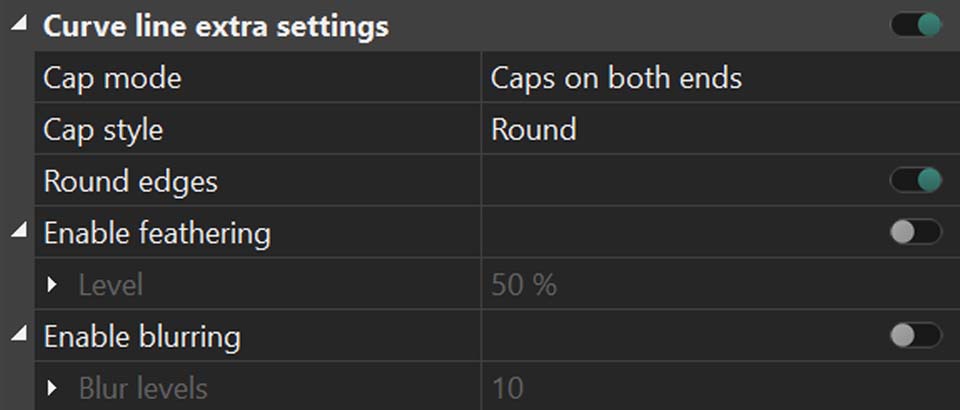
The first property you'll see is "Cap mode" that is useful for customizing your curve line's ends. Click on the arrow to reveal four options: "Caps on both ends" adds smoothing caps to all open ends, "Start cap only" or "End cap only" applies the effect to just one side and "No caps" keeps ends unmodified. Choose the one which is better for your needs.
Tip: for organic, hand-drawn effects, "Caps on both ends" typically works best. "Start cap only" is ideal for directional elements like growing lines, while "End cap only" works well for flowing designs like light trails. For sharp technical precision in UI/UX designs, choose "No caps".
This setting directly relates to the next one: "Cap style". Here you'll find three ways to display stroke ends: "Round" creates smooth semicircular caps ideal for organic shapes, "Square" extends the cap by half the stroke width for technical designs and "Rectangle" stops strokes precisely at endpoints for clean cuts.
Enabling the next option, "Round Edges", automatically softens your curve line by rounding all sharp corners into smooth arcs, creating natural-looking shapes.
For finishing touches, don’t forget to try two key smoothing options. The first one, Feathering, creates gradual transitions between your curve and background: adjust its intensity for anything from subtle glows to fully blended edges. The second one, Blurring, offers even softer results, giving your lines an ethereal quality. Its intensity is adjustable too.
Let's explore how much creative potential they unlock and create a project together.
How to Change Line Width Dynamically
Now that you're familiar with the new curve line settings, let's put this knowledge into practice. A frequently requested feature, dynamic line thickness, is finally here, and we're about to explore exactly how it works.
Simply try setting different values for the Thickness parameter of each point of your curve line. When each point has a different value for this setting, the editor automatically creates smooth transitions between them, producing gradual tapering effects along the curve segment.
To adjust the line thickness at a specific point, simply click on the desired one along the curve with CTRL pressed, and the Properties window will immediately display all customizable parameters for that selected point. Just enable the “Curve line thickness settings” and assign your desired value in the Thickness option.
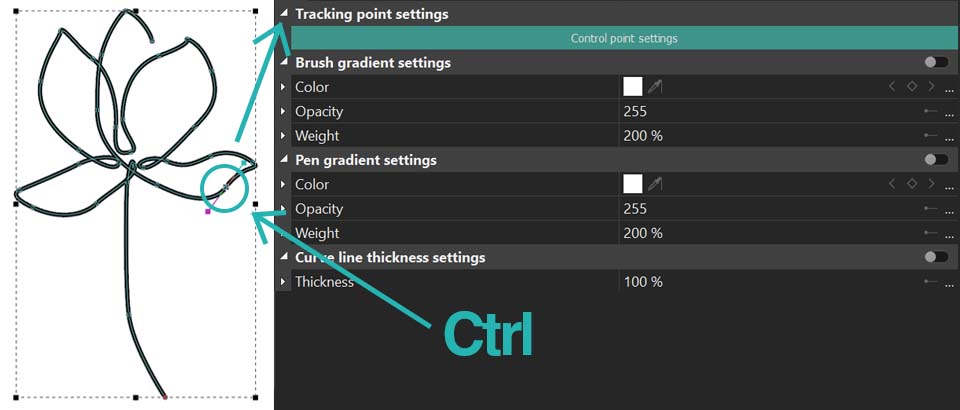
Need more control points? Select the Curve Line tool, choose "Insert point", then click anywhere along your curve to add new points. Remember that holding CTRL while dragging point handles lets you fine-tune your curve's smoothness using Bezier vectors.
Let’s see this in action: create a сurve line with three points, setting the thickness to 100 at the first point, 300 at the second and 500 at the third. Notice how the line tapers, mimicking natural brushstrokes or calligraphy. This smooth interpolation between values becomes even more eye-catching when combined with rounded caps for polished endings, soft blur and thickness for self-drawing effects.

Design Challenge
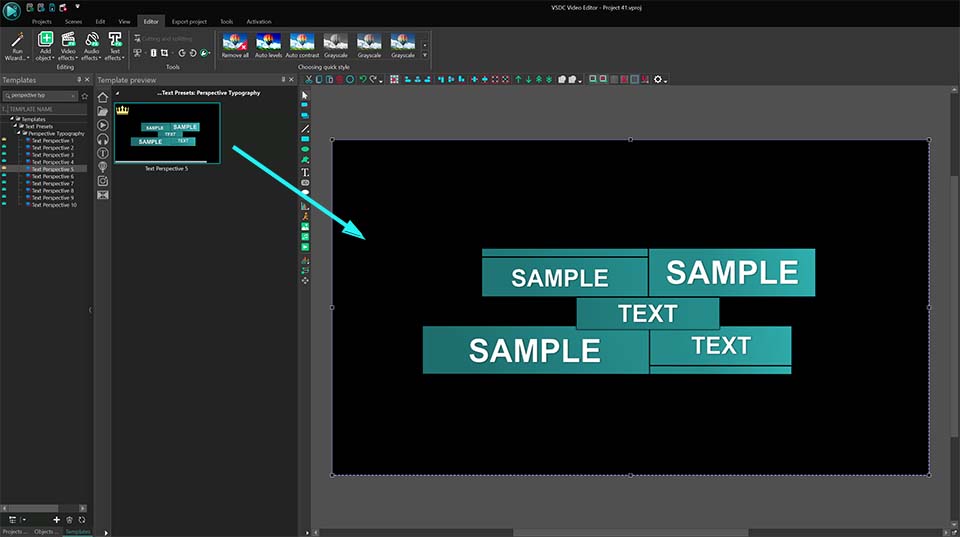
Let’s dive into a creative experimentation and see how its variable thickness capabilities work in action. We’ll choose a reference image and try to recreate it inside the VSDC video editor.

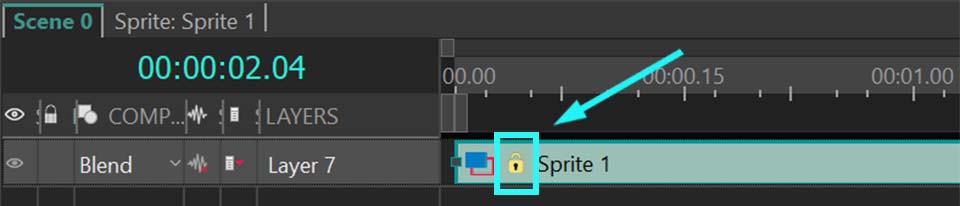
The image we’re working with is not only based on the use of variable line thickness, but it’s also perfectly symmetrical, this detail plays to our advantage. Start by adding the reference image to the scene as a visual guide. Then carefully trace one of the portions (for example, just the left side) of the design and plot each curve point manually while assigning specific thickness values. As you work, you'll immediately see these tapered variations create flowing movement along the lines. Once satisfied with your traced section, simply toggle the eye icon on the timeline to hide the reference layer or remove it entirely.
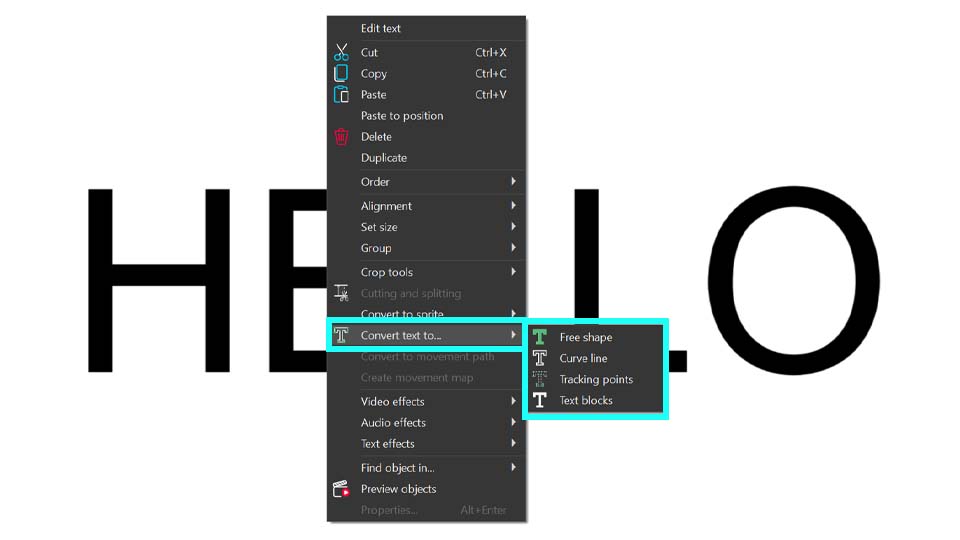
After that, to organize the drawing, group all created curve lines into a sprite: select them on the timeline, right-click and choose “Convert to sprite” from the menu.
![]()
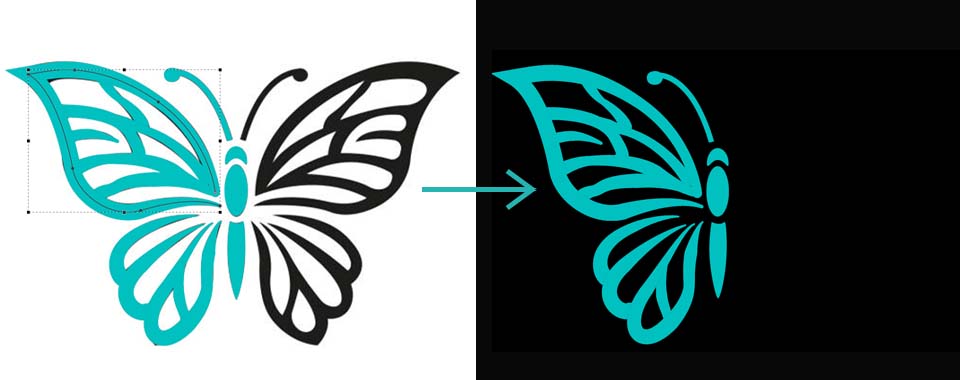
The next step is to create a mirrored version of the sprite to complete the right half of the image. Make a copy of the sprite, click on it and apply the Flip effect from the “Video effects” >> Transforms” to it. This effect will be added to your duplicate sprite on the timeline. Click on it to open the Properties window and choose the type of flip depending on your image. For our experimentation, we choose the horizontal flip for the Direction option . Align the two halves on the scene to achieve a reflection.
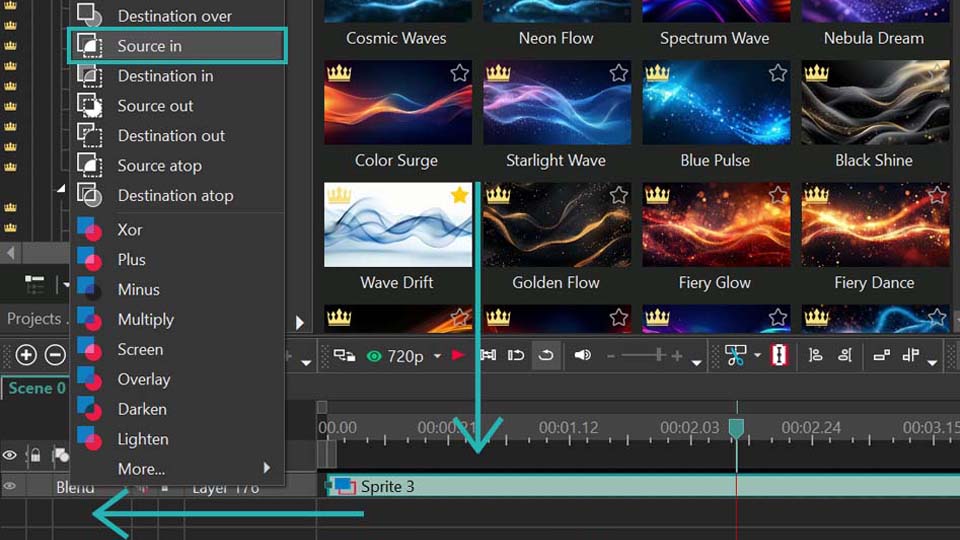
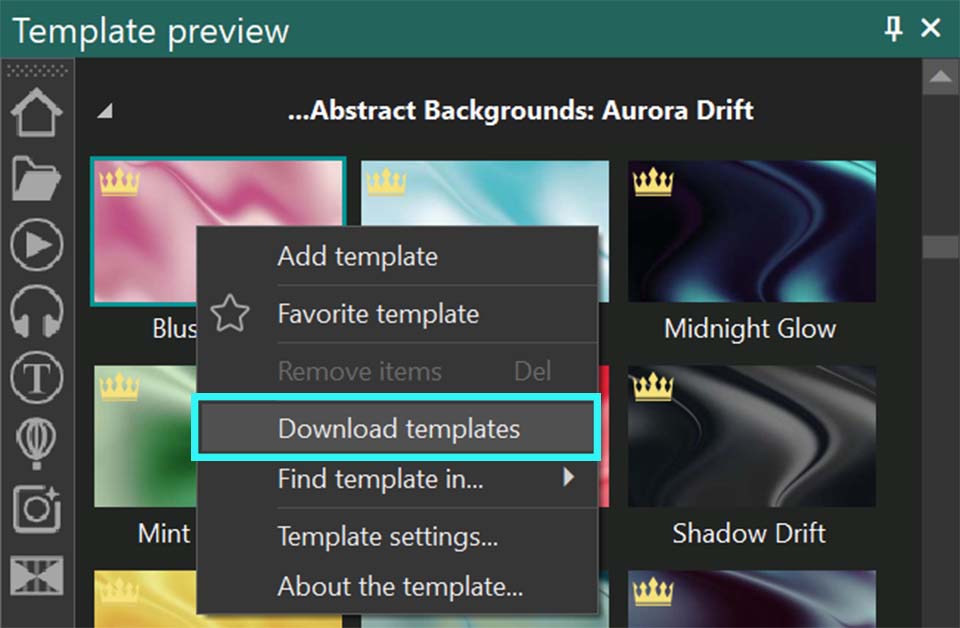
With both halves in place, you can now enhance the look by applying a color scheme. If you want to shift the overall mood of the image, consider using one of the gradient background templates available in VSDC. To do that, first convert the two mirrored sprites into one unified sprite using the same method as before. Then go to the Templates window and find the “General backgrounds” section under “Background templates”. For this example, we’ll use the “Fuchsia Gradient” template. Drag the template into your unified sprite either directly on the timeline or by dropping it onto the scene. Ensure it's placed on the top layer for proper compositing and make sure the “Use as container” parameter is set to “No, use effects and clipping” for it in the Properties window. Then change the composition mode of the layer with gradient template to “Source in”. You can do it in the left part of the timeline under the Composition mode section.
The result is a stylized symmetrical artwork elevated by rich gradient tones.

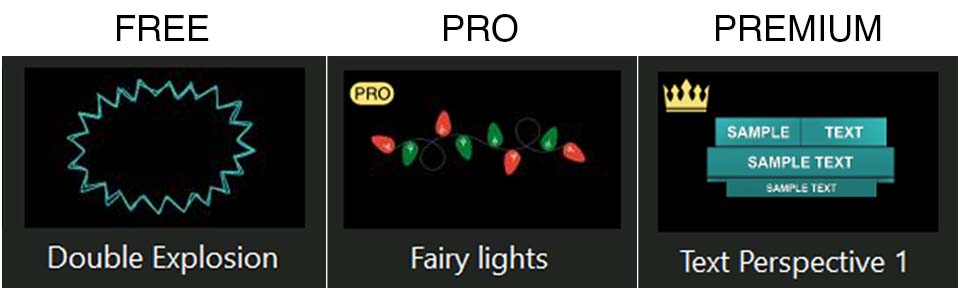
You can choose from free, PRO or premium templates (learn more about each category in this article).
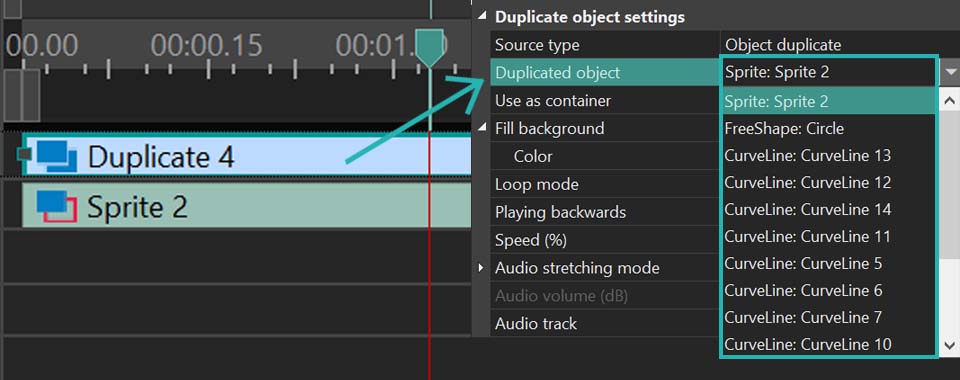
If you're after something even more dynamic, try animating the lines. The Curve Line tool includes a parameter called “Visible length”, which allows you to simulate the effect of a line being drawn in real time. This opens up opportunities for creating impressive visuals where the image gradually appears as if sketched by an invisible hand. All you need is just click on your curve lines on the timeline, expand this option for each of them and set Initial and Final values as needed.
In just a few steps, VSDC lets you recreate complex illustrations, mirror them with precision, apply vibrant gradients and animate every stroke.
Do you like the result?
We hope you enjoyed exploring these settings with us! Don’t stop here: keep experimenting with your own projects. We’re sure you’ll achieve even better results that you’ll want to share.
If you have questions or creative ideas to share, we'd love to hear from you at This email address is being protected from spambots. You need JavaScript enabled to view it. or through our social networks: Facebook, X, Reddit or Discord. And remember to check out our YouTube channel for more inspiration!


This program allows you to capture the video of your desktop and save it on your PC in various formats. Coupled with a video editor, the program is a great tool for creating presentations, tutorials and demo videos.

The program captures video from external devices and records it to computer in a free format. You can save video from video tuners, webcams, capture cards and other gadgets.
VSDC Video Editor Reviews & Ratings (Trustpilot, Capterra & Media)
VSDC Free Video Editor is rated 4.5/5 by real users on Trustpilot and Capterra. Here are a few reviews and quotes from creators and tech media.
Overall rating: 4.5/5 based on 200+ reviews on Trustpilot and 89 reviews on Capterra.
★★★★⯪
VSDC Free Video Editor is the best free video editor for Windows I’ve used, from color grading to picture-in-picture and cinematic results.
— Ejikeme Eloka Augustine
Source:Trustpilot
★★★★☆
Easy-to-use interface and quick export to social media make VSDC a versatile video editing tool for everyday projects.
— Karen C., E-Learning
Source:Capterra
★★★★☆
A feature-packed non-linear video editor for Windows that can compete with many paid video editing solutions.
— TechRadar
Source:TechRadar review
★★★★★
The free VSDC editor saved my YouTube channel – a powerful video editing software for chroma key, text effects and picture-in-picture.
— Paul Roberts
Source:Trustpilot
★★★★★
Fast and simple for YouTube videos with green screen, zoom, color tools and creative effects in one app.
— Marie R., Media Production
Source:Capterra
★★★★★
One of the best free video editor options for Windows users, ideal for GoPro, YouTube and family videos.
— VidProMom, YouTube creator
Source:Media reviews
★★★★★
I’ve been using VSDC for years; editing is easy and the final videos look great for my personal and professional projects.
— Long-time VSDC user
Source:Trustpilot
★★★★★
Great value and faster than many other free tools; I quickly create videos for YouTube, Instagram and Facebook with features my audience loves.
— Rabika B., Marketing & Advertising
Source:Capterra
★★★★★
VSDC offers many features you don’t usually find in free editors, including picture-in-picture, stabilization and modern codec support with no watermarks.
— Tech media review
Source:Media reviews
Watch us on YouTube
 / @VSDCFreeVideoEditor
© 2011-2026, www.videosoftdev.com, FLASH-INTEGRO LLC. Privacy policy | Terms of use | About us
All trademarks referenced herein are the sole property of their respective owners.
Copying any materials from this site allowed only with written consent of Site Administration.