 User Help Manual
  Learn FAQ
  Send us feedback


- Published by Amy Shao on June 30, 2026 Meet the new major update ...
- Published by Amy Shao on March 11, 2026 What is the best gift for...
- published Amy Shao 11/19/25 Meet the long-awaited VSDC 10.2 update: a new ve...
- Hi, I'm Mattea Wharton, a travel videographer from Seattle. For three years I ba...
How to Export Video in VSDC | MP4, Quality & Export Settings
Finishing the edit is only the beginning of the final stage. With VSDC Video Editor, you can turn your project into a finished video for playback, sharing, YouTube, social media, presentations, archiving, or professional delivery. The Export Project workspace brings formats, codecs, resolution, frame rate, bitrate, audio settings, and ready-made profiles together in one place, so you can move from the timeline to a polished final file with full control over quality.
For many projects, exporting is as simple as choosing a device, selecting MP4, picking a profile, and clicking Export project. When you need more control, VSDC lets you fine-tune the codec, resolution, frame rate, bitrate, and audio parameters. Both VSDC Free Video Editor and VSDC Pro provide watermark-free export, while VSDC Pro adds hardware acceleration to help compatible systems render demanding projects faster.
This guide explains the complete VSDC export workflow, including MP4 settings, custom profiles, hardware acceleration, direct YouTube upload, troubleshooting, and optional DVD burning.
 DOWNLOAD VSDC FREE VIDEO EDITOR
Save Project vs. Export Video: what is the difference?
Before exporting, it helps to distinguish the editable VSDC project from the finished video. When you use Save project or Save as project..., VSDC saves a project file with the .vproj extension. This file keeps the structure of your edit so you can return to the timeline and continue working later.
Export Project creates the finished media file. The exported video can be played in a media player, uploaded online, shared with clients or friends, placed in a presentation, or stored as a final master. Keeping the .vproj project file together with your source media is useful whenever you plan to revise the edit in the future.
Step 1. Open the Export Project tab
When your edit is ready, open the Export Project tab on the ribbon. This workspace contains the controls for choosing the target device, output format, profile, file name, destination folder, and advanced video and audio parameters.
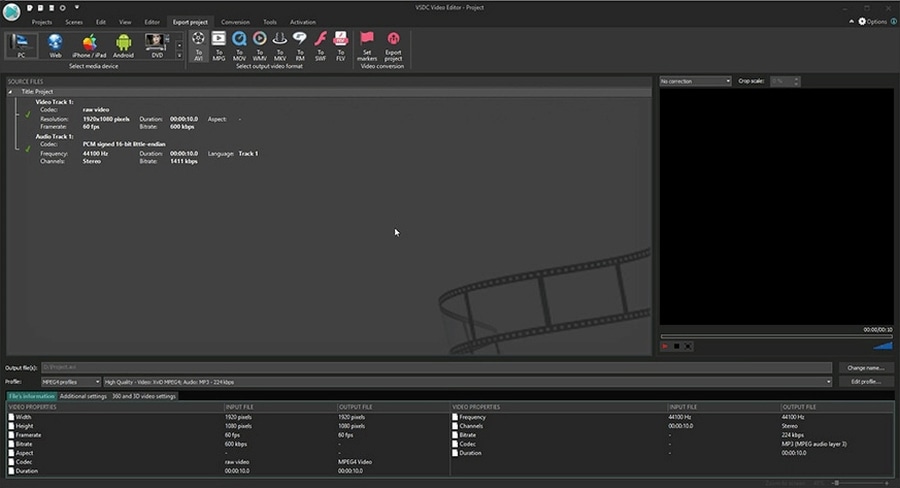
VSDC uses export profiles to simplify the final stage of editing. You can start with a ready-made preset and proceed directly to export, or customize the profile when a platform, client, device, or production workflow requires specific settings.
Step 2. Choose the target device
In the Select media device area, choose where the finished video will be used. VSDC organizes available output options by device and publishing scenario, helping you quickly narrow the list of suitable formats and profiles.

Click the arrow in the device section to display the full list of available destinations.
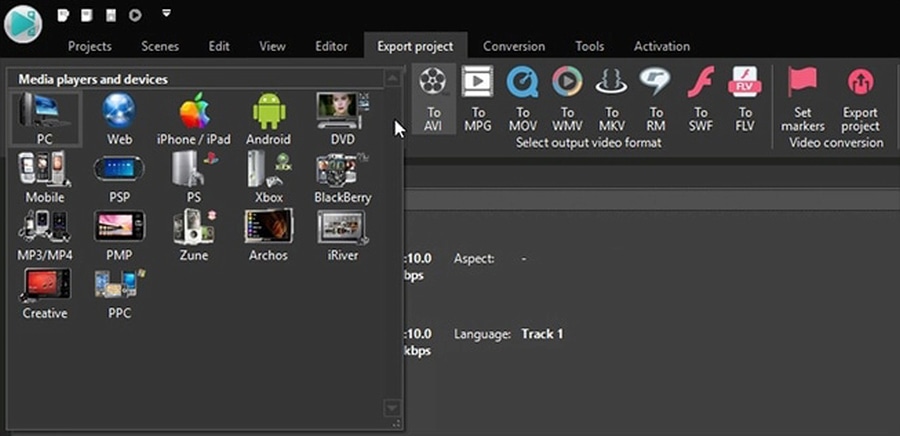
For videos intended for a computer, general playback, sharing, or further delivery, PC is a convenient starting point. For online publishing, choose Web to access profiles designed for web platforms and services such as YouTube.
Step 3. Choose the video format and export profile
After selecting the target device, choose the output format. For many everyday projects, MP4 offers an excellent balance of quality, compatibility, and file size. VSDC also provides a wide range of other video formats for specialized workflows.
Next, open the Profile menu and select a preset that matches the resolution and quality you need.
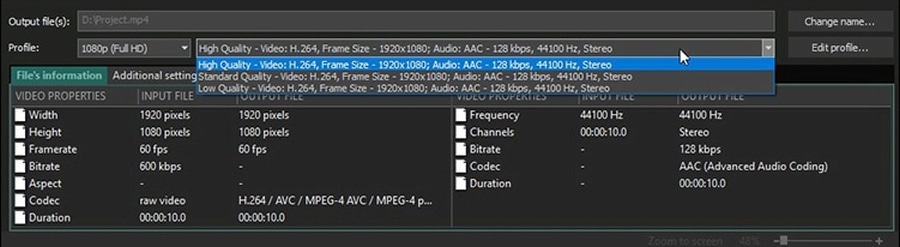
Which codec should you choose for MP4?
VSDC provides MP4 profiles with popular codecs including H.264 and H.265/HEVC. H.264 is a strong choice when broad playback compatibility is the priority. H.265 offers efficient compression and is especially useful for modern devices and high-resolution projects when HEVC playback is supported by the target platform.
Ready-made profiles are ideal for fast export. Advanced users can fine-tune the profile when they need a specific bitrate, codec, frame rate, or audio configuration.
Choose resolution and frame rate with the final platform in mind
For most projects, keeping the export resolution and frame rate aligned with the project settings preserves the intended look and motion. For example, a 1920×1080 project can be exported as Full HD, while 4K projects can use a 4K profile for high-resolution delivery.
When creating a smaller version for quick sharing, previews, or mobile delivery, you can deliberately select a lower resolution or bitrate. VSDC gives you the flexibility to create both high-quality masters and compact versions from the same project.
Step 4. Customize video and audio settings
For precise control over the final file, click Edit profile. The profile editor allows you to adjust the video codec, resolution, frame rate, bitrate, and audio parameters according to the requirements of your project.
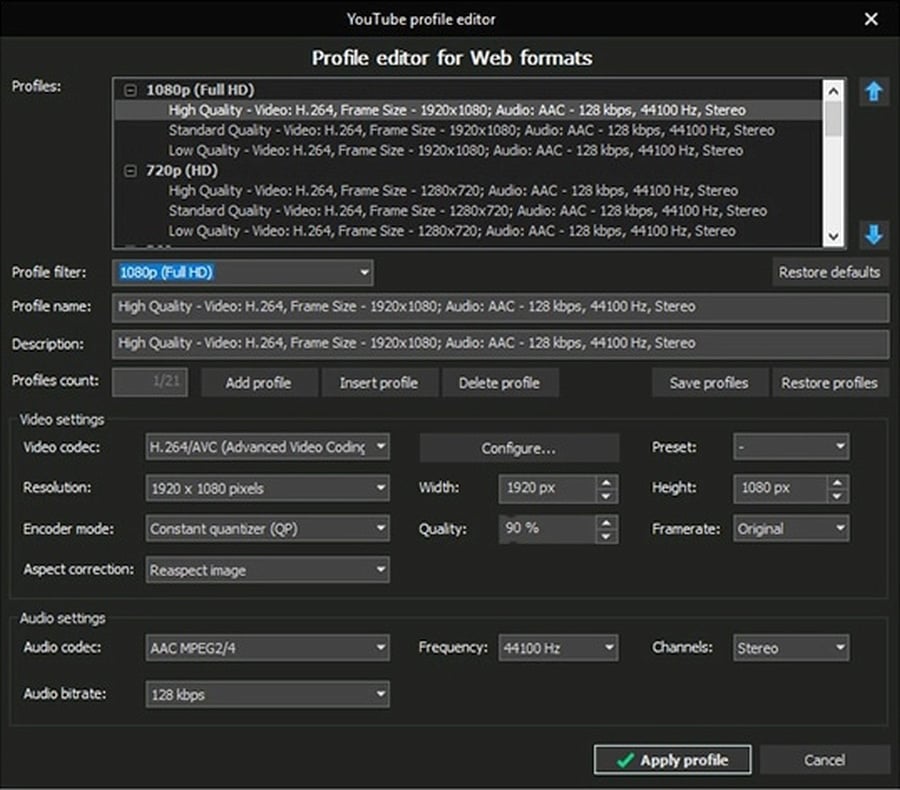
A higher bitrate can preserve more detail in complex scenes, while a more compact bitrate can reduce file size for online sharing. The most suitable value depends on the resolution, frame rate, codec, amount of motion, visual detail, and the requirements of the destination platform.
Once the settings are ready, click Apply profile and return to the main export workspace.
Step 5. Choose the output file name and folder
Use the Output file(s) field to check where VSDC will save the finished video. To choose another folder or file name, click Change name... and select the destination you need.

For recurring projects, a simple naming convention that includes the project name, resolution, version, or delivery date can make exported files easier to manage.
Step 6. Export the finished video
Review the selected format, profile, output location, and file name. When everything is ready, click Export project to start rendering the final video.

During rendering, VSDC processes the timeline, effects, transitions, color adjustments, audio, titles, and other project elements into the selected output format. More complex projects and higher-resolution settings naturally require additional processing time.
Once rendering is complete, the finished video is ready for playback, publishing, sharing, presentation, or delivery — with the quality and format settings you selected.
How to speed up video export with hardware acceleration
For demanding projects, VSDC Pro can use a compatible GPU to accelerate video encoding and rendering. This is particularly valuable for high-resolution footage, effect-heavy timelines, and projects that are exported frequently.
To enable hardware acceleration for video encoding:
- Open Options in the upper-right corner of VSDC
- Go to Acceleration Options
- Enable Use hardware acceleration for encoding video
Hardware acceleration turns the graphics processor into an additional resource for the export workflow, helping VSDC Pro complete compatible rendering tasks more efficiently.
How to export and upload a video directly to YouTube
VSDC includes a direct YouTube workflow, allowing creators to move from editing to publishing without switching to a separate upload workflow. This is especially convenient for tutorials, reviews, vlogs, gaming videos, educational content, and other YouTube projects.
To prepare a video for YouTube:
- Open the Export Project tab
- In Select media device, choose Web
- Select For YouTube from the available formats and profiles
- Check the output settings and click Export project
- When VSDC offers the YouTube upload option, sign in to your Google account
- Enter the required video details and complete the upload
This workflow combines VSDC's editing tools, export profiles, and direct YouTube publishing in one application, helping creators move efficiently from the first cut to the published video.
Optional: burn the exported video to DVD
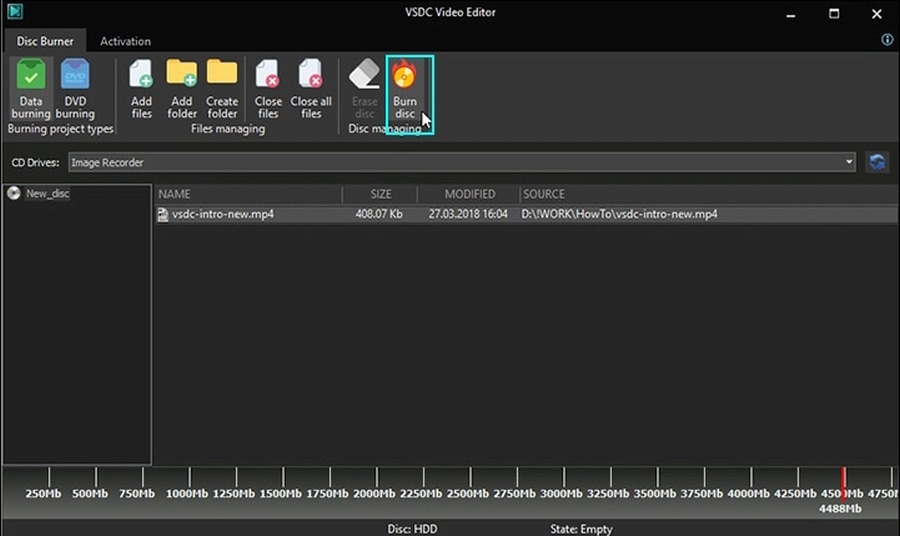
VSDC also includes disc-burning tools for projects that need physical media. After exporting the video, open the Tools tab and select Disc burner. The disc-burning window provides tools for writing data to optical media and preparing DVD video when the project has been exported in a suitable DVD format.
Why export video with VSDC?
VSDC combines professional non-linear editing and flexible export controls in a single Windows video editor. You can move from a complex timeline to a finished MP4, create versions for the web and YouTube, customize codec and bitrate settings, prepare high-resolution output, and deliver watermark-free video from both the Free and Pro editions.
For creators who work with demanding projects, VSDC Pro adds hardware acceleration to the export workflow, helping compatible systems process complex timelines more efficiently. This makes VSDC a practical choice for everything from quick social media videos to advanced production and high-resolution delivery.
Frequently Asked Questions
1. What does video rendering and export speed depend on?
Export speed depends on your computer's CPU, GPU, RAM, storage performance, the selected codec and output settings, and the complexity of the project. High-resolution footage, multiple layers, effects, transitions, and complex templates can require additional processing time.
2. Can I use my computer while VSDC is exporting a project?
Yes. Light tasks can continue while VSDC renders the video. For the fastest export and the most responsive system, keep resource-intensive applications such as games and other video-processing software closed until rendering is complete.
3. What happens if I close VSDC before the export is complete?
Your VSDC project and original source files remain available for further editing. An interrupted output file may be incomplete, so let the export process finish before closing the editor.
4. How can I speed up video export in VSDC?
VSDC Pro can use hardware acceleration with a compatible GPU to speed up video encoding and rendering. Open Options in the upper-right corner of the program, go to Acceleration Options, and enable Use hardware acceleration for encoding video.
5. Can I export and upload a video directly to YouTube from VSDC?
Yes. Open Export Project, choose Web in the Select media device section, select For YouTube, check the output settings, and click Export project. When VSDC offers the YouTube upload option, sign in to your Google account, enter the required video details, and complete the upload.
6. What is the best format for exporting video from VSDC?
MP4 is a practical choice for many playback, sharing, and online publishing scenarios. VSDC provides ready-made MP4 profiles and lets you choose codecs such as H.264 or H.265 depending on the target device, desired quality, compatibility, and file size.
7. How does watermark-free export work in VSDC?
VSDC Free Video Editor and VSDC Pro both deliver watermark-free finished videos, ready for publishing, sharing, presentations, and professional projects.
VSDC gives you a complete workflow from editing to final delivery: choose the format, fine-tune quality, accelerate rendering with VSDC Pro, and publish the finished video in the format your project requires. For product questions or export assistance, contact us at This email address is being protected from spambots. You need JavaScript enabled to view it. or send us a message through Facebook.
VSDC Free Video Editor is a professional non-linear video editor for Windows with flexible export profiles, MP4/H.264/H.265 settings, direct YouTube workflow, high-resolution output, and watermark-free export. Explore all features.
 Like us on Facebook
 Follow us on Twitter
Watch us on YouTube
 / @VSDCFreeVideoEditor
© 2011-2026, www.videosoftdev.com, FLASH-INTEGRO LLC. Privacy policy | Terms of use | About us
All trademarks referenced herein are the sole property of their respective owners.
Copying any materials from this site allowed only with written consent of Site Administration.