Video Editor

Use free video software to create and edit videos of any complexity from a family greeting card to a company presentation. Cut, merge video files, apply visual and audio effects, use filtration and image correction, make slideshows and add an appropriate soundtrack. Use multi-color Chroma Key and advanced parameters settings to give your video a professional look. All popular video and audio formats are supported.

Read more about Video Editor...

Video Converter

This program is intended for converting video files from one format to another. Nearly all popular video formats are supported (both reading and saving). In addition, the program drastically simplifies the task of converting videos for playback on specific multimedia devices, such as iPhone, Samsung Galaxy or Huawei P30 Pro. The program is extremely easy to use, has a modern interface and all necessary video processing functions.

Read more about Video Converter...

Audio Converter

The audio converter will help you convert audio files from one format to another. All key audio formats and codecs are supported. The program also allows you to manage playlists and meta tags, extract audio from video files and save these tracks on your computer in any format.

Read more about Audio Converter...

Audio CD Grabber

This audio tool is intended for grabbing audio tracks from compact discs and saving them to the user’s computer in any format. Nearly all popular audio formats and codecs are supported. The program can also extract track details from the FreeDB server for automatic file renaming and updating meta tags.

Read more about Audio CD Grabber...

Multifunctionality

Multifunctionality

A wide array of multimedia processing tools in one free video software suite.

High speed

High speed

Our programs use fast
and high-quality algorithms optimized for single and multi-core CPU’s.

Affordability

Affordability

VSDC video software is freely available for download to Windows OS-based PCs and laptops.

How to Create Realistic Shattered Glass Effect

The Shattered Glass effect is a popular transition effect that has recently become available in VSDC Pro. With the proper setup, this effect will help you add depth to the video and achieve perspective. You can use it to create a smooth transition between scenes, end a video with a bang, or start your story.

In this tutorial, we’ll show you how to create a realistic shattered glass effect. However, before moving on, make sure to download the latest version of VSDC from our official website because the new effect is unavailable in versions earlier than 6.8.


How to apply Shattered Glass effect in VSDC

To get started, launch VSDC and use the Import content option to upload your footage to the editor. Once you do that, the video will automatically land on the timeline, and you can begin your work.

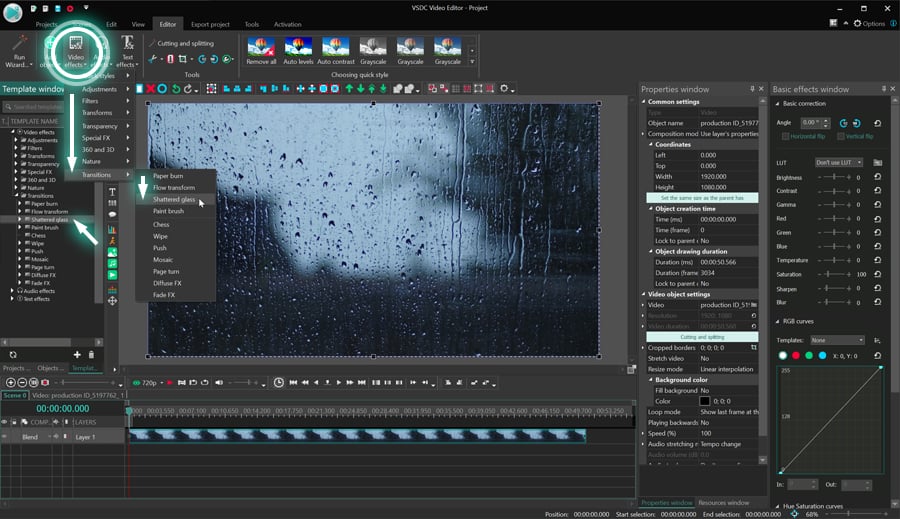
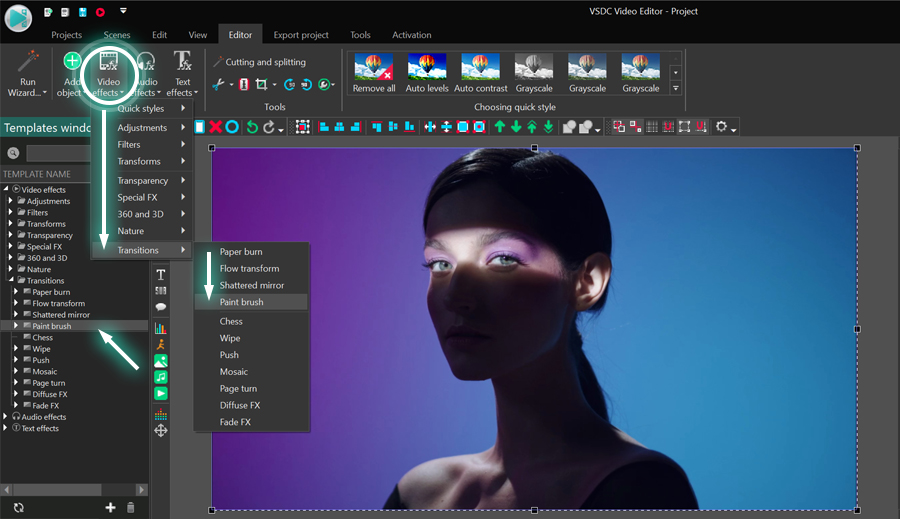
To apply the Shattered Glass effect, open the Video effects menu at the top and proceed to Transitions. Then select Shattered Glass.

How to apply the Shattered glass transition effect in VSDC Pro

After you apply the effect, a pop-up window called Object position settings will indicate that the effect will be added to the end of the scene. Later, you’ll be able to change the effect position manually.

Use the preview window to see the result, and if you’re happy with the way the transition looks – go ahead and either export the video or continue working on the rest of it. If you, however, want to see how you can customize the effect, continue reading.


How to access Shattered Glass effect settings in VSDC

To open the effect settings, you first need to access the effect on the timeline. To do that, double-click on the video you’ve applied the effect to. From there, make a right-mouse click on the effect layer and select Properties. The Properties window will slide in from the right-hand side.

Shattered glass effect settings available in VSDC Pro

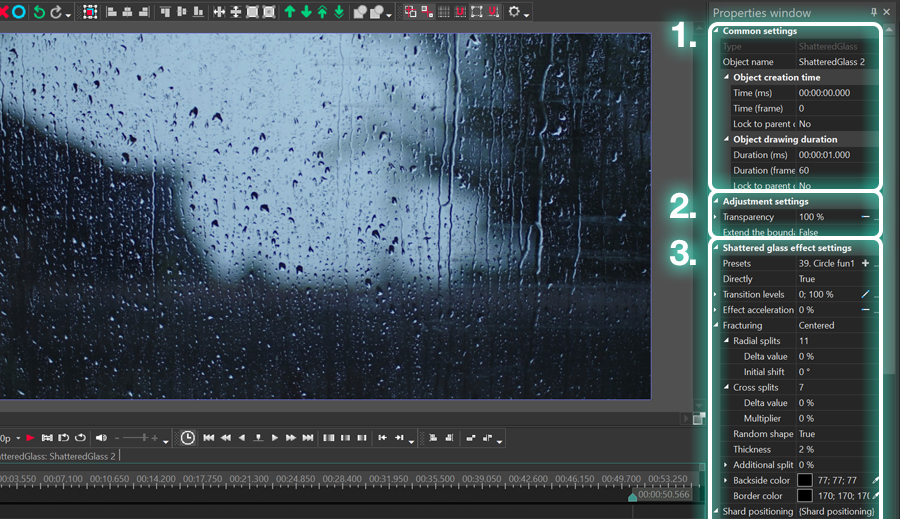
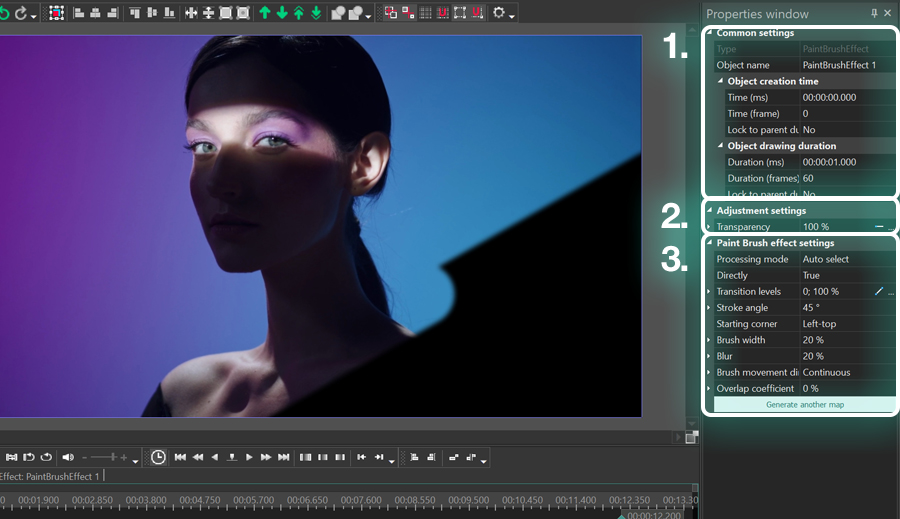
In the Properties window, there are three groups of settings:

  • Common settings
  • Adjustment settings
  • Shattered Glass effect settings

Common settings

Common settings allow you to rename the effect layer on the timeline, define the duration of the effect and set the exact moment when it should appear in the video (in seconds or frames).

Adjustment settings

Adjustment settings include two controls: Transparency of the effect and the option to Extend the boundaries of the shattered pieces (shards).

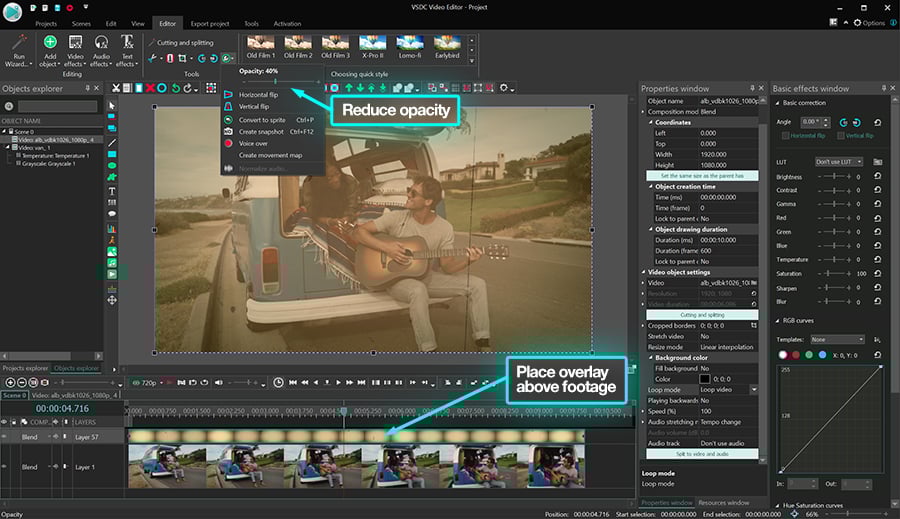
The former control directly affects the opacity of shattered pieces. For example, if the transparency value equals 100%, the picture shatters while the background remains black. However, if you significantly decrease the Transparency level, the shattered pieces will become semi-opaque, and instead of the black background, the original picture will remain visible.

Notice that if you expand the Transparency menu, you’ll notice two additional properties: Initial value and Final value. Use these values if you want the Transparency level to increase or decrease over time.

Keep in mind that you’ll see the initial and final values for many other parameters in the Properties window. They all work just the same. Make the initial value smaller than the final value, and the parameter value will be increasing as the transition progresses; do the opposite, and the parameter value will be decreasing as the transition progresses.

Now, the latter control in the Adjustment settings is named Extend the boundaries. By default, it’s deactivated, and that means that the shattered pieces of glass remain within the frame of the original video, image, or any other object you’ve applied this transition to. However, if you activate this parameter, the pieces will continue moving freely outside of the object boundaries.

Now that we’ve covered the most basic effect adjustments, let’s go ahead and review customization controls available in the third group of settings.

Shattered Glass effect settings

On this level, you get to adjust the type of fracturing, the movement of shattered pieces, the impact power, and some other parameters. We’ll briefly go over each parameter below.

Parameters allowing you to customize the Shattered glass effect in VSDC

Presets

Presets are your own effect settings saved in the library. Say, after toggling the controls for some time, you’ve achieved an impeccable transition effect, and you want to save this combination of parameters for the next time. You’ll be able to save it as a preset and then find it in the menu whenever you need it.

Directly

If you leave this parameter deactivated, the transition effect will progress in the direct sequence which represents an object falling into pieces. If you activate this parameter, the transition will progress in the reverse sequence: shattered pieces will gradually form an object.

Effect acceleration

This parameter allows you to accelerate or decelerate the transition, depending on the values you type (you can type negative and positive numbers). Notice that under the Effect acceleration menu, there’s also an option to apply a so-called “Random delay”. If you activate it, for some random pieces of glass, the movement rotation will be delayed.

Fracturing

This parameter defines the type of fracturing and includes two options: Centered and Disbanded.

Both scenarios have additional settings that allow you to control the number of cracks, the movement direction for shards, their shape, and other characteristics. Without further ado, let’s go ahead and see how things work.

Centered fracturing

If you select the Centered type of fracturing, the cracks will form in straight lines coming from the impact point which you can move anywhere you like – as shown in the illustration below.

Radial splits is the parameter that allows you to set the number of cracks – and therefore, the number of shattered pieces.

Delta value defines the delta of the angles formed by the cracks. For example, knowing that the maximum degree value is 3600, you can set the Delta value at 0 and have 10 cracks, each forming a 360 angle. However, if you start increasing the Delta value, the angles will vary based on the number of cracks and the Initial shift which sets the angle deviation from 00.

Cross splits is the parameter that allows you to add cracks across radial splits and shatter the glass into smaller pieces. You can change the distance between cross splits using the parameter called Delta value or move them closer/further from the center using the parameter called Multiplier.

Random shape is a parameter that allows you to choose whether you want shattered pieces to be of a random, odd shape or remain in the correct shape formed by the split lines.

To increase the thickness of shattered pieces, you can use the parameters named Thickness.

Additional split chance is the parameter that creates a chance for each shattered piece to break into smaller shards. The higher its value, the more random pieces will have additional fracturing.

To control the size of the shards, use the parameter named Max fracturing. The smaller its value, the smaller the shards are.

Backside color defines the color on the flip side of the shattered pieces. By default, the flipside is black, however, you can select any other color as well as set their Opacity level.

For example, if you set the Opacity level at zero, both sides of the shattered pieces will reflect the original image. Otherwise, one side will contain a fragment of the image, and the other side will be of the color of your choice. Similarly, you can set the color for shard borders.

Disbanded fracturing

Now that we’ve reviewed the first fracturing scenario, let’s see how Disbanded fracturing works.

The key difference here is that if you apply this scenario, the fractures will be spread evenly on the image with no single visible point of impact.

To change the number of shattered pieces, use the Points on X/Y axis. These parameters set the number of corners that belong to the shattered pieces – therefore, the higher the number you use, the more pieces there will be.

Keep in mind that for each of these numbers, you can also choose a Delta value (X/Y). Delta values set the deviation of the number of points on the X and Y axis. For example, if you put 5 points on the Х axis, and the Delta value is 100%, each horizontal line will produce from 1 to 10 shattered pieces.

The following parameters – Thickness, Additional split chance, and Backside color – are similar to what we’ve already reviewed in the previous section, so we’re going to skip them and move to the next feature called Shard positioning.

Shard positioning is a group of settings to help you customize the shards. The first parameter in this menu is named Use initial shift, and it’s activated by default. It creates a sense of depth in the video by sending some of the shards straight to the foreground of the scene. If you deactivate this parameter, the pieces will be moving within the middle ground only.

Notice that if you use this feature, you can customize the movement of the shattered pieces by applying the Minimum shift and Shift delta. The former defines the shift of the shattered pieces from their original position to the foreground. The latter defines the deviation delta for the Minimum shift.

The following parameters are named X axis motion, Y axis motion, and Z axis motion. They help you set the movement direction around the axis for the shattered pieces. By default, all these parameters are set at 0% and that’s why shards remain in the same spot. However, as you start increasing the values, the pieces will start moving in the indicated direction.

Movement speed defines the speed at which shattered pieces are moving until they fully disappear from the scene. By default, this value is set at 100% which is the maximum speed. If you type 0% instead, the pieces will be rotating around themselves without moving anywhere.

Now, to make the disappearance of the pieces more dynamic, the developers have added an option named Reduce movement speed. This feature reduces the movement distance assigned to certain shards before they disappear from the scene. As a result, the shattering effect gets more volume and looks more cinematic.

There are 8 Reduction scenarios you can choose from, and they all create a slightly different effect.

The following parameters in the menu are named X/Y impact motion, and they enable you to emphasize the impact point by moving the pieces further away from it after the split. The movement direction in this case will be defined by the values you assign for the X and Y axis.

For example, if X impact motion equals 0, but Y impact motion has been assigned any value above 0, you’ll see a vertical split. If you assign any value above 0 to each axis, the shattered pieces will split both vertically and horizontally.

To adjust the speed at which pieces will bounce off from the impact point, use the parameter named Impact force. Essentially, it literally means the strength of the impact. The higher its value, the bigger the split and the faster the pieces will be moving.

Under the Impact force menu, you’ll find additional parameters that will help you adjust the impact. For example, you can Add random shift to allow shards to randomly shift from the impact point.

Aspect correction is the parameter that adjusts the movement of shattered pieces according to the size of the video or the object you’ve applied the transition to. If you enable this option, shattered pieces will shift evenly, regardless of the given aspect ratio. If you disable this option, the movement shift will be based on the aspect ratio: for instance, if your video has the 16:9 aspect ratio, the pieces will move further horizontally because the width of the video exceeds its height.

Reduce impact force is the parameter that enables you to reduce impact force using pre-configured Reduction scenarios. You can type any value from -99 to 99. The lower the value, the less visible the impact point and the split. Once you set the value, you can open the Reduction menu and select the reduction scenario. We’ll skip the overview of these scenarios because they’re identical to those we reviewed earlier.

The following group of parameters named X/Y/Z axis rotation set the rotation angle for the pieces. If the angle value is above 360 degrees, they define the number of turns each piece makes around the corresponding axis.

Fade-out applies the fade-out effect to the shattered pieces as they reach a certain point of the trajectory.

Perspective projection is a mode that lets you enable and disable perspectivity. By default, it’s enabled, which means the viewer is under the impression that the pieces are moving toward them. If you disable perspective projection, shattered pieces will be moving to the borders of the scene.


Download the new version of VSDC to try the Shattered Glass effect

Hopefully, this tutorial has inspired you and started some idea brewing! If you’re ready to try the Shattered Glass effect in your videos, go ahead and download VSDC 8.2 from our official website.

Need more inspiration? Then make sure to subscribe to our YouTube channel to get notified when we publish new videos.

download windows versionDownload Video Editor now

How to Apply Paint Brush Transition in VSDC

The Paint Brush transition is a popular effect that imitates brush strokes. You can use it to gradually move from one scene to another by either covering the video with a paint brush stroke by stroke, or revealing the next image from under a coat of paint. Here is what it looks like:

From this tutorial, you’ll find out how to apply this effect in your videos and tailor it to your vision. The Paint Brush effect is available in VSDC starting version 6.8, so make sure to download it before moving one with the tutorial.


How to apply Paint Brush transition in VSDC

Once you download VSDC, launch it on your computer and import your footage. We recommend using the Import content button unless you want to apply custom parameters to the project. Next, select the video you want to apply the transition to, open the Video effects menu, proceed to Transitions and select Paint Brush.

How to apply the Paint Brush transition effect in VSDC

The Object position settings window will pop up indicating that the transition will be added to the end of the scene. Click OK to proceed and preview the result. Notice that if you want to stretch the duration of the transition, you’ll be able to do it manually. We’ll talk more about it in the following section.


How to access Paint Brush transition settings

To open the effect settings, first make a double-click on the video you’ve applied the effect to. You’ll find yourself in a new tab with the effect layer named PaintEffect. Make a right click on it and select Properties. The Properties window will slide-in from the right.

The Properties window for the Paint Brush transition includes 3 groups of settings:

  • Common settings
  • Adjustment settings
  • Chess settings - Paint Brush effect settings

Paint Brush effect settings in VSDC Free Video Editor

Let’s go over each group of settings and see what they do.


Common settings

The settings in the first group allow you to rename the transition effect layer, type the exact moment when the transition should begin (in seconds or in frames) and set its duration (in seconds or in frames). Keep in mind that you can also manually move and stretch the effect layer right on the timeline using the handlers.


Adjustment settings

The Adjustment settings consist of a single parameter, named Transparency. Transparency enables you to adjust the opacity level for the paint strokes. For example, if you leave the default value (100%), the paint will be completely non-transparent. However, if you decrease the value, you’ll start getting the see-through effect.

If you expand the Transparency parameter, you can access the Initial and Final values. These values enable you to set the opacity level for the beginning of the Paint Brush effect and the end of it, thus creating a smoother transition between scenes.


Paint Brush effect settings

The settings in the third group allow you to tailor the effect to your needs. For instance, you can change the direction and angle of the brush strokes, choose the brush width, and more.

Directly

The first parameter in this group is named Directly, and it refers to the direction of transition. If you leave this parameter deactivated, the paint brush will gradually cover your footage, stroke by stroke. If you activate this parameter, the transition will work in the opposite way and gradually uncover video from a coat of paint.

Stroke angle

The following parameter allows you to change the brush stroke angle. By default, the brush moves under a 45-degree angle, however, you can change this value to your taste. For example, in the illustration below, you can see how the strokes will look if you use a 90-degree and a 30-degree angles.

In addition to the Stroke angle, you can activate the option called Opposite side and change the side where the brush starts moving. For example, by default, the paint brush moves from right to left. In this case, the opposite side direction will be from left to right.

Starting corner

This parameter defines the corner where the effect starts. There are 4 self-explanatory options you can choose from: left-top, right-top, left-bottom, and right-bottom.

Brush width

Brush width is rather self-explanatory as well. This parameter defines how wide and thick brush strokes are, and you can leave its value consistent or make it dynamic. For example, if you set the Initial value at 10% and the Final value at 50%, each subsequent brush stroke will be thicker.

Blur

This parameter adds blur to the paint and makes brush strokes less defined. The higher the value, the more blurred the strokes will be. As a matter of fact, if you type 100%, the effect will resemble spray paint.

Brush movement direction

Brush movement direction is the brush movement pattern defining the order in which brush strokes are applied. The are 5 options you can choose from:

  • Non-continuous – each subsequent brush stroke will start on the same side of the scene.
  • Continuous – each subsequent brush stroke starts on the opposite side of the scene.
  • Area-based – the scene gets divided into several areas, and each area gets covered with paint
  • Random (same angle) – each brush stroke appears in a random place on the scene under the same angle.
  • Random (random angle) – each brush stroke appears in a random place on the scene under a random angle.

Overlap coefficient

Overlap coefficient defines the percentage of brush strokes that appear on the scene at the same time. For example, if the total number of brush strokes required to cover the scene entirely is 12, and the overlap coefficient equals 30%, at any given moment, you’ll be seeing 4 brush strokes instead of just one.


Try the Paint Brush transition for free

The new Paint Brush transition effect is available in the free version of VSDC Video Editor, so if you liked this tutorial, go ahead and download VSDC from the official website.

Feel free to message us on Facebook and make sure to subscribe to our YouTube channel for a weekly doze of video editing inspiration.

How to Create the Old Film Effect in a Video

So you want to learn how to make the old film effect in a video. While we’re all familiar with the quick Instagram-style filters, to achieve a more authentic look, it’s good to know what else contributes to the vintage look of old movies.

In this tutorial, we’ll show you the color correction effects, framerate settings, overlays, and aspect ratio hacks used to achieve the old film effect. You can select just one effect or use multiple tricks on the same video. Before getting started, download VSDC, the free video editor for Windows we’ll be using in this tutorial.


5 Easy tricks to achieve the old film effect in VSDC

To get started, launch VSDC on your computer and use the Import content button to upload your footage. By using this option, you preserve the original footage properties, such as the size of the video, its aspect ratio and resolution.

1. Try pre-designed Old Film styles

If you’re here for a quick solution, the pre-designed styles are your best friends. In VSDC, there are 3 pre-designed Old Film styles. To apply them, click on the video you’ve uploaded, then open the Quick style menu at the top, and select one of the Old Film options.

To unselect a style, make another click on its icon in the menu. Keep in mind that there are more vintage-looking styles and Instagram filters in the menu, and you can apply more than one to the same video.

2. Use a vintage film look overlay

The second relatively easy way to achieve the old film effect is by using a ready-made overlay from one of the stock video marketplaces.

Overlays are videos that you blend with the main footage to achieve the desired atmosphere. They typically have a monochrome background and contain particles, flares, or other visual components such as smoke stripes or water droplets. If you want to learn more, read our brief guide to working with overlays.

Vintage film look overlays aren’t different. They may contain film dust, flashes, scratches, light leaks, letterboxes, and other “attributes” of an old movie. Here is an example of an old film overlay:

Now, if you want to try this technique on your video, go to one of the free stock video marketplaces, such as Videezy, Pexels, or Pixabay, and search for an “old film look overlay” or a “vintage film overlay”. Once you find the video to your taste, download it and drag it to the scene where your main footage is. Place the overlay above the main footage, then go to the quick access menu at the top and decrease the Opacity level of the overlay.

How to apply a retro video overlay to achieve an old film effect

As a result, the overlay will become semi-transparent while maintaining its distinguishing color tone and the particles.

3. Add the grainy look

Ever noticed that some old movies look grainy? This effect is also easy to replicate. Once you’ve added your footage to the scene, open the Video effects menu, proceed to Filters, then select Noise.

The image noise filter is a surefire way to achieve the old film effect

If you want to make the video look less grainy, make a right mouse-click on the filter layer and select Properties. Then use the Properties window on the right-hand side to reduce the noise and transparency levels.

4. Apply the grayscale effect

Now that we’re approaching the end of the tutorial, it’s time to talk about good old black and white videos. If this is what you’re trying to achieve, just open the Video effects menu, proceed to Adjustments and select Grayscale.

How to make a movie look black and white in VSDC

Since old-school videos also tend to have a brighter and less contrasting look, we also recommend toggling the controls in the Basic effects window on the right-hand side to see what works for your footage. But most importantly – and this is a lesser-known tip – old movies had a lower framerate and a 4:3 aspect ratio. Once you apply these two settings, it will be hard to tell whether your video was recorded yesterday or in the 1920s. We’ll show you how to go about it in the following section.

5. Change the framerate and resolution of your footage

The fastest way to set the desired framerate and resolution is by creating a new project with the said properties. This means that instead of importing your video with the original properties, you’ll need to set the properties that will be applied to the video you’ll be working with.

Once you launch VSDC, hit Blank project. Then select the 4:3 aspect ratio in the Resolution menu, and the desired framerate in the corresponding menu below.

How to change the framerate and aspect ratio to achieve the old movie effect

To imitate a movie recorded on an old-school camera, you can choose anything between 10 and 15 frames per second. The lower the framerate is, the more noticeable the transition between the frames will be.

Now, when you create a 4:3 project and import your footage, chances are, the video will not fit the scene properly – that’s because the vast majority of modern videos have a 16:9 aspect ratio. The ideal solution will be to crop your footage and make it fit the 4:3 project. This is not the most elegant solution since some of the footage will get cropped out, however, this is the only way to achieve the authentic old film effect.

To crop the video, click on the Crop icon at the top and proceed to Auto cropping. The footage will be automatically cropped to fit the scene.

Once you’re ready, go ahead and save your video. Open the Export project tab, select the final destination of the video, and proceed to Export.


Want to achieve a more artistic old film look? Consider the VHS effect

There are many ways to achieve the old film effect. If you’re ready for a more advanced post-production technique, check out this guide to replicating a stylish VHS look.

Got any questions? DM us on Facebook or leave a comment on our YouTube channel.

How to Apply test

The Paint Brush transition is a popular effect that imitates brush strokes. You can use it to gradually move from one scene to another by either covering the video with a paint brush stroke by stroke, or revealing the next image from under a coat of paint. Here is what it looks like:

From this tutorial, you’ll find out how to apply this effect in your videos and tailor it to your vision. The Paint Brush effect is available in VSDC starting version 6.8, so make sure to download it before moving one with the tutorial.


How to apply Paint Brush transition in VSDC

Once you download VSDC, launch it on your computer and import your footage. We recommend using the Import content button unless you want to apply custom parameters to the project. Next, select the video you want to apply the transition to, open the Video effects menu, proceed to Transitions and select Paint Brush.

How to apply the Paint Brush transition effect in VSDC

The Object position settings window will pop up indicating that the transition will be added to the end of the scene. Click OK to proceed and preview the result. Notice that if you want to stretch the duration of the transition, you’ll be able to do it manually. We’ll talk more about it in the following section.


How to access Paint Brush transition settings

To open the effect settings, first make a double-click on the video you’ve applied the effect to. You’ll find yourself in a new tab with the effect layer named PaintEffect. Make a right click on it and select Properties. The Properties window will slide-in from the right.

The Properties window for the Paint Brush transition includes 3 groups of settings:

  • Common settings
  • Adjustment settings
  • Chess settings - Paint Brush effect settings

Paint Brush effect settings in VSDC Free Video Editor

Let’s go over each group of settings and see what they do.


Common settings

The settings in the first group allow you to rename the transition effect layer, type the exact moment when the transition should begin (in seconds or in frames) and set its duration (in seconds or in frames). Keep in mind that you can also manually move and stretch the effect layer right on the timeline using the handlers.


Adjustment settings

The Adjustment settings consist of a single parameter, named Transparency. Transparency enables you to adjust the opacity level for the paint strokes. For example, if you leave the default value (100%), the paint will be completely non-transparent. However, if you decrease the value, you’ll start getting the see-through effect.

If you expand the Transparency parameter, you can access the Initial and Final values. These values enable you to set the opacity level for the beginning of the Paint Brush effect and the end of it, thus creating a smoother transition between scenes.


Paint Brush effect settings

The settings in the third group allow you to tailor the effect to your needs. For instance, you can change the direction and angle of the brush strokes, choose the brush width, and more.

Directly

The first parameter in this group is named Directly, and it refers to the direction of transition. If you leave this parameter deactivated, the paint brush will gradually cover your footage, stroke by stroke. If you activate this parameter, the transition will work in the opposite way and gradually uncover video from a coat of paint.

Stroke angle

The following parameter allows you to change the brush stroke angle. By default, the brush moves under a 45-degree angle, however, you can change this value to your taste. For example, in the illustration below, you can see how the strokes will look if you use a 90-degree and a 30-degree angles.

In addition to the Stroke angle, you can activate the option called Opposite side and change the side where the brush starts moving. For example, by default, the paint brush moves from right to left. In this case, the opposite side direction will be from left to right.

Starting corner

This parameter defines the corner where the effect starts. There are 4 self-explanatory options you can choose from: left-top, right-top, left-bottom, and right-bottom.

Brush width

Brush width is rather self-explanatory as well. This parameter defines how wide and thick brush strokes are, and you can leave its value consistent or make it dynamic. For example, if you set the Initial value at 10% and the Final value at 50%, each subsequent brush stroke will be thicker.

Blur

This parameter adds blur to the paint and makes brush strokes less defined. The higher the value, the more blurred the strokes will be. As a matter of fact, if you type 100%, the effect will resemble spray paint.

Brush movement direction

Brush movement direction is the brush movement pattern defining the order in which brush strokes are applied. The are 5 options you can choose from:

  • Non-continuous – each subsequent brush stroke will start on the same side of the scene.
  • Continuous – each subsequent brush stroke starts on the opposite side of the scene.
  • Area-based – the scene gets divided into several areas, and each area gets covered with paint
  • Random (same angle) – each brush stroke appears in a random place on the scene under the same angle.
  • Random (random angle) – each brush stroke appears in a random place on the scene under a random angle.

Overlap coefficient

Overlap coefficient defines the percentage of brush strokes that appear on the scene at the same time. For example, if the total number of brush strokes required to cover the scene entirely is 12, and the overlap coefficient equals 30%, at any given moment, you’ll be seeing 4 brush strokes instead of just one.


Try the Paint Brush transition for free

The new Paint Brush transition effect is available in the free version of VSDC Video Editor, so if you liked this tutorial, go ahead and download VSDC from the official website.

Feel free to message us on Facebook and make sure to subscribe to our YouTube channel for a weekly doze of video editing inspiration.

10 Best Music Visualizers [2023 Edition]

Music visualizers have been around for a while, but right now, they’re catching a new wave of popularity. People use them for podcasts, music videos, and social media posts.

Of course, major market players like Adobe Effects do include an audio spectrum effect, but if you’re only posting visuals once in a while, you may not want to break your piggy bank for the subscription fee. So if you’re looking for a free or affordable tool for creating beautiful audio visualizations, below are 10 programs to help you do just that.


5 Absolutely free music visualizers (no watermark)

Without further ado, let’s start with free music visualizers you can use on your PC or right in the browser.


VSDC

VSDC is a free video editing suite for Windows, but it happens to have a powerful built-in music visualizer. Unlike most tools, VSDC works offline, so you don’t have to rely on your Internet speed and worry about the file size. You can use it to create linear or circular audio spectrums, abstract music visualizations, and anything in-between.

Because it’s a non-linear video editor, its feature set is significantly more versatile than what most dedicated music visualizers offer. For instance, you can visualize an audio that is a part of an uploaded video file. You can also upload an image or a video as a background, and place an audio waveform over it. On top of that, VSDC includes lots of cinematic effects that will come in handy if you’re working on a lyrics video. Such effects include raindrops, various video overlays, side-by-side videos, and more.

Download the latest version of VSDC

VSDC supports all popular audio formats and allows you to upload your projects directly to YouTube. If you’re creating videos for social media, there are special export profiles for Facebook, Twitter, Vimeo, and Instagram that help you save your files using the best parameters for the selected platform.

Read a detailed guide to using VSDC audio visualizer here >>


MusicVid

MusicVid is a popular template-based music visualizer. As you enter their website, you’ll find a gallery of pre-designed templates: circle spectrum, bar visualizer, audio waves, and more. Select any template and click around if you want to test the app without having to start a new visual from scratch.

Depending on the template you’ve selected, you can customize your animation. For instance, if you’ve applied the circle spectrum template, you can adjust the background, spectrum type, color theme, number and size of particles, and other parameters.

MusicVid is a free cloud-based music visualizer

The spectrum visualizer seems to be the most versatile template in the MusicVid library because other templates provide fewer settings to play with. However, you can also start an empty project and create your own visualizers. Keep in mind that some templates include an attribution notice and require you to credit the author when you publish your project.

Exporting is very straightforward, although it may take some time while all the elements added to the scene are being rendered. One really convenient feature you’ll notice during the export is the ability to save a fragment of the audio instead of the entire file. It’s a great way to create a short sample, a teaser, or a soundbeat for social media.

Watch the MusicVid tutorial and try it for yourself.


Vizzy

Vizzy is another online music visualizer from the creators of MusicVid. Although this app is still in the Alpha version, Vizzy is rather impressive and definitely worth trying. You can work with animated text objects, spectrums, images, and effects. The most outstanding feature in the Vizzy toolset is called Analyzers. Analyzers allow you to manually control how objects added to the scene react to the music beat.

Unlike MusicVid, Vizzy brings many more cinematic effects you can apply to the visualizer. Some of the most stylish ones include Glitch, VHS, and Fisheye.

Vizzy is a new music visualizer from the creators of MusicVid

Of all tools in this list, Vizzy seems to have the most intuitive interface, although to upload your own files, you’ll have to log into the program using your email. For testing purposes, however, you can open the Creations library and use animations created by others. This is a very user-friendly approach, especially if you’re in the process of comparing tools and don’t want to register on every website. Besides, seeing other creators’ projects can be inspiring!


Headliner

Headliner is an online audio visualizer designed for podcasters. Its newbie-friendly wizard-based interface will walk you through the process of creating a beautiful visual within few minutes. To get started, you can either upload your own track or paste a link to your existing podcast. Next, the app will ask you to select the range for visualization and the output video size. However, the most exciting part starts at the Customization step. This is where you can select the waveform style, add a background image and text. If your muse is taking a vacation, you can just jump to the template gallery and select any pre-designed visual.

Headliner is a stylish music visualizer designed for podcasters

Once you’re ready, you can share your video directly on Twitter, YouTube, Instagram, Facebook, save it to Drive and Dropbox, or download it to your computer in the MP4 format. The paid tiers include extra features like captions, unlimited audio transcriptions, and custom fonts. The free plan allows you to download up to 5 unwatermarked videos per month and produce under 10 minutes of transcription.

Like Vizzy, the Headliner gallery features audio visualizations created by other users. Unlike Vizzy though, the Headliner featured user base includes celebrities and media outlets such as Julie Andrews, The Economist, Smartless magazine, and more. Be sure to check it out if you’re onto finding a new podcast to subscribe to.

View the gallery of videos created in Headliner and try it for yourself.


WoFox

WoFox is a content creation and management platform that boasts dozens of helpful tools including graphic design builder, video maker, and a music visualizer. The app is currently in the Beta version, but it works well albeit the loading speed seems a bit low. The interface of WoFox resembles a slideshow maker: it seems familiar and straightforward. Once you choose a template, you can adjust the text, the color theme, the visualizer type, and the graphics.

WoFox is an online platform for content creation that includes music visualizer

Most templates are designed to help musicians promote their songs on social media platforms that don’t support audio formats per se. What makes the templates especially convenient is the ability to quickly change the video type and aspect ratio for the platform where you’re planning to publish it.

The free plan of WoFox generously provides you with an unlimited choice of templates and graphic assets. You can export videos up to 30 seconds and 360 px each without watermarks. Keep in mind that the free version includes built-in ad banners (which are small and unobtrusive) and provides no commercial use rights. To change that, you’ll need to upgrade to one of the paid tiers starting at $10/mo.

Check the WoFox template library and try it for yourself.


5 Paid (although affordable) music visualizers

To be fair, most free tools include virtually everything you’d want to find in the paid ones. However, since some of you may not be willing to put up with the embedded ads, the lack of customer support or customization, we’ve included 5 more music visualizers that come with a price tag, yet remain somewhat affordable.


Renderforest

Renderforest is a popular content creation platform for non-techies who need marketing visuals and have zero design skills. A large part of that content creation toolkit is a video maker that allows you to create explainer videos, animations, presentations, and music visualizations.

Renderforest is a popular online tool for creating video content

The Renderforest interface is a complete no-brainer. For each template in the gallery, there is a set of style variations to help you adjust the look and feel of your animation. Once you’re ready, you can decide whether you want to export your video for free or willing to pay for better quality.

The free version allows you to export 360p videos for up to 3 minutes with a watermark. The upgrade system is very flexible though: you can pay just for a single export, a subscription, an HD quality, or a custom watermark. In other words, Renderforest utilizes the pay-for-what-you-use system and it seems fair, especially if your project is a one-off and you’re hesitant about getting a subscription. The lowest price for exporting a single video without a watermark is $9.


Videobolt

Videobolt is an online video maker with a music visualizer on board. It seems to be tailored more toward music creators, rather than podcasters because most templates in the gallery are designed with music animation in mind.

Videobolt is a paid music visualizer that works in a browser

Videobolt allows you to upload audio from your computer or directly from SoundCloud. When you first open the app, a quick walkthrough window pops up, however, it is seemingly unnecessary. Using the main screen, you can quickly upload your track, the artist info, and the background. For further customization, you can use the options in the left-hand side menu.

Once you select the color theme, the beat frequency, and the effects, you’ll be prompted to produce a 15-second low-quality preview with a (rather huge) watermark to see the result before exporting the entire video. From there, you can either go back to editing or choose a subscription plan to export the video in high quality. Pricing plans start at €7.99/mo which includes up to 6-minute videos, a commercial license, fully licensed music library, lots of stock footage, and cloud storage for your media files. There’s no free plan or trial period.


Songrender

Songrender is like Canva for podcasters. It helps you create simple music visualizers and podcast clips for social media. To get started with this tool, you’ll have to register an account. It does seem a bit of a hurdle, especially given that most tools allow you to run a test drive without signing up. However, from there, the process is smooth and simple.

Songrender is an intuitive cloud-based music visualizer

In the array of black-themed interfaces, Songrender feels like a breather. It loads fast and walks you through every step during the onboarding process which includes 2 screens: you upload your track and the background on the first one, and customize the style of the waveform on the second one. Before rendering your file entirely, you can export a shorter sample just by dragging the handles on the timeline. From there, you can either proceed with a watermark or buy a “credit” for $5 to export 1 video without a watermark. If you’re going to produce music visualizers on a regular basis, there are credit packages and monthly subscriptions available.

Using the free trial plan, you can export as many 720p watermarked videos as you want as long as they’re under 5 minutes. Unlike Videobolt, Songrender allows you to actually save watermarked videos to your computer and publish them online.


Specterr

Specterr is an online music visualizer and a lyrics video maker. This means that in addition to the audio beat visualization, it enables you to add synchronized song lyrics to the scene.

Specterr is an expensive online music visualizer

It’s hard to call the Specterr templates somewhat unique, yet it can boast about quite a few customization controls that allow you to turn your music beat into a truly unique video. For instance, one cute detail missing from most music visualizers on the list is the ability to create depth by adding particles to the video.

When finished, you can either save your project in the cloud or export it to your desktop. At this point, you’ll be prompted to sign up and create an account. The price tag for using Specter is higher than what similar tools ask for. The free plan includes 2 watermarked videos per day with a duration of up to 5 minutes. If you want to download a single video without a watermark, you can do it for €11.99 (720p) or €15.99 (1080p). Otherwise, you’ll have to select a subscription plan. For a fee, Specterr offers two options: 4 high-quality videos for €20 per month, or an unlimited number of videos for €60 per month.


OFFEO

OFFEO is a video maker designed for marketers. This app is an official Facebook partner, and it offers tools for creating intros, GIFs, memes, video ads, and other assets. You can very well use it as a music visualizer, too! There’s a dedicated gallery featuring stylish quick-start templates.

OFFEO is an online content creation platform with a music visualizer onboard

If you’re a creator promoting your brand (or your band) on social media, OFFEO seems like a really handy all-in-one platform that comes choke-full of design tools. However, to try it out, you’ll have to register an account and provide your payment info. There is no free plan or commitment-free trial period, which seems to be an outdated practice for SaaS. Although the company does offer a 30-day refund guarantee, it makes it harder to compare apps and make a decision. For those on the fence, there is a private Facebook community where OFFEO users share their projects and insights.


Choose a music visualizer that works for you

As you can see, there’s a wide choice of music visualizers on the market. With this roundup, we’ve just scratched the surface trying to find free or affordable tools for those on the budget. At their core, most apps are nearly the same: they do the job and allow you to create beautiful music videos without being a video editing pro. At the end of the day, your choice will depend on three questions:

  • whether you prefer a cloud-based solution or a desktop app;
  • whether you want to have full customization freedom or you can make do with a pre-designed template;
  • and whether you’re ready to pay for unwatermarked videos or not.

Finally, it’s also important that you like the way the app looks and feels. So go ahead and try a couple of them from our list to find the one that works for you.

News

New Transition Addition Methods, RAW/BRAW Files Support and Free Waveform

Welcome to the next level of video editing with VSDC's latest release, Version 9.1! Packed with an array of fresh features and enhancements, this update is designed to make your video editing experience...

VSDC 8.3 – 100+ New Templates, Key Editor Window, AV1 and Enhanced GUI

Welcome to the latest VSDC update, Version 8.3! We've been working hard and we’re ready to present a feature-packed release for you to discover an exciting array of over 100 fresh free video templates,...

Free video editing in 2023: Unlock Your Creativity without Breaking the Bank

In today's digital world creativity reigns supreme. It offers endless possibilities for individuals and brands to captivate audiences and leave a lasting impression. With social media platforms at the...

The Best Online Video Editors in 2023: Benefits and Drawbacks

In today’s digital landscape, the popularity of video content is gaining momentum, with users increasingly turning to video creation both for personal advantage and professionally. When searching for...

VSDC 8.2 – Proxy File Support, Color Keyframes and Vectorscope

We are thrilled to unveil the highly anticipated VSDC video editor 8.2 update. Our team has been hard at work, ensuring that this release is packed with exciting features and enhancements to elevate your...

VSDC 8.1 Brings Multicam, Curve Line Object, Scrolling Text Effect, and More

We’re thrilled to introduce VSDC 8.1. The new version primarily caters to professional videographers, graphic designers, and artists, however, everyday video creators will benefit from the update as...

VSDC 7.2 Takes Its Color Correction Toolset to the Next Level (Plus, Other Updates)

It has been another productive couple of months for the VSDC team, and we’re thrilled to announce the release of VSDC 7.2 – the new version of our video editing suite. Although the majority of updates...

5 Free Pieces of Software for Video Color Correction

If you’re a video creator, there are three reasons why it’s crucial to learn color correction. First, it will help you enhance your videos and make them look professional. Second, it will allow you...

VSDC 7.1 Upgrades GUI and LUT Editor, Adds New Effects and Custom Shortcuts

The new version of VSDC includes two new video effects, expands the functionality of the LUT editor, and makes video editing more convenient by bringing an improved interface, optimized timeline, and custom...

10 Pieces of Truly Free Video Editing Software (with No Watermarks)

Seeing a watermark on your video after spending hours editing it feels infuriating. Yet a few video editing software developers are still using this practice to limit the free usage of their products....
 

Screen Recorder Box

This program allows you to capture the video of your desktop and save it on your PC in various formats. Coupled with a video editor, the program is a great tool for creating presentations, tutorials and demo videos.

Read more about Screen Recorder...


Video Capture Box

The program captures video from external devices and records it to computer in a free format. You can save video from video tuners, webcams, capture cards and other gadgets.

Read more about Video Capture...


Reviewed by


"VSDC Free Video Editor is a surprisingly powerful, if unconventional video editor"

- PC Advisor


"This video editor gives you tons of control and editing power"

- CNet


"The editor handles many common formats and boasts a good deal of capabilities when it comes time to alter lighting, splice video, and apply filters and transitions in post production"

- Digital Trends