 User Help Manual
  Learn FAQ
  Send us feedback
 ")


- Published by Amy Shao on June 30, 2026 Meet the new major update ...
- Published by Amy Shao on March 11, 2026 What is the best gift for...
- published Amy Shao 11/19/25 Meet the long-awaited VSDC 10.2 update: a new ve...
- Hi, I'm Mattea Wharton, a travel videographer from Seattle. For three years I ba...
How to Use Flow Transformation Effect in VSDC
Starting version 6.7, VSDC has received two new transition effects: Paper burn and Flow transformation. In this tutorial, we're going to show you how Flow transformation works.
Once applied, it distorts the image and gradually makes it disappear or dissolve into the next scene. Now, the tricky part is that the distortion pattern is always unique because it's based on the image you apply the effect to. You can, however, significantly customize the pattern to achieve the desired distortion look: from a skewed image to an object falling into a million pieces.
Check out this Star Trek transporter imitation we created using the Flow transformation effect:
In this guide, we'll show you how Flow transformation works and which settings you should be looking at to achieve the desired effect. If you haven’t downloaded VSDC 6.7, do it here.
How to add Flow transformation effect to the video
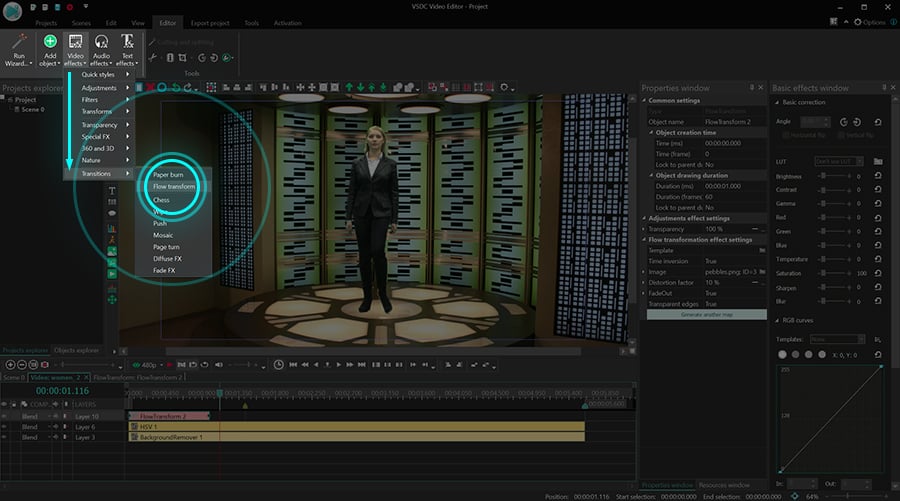
To get started, import your footage (or a photo) to VSDC and open the Video effects menu. Find Transitions and select Flow transformation. In the Object’s position settings window, click OK.
Now that the transition effect is on the timeline, you can move it, change its duration and the distortion pattern.
How to adjust Flow transformation effect
Make a double-click on the main file to get to the transition layer: FlowTransform1. Then make a right mouse-click on the transition and select Properties. The Properties window will slide in from the right-hand side.
In the Properties window, you'll see three groups of settings: Common settings, Adjustment effect settings, and Flow transformation effect settings. We'll take a close look at each group below.
Common settings allow you to change the name of the effect layer, set the exact moment of its appearance and duration – by seconds or by frames.
Adjustment effect settings allow you to set the level of transparency for the effect. This means that the effect can be fully opaque or semi-transparent throughout the entire transition, or change its transparency level dynamically.
The latter is achieved through the parameters called Initial value and Final value. The initial value defines the level of transparency for the beginning of the transition; the final value defines the level of transparency for the end of the transition.
For example, if we set the Initial value at 100% (absolutely non-transparent) and the Final value at 10% (almost transparent), the transition will look as follows:
Flow transformation effect settings include distortion pattern controls, templates, time inversion settings, and other customization parameters. Let's review each parameter one by one.
Template
Templates define the way the distortion looks. There are 4 types of templates available in the dropdown menu – Fractal in, Fractal out, Drops in, Drops out – and each of them has three variations.
It's best if you go through the templates one by one to see how they modify the effect for your video.
Time inversion
By default, the flow transformation transition distorts the original image until it becomes unrecognizable. If you activate the Time inversion parameter, the transformation goes the opposite way: the image gets restored from its distorted state.
Image
If you want to modify the distortion, you can upload an image containing the desired pattern. When you do that, the distortion algorithm will follow the pattern on the image. Without an image, the distortion will look like a chaotic, random process.
For instance, depending on the template you select, some pattern variations will be already available in the Image dropdown menu. Here are the examples of distortion based on different images:
Keep in mind that you can scale the uploaded image up and down using the parameter called Scale. Initially, Scale defines the size of the image on the screen. Therefore, the smaller its value is, the more tiny pattern copies there will be on the screen.
If you want the number of copies to change gradually during the playback, you can use the Initial value and the Final value. The former defines the scale factor at the beginning of the effect; the latter defines the scale factor at the end of the effect.
Distortion factor
The distortion factor sets the distortion intensity. The higher its value is, the stronger and faster the distortion process will go. In certain scenarios, it makes sense to change the intensity of distortion within time. To do that, use the Initial value and the Final value parameters.
Fade-in
By default, the image starts being distorted from the beginning of the effect. However, if you set the distortion factor high, that will mean instant image distortion from the beginning of the transition. To avoid severe contrast, we recommend activating the Fade-in option. With it, the distortion process will start more gradually and increase within time.
Fade-out
The fade-out parameter applies gradual distortion disappearance. Notice: if you activate it, the Start offset option becomes available, too and allows you to decide when the fading-out process should start. For instance, if you type 50%, the distortion will start fading out halfway through the effect.
Pattern width/height
These parameters allow you to change the height and the width of the distortion pattern. By default, they both are equal to 1. However, as you increase the values, you’ll start seeing the difference.
Transparent edges
The last parameter in the menu is called Transparent edges. When activated, it makes the most distorted parts of the image gradually disappear.
Apply the new transition effect with VSDC 6.7
To try the new effect, download the latest version of VSDC from our official website.
If you have any questions, feel free to send us an email at This email address is being protected from spambots. You need JavaScript enabled to view it. or DM us on Facebook. Remember to subscribe to our YouTube channel for weekly video tutorials. Stay tuned!
Watch us on YouTube
 / @VSDCFreeVideoEditor
© 2011-2026, www.videosoftdev.com, FLASH-INTEGRO LLC. Privacy policy | Terms of use | About us
All trademarks referenced herein are the sole property of their respective owners.
Copying any materials from this site allowed only with written consent of Site Administration.