Video Editor

Use free video software to create and edit videos of any complexity from a family greeting card to a company presentation. Cut, merge video files, apply visual and audio effects, use filtration and image correction, make slideshows and add an appropriate soundtrack. Use multi-color Chroma Key and advanced parameters settings to give your video a professional look. All popular video and audio formats are supported.

Read more about Video Editor...

Video Converter

This program is intended for converting video files from one format to another. Nearly all popular video formats are supported (both reading and saving). In addition, the program drastically simplifies the task of converting videos for playback on specific multimedia devices, such as iPhone, Samsung Galaxy or Huawei P30 Pro. The program is extremely easy to use, has a modern interface and all necessary video processing functions.

Read more about Video Converter...

Audio Converter

The audio converter will help you convert audio files from one format to another. All key audio formats and codecs are supported. The program also allows you to manage playlists and meta tags, extract audio from video files and save these tracks on your computer in any format.

Read more about Audio Converter...

Audio CD Grabber

This audio tool is intended for grabbing audio tracks from compact discs and saving them to the user’s computer in any format. Nearly all popular audio formats and codecs are supported. The program can also extract track details from the FreeDB server for automatic file renaming and updating meta tags.

Read more about Audio CD Grabber...

Multifunctionality

Multifunctionality

A wide array of multimedia processing tools in one free video software suite.

High speed

High speed

Our programs use fast
and high-quality algorithms optimized for single and multi-core CPU’s.

Affordability

Affordability

VSDC video software is freely available for download to Windows OS-based PCs and laptops.

How to Change a Color in a Video Using VSDC LUT Editor

If you want to change or replace a color in a video, you can do it using the free version of VSDC. Due to the built-in LUT editor, VSDC allows you to have full control of the video color scheme, so you can enhance the look of your footage, change its aesthetic, or add an artistic touch by replacing certain colors.

The best part about this color replacement trick? As long as your footage is of high quality, it’s surprisingly easy to replicate. As a matter of fact, you’ll be able to do it even if you have zero video editing experience. Moreover, you can replace a color in a video permanently (for the entire duration of the video) or temporarily as illustrated in the example above.

The only thing to keep in mind before getting started is that the color you want to replace should be unique and contrasting compared to the rest of the colors in the video (again, like in the example above). Otherwise, other objects in the video containing the same color tone might be affected by the changes.

Ready to start? Download the latest version of VSDC (Windows only) and follow the steps below.

Step 1. Import your footage to VSDC

Launch VSDC on your computer and hit Import content to upload your video. The program will automatically create a project with the parameters matching the parameters of your video. Just confirm the default selection in the pop-up window, and your footage will be added to the scene.

Upload colorful footage to the scene in VSDC

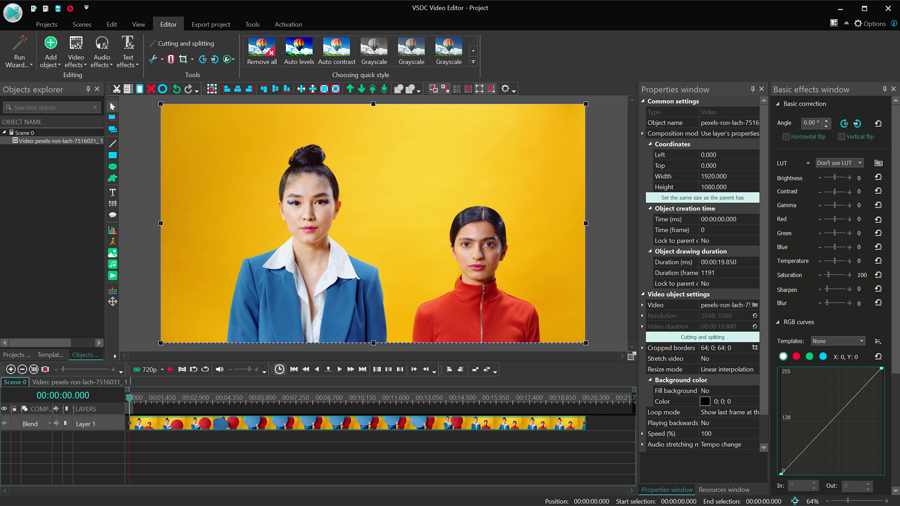
For this tutorial, we’re going to change the color of the background by replacing yellow with other colors.

Step 2. Create an empty LUT

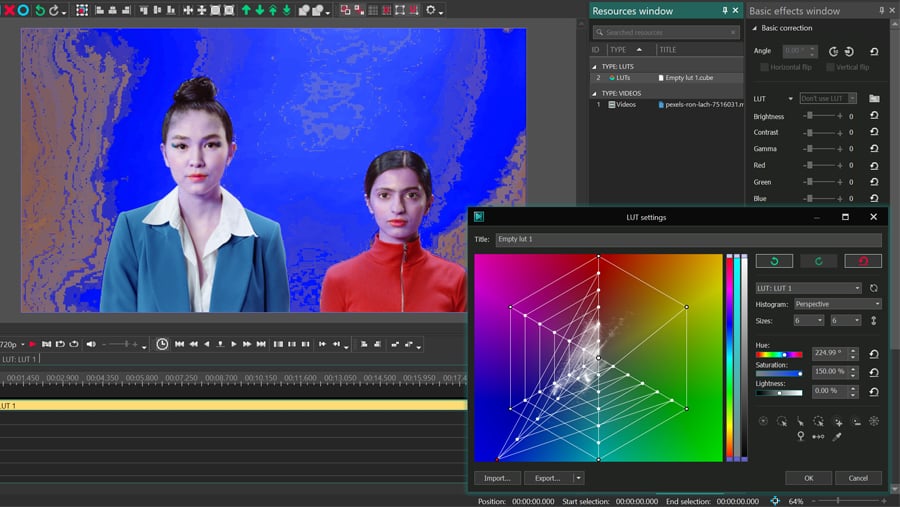
The fastest and most efficient way to replace a color in a video is a custom LUT. To create one, switch to the View tab at the top and select Resources window. Then click anywhere in the Resources window using the right mouse button and select Add resources > Create LUT. A new empty LUT will be added to the list of resources.

How to create an empty LUT in VSDC

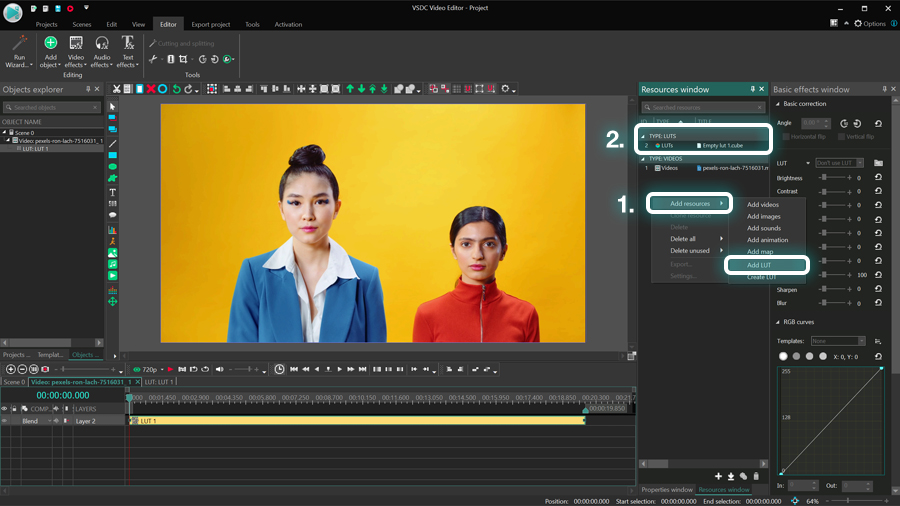
Double-click on the video and drag the LUT from the Resources window to the timeline. Notice that by default the LUT will be added to the timeline from the playhead position, but you can move it with the mouse, too.

Once the LUT is on the timeline, go back to the Resources window and double-click its cube-shaped icon to open the LUT settings.

How to open a LUT editor in VSDC

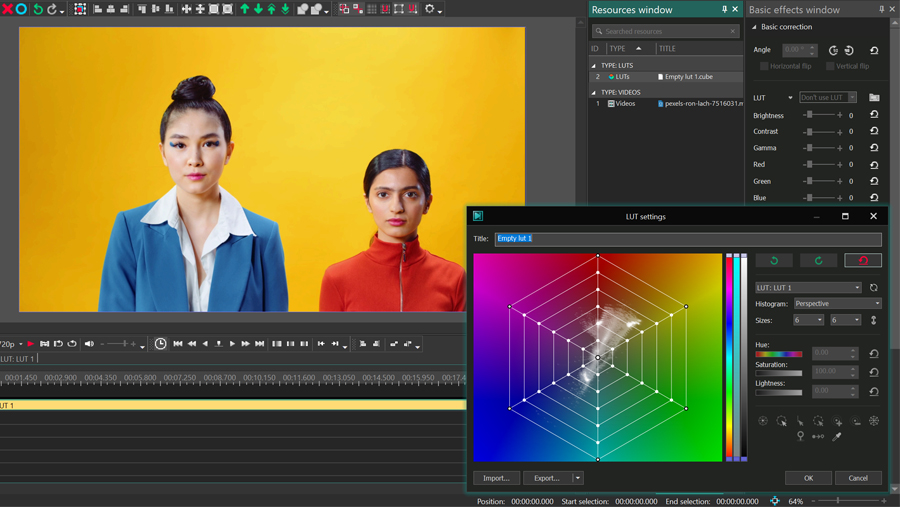
The gradient histogram represents all existing color tones, and the white spots visualize the color tones in that particular video. Using control points (the intersections of rays and circles), we can adjust any color tone in the video and change its saturation level or hue. The latter is exactly what we’ll do in the next step.

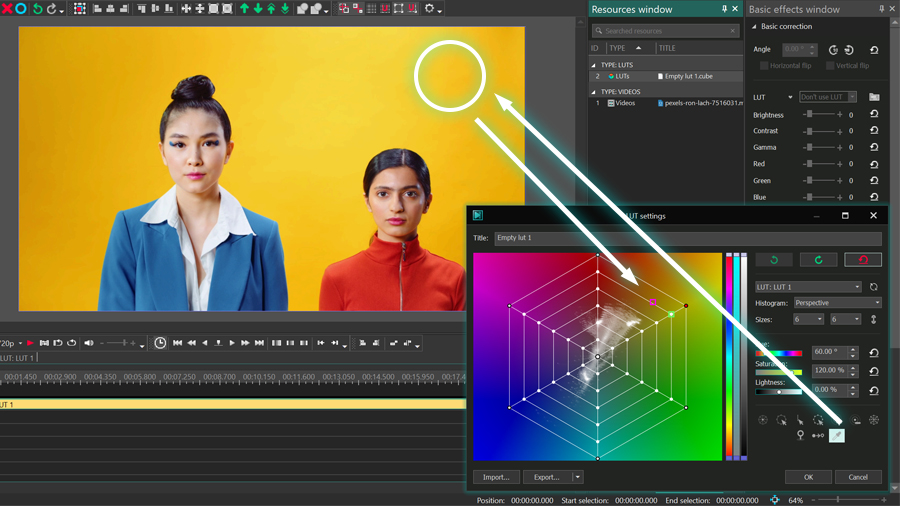
Step 3. Replace the color in your video

To replace color A with color B in a video, you need to select the corresponding control points in the color A section and drag them to the color B section on the histogram.

For our example, we can grab the brightest yellow tone control point and drag it to any other color section. You’ll be able to see the result immediately.

Notice that the entire ray of yellow color tones is dragged along. This approach produces an impeccable result and works well for most videos. In a moment, we’ll show you what happens if some of the tones remain unchanged.

How to find the right control point on the grid

Our footage makes it easy to tell which control point we should select. However, in your case, things might look different. Because of the spectrum of tones and shades, it may be unobvious how to find the right color on the gradient and which control points you should be working with.

For these cases, the eyedropper tool comes in handy. Select the eyedropper icon from the right-side menu and go to the preview window to click on the color you want to replace. The corresponding point on the grid will be selected automatically.

How to select colors on the histogram in the VSDC’s LUT editor

From there, you can try and work with the suggested control point. However, be prepared for further adjustments. In our example, the major part of the background has been replaced, however, there are noticeable artifacts in the areas where the yellow tone was brighter.

What color replacement artifacts look like

In our case, it’s an easy fix. All we need is to drag the remaining control point from the yellow section to the blue section.

Color tones can be tricky, especially if a video was shot with insufficient light. If things don’t look the way you expected right away, don’t get discouraged and try to toggle the controls a bit. For example, you may want to move control points of the same color section one by one to see how each of them affects the result. You may also want to increase the number of control points by changing the number of rays and circles on the grid.

Finally, we recommend reading this detailed guide to working with the LUT editor to better understand its toolset.

Step 4. Preview the result and export your video

Use the Preview feature, and if you’re happy with the look of the video, hit OK in the LUT editing window to close it. Next, before proceeding to export, make sure that the duration of the LUT on the timeline aligns with your goals.

How to evaluate the duration of the color replacement effect in a video

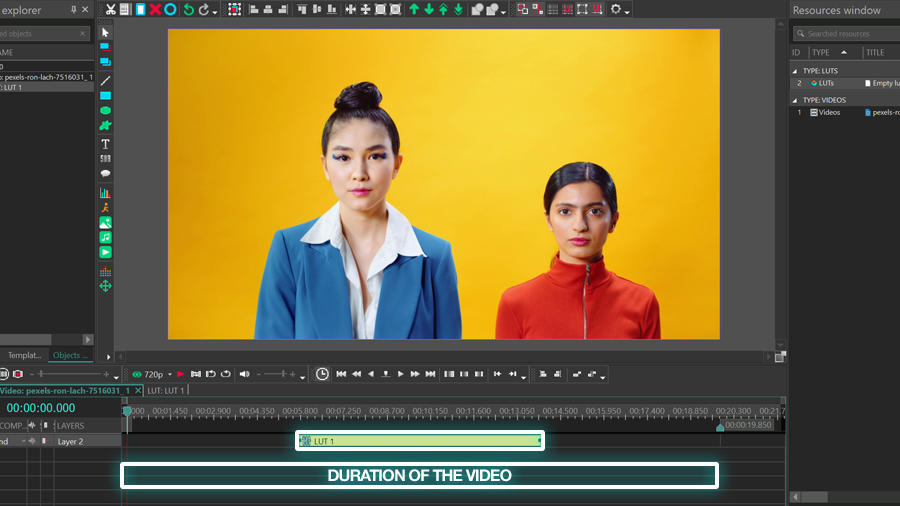
For example, if you want the selected color to be replaced for the duration of the entire video, the LUT layer should have the same duration as the video you’ve applied it to. However, if you need the color replacement to be temporary, shorten the LUT layer and place it accordingly on the timeline.

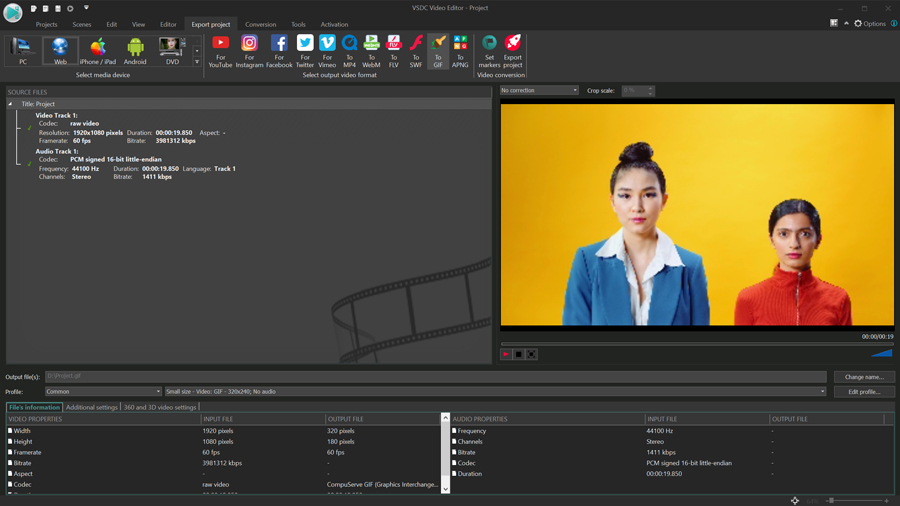
Once ready, go to the Export tab and save the video to your computer.

How to export a video from VSDC

Bonus: how to change the color of the same object more than once

Now that you’ve learned how to use LUTs to change a color in a video, feel free to experiment! For example, you can try to replicate the popular “chameleon” effect and make an object in a video change color multiple times – just like at the beginning of this tutorial.

To achieve this effect, you’ll need to create as many empty LUTs as many times you want the object’s color to change. Adjust the settings for each LUT following the guidelines from above, then shorten their duration and merge them on the timeline.

In our example, there are 5 LUTs with different color replacement settings visible somewhere between the 3rd and the 20th seconds. When you start working on your video, you will be able to fine-tune all these nuances: decide on the number of LUTs, their sequence, and duration.

Explore more color editing tricks with VSDC

If you like working with color, and you’d like to learn more tricks, go straight to the VSDC YouTube channel and browse through the videos. There’s much more to it than just color grading! For instance, if you always wanted to replicate the famous Sin City effect (which means dimming all tones in a video except for one color), below is a tutorial to help you achieve that. Enjoy!

Got any questions about the effect? Email us at This email address is being protected from spambots. You need JavaScript enabled to view it.

Looking for inspiration for your next video? Check our YouTube channel.


You can get more information about the program on Free Video Editor description page.

How to Use Time Remapping in VSDC

If you’re familiar with the object movement feature available in VSDC, you’ll be excited to learn about time remapping. Time remapping allows you to slow down, speed up, or reverse object movement in a selected part of its movement path. As a result, you’ll be able to create really impressive effects, like this one:

The new feature is available in VSDC Pro starting version 6.9. Below, we’ll show you how it works.


How to use time remapping in VSDC

Currently, time remapping can only be applied to moving objects. This includes images, shapes, titles, icons, or any other 3rd-party objects added to the scene. Here is how to get started.

Create a moving object

To make an object move in a video, you need to add it to the scene, double-click it, and hit the movement icon from the left-side menu. Then place the cursor where the movement destination is and adjust the vector.

The object movement feature is newbie-friendly and straightforward, but if you’re unfamiliar with it, we have a detailed guide for you.


Open the time remapping graph

Once you’ve created the movement path, right mouse-click the movement layer on the timeline and select Properties. In the Properties window, find Time remapping, and hit the 3-dot icon to access the graph.

How to access the remapping graph

This graph illustrates object movement over time, and the two axes define two different aspects of it. The X axis reflects the duration of the movement effect: the left part of the timeline is the beginning of it, and the right part is the end. The Y axis reflects the object’s movement path: the bottom part of the timeline is the beginning of the path, and the top part is the end.

By modifying the graph, you can modify the object movement progress. For example, you can make the object go slower or faster through certain parts of the path, or even send it in the opposite direction. All it takes is a couple of keyframes placed in the right spots! Let’s see how you can create them.


Understanding keyframes and the Y axis

Keyframes are control points that allow you to break the graph – and therefore, the movement path – into sections so that you can work with each section independently. You can create keyframes manually by double-clicking the graph or use the templates from the menu. For this tutorial, we’ll use the former option.

Notice that the first keyframe (Y:0) indicates the initial object position on the path. The last keyframe (Y:100) is the end of the path.

As long as the graph is continuously ascending from 0 to 100, the object will be moving from point A to point B following the movement vector you created. We call it the original, unmodified time flow.

Now, let’s see what happens when we change the graph.

We’ve already mentioned that the Y axis indicates the time flow for the object. Below is a simple illustration of how you can reverse it. Suppose you want the object to go halfway through the movement vector and then go back to the initial point, at the same speed. All you need to do is create a keyframe in the middle of the graph and drag the last keyframe from 100 to 0.

Let’s break it down. The object was moving along the movement path up to the breaking point – the keyframe we created. Then, instead of continuing the movement, it started heading back because instead of continuing to ascend, the second part of the graph descends back to Y:0 which indicated the initial point on the movement path for the object. In other words, according to the Y axis, the start and the end of the movement path became the same.

Here is another way to look at it. If the angle between two subsequent keyframes is greater than zero degrees, the object time flow in this section goes in the original direction. However, if the angle between two subsequent frames is less than 0 degrees, the object time flow goes in the reversed direction.

The explanation of the Y axis in the time remapping graph

For example, if you apply the ZigZag template from the template menu, you’ll get an object bouncing between the sides of the scene.

Note that the movement effect will continue for as long as the object is present in the video.


Understanding the X axis

Now that you have an idea of the time direction for the object, let’s go back to the drawing board and see how you can tweak movement speed at any given point in time.

Suppose you want the object to reach the middle of the way, slow down for a second, and continue at a slightly higher speed. To achieve that, place a keyframe one second past half the graph and drag it down to make that segment of the graph flatter. Here is what the result will look like:

Here is how it works. By adding a keyframe, you’ve created a new section on the graph, and by dragging the keyframe down you’ve decreased the movement speed for that section.

Suppose you want the object to briefly speed up in the middle of the path and then go back to normal speed for the rest of the way. That’s easy! Drag the new keyframe up to the desired angle and mirror its position with the central keyframe to create identical angles on the graph.

The takeaway from these two examples? The angle between two subsequent keyframes defines object movement speed. The greater the angle, the higher the movement speed is; the lower the angle, the lower the speed is.

The explanation of the X axis in the time remapping graph

Congratulations! By now, you should have a good understanding of how time remapping works for a single movement vector animation. However, in many cases, the object movement path contains two vectors or more. Let’s see how the time remapping graph will look in these cases, and how you should approach it.


Time remapping for multi-vector movement path

If you’ve created a movement path consisting of multiple vectors, on the time remapping graph, each vector will be represented by a light-gray rectangle. The purpose of these rectangles is to help you visualize the position of each vector in time and create keyframes accordingly.

Time remapping graph for a multi-vector movement path

The general approach to multi-vector movement paths is no different from what we’ve described above. However, there’s one tricky part you should keep in mind. If you decide to change any vector position in the scene, the gray rectangles will shift accordingly. The tricky part is that if you’ve already created keyframes on the graph based on those movement vectors, you’ll have to manually shift them too.

Essentially, you need to remember that keyframes aren’t attached to movement vectors. So if you want the object to move through a certain vector with a certain speed, and you’re moving that vector around, make sure to double-check the keyframes.


Have full control of object animation with remapping

Time remapping is a powerful tool, and we’re excited to introduce it in the new version of VSDC. Although we’ve gone through every step of applying this feature, there’s much more to discover. For instance, you can incorporate object rotation, transition effects, and even motion tracking.

Download VSDC 6.9 now and try it for yourself!


You can get more information about the program on Free Video Editor description page.

How to Make Transitions Smoother Using Bezier Curves

Bezier curves have many uses in video editing, one of which we already explored in our quick guide to drawing shapes. This time, we’ll show you how to use Bezier curves in so-called “easing curves” – the tool allowing you to control how long it takes a transition to kick in or fade out.

Please note that editing transitions along Bezier curves is only available in the Pro version of VSDC.

Step 1: Import your footage and add a transition

Making smooth transitions with the Bezier curve is a simple process. First, import your video file to the project. If you already have a blank project opened, you can just drag the video file onto the timeline. Next, add a transition. For this tutorial, we will be using the Wipe transition, but you can choose any of the ones available in the Templates window.

Step 2: Apply transition curve template

Right-click on the transition effect to open the Properties window. For our example, we’ll be working with Transition levels – the parameter setting the speed of the transition. Right-click on the tiny Parameter change icon next to Transition levels and hover over Templates. Then select “Quad Out.”


How to use bezier curves

There are over a dozen options available in the menu; however, for our example, we need to use a template ending with “Out” because the transition is at the end of the video. Had we placed the transition at the beginning of the video, we would have selected a template ending with “In.”

Step 3: Configure Bezier curve

Once you apply the template, the timeline window will display a graph. The curve on the graph is based on the Transition level values, therefore, by changing this curve, you will be adjusting the pace of the transition.

To get started, find the two control points: one at the beginning of the graph and one at the end of it. These are called “keyframes.” Click on either of the keyframes, and you’ll see a vector. Grab the end of the vector and drag it around: both the length and the angle of the vector change the curve and, thus, the pace of the transition.


To adjust the transition at any specific moment, you can create additional keyframes by double-clicking on the graph. The smoother the curve is, the smoother the transition. The opposite is true: if you create a sharp curve, the pace of the transition will spike accordingly.

Create custom video effects using Bezier curves

Customizing transitions with Bezier curves is easy. You can apply them to any parameter that includes values changing along a curve and achieve outstanding video effects. Furthermore, after creating your ideal transition, you can save it as a template and use it later. Check out a quick tutorial on how to do it.

How to Record Minecraft Gameplay

Do you want to record Minecraft gameplay for your YouTube channel? Maybe you want to capture your speedrun, or just make a let’s play? This means that in addition to the screen, you might also need to record your webcam or microphone — or even both at the same time.

To help you out, we’ve put together a step-by-step tutorial on how to do it using the VSDC Screen Recorder. It’s a free screen recorder for Windows PC with a built-in game capturing mode that allows you to save footage in ultra-high resolution.

Without further ado, let’s dive right in.


Step 1. Launch VSDC Screen Recorder on your PC

After you’ve installed VSDC on your PC, you can launch it through the shortcut on your desktop. Once opened, you will see this window:

How to record minecraft

The interface is pretty simple and user-friendly, so you should have no trouble navigating it, even if you’re not tech-savvy. Before getting started, you’ll need to enable your recording devices. Let’s see how you can do it.


Step 2. Enable recording devices

If your webcam and/or microphone are external (not built-in), you’ll need to connect them to your PC first. After doing that, click the Enable sound button to enable microphone sound in your video, and hit Enable camera to record video from your webcam.

Keep in mind that if you choose to record your Minecraft gameplay using the Game capturing mode, it will be impossible to place the facecam over the game window. Instead, the webcam video will be recorded separately and you can add it to the video later (we’ll show you how to do that). To save the video from your webcam as a separate file, open the settings window, go to Mixer and tick the Save camera recording as file checkbox.


Step 3. Configure your settings

It’s important to set the software up before starting to record. For instance, you can tweak the output video quality as well as the folder where the resulting video will be saved.

To configure the details, use the Common settings and the Export settings. The former allows you to change your Output Folder by clicking Change next to the corresponding option. If you leave the default settings, your video will be saved to the default folder: Videos\VSDC Free Screen Recorder. The latter allows you to configure the number of frames per second, resolution, hotkeys, and the overall quality of the recording. We recommend keeping the quality at 70-80%.

How to record gameplay

Once you’re done, the settings will be saved automatically.


Step 4. Record your Minecraft gameplay

You can now launch Minecraft. In the VSDC taskbar, right-click on the Game Capturing button and choose the game. Then, switch to the Minecraft window and press Start recording hotkey, by default it’s Ctrl+F5.

Once you’ve finished recording your footage, press the Stop recording hotkey, which is Ctrl+F8 by default. To quickly navigate to your recordings, hit the Open Output Folder in the VSDC taskbar.


Step 5. Add your facecam to the video

If you chose to record your webcam along with the gameplay, it’s time to add it to the video. You can use any free video editing software of your choice, however, for the sake of this tutorial, we’ll use VSDC Free Video Editor.

Launch VSDC on your computer and use the Import content option to add the gameplay video to the scene. In the pop-up project settings window hit OK. Next, press Shift + V to add a new video to the scene and select your facecam video from the computer. In the pop-up window, select Add new layer, so that the facecam video is placed over the main video with the gameplay.

From there, all you need to do is grab the handlers of the facecam video and resize it and place it in the corner of your choice.

Enjoy the result

Now that you know how to record your footage, why not try it for yourself? Who knows, maybe you’ll be the next big Minecraft YouTuber! All you have to do is try. In case you want to edit your video, look through the list of tutorials here or check out the VSDC YouTube channel.

How to Use Bezier Curves for Drawing Shapes

Bezier curve is a tool that lets you draw odd shapes with precise accuracy. In video editing, it’s one of those rare features that are easy to use and hard not to. Below, we’ll show you how to use Bezier curves in VSDC Free Video Editor for creating shapes you can later use for clipping or inverted masks. For the sake of this tutorial, we’ve selected a heart shape as an example to practice on; once you get the hang of it, you’ll be able to draw any other shape quickly and effortlessly.

Bezier curves are available in VSDC starting version 6.8. Make sure to download it before getting started.

Step 1. Launch VSDC Free Video Editor and import your content

First, boot up VSDC Free Video Editor. On the main screen, there are different options for importing your content. You can create a blank project with custom parameters, or you can simply click Import content and select your video files from the computer. If you decide to do the latter, VSDC Free Video Editor will automatically change the project’s parameters to the parameters of your video.

Step 2. Draw the foundation of your shape

Once you access the project’s scene, go to the left-side menu and select the Add free shape tool:

How to use bezier curves

A window called Object position settings will pop up to indicate the position of the shape you’re creating on the timeline – just click OK.

Now, as an easy demonstration of what the Bezier curve is capable of, let’s draw a heart shape. In the previous versions of VSDC, you would have to create up to 100 control points just to draw a smooth-looking heart. However, now you’ll be able to make do with only a couple of control points, even if you have little to no vector drawing experience. The Bezier curves will practically draw the shape for you!

To get started, click anywhere on the scene and while holding the mouse button, drag it to the side. Once you do that, you’ll see two vectors that will start forming the shape. Leave them as they are and repeat your steps to create another control point above the first one: now you have half of the shape! Okay, it may not look like half of a heart shape, but that’s temporary.


Now all you have to do is close the shape before we start turning it into a heart. There are two ways to do that. You can either select the first control point and press the Closed Free Shape button in the Shape Point Settings, or simply hold the Ctrl key and click on your first control point.

Step 3: Adjust the vectors to achieve the desired shape

Vectors determine the shape of your figure; therefore, you can tweak the shape just by dragging them in the desired direction. For instance, to turn the circle into a heart shape, press the Ctrl key and drag one of the vectors at a 45-degree angle. Keep in mind that if you forget to press the Ctrl key, both vectors will be moving along, staying parallel to each other. Once you’re finished with one vector, drag the second one at the same angle but in the opposite direction. Repeat the process with the vectors from the second control point, and voila – you have a heart. You always had.


Make use of your shape

Drawing shapes with the Bezier curve is this easy. You can add as many control points as you want: each will have two vectors to help you form the shape more precisely. Whether you want to create a clipping mask, hide an object behind a shape, or just practice vector drawing – now it’s much easier. We’re excited to see what uses you’ll find for this tool!

Now, if you’d like to continue exploring the power of Bezier curves, go ahead and read our guide to using them for creating smoother, custom-paced transitions.

News

New Transition Addition Methods, RAW/BRAW Files Support and Free Waveform

Welcome to the next level of video editing with VSDC's latest release, Version 9.1! Packed with an array of fresh features and enhancements, this update is designed to make your video editing experience...

VSDC 8.3 – 100+ New Templates, Key Editor Window, AV1 and Enhanced GUI

Welcome to the latest VSDC update, Version 8.3! We've been working hard and we’re ready to present a feature-packed release for you to discover an exciting array of over 100 fresh free video templates,...

Free video editing in 2023: Unlock Your Creativity without Breaking the Bank

In today's digital world creativity reigns supreme. It offers endless possibilities for individuals and brands to captivate audiences and leave a lasting impression. With social media platforms at the...

The Best Online Video Editors in 2023: Benefits and Drawbacks

In today’s digital landscape, the popularity of video content is gaining momentum, with users increasingly turning to video creation both for personal advantage and professionally. When searching for...

VSDC 8.2 – Proxy File Support, Color Keyframes and Vectorscope

We are thrilled to unveil the highly anticipated VSDC video editor 8.2 update. Our team has been hard at work, ensuring that this release is packed with exciting features and enhancements to elevate your...

VSDC 8.1 Brings Multicam, Curve Line Object, Scrolling Text Effect, and More

We’re thrilled to introduce VSDC 8.1. The new version primarily caters to professional videographers, graphic designers, and artists, however, everyday video creators will benefit from the update as...

VSDC 7.2 Takes Its Color Correction Toolset to the Next Level (Plus, Other Updates)

It has been another productive couple of months for the VSDC team, and we’re thrilled to announce the release of VSDC 7.2 – the new version of our video editing suite. Although the majority of updates...

5 Free Pieces of Software for Video Color Correction

If you’re a video creator, there are three reasons why it’s crucial to learn color correction. First, it will help you enhance your videos and make them look professional. Second, it will allow you...

VSDC 7.1 Upgrades GUI and LUT Editor, Adds New Effects and Custom Shortcuts

The new version of VSDC includes two new video effects, expands the functionality of the LUT editor, and makes video editing more convenient by bringing an improved interface, optimized timeline, and custom...

10 Pieces of Truly Free Video Editing Software (with No Watermarks)

Seeing a watermark on your video after spending hours editing it feels infuriating. Yet a few video editing software developers are still using this practice to limit the free usage of their products....
 

Screen Recorder Box

This program allows you to capture the video of your desktop and save it on your PC in various formats. Coupled with a video editor, the program is a great tool for creating presentations, tutorials and demo videos.

Read more about Screen Recorder...


Video Capture Box

The program captures video from external devices and records it to computer in a free format. You can save video from video tuners, webcams, capture cards and other gadgets.

Read more about Video Capture...


Reviewed by


"VSDC Free Video Editor is a surprisingly powerful, if unconventional video editor"

- PC Advisor


"This video editor gives you tons of control and editing power"

- CNet


"The editor handles many common formats and boasts a good deal of capabilities when it comes time to alter lighting, splice video, and apply filters and transitions in post production"

- Digital Trends