- Published by Amy Shao on March 11, 2026 What is the best gift for...
- published Amy Shao 11/19/25 Meet the long-awaited VSDC 10.2 update: a new ve...
- Hi, I'm Mattea Wharton, a travel videographer from Seattle. For three years I ba...
- published Amy Shao 6/10/25 The wait for something new and unusual is finally...
How to Create Realistic Shattered Glass Effect
The Shattered Glass effect is a popular transition effect that has recently become available in VSDC Pro. With the proper setup, this effect will help you add depth to the video and achieve perspective. You can use it to create a smooth transition between scenes, end a video with a bang, or start your story.
In this tutorial, we’ll show you how to create a realistic shattered glass effect. However, before moving on, make sure to download the latest version of VSDC from our official website because the new effect is unavailable in versions earlier than 6.8.
How to apply Shattered Glass effect in VSDC
To get started, launch VSDC and use the Import content option to upload your footage to the editor. Once you do that, the video will automatically land on the timeline, and you can begin your work.
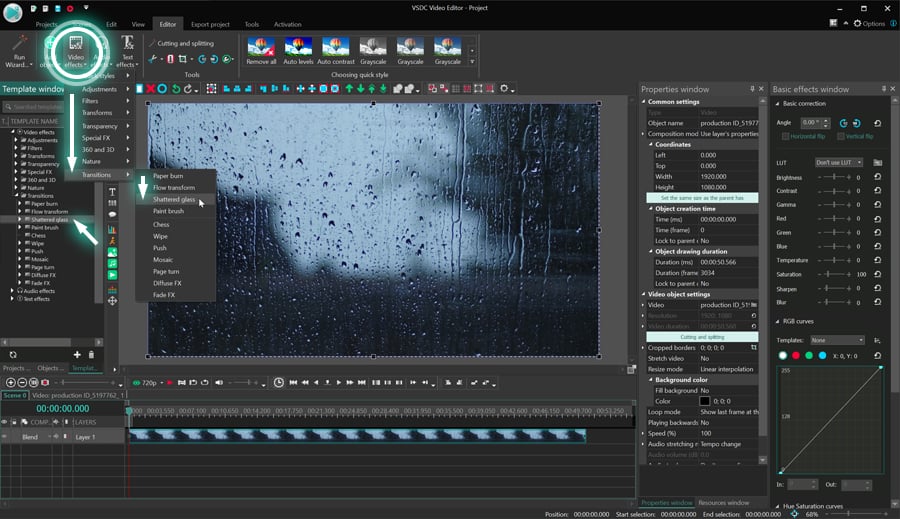
To apply the Shattered Glass effect, open the Video effects menu at the top and proceed to Transitions. Then select Shattered Glass.

After you apply the effect, a pop-up window called Object position settings will indicate that the effect will be added to the end of the scene. Later, you’ll be able to change the effect position manually.
Use the preview window to see the result, and if you’re happy with the way the transition looks – go ahead and either export the video or continue working on the rest of it. If you, however, want to see how you can customize the effect, continue reading.
How to access Shattered Glass effect settings in VSDC
To open the effect settings, you first need to access the effect on the timeline. To do that, double-click on the video you’ve applied the effect to. From there, make a right-mouse click on the effect layer and select Properties. The Properties window will slide in from the right-hand side.

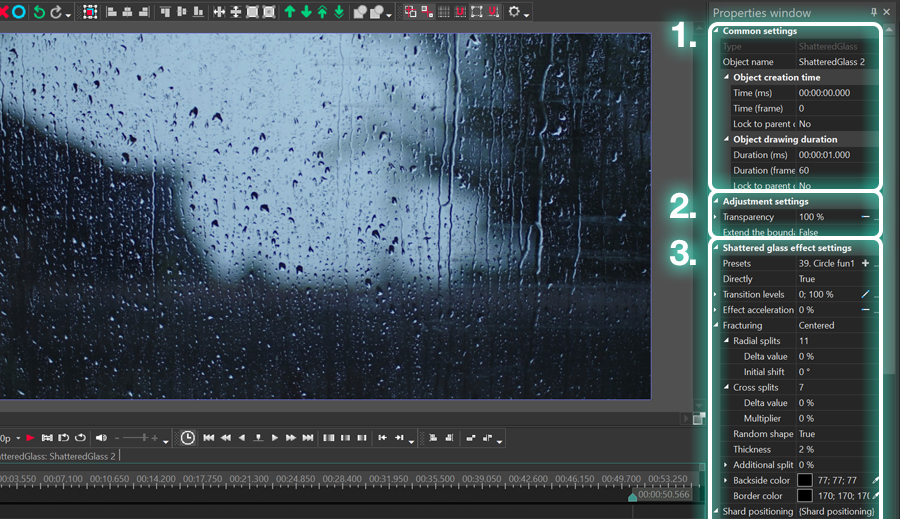
In the Properties window, there are three groups of settings:
- Common settings
- Adjustment settings
- Shattered Glass effect settings
Common settings
Common settings allow you to rename the effect layer on the timeline, define the duration of the effect and set the exact moment when it should appear in the video (in seconds or frames).
Adjustment settings
Adjustment settings include two controls: Transparency of the effect and the option to Extend the boundaries of the shattered pieces (shards).
The former control directly affects the opacity of shattered pieces. For example, if the transparency value equals 100%, the picture shatters while the background remains black. However, if you significantly decrease the Transparency level, the shattered pieces will become semi-opaque, and instead of the black background, the original picture will remain visible.
Notice that if you expand the Transparency menu, you’ll notice two additional properties: Initial value and Final value. Use these values if you want the Transparency level to increase or decrease over time.
Keep in mind that you’ll see the initial and final values for many other parameters in the Properties window. They all work just the same. Make the initial value smaller than the final value, and the parameter value will be increasing as the transition progresses; do the opposite, and the parameter value will be decreasing as the transition progresses.
Now, the latter control in the Adjustment settings is named Extend the boundaries. By default, it’s deactivated, and that means that the shattered pieces of glass remain within the frame of the original video, image, or any other object you’ve applied this transition to. However, if you activate this parameter, the pieces will continue moving freely outside of the object boundaries.
Now that we’ve covered the most basic effect adjustments, let’s go ahead and review customization controls available in the third group of settings.
Shattered Glass effect settings
On this level, you get to adjust the type of fracturing, the movement of shattered pieces, the impact power, and some other parameters. We’ll briefly go over each parameter below.

Presets
Presets are your own effect settings saved in the library. Say, after toggling the controls for some time, you’ve achieved an impeccable transition effect, and you want to save this combination of parameters for the next time. You’ll be able to save it as a preset and then find it in the menu whenever you need it.
Directly
If you leave this parameter deactivated, the transition effect will progress in the direct sequence which represents an object falling into pieces. If you activate this parameter, the transition will progress in the reverse sequence: shattered pieces will gradually form an object.
Effect acceleration
This parameter allows you to accelerate or decelerate the transition, depending on the values you type (you can type negative and positive numbers). Notice that under the Effect acceleration menu, there’s also an option to apply a so-called “Random delay”. If you activate it, for some random pieces of glass, the movement rotation will be delayed.
Fracturing
This parameter defines the type of fracturing and includes two options: Centered and Disbanded.
Both scenarios have additional settings that allow you to control the number of cracks, the movement direction for shards, their shape, and other characteristics. Without further ado, let’s go ahead and see how things work.
Centered fracturing
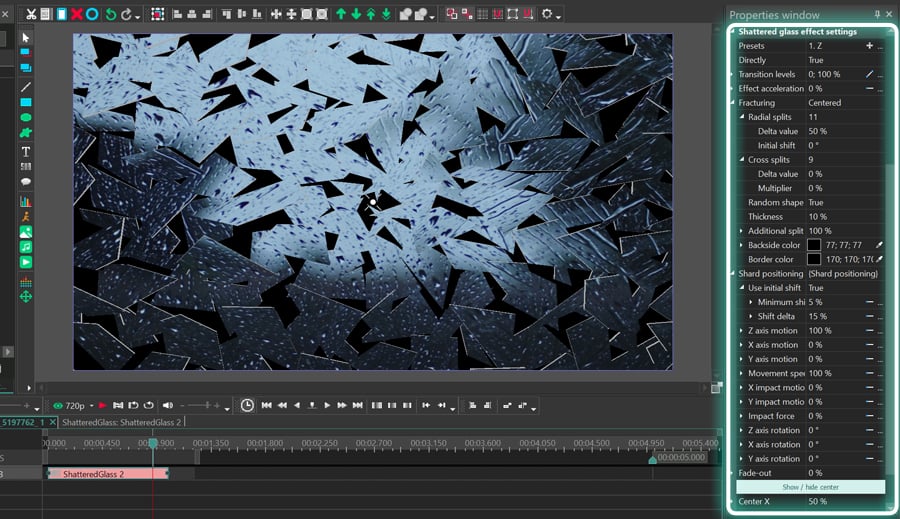
If you select the Centered type of fracturing, the cracks will form in straight lines coming from the impact point which you can move anywhere you like – as shown in the illustration below.
Radial splits is the parameter that allows you to set the number of cracks – and therefore, the number of shattered pieces.
Delta value defines the delta of the angles formed by the cracks. For example, knowing that the maximum degree value is 3600, you can set the Delta value at 0 and have 10 cracks, each forming a 360 angle. However, if you start increasing the Delta value, the angles will vary based on the number of cracks and the Initial shift which sets the angle deviation from 00.
Cross splits is the parameter that allows you to add cracks across radial splits and shatter the glass into smaller pieces. You can change the distance between cross splits using the parameter called Delta value or move them closer/further from the center using the parameter called Multiplier.
Random shape is a parameter that allows you to choose whether you want shattered pieces to be of a random, odd shape or remain in the correct shape formed by the split lines.
To increase the thickness of shattered pieces, you can use the parameters named Thickness.
Additional split chance is the parameter that creates a chance for each shattered piece to break into smaller shards. The higher its value, the more random pieces will have additional fracturing.
To control the size of the shards, use the parameter named Max fracturing. The smaller its value, the smaller the shards are.
Backside color defines the color on the flip side of the shattered pieces. By default, the flipside is black, however, you can select any other color as well as set their Opacity level.
For example, if you set the Opacity level at zero, both sides of the shattered pieces will reflect the original image. Otherwise, one side will contain a fragment of the image, and the other side will be of the color of your choice. Similarly, you can set the color for shard borders.
Disbanded fracturing
Now that we’ve reviewed the first fracturing scenario, let’s see how Disbanded fracturing works.
The key difference here is that if you apply this scenario, the fractures will be spread evenly on the image with no single visible point of impact.
To change the number of shattered pieces, use the Points on X/Y axis. These parameters set the number of corners that belong to the shattered pieces – therefore, the higher the number you use, the more pieces there will be.
Keep in mind that for each of these numbers, you can also choose a Delta value (X/Y). Delta values set the deviation of the number of points on the X and Y axis. For example, if you put 5 points on the Х axis, and the Delta value is 100%, each horizontal line will produce from 1 to 10 shattered pieces.
The following parameters – Thickness, Additional split chance, and Backside color – are similar to what we’ve already reviewed in the previous section, so we’re going to skip them and move to the next feature called Shard positioning.
Shard positioning is a group of settings to help you customize the shards. The first parameter in this menu is named Use initial shift, and it’s activated by default. It creates a sense of depth in the video by sending some of the shards straight to the foreground of the scene. If you deactivate this parameter, the pieces will be moving within the middle ground only.
Notice that if you use this feature, you can customize the movement of the shattered pieces by applying the Minimum shift and Shift delta. The former defines the shift of the shattered pieces from their original position to the foreground. The latter defines the deviation delta for the Minimum shift.
The following parameters are named X axis motion, Y axis motion, and Z axis motion. They help you set the movement direction around the axis for the shattered pieces. By default, all these parameters are set at 0% and that’s why shards remain in the same spot. However, as you start increasing the values, the pieces will start moving in the indicated direction.
Movement speed defines the speed at which shattered pieces are moving until they fully disappear from the scene. By default, this value is set at 100% which is the maximum speed. If you type 0% instead, the pieces will be rotating around themselves without moving anywhere.
Now, to make the disappearance of the pieces more dynamic, the developers have added an option named Reduce movement speed. This feature reduces the movement distance assigned to certain shards before they disappear from the scene. As a result, the shattering effect gets more volume and looks more cinematic.
There are 8 Reduction scenarios you can choose from, and they all create a slightly different effect.
The following parameters in the menu are named X/Y impact motion, and they enable you to emphasize the impact point by moving the pieces further away from it after the split. The movement direction in this case will be defined by the values you assign for the X and Y axis.
For example, if X impact motion equals 0, but Y impact motion has been assigned any value above 0, you’ll see a vertical split. If you assign any value above 0 to each axis, the shattered pieces will split both vertically and horizontally.
To adjust the speed at which pieces will bounce off from the impact point, use the parameter named Impact force. Essentially, it literally means the strength of the impact. The higher its value, the bigger the split and the faster the pieces will be moving.
Under the Impact force menu, you’ll find additional parameters that will help you adjust the impact. For example, you can Add random shift to allow shards to randomly shift from the impact point.
Aspect correction is the parameter that adjusts the movement of shattered pieces according to the size of the video or the object you’ve applied the transition to. If you enable this option, shattered pieces will shift evenly, regardless of the given aspect ratio. If you disable this option, the movement shift will be based on the aspect ratio: for instance, if your video has the 16:9 aspect ratio, the pieces will move further horizontally because the width of the video exceeds its height.
Reduce impact force is the parameter that enables you to reduce impact force using pre-configured Reduction scenarios. You can type any value from -99 to 99. The lower the value, the less visible the impact point and the split. Once you set the value, you can open the Reduction menu and select the reduction scenario. We’ll skip the overview of these scenarios because they’re identical to those we reviewed earlier.
The following group of parameters named X/Y/Z axis rotation set the rotation angle for the pieces. If the angle value is above 360 degrees, they define the number of turns each piece makes around the corresponding axis.
Fade-out applies the fade-out effect to the shattered pieces as they reach a certain point of the trajectory.
Perspective projection is a mode that lets you enable and disable perspectivity. By default, it’s enabled, which means the viewer is under the impression that the pieces are moving toward them. If you disable perspective projection, shattered pieces will be moving to the borders of the scene.
Download the new version of VSDC to try the Shattered Glass effect
Hopefully, this tutorial has inspired you and started some idea brewing! If you’re ready to try the Shattered Glass effect in your videos, go ahead and download VSDC 8.2 from our official website.
Need more inspiration? Then make sure to subscribe to our YouTube channel to get notified when we publish new videos.