Video Editor

Download and use the free video software to create and edit videos of any complexity from a family greeting card to a company presentation. Apply vsdc free video editor for light edit hdr-video, any raw-video formats from cams - BRAW, ProRes RAW, any high resolution 4k or more due to video proxies technologies in the editor.
Cut, merge video files, apply visual and audio effects, use filtration and image correction, make slideshows and add an appropriate soundtrack. Use multi-color Chroma Key and advanced parameters settings to give your video a professional look.
All popular video and audio formats are supported.

Read more about Video Editor...

Video Converter

This program is intended for converting video files from one format to another. Nearly all popular video formats are supported (both reading and saving). In addition, the program drastically simplifies the task of converting videos for playback on specific multimedia devices, such as iPhone, Samsung Galaxy or Huawei P30 Pro. The program is extremely easy to use, has a modern interface and all necessary video processing functions.

Read more about Video Converter...

Audio Converter

The audio converter will help you convert audio files from one format to another. All key audio formats and codecs are supported. The program also allows you to manage playlists and meta tags, extract audio from video files and save these tracks on your computer in any format.

Read more about Audio Converter...

Animated Intro & Title Templates

Explore the VSDC Template Store with ready-made video templates for intros, animated titles, lower thirds, logo reveals, slideshows, glitch transitions, LUTs, and color grading presets. Drop a template into the VSDC Video Editor timeline, edit text, timing, and colors, and finish professional video projects in minutes.

Choose from 300+ exclusive packs of video transitions, LUT packs, text effects, GPS telemetry widgets, animated elements, and animated backgrounds for VSDC. All templates are fully customizable, support up to 4K resolution in 16:9, and help you build intros, wedding slideshows, travel videos, and tutorials much faster.

Store catalog

VSDC Cloud - Online video management

Keep your work safe, organized and always accessible! Back up your video projects, store media files online and access them from any device. Enjoy collaboration, share project updates and exchange files easily.

Online video editing management capabilities

Multifunctionality

Multifunctionality

A wide array of multimedia processing tools in one free video software suite.

High speed

High speed

Our programs use fast
and high-quality algorithms optimized for single and multi-core CPU’s.

Affordability

Affordability

VSDC video software is freely available for download to Windows OS-based PCs and laptops.

Removing Watermarks and Hiding Logos from a Video in VSDC

In today's digital landscape, watermarks and logos serve as both protective measures against unauthorized use and symbols of brand identity. Yet, there are legitimate circumstances for removing watermarks and hiding logos from a video, whether for aesthetic reasons, content reusability or to avoid native advertising. So, as you see, knowing how to efficiently eliminate or conceal watermarks becomes essential, and VSDC Free Video Editor emerges as a powerful tool in this domain. This article provides solutions on how to effectively tackle these marks using VSDC. Dive in to master this art and elevate your video editing skills!

DeLogo Filter

Offered in the free version of VSDC, the DeLogo filter presents a straightforward approach to remove watermarks, obscure unwanted logos or other overlay graphics from videos. It can be applied the following way:

  • Start by launching VSDC Free Video Editor. Click on the Blank project button to create your own project.
  • Then choose a file in the file explorer, drag it to the scene and drop the mouse button. If you are new to VSDC and want to learn more about how to get started with VSDC, we advise you to watch our comprehensive video guide.
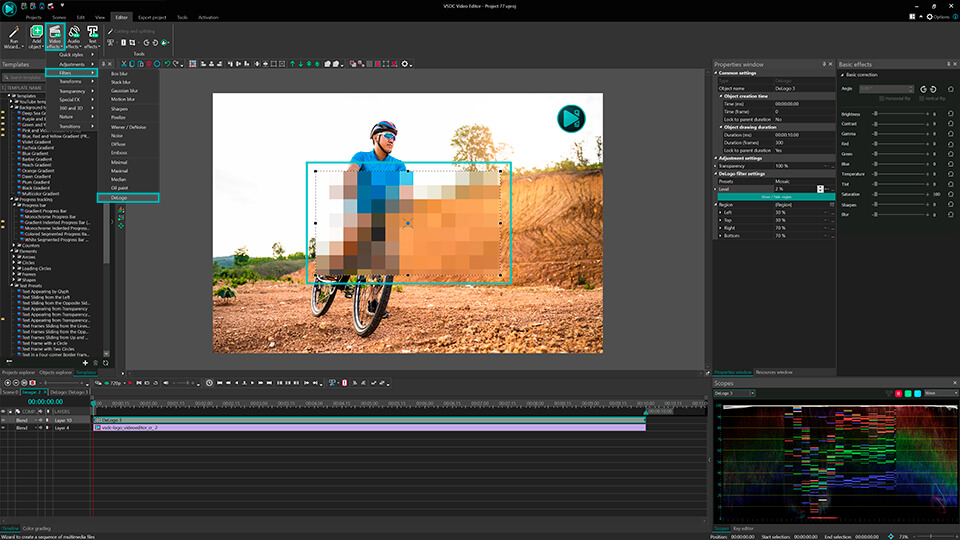
  • To access the DeLogo filter, make sure your video file is selected on the timeline. Then head to the Video Effects tab located on the Ribbon, opt for Filters from the dropdown menu and choose the DeLogo option.
  • After selecting an object, a pop-up window will emerge, allowing you to define the exact timing for when the effect should be visible and when it should disappear. As soon as you're satisfied with the configurations, click “Ok” to confirm changes. Then you'll observe a pixelated rectangle in the video's center. Simultaneously, DeLogo filter will appear on the timeline.
Removing Watermarks

If the default settings aren't ideal:

  1. Click on the DeLogo filter on the timeline and navigate to the Properties window on the right side of the scene. If it isn't immediately visible, right-click on the DeLogo filter and select Properties. In the Properties window you can adjust the size and position of the pixelated rectangle, ensuring it effectively covers the watermark or logo.
  2. Within the settings, you have a choice of five presets: Pixelate, Box blur, Lens blur, Mosaic, and Gaussian blur. Choose one that best fits your needs.
  3. Below, there's an option to adjust the intensity level to fine-tune the appearance.

Now the logo is covered by a blurred rectangle and successfully hidden from your video. If you are satisfied with the result, export your project. This way you can easily remove watermarks, logos, GPS details, vehicle registration numbers and more. So, you see that the DeLogo filter is quite handy, allowing for performing different tasks. But if you are looking for an even more refined appearance, Telea mode is your go-to.

Telea Mode

For those desiring a highly discreet and sophisticated watermark hiding technique, Telea mode is the answer. Unlike basic blurring or pixelation methods that might leave visible traces, the Telea method is based on an algorithm that fills in the unwanted region by analyzing and replicating the surrounding pixels, allowing for a more seamless and discreet removal. However, this feature requires an upgrade to VSDC Pro, which unlocks a world of advanced video editing capabilities. So, this is how to use the Telea mode:

  • Again, start by uploading your video into VSDC Free Video Editor. To do this, follow the steps described above.
  • Navigate to the vertical tab on the left of the scene and choose the Rectangle tool.
  • Use this tool to craft a rectangle that matches the size of the object you wish to conceal, positioning it accordingly.
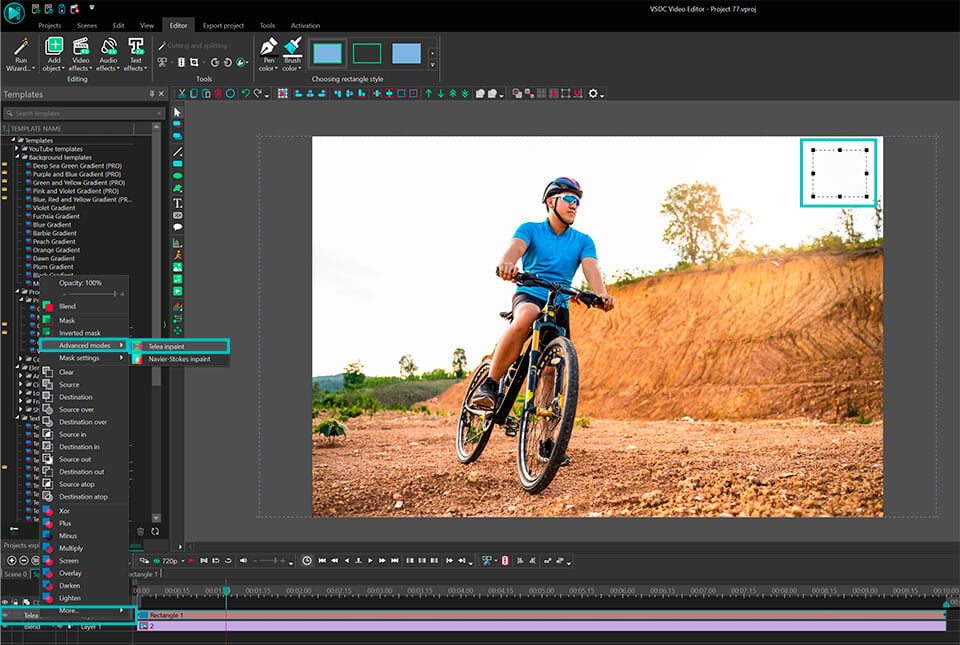
  • Select the Rectangle on the timeline and navigate to the Blend menu on the left of the timeline.
  • In the Blend menu find Advanced modes >> Telea inpaint in the drop-down menu and click on it. That’s it!
Removed the watermark

As a result, Telea mode has removed the watermark by replacing it with the existing parts of your video. So, the area's edges are almost invisible and a bit more subdued than with the DeLogo filter.

Please, note, that when you apply Telea mode in a video editor and launch the preview, you might notice a slowdown. It occurs because both the video and the mask are being processed simultaneously. To optimize the editing process and prevent such delays, we recommend you to convert the original video into a proxy format.

Wrapping up

Removing or hiding watermarks and logos can be a challenging task. VSDC Free Video Editor has proved to be an effective tool for this purpose. Whether you opt for the straightforward DeLogo filter or the more refined Telea Mode, it's crucial to use these instruments responsibly and ethically, always respecting the original content creators' rights and intellectual property.

As you continue your video editing journey, subscribe to VSDC YouTube channel to receive instant notifications about new tutorials published. And if you have any questions or need assistance, you can reach our support team via email at This email address is being protected from spambots. You need JavaScript enabled to view it. or through Facebook and Twitter.
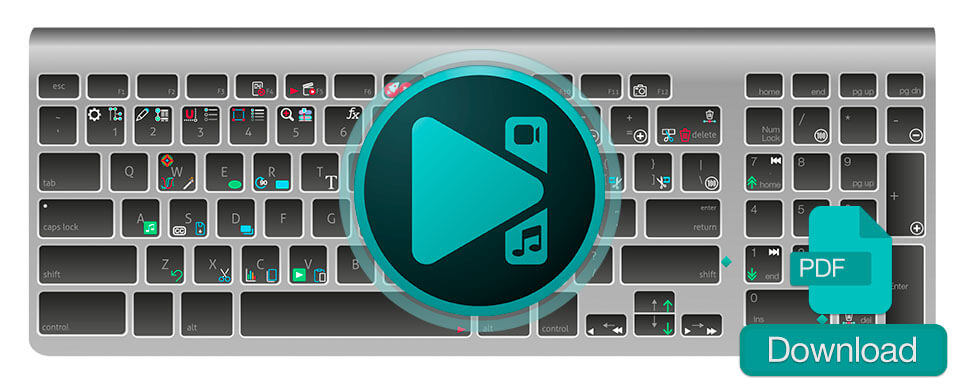
Hotkeys VSDC Free Video Editor

hotkey for vsdc

Boost your productivity and enhance editing efficiency with our extensive collection of keyboard shortcuts tailored for VSDC Free Video Editor. Download the convenient PDF file and swiftly navigate through various features and commands, streamlining your workflow and elevating your video editing skills to new heights!

download windows versionDownload hotkeys map for VSDC video editor

Additionally, VSDC Free Video Editor allows you to customize your desired hotkeys. To do so, simply access the Options menu and navigate to the Keyboard Shortcuts tab.

In this section, you will discover the available keyboard shortcuts in the editor and learn how to reassign them or create your own combinations. The first field, Keyboard Scheme, is designed for users transitioning from different video editing software. You'll find four pre-defined keyboard shortcut schemes there: Default, Adobe Premier, Filmora, and HitFilm.

A comprehensive list of all available hotkeys can be found in a table at the center of this window. To quickly find the desired keyboard shortcut, use the Shortcuts filter option.

Selecting any command from the table will display its assigned hotkey in the Shortcut for selected commands field. If necessary, you can remove the assigned hotkey using the option of the same name or reassign it in the Press shortcut keys field.

Be cautious that if the new combination is already being used by another action, you will receive a warning in the Shortcut currently used by field.

If you wish to reset the keyboard shortcuts to their default settings, simply click the Reset button next to the Keyboard scheme.

To make this process even more accessible, we have provided a helpful video below, illustrating the entire customization process.


Get VSDC Free Video Editor - powerful non-linear editing software with advanced features. Perfect for YouTube creators, social media videos, and professional projects. Learn more about features.

How to Work with Color Keyframes in Effects

Color plays a vital role in establishing the atmosphere and mood of a video. Different color palettes evoke various emotions in viewers, ranging from vibrant and bright to dark and somber. While classic color correction can help create the desired mood, effects can further enhance the impact.

Mastering Color Keyframes in VSDC: Create Stunning Animations

In the latest update 8.2, the VSDC team has expanded the functionality of effects by introducing color keyframes. This new feature allows you to create keyframes and modify colors within effects. It provides you with greater flexibility to experiment with colors according to your preferences and evoke the desired emotions in your audience.

Let's dive into this new feature and explore how it can assist you in adding a unique and memorable style to your videos.

download windows versionDownload Free Video Editor

Step 1 – Create additional keyframes

To begin, create a project and simply drag the desired media file from the desktop to the timeline. Alternatively, you can use the Add an object option located to the left of the preview window. Next, select the media file on the timeline and apply an effect with color parameters. For instance, let's select the LensFlare effect (Editor - Video effects - Nature).

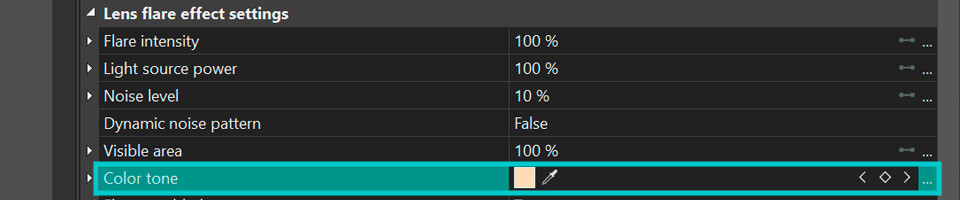
Click on the effect to select it, and the properties window will appear on the right-hand side. If the properties window does not show up, right-click on the effect and choose Properties. Look for the Color Tone property within the properties window. This is where we will create and adjust the keyframes. To access the keyframe window, click on the three dots next to this parameter.

Color Tone

By default, the effect contains two keyframes - the first and the last one. On the timeline, these keyframes are represented as squares of a uniform light brown color. In the properties window, the keyframes are displayed as diamond-shaped icons within the Color Tone parameter. If the diamond icon is filled with color, it means that a keyframe has been created. If you see only the outline of the diamond icon, it indicates that no keyframe is present, and you can create one.

Color Tone parameter

To create a keyframe:

  • Place the cursor on the timeline where you want to create a keyframe
  • Go back to the properties window to the Color tone parameter and find a diamond-shaped icon
  • Click on the icon to create a new keyframe

Add as many keyframes as necessary to achieve the desired effect.

To navigate between frames, use the arrows located to the left and right of the keyframes icon. This allows you to move back and forth between the created keyframes.

If you want to remove a keyframe, simply place your cursor on it and click on the filled diamond-shaped icon. This will delete the selected keyframe from the sequence.

Step 2 – Assign colors to keyframes

After creating keyframes, you can assign different colors to them, thereby adding vibrancy and expressiveness. To select a desired color, follow one of these actions:

  • Double-click on a keyframe on the timeline to open the color palette.
  • Go to the properties window and click on the small color square that represents the current tone of the keyframe. This will open the color palette.

From the palette, you can choose a color by clicking on it or by specifying its RGB or HEX value. You can also change colors by moving the keyframe up or down on the timeline while holding the Shift key. This allows you to select the desired position.

To select a color from the scene itself, use the Eyedropper tool located in the properties window. Click on the tool and then select a color from the scene. Please note that the Eyedropper tool is only visible when the timeline cursor aligns with a keyframe.

Each keyframe can have a different color, and the algorithm will ensure a smooth transition between them. The gradient line below the keyframes on the timeline will automatically update, showing how the effect color will change during playback.

If you want to adjust when a keyframe appears or disappears in the video, simply move it to the right or left on the timeline while holding the Shift key.

Above the timeline in the keyframe window, you will find a quick access panel for the main keyframe functions. Here, you can create and delete keyframes using the diamond-shaped and bin icons, and configure other keyframe parameters. Let's examine them in more detail.

Configure other keyframe parameters

If you want to assign one color to all keyframes, select the Constant parameter value option. It will remove all previously created keyframes except for the first and the last one. The color of the last keyframe will adapt to the color of the first one.

If you want to create a smooth transition between the colors of the first and the last keyframes, select the Linear parameter change option. You can assign different colors to the first and the last keyframes, and the algorithm will ensure a smooth transition between them.

If you want to go back to the mode with multiple keyframes of different colors, select the Linear parameter change along a trajectory function. All created keyframes except for the last one will be restored.

If you have already achieved the desired result, you can finish the lesson at this step. However, if you wish to change the weight of the color or add another effect, continue following the instructions.

Step 3 – Experiment with the color weight

If you want the color to last longer during the transition between keyframes, you can adjust its weight. Follow these steps:

  • Place the cursor on the timeline at the keyframe you want to extend.
  • Click on Parameter change along a Bezier curve.
  • While holding down the Ctrl button, you can horizontally extend the vectors from the keyframe to the left or right. It's important to note that changing the vertical position of the vectors will not affect the color's weight.

These vectors represent the extension of the color of the keyframe. The longer the vector, the longer the color will remain constant without transitioning to another color. If the vector is not visible, it indicates a smooth transition between keyframes, as both colors have a similar weight.

By adjusting the weight of the color, you can emphasize the importance of a certain color and create the desired effect in your video.

Step 4 – Add effects and synchronize parameters

You can synchronize colors in keyframes when you have several identical effects applied to the object. For example, you can add one or more additional LensFlare effects to the object.

To synchronize the colors of the keyframes, follow these steps:

  • Select two or more identical effects on the timeline.
  • In the properties window, locate the Color tone parameter and find the synchronize icon. Click on it.

Now, all the keyframes of the second effect will have the same colors as the first one. Therefore, it is important to ensure that the first effect you select is the one from which you want the colors to be copied to the other effects.

Wrapping up

We hope that this lesson has helped you understand the new capabilities of VSDC and has inspired you to experiment with keyframes. Creating a dynamic color palette for your videos can greatly enhance the visual experience and add uniqueness to your projects.

We encourage you to explore and implement your artistic vision in your projects. Use the new tools, play with colors, create stunning transitions, and compose expressive visuals. The possibilities are endless.

If you encounter any issues or need assistance, please don't hesitate to reach out to our support team at This email address is being protected from spambots. You need JavaScript enabled to view it. or through our social media channels on Facebook or Twitter. We are here to help.

Good luck with your artistic projects!

How to Work with the Scopes Window in VSDC

Mastering Color Analysis and Correction: A Comprehensive Guide to Using Histograms

How do you evaluate the accuracy of exposure? How do you determine if color correction is necessary? How do you identify overexposed or underexposed areas? Sometimes a mere visual assessment is insufficient to answer these questions and more.

In this article, we will delve into a powerful color analysis tool - histograms, which are accessible in the Free version of VSDC Video Editor. They enable you to objectively assess the color distribution within the frame and determine if color correction is required.

We will guide you through the process of working with this analytical tool to achieve your desired outcome.

download windows versionDownload Free Video Editor

What is a histogram?

Histograms are visual graphs that display the pixel values of a frame, enabling the analysis of brightness, contrast levels, and color balance of an image. They provide objective information about the characteristics and deficiencies of the image, helping to determine if color correction is required.

In VSDC Video Editor, you can access histograms in the Scopes window, typically located in the bottom right corner of the software. If you don't see the window, navigate to the View tab in the upper part of the program and activate the corresponding option.

At the upper left corner of the Scopes window, you'll find a dropdown menu that allows you to select the object to be analyzed: the selected media file or the overall scene. To fix your selection, click on the selection field with the left mouse button, then with the right mouse button to confirm.

In the upper right corner, there's another dropdown menu offering four Scopes modes: Wave, Parade, RGB, and Vectorscope. Each mode provides information on the brightness and saturation of the pixels in the frame, with slight differences in representation and details.

Let's explore each mode in more detail.

Wave

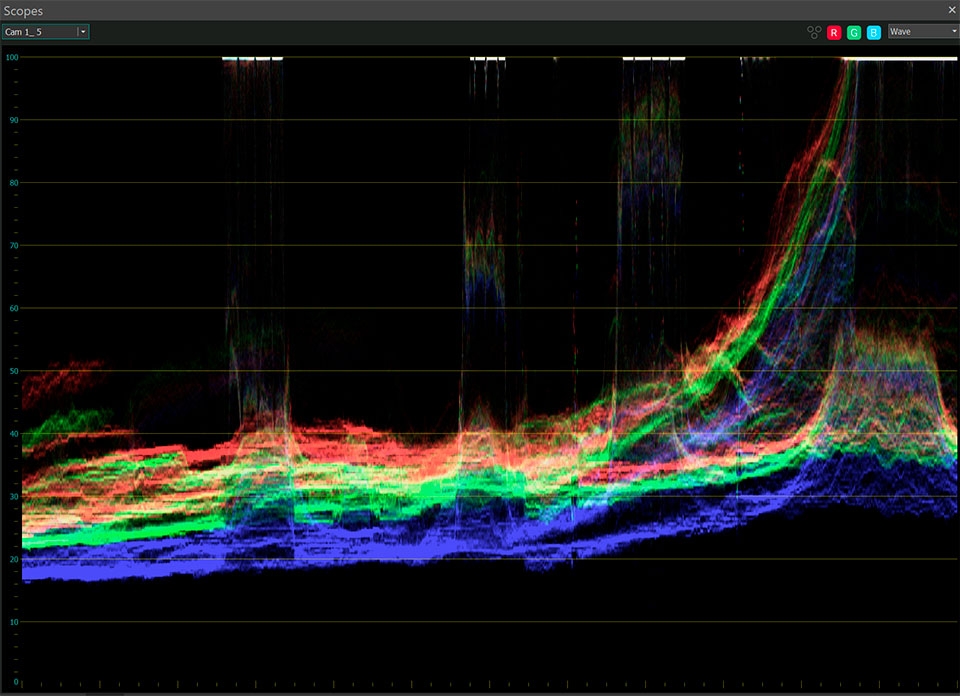
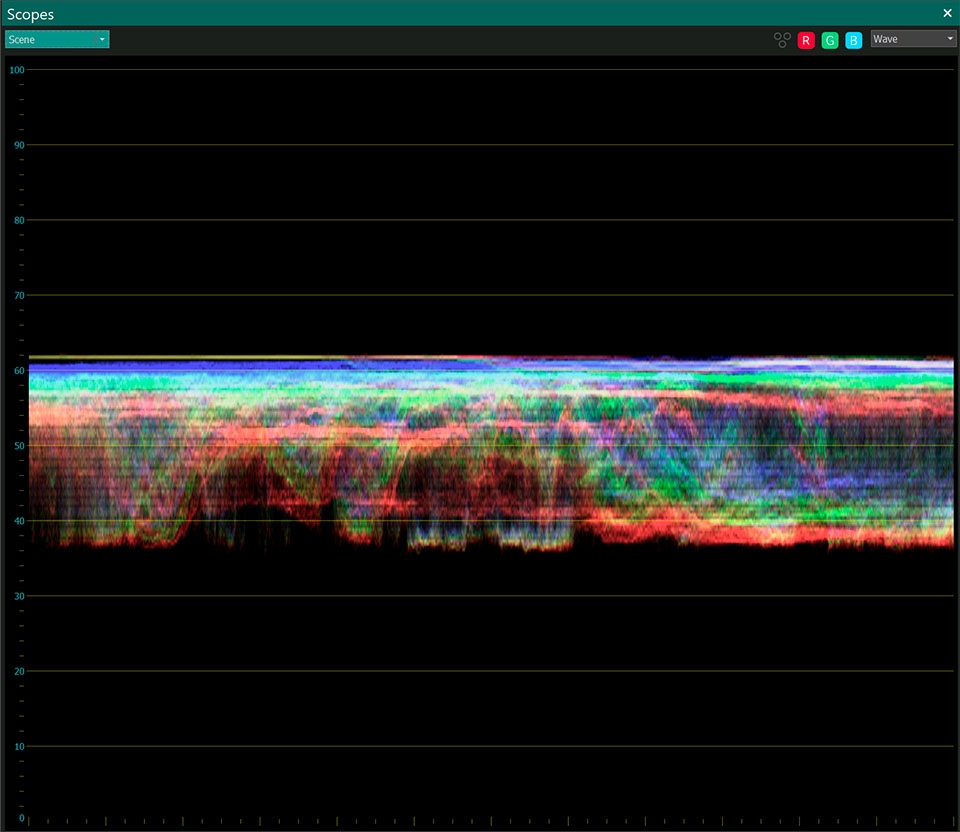
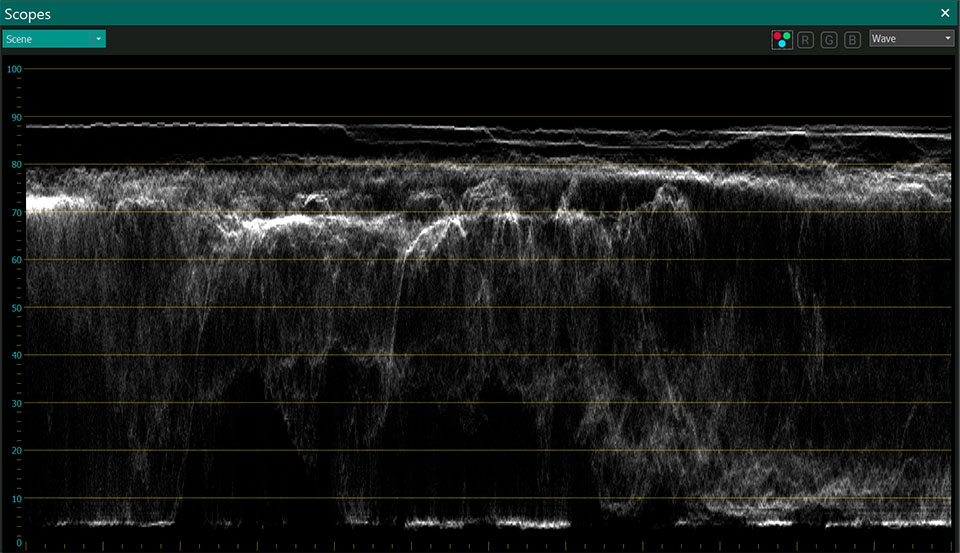
By default, the Scopes window displays the Wave mode, which allows you to analyze the brightness and color values of the scene or selected object. When you place the cursor on a frame in the timeline, you can observe the characteristics of that frame represented as pixels in a waveform on the graph. It's important to note that each column on the graph corresponds to a column of pixels in the object.

The horizontal axis (X-axis) on the graph represents the distribution of color tones of the object from left to right. This means that the left side of the object corresponds to the left side of the graph, and the right side of the object corresponds to the right side of the graph.

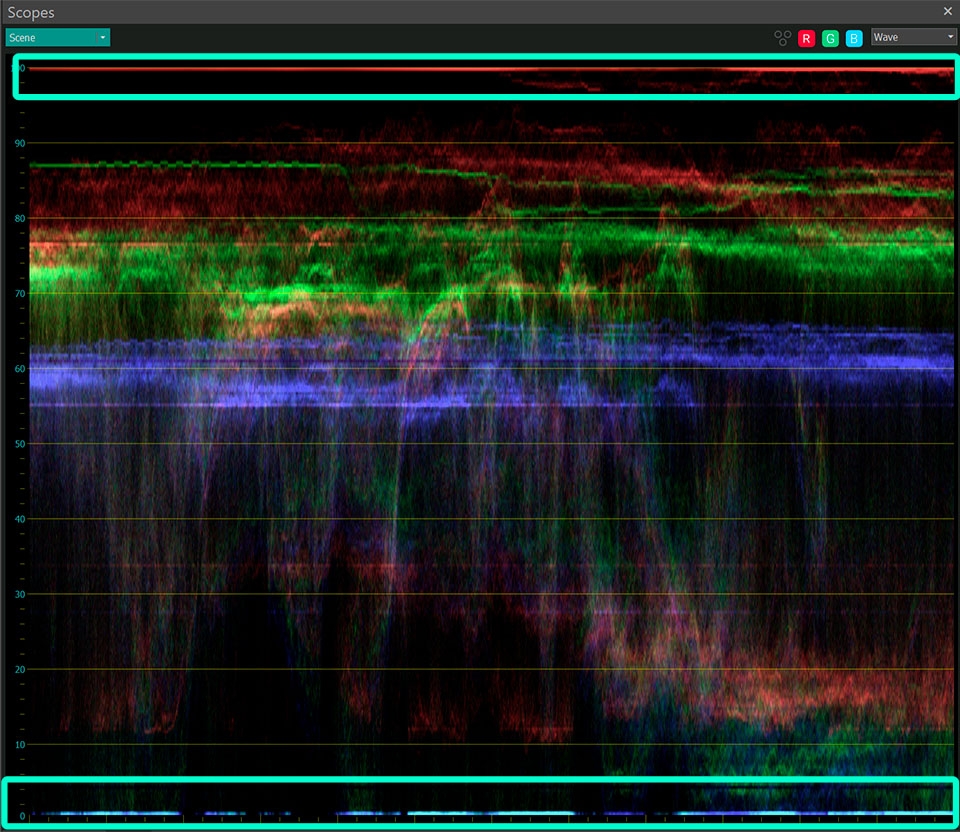
The vertical axis (Y-axis) of the graph represents the brightness of color, ranging from 0% for black tones (shadows) to 100% for white tones (highlights).

Let's review several specific examples of using this mode:

  1. Uneven brightness: If the graph shows a significant imbalance in the heights between the left and right sides, it may indicate an uneven distribution of brightness. In such cases, you can use the corresponding tools in the Basic Effects window above the Scopes to adjust the brightness or contrast levels and achieve a more balanced distribution.
  2. Scopes Window

  3. High or low contrast: If the graph shows a narrow and high waveform, it may indicate a high contrast in the object, where bright and dark areas strongly contrast each other. In this situation, you may need to decrease the contrast or adjust it to achieve the desired level.
  4. Scopes Window

  5. Lack of details in shadows or highlights: If the graph shows clipped peaks, it may indicate a loss of details in the shadows or highlights of the image. In this case, you can adjust the brightness and contrast to restore the details and create a more balanced image.
  6. Scopes Window

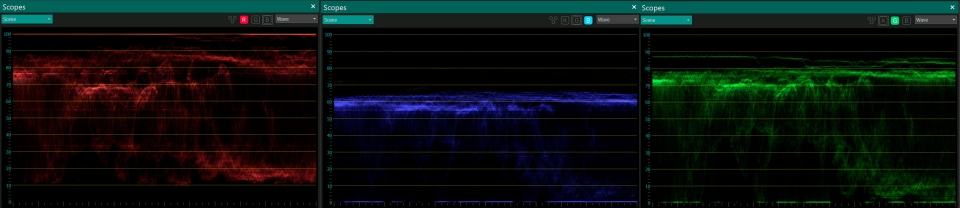
By default, the waveform displays RGB values (Red, Green, Blue) for each pixel. If you need to not only evaluate the brightness and contrast levels but also determine which color components predominate in each area, you can activate the RGB channels separately:

Scopes Window

However, if you want to solely focus on the levels of brightness without being distracted by the color components of the object, you can switch to the Luma mode. This mode will display the histogram in black-and-white, showing only the relevant brightness characteristics.

Scopes Window

Parade

The Parade mode is useful when you want to determine the predominant color (red, green, or blue) in the scene or object. In this mode, the color channels are displayed closely together without crossing. The horizontal axis (X-axis) represents the selected frame in pixels, with three miniature graphs for red, green, and blue colors respectively, maintaining their orientation. The vertical axis (Y-axis) represents the brightness of the color from dark to light.

By analyzing the graphs of each color channel, you can determine their respective predominance. If one color channel's graph has a higher peak or if the waveform is positioned higher on the graph, it indicates that there are more pixels of that color in the scene or object.

The Parade mode provides a detailed examination of color distribution. If you need to correct a specific color channel, we recommend using the RGB curves tool available in the Color Grading panel. Additionally, you can focus on a specific color by disabling the display of other channels using the corresponding buttons above the graph. This allows you to isolate and make adjustments to individual color channels as needed.

RGB

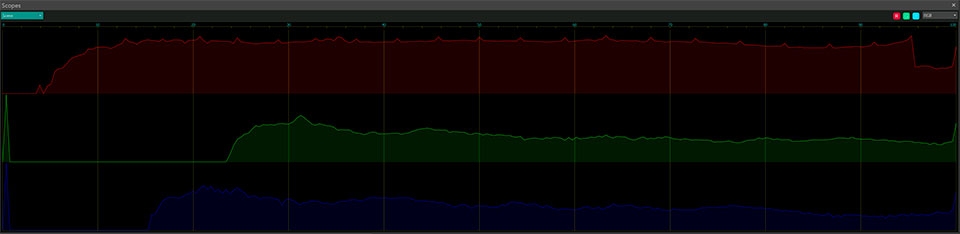
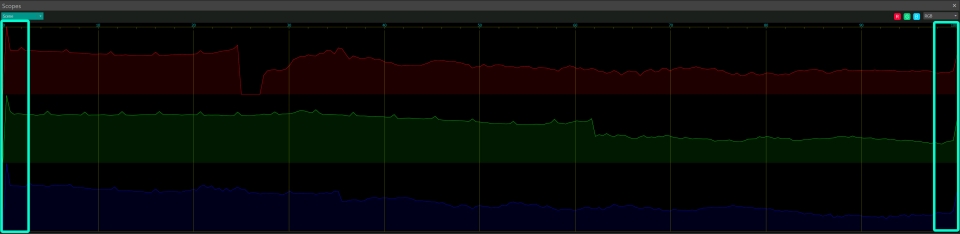
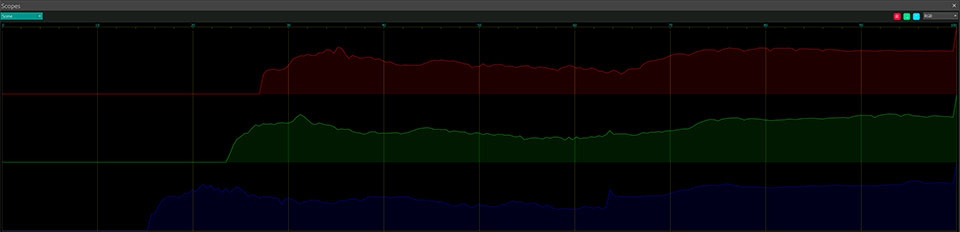
In RGB mode, the graph displays curves for the three color channels: Red, Green, and Blue. Unlike other modes that are linked to pixel columns of the frame, RGB mode provides tonal information about the object as a whole.

Each color curve is represented by a separate line, showing the distribution of brightness values in a color channel. The horizontal axis represents different levels of brightness, while the vertical axis displays the quantity of pixels at each level. The height and shape of the curves provide information about the predominant color channels and the distribution of brightness among them.

Here are a few examples to consider:

  1. If the curve of one color channel is higher than the others, it indicates that the object contains more brightness in that particular color.
  2. Scopes Window

  3. If the values on the graph in one or several color channels touch the X-axis, it suggests a loss of color hues. This means that the corresponding color components are absent or insufficient.
  4. Scopes Window

  5. If the graph is shifted to the left, it indicates an underexposed image, where the brightness and details in the dark areas are not prominent enough.
  6. Scopes Window

  7. If the graph is shifted to the right, it indicates an overexposed image, where the brightness and details in the light areas are lost.
  8. Scopes Window

By analyzing the RGB curves, you can gain valuable insights into the overall tonal distribution and make adjustments to achieve the desired color balance and exposure in your video.

Vectorscope

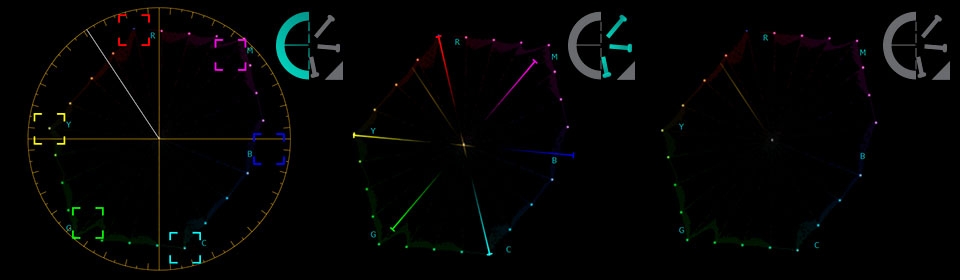
Vectorscope is a powerful tool for visualizing and analyzing the color components of an object. It presents the hues and saturation levels of colors in a selected frame using a circular diagram divided into segments. Each segment represents a specific color, such as yellow, red, magenta, blue, and others, indicated by corresponding square brackets.

Each color segment on the vectorscope has a radius, representing the distance from the center of the diagram to the edge. The length of the radius indicates the saturation or intensity of the color value. A longer radius indicates higher saturation, while a shorter radius indicates lower saturation. For example, if the color value extends beyond the radius of the diagram, it means that the frame is oversaturated.

Above the vectorscope, you will find four options with additional functions:

  1. Vectorscope modes: The first icon from the left allows you to select from three available display modes. The classic mode displays a vectorscope graph as a traditional circle diagram with indicators, providing a general idea of color distribution in a frame. The vector mode splits the diagram into sectors of different colors, allowing for a more detailed examination of color distribution and specific hues. The Hide graticule/vectors mode shows only the color values of the object on the vectorscope, hiding the sectors, circle, and indicators. This mode is useful when you want to focus solely on the color of the object.
  2. Scopes Window

  3. Color borders: The second icon controls the display of color borders represented as square boxes. There are six of these boxes, and they indicate excessive saturation of the object.
  4. Color mode: The third icon allows you to toggle the display of color in the graph. When activated, the diagram displays the color palette, illustrating the distribution of hues. When deactivated, the graph displays black, gray, and white hues.
  5. Skin tone radius line: The last icon activates a line indicating optimal color values for more precise skin tone adjustment. When analyzing a frame with a person in it, you can observe how the pixels on the graph align with this line. If the pixels match the line, it indicates that the color values in the frame correspond to the optimal skin tone color. If the pixels deviate significantly from the line, color correction may be needed to align them.

Once you have selected the mode, you can analyze how the colors and saturation levels are distributed on the vectorscope. If you notice any unevenness or issues on the graph, you can use the corresponding color correction effects or tools from the Lift, Gamma & Gain tools in VSDC. These tools allow you to adjust color values, saturation, and other parameters to achieve the desired result.

Wrapping up

The Scopes window in VSDC provides reliable tools for enhancing the quality of your images. Even with basic skills, you can effectively control the contrast level, saturation, and color balance in your projects without risking the loss of details or making exposure mistakes. We encourage you to explore and experiment with these tools and share your successes with us.

It's important to note that there is no universal rule or one-size-fits-all approach to pixel distribution in a graph. You have the freedom to deviate from the classical representation of the graphs based on your preferences, objectives, or the mood you wish to convey. Feel free to customize and adapt the graphs according to your creative vision.

Should you have any questions, do not hesitate to reach out at This email address is being protected from spambots. You need JavaScript enabled to view it., through Facebook or Twitter.

How to Edit Multi-Camera Videos in VSDC | Multicam Guide

VSDC Multicam gives video creators a professional workflow for synchronizing footage from multiple cameras, switching angles during playback, and managing video and audio from one editing workspace. It is ideal for interviews, podcasts, live events, performances, tutorials, product demonstrations, and any project recorded from several viewpoints.

With VSDC Free Video Editor, you can create a multicam clip from two camera angles, synchronize the sources by sound or timecode, choose a master audio track, switch between shots in real time, and export the finished video without a watermark. Projects that require three or more camera angles can be edited in VSDC Pro.

Watch the video tutorial below, then follow the complete step-by-step guide to create your own multi-camera video in VSDC.

Download VSDC Free Video Editor for WindowsDOWNLOAD VSDC FREE VIDEO EDITOR
Before you start: prepare your multicam footage

A few simple preparation steps will make synchronization faster and angle switching more precise:

  • Import every camera recording and any separate microphone or audio-recorder track you plan to use
  • Choose the cleanest recording as the master audio track for the finished video
  • Use a synchronization clap, spoken cue, music, or another clear common sound when recording
  • Give the camera files clear names so that every angle is easy to identify
  • Check smartphone footage for orientation and variable frame-rate differences before editing
  • For demanding 4K or high-bitrate footage, generate proxy media in the Resources window to keep preview and angle switching smooth

VSDC uses the original source files during export, so working with proxy media improves editing performance without reducing the quality of the final video.

Step 1. Import the camera and audio files

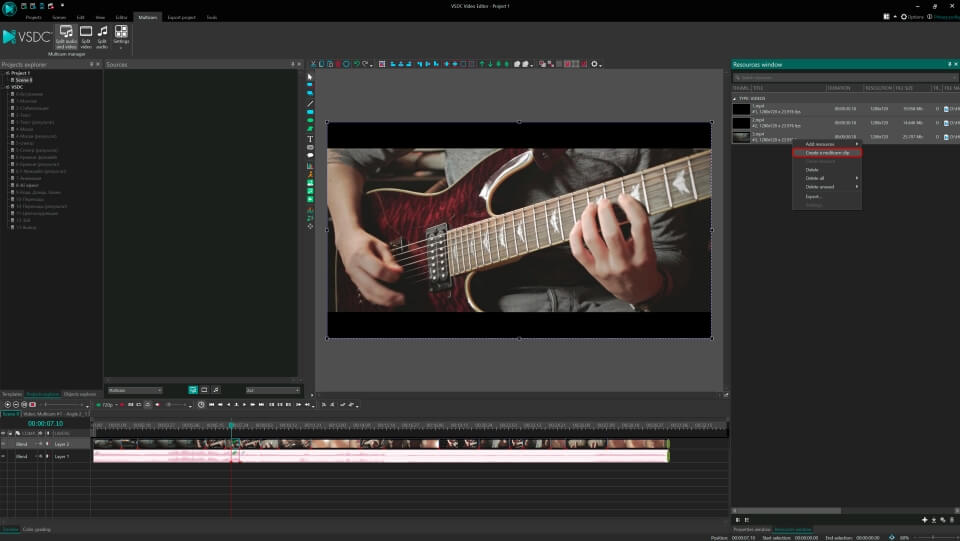
Open the Resources window on the right. If it is hidden, go to the View tab, select Resources, and click View/Hide window. Drag the camera files and audio recordings from your computer into the Resources window.

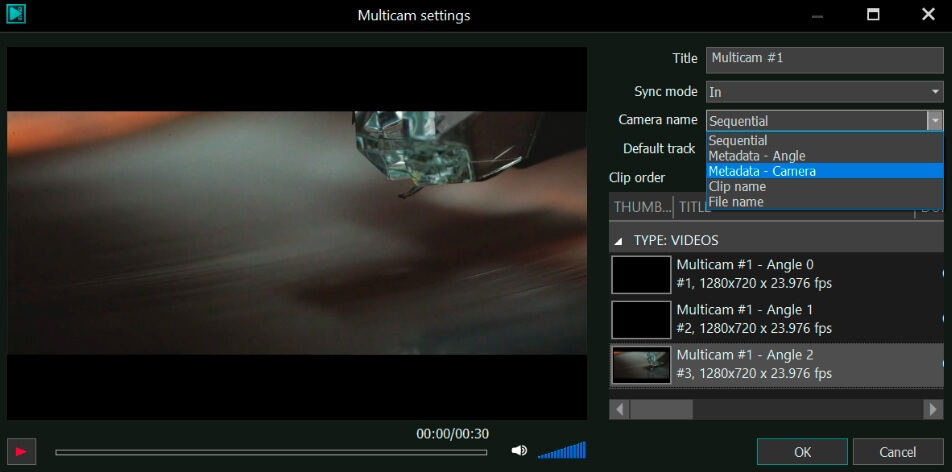
Select all sources you want to include, right-click the selection, and choose Create a multicam clip. VSDC will open the multicam settings, where you can choose the synchronization method, camera naming system, and default audio track.

Create a multicam clip from imported camera and audio files in VSDC

Step 2. Synchronize and configure the multicam clip

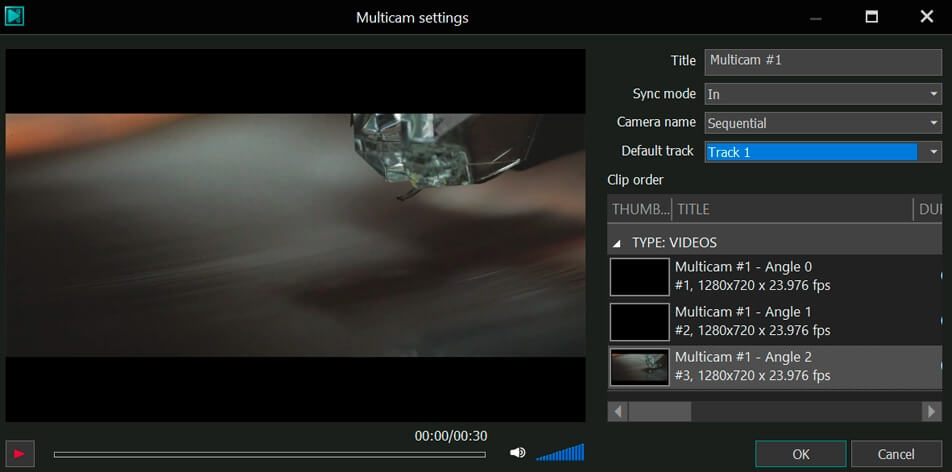
The multicam settings window brings the essential preparation tools together in one place. Configure the synchronization mode, camera names, and master audio track before adding the clip to the timeline.

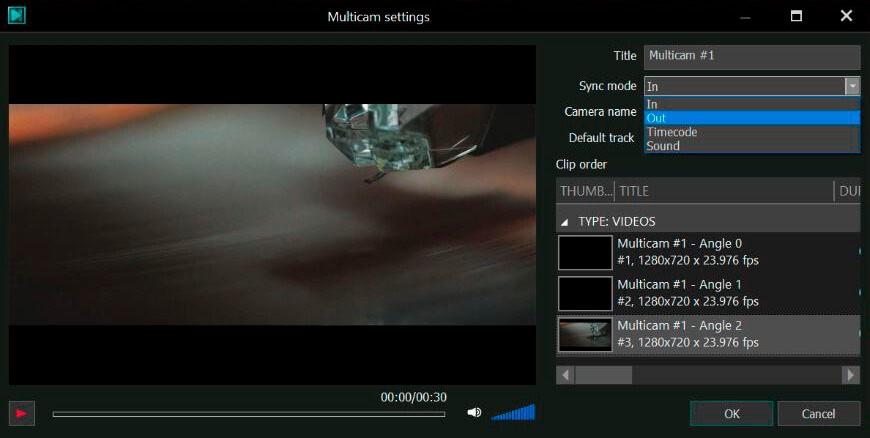
Choose a synchronization mode

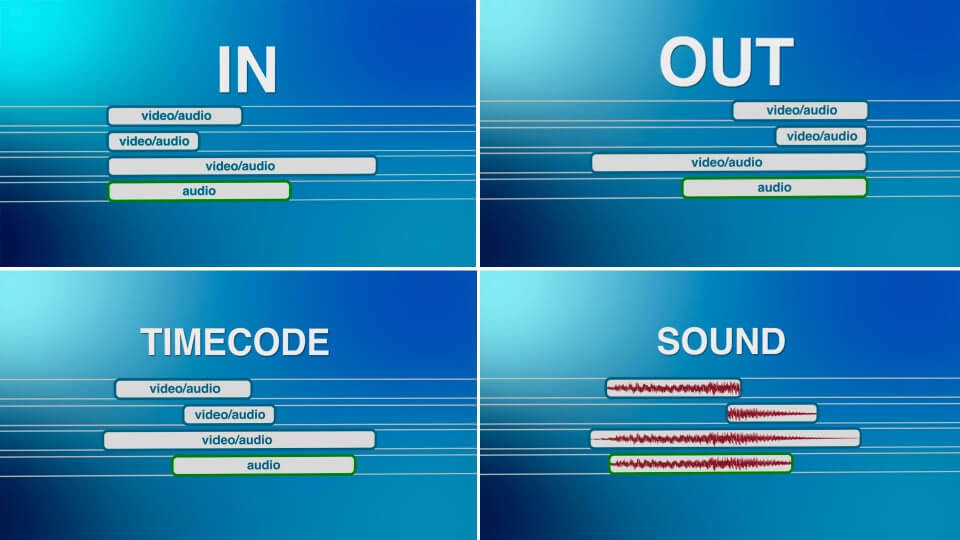
VSDC provides four synchronization methods, allowing you to match camera recordings according to the way the project was captured.

Choose a synchronization mode for a VSDC multicam clip

  • In — aligns the clips by their starting points
  • Out — aligns the clips by their ending points
  • Timecode — synchronizes footage using the timecode stored in the source files
  • Sound — analyzes the audio tracks and aligns matching sound automatically

For interviews, concerts, presentations, and events where every camera recorded the same audio, Sound mode is usually the most convenient choice. VSDC analyzes the shared audio and aligns the recordings automatically.

Synchronize multiple camera recordings by sound in VSDC

If the cameras were recorded with matching timecode, choose Timecode for a metadata-based professional workflow. Use In or Out when the recordings have a reliable common starting or ending point.

Name the camera angles

The Camera name setting determines how the sources are labeled in the Multicam panel. You can use sequential numbers, angle names, camera metadata, or another available naming method.

Choose camera angle names for a VSDC multicam project

Clear names such as Wide shot, Speaker close-up, or Camera 2 make it easier to recognize each angle while editing, especially when several recordings show similar scenes.

Select the default audio track

Use the Default track menu to choose the main audio source for the multicam clip.

Select the default audio track for a VSDC multicam clip

For a polished result, select the cleanest and most consistent recording. This may be the audio from a dedicated microphone, an external recorder, or the main camera. You can keep this master track playing continuously while switching only the video angles.

When the settings are ready, click OK. VSDC will create the synchronized multicam clip and add it to the Resources window.

Step 3. Add the multicam clip to the timeline

Find the newly created multicam clip in the Resources window and drag it onto the timeline.

Add a synchronized multicam clip to the VSDC timeline

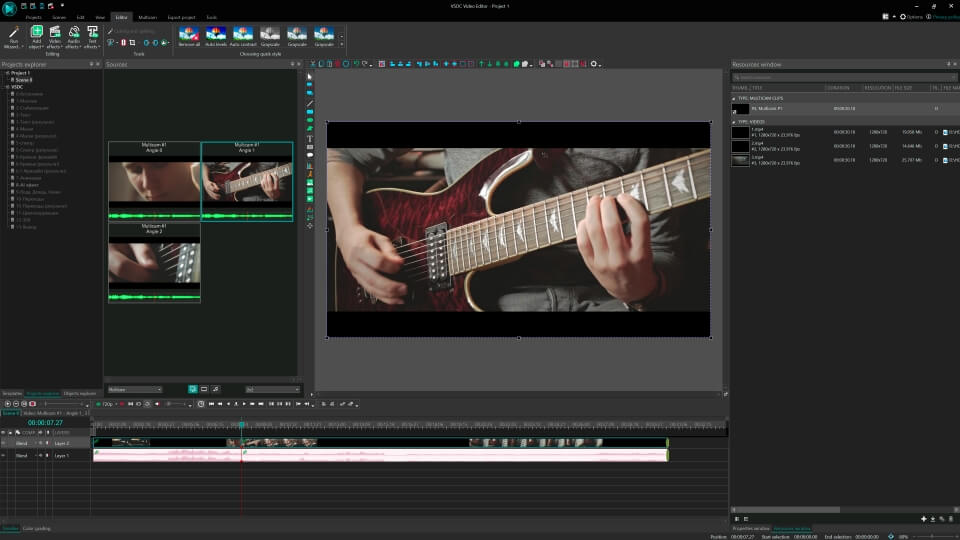
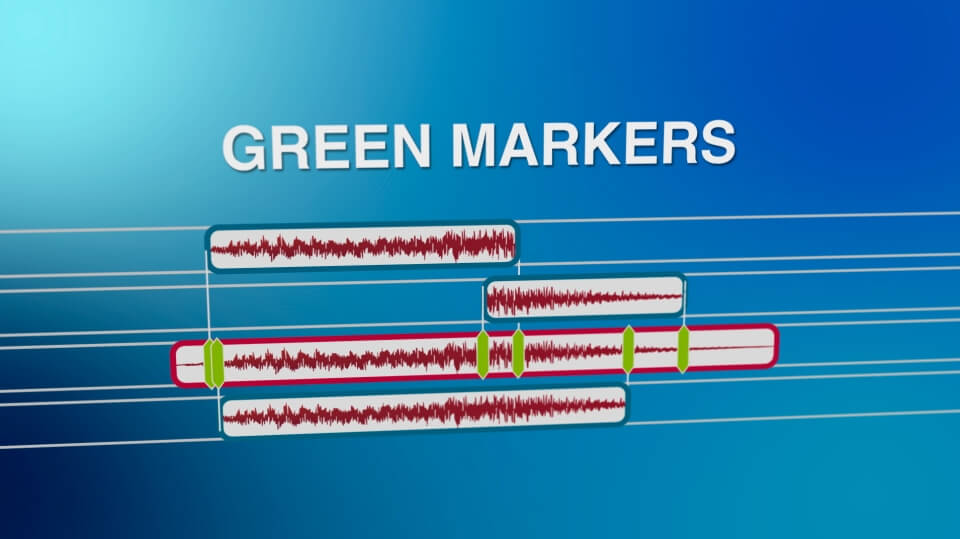
The multicam clip appears as a single, easy-to-manage object containing all selected camera and audio sources. Green markers indicate the boundaries of the source recordings and help you see where each file begins and ends.

View multicam source boundaries and markers on the VSDC timeline

This compact timeline design keeps the project organized while the dedicated Multicam workspace gives you direct access to every camera angle and audio source.

Step 4. Switch camera angles and control the audio

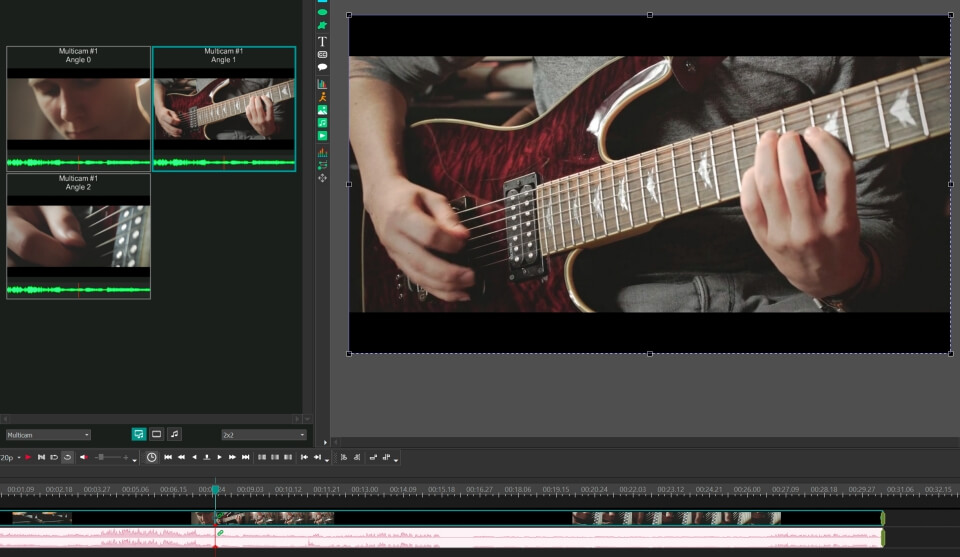
Open the View tab and select Sources. At the bottom of the Sources window, switch the workspace from Source to Multicam. The panel will display all camera angles and audio files included in the selected multicam clip.

Open the Multicam Sources panel and view all camera angles in VSDC

To change the active angle, click the required camera in the Multicam panel. You can switch shots while the video is playing to build the edit in real time, or pause playback and select angles with frame-level precision.

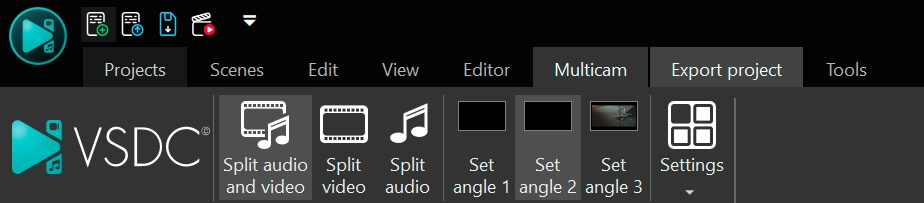
VSDC provides three editing modes for controlling how each selection affects the video and audio:

  • Split audio and video — switches both the picture and the corresponding audio source
  • Split video — changes the camera angle while preserving the current master audio track
  • Split audio — changes the audio source without switching the active video angle

Choose video and audio switching modes in VSDC Multicam

For interviews, podcasts, and performances, Split video is often the best option because it lets you switch camera angles while keeping one clean audio track uninterrupted. Use Split audio and video when each angle should bring its own sound, or Split audio when you need to replace only the audio source.

The same controls are available on the Multicam toolbar, so you can use the panel or the ribbon controls according to your preferred editing workflow.

Use the VSDC Multicam toolbar to switch camera and audio tracks

Step 5. Refine and export the multicam video

After selecting the camera angles, use the standard VSDC editing tools to polish the project. You can trim unwanted sections, adjust colors, improve the audio, add titles, transitions, captions, logos, and visual effects, and fine-tune the timing directly on the timeline.

To export the finished multicam video, open the Export Project tab. Choose PC or Web as the target device, select MP4 or another required output format, and choose a profile that matches the resolution and frame rate of your project.

Use Edit profile when you need detailed control over the codec, resolution, frame rate, bitrate, and audio parameters. Then click Export Project to render the video. VSDC Free and VSDC Pro export without adding a watermark to the finished file.

For a complete explanation of the available formats and profiles, see the VSDC project export guide.

Why use VSDC for multicam video editing?

VSDC combines multi-camera synchronization, real-time angle switching, flexible audio control, proxy editing, professional effects, and watermark-free export in one non-linear video editor for Windows. The workflow is suitable for beginners who are creating their first two-camera interview as well as experienced creators producing complex event, podcast, performance, and tutorial videos.

VSDC Free Video Editor supports multicam projects with up to two camera angles. When your production requires three or more angles, VSDC Pro expands the multicam workflow while providing additional professional editing and performance tools.

Frequently Asked Questions

1. How many camera angles can I use in VSDC Multicam?

VSDC Free Video Editor supports multicam projects with up to two camera angles. VSDC Pro removes this two-angle limit, making it the right choice for productions that use three or more cameras.

2. How do I synchronize multiple cameras by audio in VSDC?

Select Sound as the synchronization mode when creating the multicam clip. VSDC analyzes the audio recorded by each source and aligns matching sections automatically. For the best result, make sure every camera captured a clear common sound such as speech, music, or a synchronization clap.

3. How do I display both video and audio when switching camera angles?

Open the Sources panel, switch it to Multicam mode, and select Split audio and video. This mode updates both the active camera angle and its audio. Use Split video when you want to keep one continuous master audio track while changing only the picture.

4. Can I combine smartphone and camera footage in a VSDC multicam project?

Yes. VSDC can combine footage recorded with smartphones, cameras, action cameras, and external audio recorders in the same multicam project. Before creating the clip, check the orientation, frame rate, resolution, and audio quality of each source for the smoothest workflow.

5. How do I open the Multicam preview panel in VSDC?

Open the View tab and select Sources. At the bottom of the Sources window, switch the workspace from Source to Multicam. The panel will display the camera angles and audio sources included in the selected multicam clip.

Ready to create a professional multi-camera video? Download VSDC Free Video Editor and start editing synchronized camera angles today. For product questions, email us at This email address is being protected from spambots. You need JavaScript enabled to view it. or send us a message through Facebook.


Get VSDC Free Video Editor — professional non-linear video editing software for Windows with multicam synchronization, real-time angle switching, flexible audio control, proxy editing, and watermark-free export. Explore all features.

News

VSDC 11.3 Update: AI Video Generator, Templates & Telemetry

What's new in VSDC 11.3AI image and video generation directly in VSDCAI-powered image editingNew handheld camera, lens correction, and Audio Spectrum templatesExpanded Garmin and DJI telemetry overlaysKey...

VSDC 11.2: Smart search for lost files, GPS data and video sync, H.266 (VVC), accelerated proxy generation even for 4K/8K, keyframe support for shapes and brand-new designer templates

Published by Amy Shao on June 30, 2026 Meet the new major update to VSDC Free Video Editor: version 11.2! Remember how much time you used to spend hunting for lost files in your projects?...

VSDC 11.1 Adds Direct Insta360 Video Editing, GPS Overlays and Auto-Save

Published by Amy Shao on March 11, 2026 What is the best gift for a creative person? New possibilities, of course. With the VSDC 11.1 update, editing footage from Insta360 cameras becomes...

VSDC 10.2: GPS Gauges for GoPro and Other Action Cameras, Selective Export, Metadata Editing, Extended Codecs and Smarter Workflow

published Amy Shao 11/19/25 Meet the long-awaited VSDC 10.2 update: a new version packed with incredible features and significant enhancements designed to empower all of you, from hobbyists to professionals. GPS...

Major VSDC 10.1 Update: Advanced HDR, GPS Telemetry, New Effects, Great Variety of New Templates and Tools For Different Needs

published Amy Shao 6/10/25 The wait for something new and unusual is finally over! The update is here and it isn’t just another version: it’s VSDC 10.1! VSDC 10.1 Update: Advanced HDR, GPS Telemetry,...

VSDC Christmas Update 9.4: Enhanced Effect Management, 100+ Background Templates and Streamlined Editing

This holiday season embraces new beginnings with the latest update of VSDC Video Editor! We’ve listened to your feedback and decided to focus on enhancing the tools you love most—all while laying the...

How VSDC Free Became My Secret Weapon for Watermark (Free 4K Editing in 2025)

Hi, I'm Mattea Wharton, a travel videographer from Seattle. For three years I battled with video editors that slapped ugly watermarks on my videos until I found VSDC. This free no-subscription editor completely...

VSDC 9.3: 150+ Templates, Text Transformer, Sprite Auto-Detect and GUI Update

Change is all about improvement, and this process wouldn't be possible without your input. After carefully reviewing your feedback, we’ve addressed several key issues and introduced updates designed...

Best Special Effects Software

Intro In 2024 the options range for creating visual effects is incredibly diverse and it becomes more and more challenging to identify the top choices. Here you can find a guide to the top visual FX...

VSDC 9.2: AI Segmentation Models, 300+ Transitions, VSDC Cloud and New Templates Pack

Are you ready to explore new heights with the latest major VSDC update? Finally, Version 9.2 is here! Packed with groundbreaking features, including the new AI-powered Segmentation tool, this update offers...
 

Screen Recorder Box

This program allows you to capture the video of your desktop and save it on your PC in various formats. Coupled with a video editor, the program is a great tool for creating presentations, tutorials and demo videos.

Read more about Screen Recorder...


Video Capture Box

The program captures video from external devices and records it to computer in a free format. You can save video from video tuners, webcams, capture cards and other gadgets.

Read more about Video Capture...

VSDC Video Editor Reviews & Ratings (Trustpilot, Capterra & Media)

VSDC Free Video Editor is rated 4.5/5 by real users on Trustpilot and Capterra. Here are a few reviews and quotes from creators and tech media.

Overall rating: 4.5/5 based on 200+ reviews on Trustpilot and 89 reviews on Capterra.

★★★★⯪

VSDC Free Video Editor is the best free video editor for Windows I’ve used, from color grading to picture-in-picture and cinematic results.

— Ejikeme Eloka Augustine

Source:Trustpilot

★★★★☆

Easy-to-use interface and quick export to social media make VSDC a versatile video editing tool for everyday projects.

— Karen C., E-Learning

Source:Capterra

★★★★☆

A feature-packed non-linear video editor for Windows that can compete with many paid video editing solutions.

— TechRadar

Source:TechRadar review

★★★★★

The free VSDC editor saved my YouTube channel – a powerful video editing software for chroma key, text effects and picture-in-picture.

— Paul Roberts

Source:Trustpilot

★★★★★

Fast and simple for YouTube videos with green screen, zoom, color tools and creative effects in one app.

— Marie R., Media Production

Source:Capterra

★★★★★

One of the best free video editor options for Windows users, ideal for GoPro, YouTube and family videos.

— VidProMom, YouTube creator

Source:Media reviews

★★★★★

I’ve been using VSDC for years; editing is easy and the final videos look great for my personal and professional projects.

— Long-time VSDC user

Source:Trustpilot

★★★★★

Great value and faster than many other free tools; I quickly create videos for YouTube, Instagram and Facebook with features my audience loves.

— Rabika B., Marketing & Advertising

Source:Capterra

★★★★★

VSDC offers many features you don’t usually find in free editors, including picture-in-picture, stabilization and modern codec support with no watermarks.

— Tech media review

Source:Media reviews