 User Help Manual
  Learn FAQ
  Send us feedback


How to Add Subtitles to a Video in VSDC
Subtitles and captions are essential for making videos accessible, engaging, and easy to follow. They help deaf and hard-of-hearing viewers, people who watch social media videos without sound, and international audiences understand your message. VSDC Video Editor gives you a complete professional workflow for importing SRT files, creating subtitles manually, fine-tuning timing, styling the text, and exporting a polished video.
In this tutorial, you’ll learn how to add subtitles to a video in VSDC, edit subtitle text and timing, generate timeline markers from subtitle cues, customize marker settings, format the subtitle design, and export the finished video with burned-in subtitles that display consistently on any device.
Watch the video tutorial first, then use the detailed instructions below to complete the entire subtitle workflow in VSDC.
 DOWNLOAD VSDC FREE VIDEO EDITOR
Step 1. Add or create subtitles
VSDC lets you begin with either a ready-made SRT file or a new subtitle object created directly in the editor. First, import your video using the Import content button on the start screen. Then choose the method below that best fits your project.
If you have an SRT subtitle file
Importing an existing subtitle file is the fastest way to add professionally timed subtitles in VSDC. Use a file with the .srt extension and the standard SubRip structure.
You can create an SRT file in Notepad or use a dedicated subtitle editor, such as Open Subtitle Editor or Jubler. If you download subtitles from YouTube or another platform, check the file extension first. If the file is in VTT, SBV, or another format, convert it to SRT before importing it into VSDC.
When saving an SRT file in Notepad, select UTF-8 encoding. This helps preserve accented characters and non-Latin alphabets correctly.
Once the file is ready, click the CC button on the left-hand toolbar and select the SRT file.
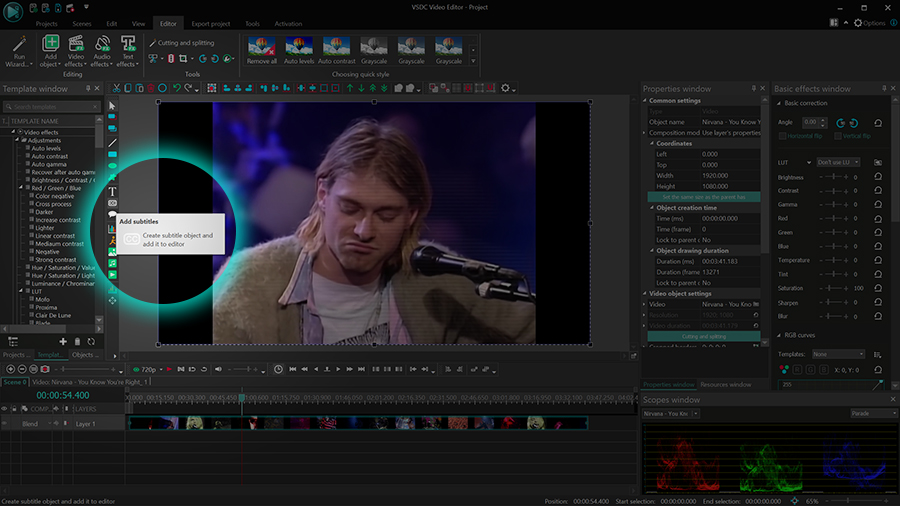
In the pop-up Object position settings window, click OK. Then draw or position the subtitle area on the scene. The subtitle object will appear on the timeline, and the subtitle text will be displayed in the preview window.
If you don’t have an SRT subtitle file
VSDC also lets you create subtitles from scratch without leaving the editor. Click the CC button on the left, select Cancel when the file selection window opens, and click OK in the Object position settings window. Draw the subtitle area on the scene, then open Edit subtitles in the Properties window.
Enter the subtitles phrase by phrase using the standard SRT structure:
The first line is the subtitle sequence number. The second line contains the exact time when the subtitle appears and disappears. The third line contains the subtitle text. Leave an empty line between subtitle blocks.
Always use the standard SRT timestamp format: HH:MM:SS,mmm --> HH:MM:SS,mmm. Use two hyphens followed by the greater-than sign between the timestamps, and use a comma before milliseconds.
If a subtitle contains two lines of text, enter both lines below the timestamp before adding the empty line that separates it from the next subtitle block.
Step 2. Generate subtitle markers and adjust the timing
VSDC can automatically generate timeline markers from subtitle cues. Each marker identifies the beginning of a subtitle phrase, giving you precise visual reference points for synchronizing video clips, audio, animations, transitions, and effects with the narration.
To generate the markers, select the subtitle object on the timeline and open the Properties window on the right. Then click Add markers. The result will look like this:

Edit subtitle text or timing and regenerate the markers
If a subtitle appears too early or too late, or if the text is incorrect, select the subtitle object and open Edit subtitles in the Properties window.
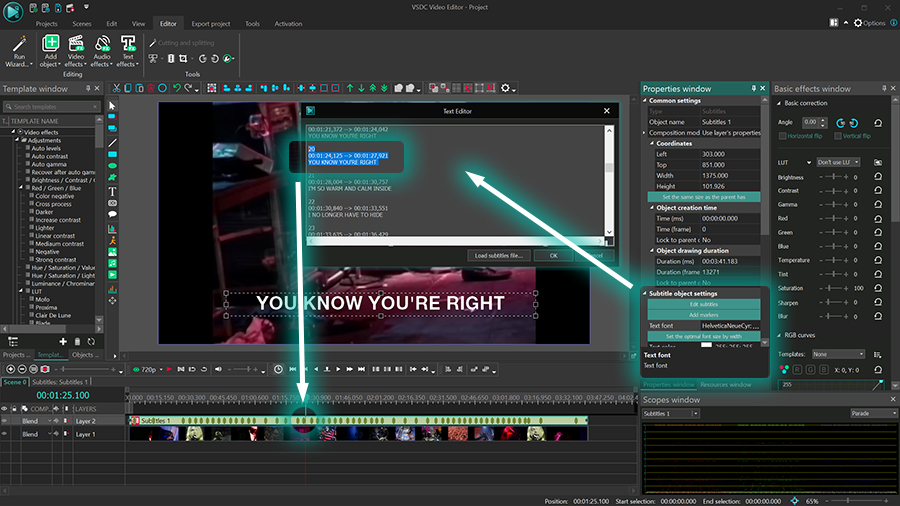
To correct the text, select the required subtitle phrase and type the new text. To change the timing, find the moments when the subtitle should appear and disappear, then update the timestamps in the subtitle editor. You can use the time indicator in the upper-left corner of the timeline to identify the required position.
Keep the standard SRT format when editing timestamps: HH:MM:SS,mmm --> HH:MM:SS,mmm. Otherwise, the subtitle cue may not be displayed correctly.
When you have finished editing, click OK. If markers have already been generated, click Add markers again so that the timeline markup reflects the updated subtitle timing.
Customize individual subtitle markers
In addition to changing marker positions through subtitle timestamps, you can change marker colors, assign names, add comments, select marker types, and configure marker visibility. Double-click the subtitle layer, then double-click the marker you want to edit.
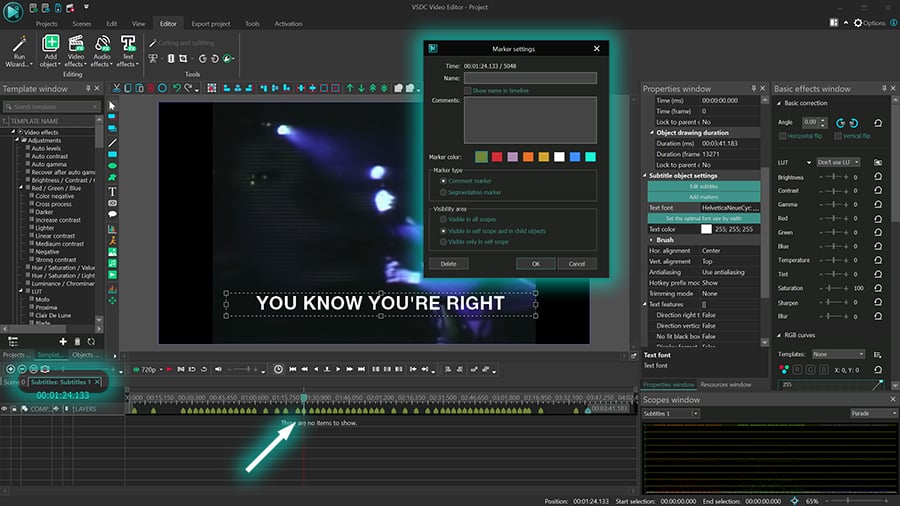
Using the Marker settings window, you can:
- Name the marker
- Add a comment to the marker
- Change the marker color
- Change the marker type
- Change the marker visibility
The first three options make markers easier to identify. The marker name and comment appear when you hover over the marker on the timeline. To keep the name visible, enable Show name in timeline. A custom marker color makes the marker easier to recognize across the timeline levels where it is visible.
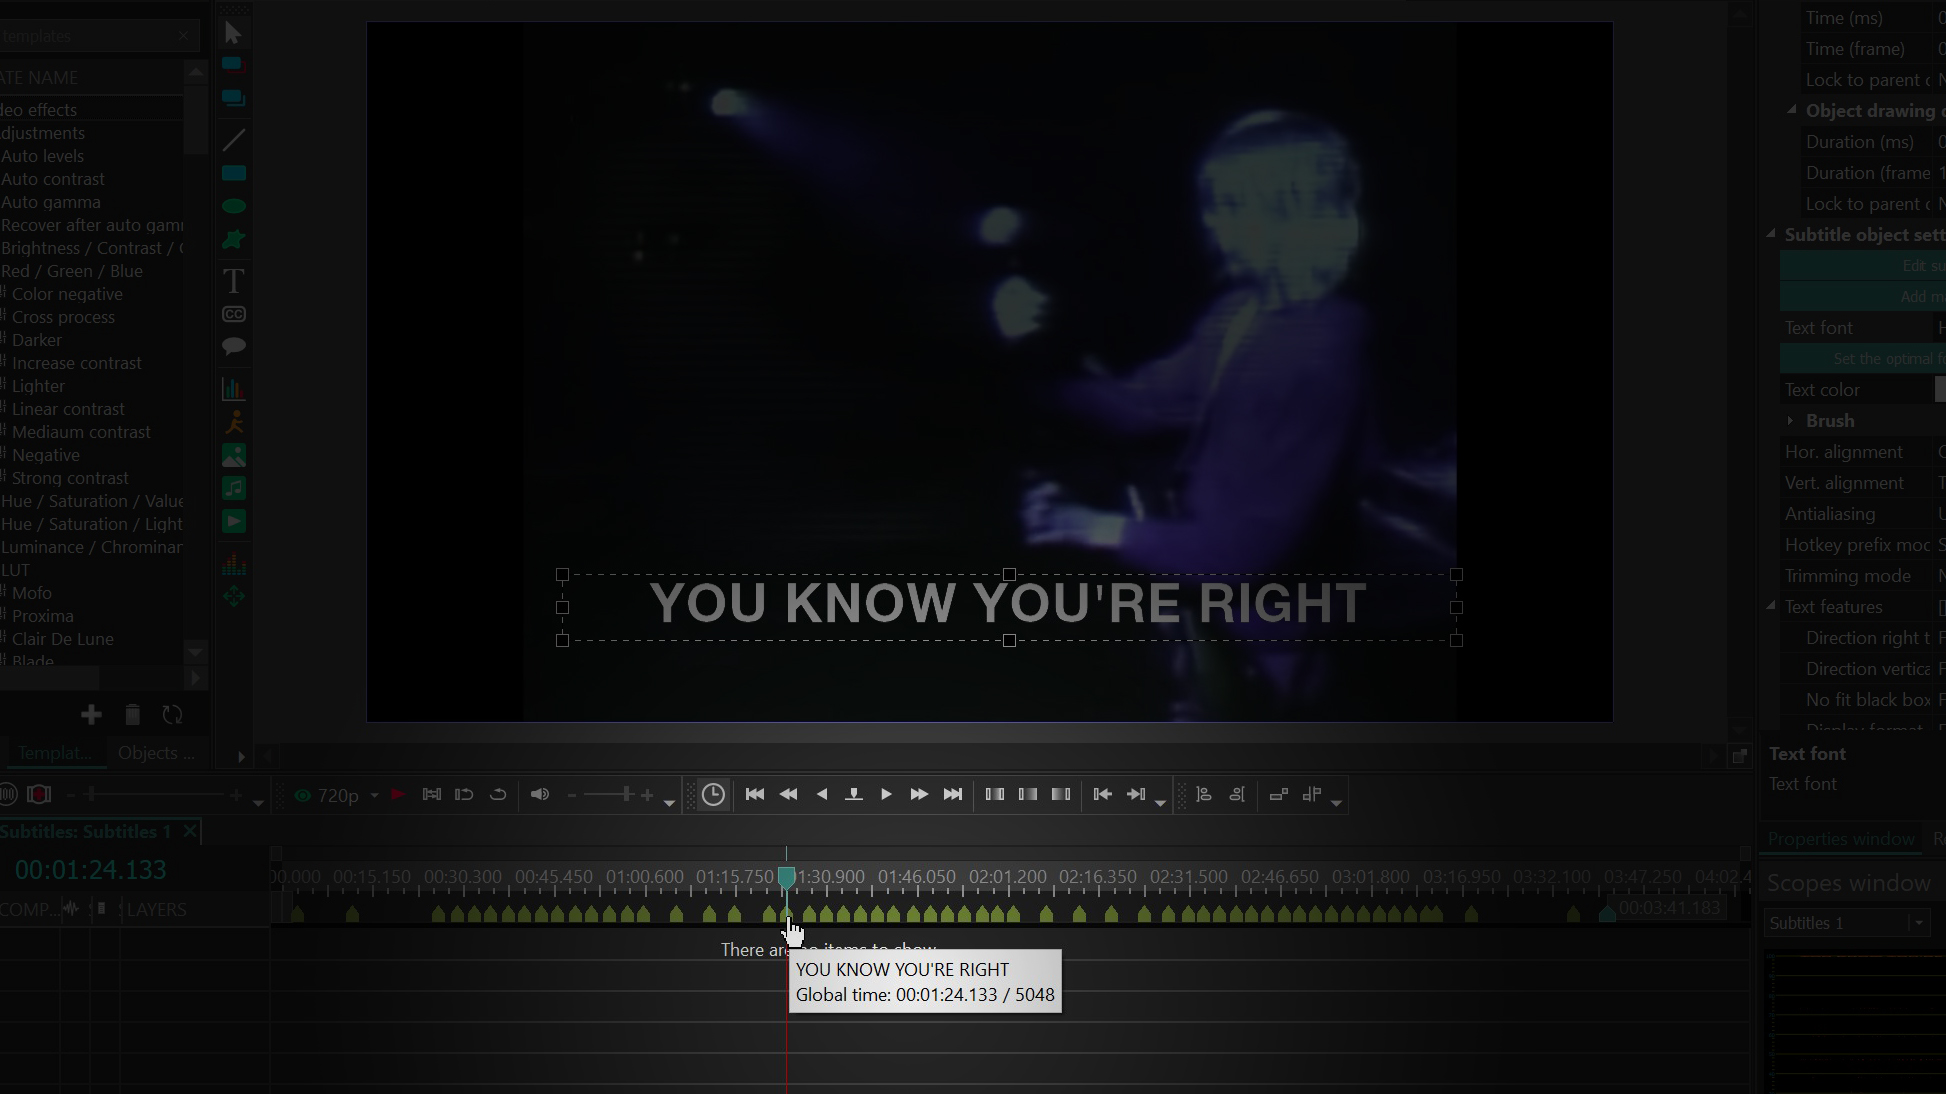
The Marker type option allows you to use selected markers for splitting the exported project into separate files. Change a marker from Comment marker to Segmentation marker. During export, enable Split by markers, and VSDC will create multiple video files according to the segmentation markers.
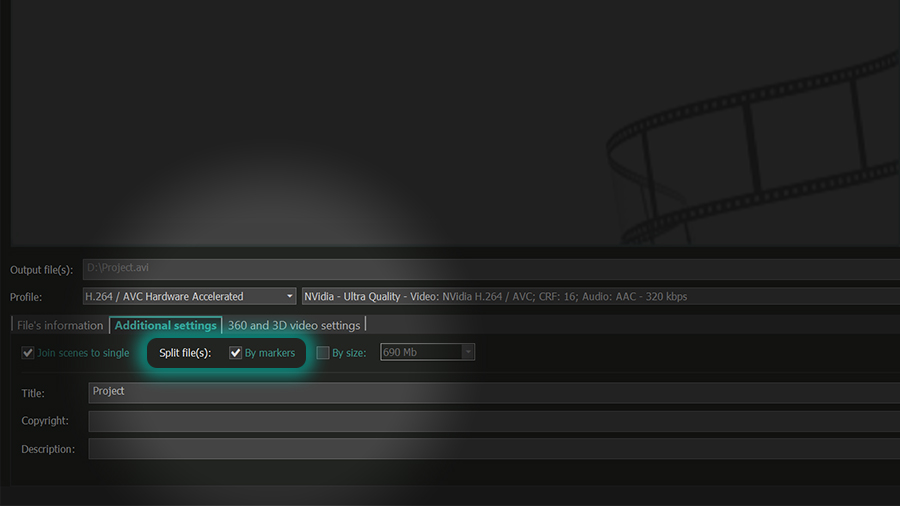
The marker editing menu also includes the Visibility area setting. It determines the timeline levels where the marker, its name, and its comments are visible.
There are three visibility levels:
- Visible on all scopes — the marker is visible on all timeline levels
- Visible in self scope and child object — the marker is visible on the current level and all levels below it
- Visible only in self scope — the marker is visible only on the current level
For example, if you choose Visible on all scopes, you can return to the main timeline tab and still see the marker above the timeline.
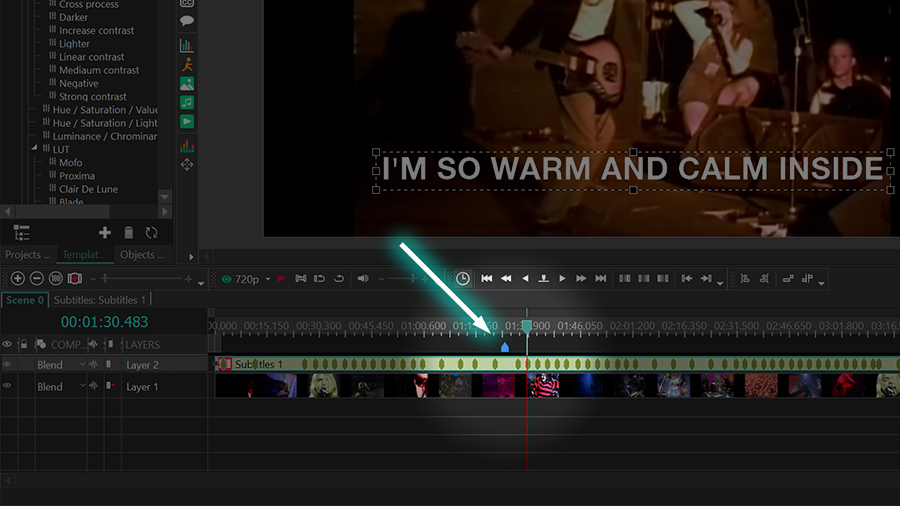
With the other two options, the markup remains limited to the subtitle layer or its related child levels.
Step 3. Format the subtitles
VSDC provides flexible professional controls for designing subtitles that remain clear and consistent throughout the video. Select the subtitle object on the timeline and use the Editor tab and the Properties window to adjust the subtitle area and configure the following parameters:
- Font family, style, and size
- Text color and opacity
- Outline color and thickness
- Horizontal and vertical alignment
- Text position within the subtitle area
- Line spacing and other paragraph settings
- Subtitle background and background color
Keep the subtitle area inside the visible frame and preview several cues before export. The text should remain readable over both bright and dark parts of the video. A contrasting outline or background can improve readability when the footage changes frequently.
For more advanced styling and animation, right-click the subtitle object on the timeline and select Convert to text. VSDC will turn every subtitle cue into an editable text object, allowing you to apply professional text effects, animate individual phrases, and fine-tune each object separately.
Step 4. Export a polished MP4 video with subtitles
When the subtitle text, timing, and formatting are ready, preview the project from beginning to end. VSDC renders the subtitle object directly into the video image during export, creating burned-in or hardcoded subtitles. This approach ensures that your subtitles display consistently on any device or media player without requiring a separate subtitle file or player-specific settings.
To export the project, open the Export Project tab on the ribbon. Select PC or Web as the target device and choose MP4 as the output format. Then select a suitable profile for the required resolution and quality.
Check the Input file and Output file parameters at the bottom of the window. Use Change name if you need to select another output folder or filename. For more detailed control over the codec, resolution, frame rate, bitrate, and audio settings, click Edit profile.
When the settings are ready, click Export Project on the ribbon to start rendering. After the process is complete, open the MP4 file and check several subtitle cues to make sure the text is readable and synchronized correctly. For more information about export profiles, see the VSDC project export guide.
Create professional subtitles with VSDC
VSDC brings the complete subtitle workflow into one powerful video editor: import SRT files, create subtitles manually, adjust timing with precision, generate timeline markers, customize text design, apply effects, and export a finished MP4 with burned-in subtitles. Whether you are producing social media videos, tutorials, presentations, interviews, or international content, VSDC gives you the tools to create accessible, polished, and professional-looking results for free.
Frequently Asked Questions
1. How do I change the font, size, and color of subtitles in VSDC?
Select the subtitle object on the timeline, open the Properties window, and find the Subtitle object settings section. VSDC gives you full control over the font, size, text and outline colors, alignment, text position, and subtitle background.
2. How do I match SRT timestamps with the VSDC timeline?
Open the editor settings using the gear icon in the upper-right corner, go to Editor options, and set Timeline time format to hh:mm:ss:ms. This makes it easier to match timeline positions with subtitle timing, while the SRT file continues to use the standard HH:MM:SS,mmm --> HH:MM:SS,mmm format.
3. How do I add a shadow to subtitles in VSDC?
Duplicate the subtitle object, place the copy on a layer below the original, choose the desired shadow color, and offset its position slightly. For more precise control, apply Video effects > Transforms > Skew to adjust the shadow angle and displacement.
4. How do I animate subtitle characters one by one in VSDC?
Right-click the subtitle object on the timeline and select Convert to text. VSDC will convert every subtitle cue into an editable text object, giving you access to text effects and character animation controls. More information is available in the VSDC text effects tutorial.
5. How does VSDC include subtitles in an exported MP4?
VSDC renders the subtitle object directly into the video image during export. This creates burned-in subtitles that display consistently in the finished MP4 on any device or media player without requiring a separate subtitle file.
Ready to improve your videos with professional subtitles? Download VSDC Free Video Editor and start creating. For product questions, email us at This email address is being protected from spambots. You need JavaScript enabled to view it. or send us a message on Facebook.
Get VSDC Free Video Editor — professional non-linear video editing software for Windows with powerful tools for subtitles, text effects, social media videos, YouTube content, and advanced creative projects. Explore professional features.
 Like us on Facebook
 Follow us on Twitter
Watch us on YouTube
 / @VSDCFreeVideoEditor
© 2011-2026, www.videosoftdev.com, FLASH-INTEGRO LLC. Privacy policy | Terms of use | About us
All trademarks referenced herein are the sole property of their respective owners.
Copying any materials from this site allowed only with written consent of Site Administration.