Video Editor

Use free video software to create and edit videos of any complexity from a family greeting card to a company presentation. Cut, merge video files, apply visual and audio effects, use filtration and image correction, make slideshows and add an appropriate soundtrack. Use multi-color Chroma Key and advanced parameters settings to give your video a professional look. All popular video and audio formats are supported.

Read more about Video Editor...

Video Converter

This program is intended for converting video files from one format to another. Nearly all popular video formats are supported (both reading and saving). In addition, the program drastically simplifies the task of converting videos for playback on specific multimedia devices, such as iPhone, Samsung Galaxy or Huawei P30 Pro. The program is extremely easy to use, has a modern interface and all necessary video processing functions.

Read more about Video Converter...

Audio Converter

The audio converter will help you convert audio files from one format to another. All key audio formats and codecs are supported. The program also allows you to manage playlists and meta tags, extract audio from video files and save these tracks on your computer in any format.

Read more about Audio Converter...

Audio CD Grabber

This audio tool is intended for grabbing audio tracks from compact discs and saving them to the user’s computer in any format. Nearly all popular audio formats and codecs are supported. The program can also extract track details from the FreeDB server for automatic file renaming and updating meta tags.

Read more about Audio CD Grabber...

Multifunctionality

Multifunctionality

A wide array of multimedia processing tools in one free video software suite.

High speed

High speed

Our programs use fast
and high-quality algorithms optimized for single and multi-core CPU’s.

Affordability

Affordability

VSDC video software is freely available for download to Windows OS-based PCs and laptops.

Apply professional-level color correction with Hue & Saturation curves

Have you ever noticed that the same picture may look absolutely differently if processed in opposite colors? The same is true for videos: cool colors are often used to create an atmosphere of anxiety, meanwhile, warm colors are good for creating the spirit of joy, comfort, and romance. Both – photographers and videographers use this approach to transmit the desired emotion to the viewers.

From a technical standpoint, you can achieve these effects by shifting the color balance of a picture, and in this article, we’ll show you exactly how to do that using VSDC Free Video Editor.

Being able to correct color balance through working with Hue and Saturation parameters will come in handy for any video editing enthusiast, not just professionals. In fact, that’s sometimes the only way to “save” a video recorded with wrong white balance settings, make a photo more vivid, or create a popular effect through desaturating one or several colors in the picture.

Below, we’ll show you what a Hue&Saturation color wheel is, and how to use it. If you’re interested in exploring other video color correction techniques, we also suggest you check our guide on working with RGB curves to balance out the brightness and contrast of your picture.

Before you start, make sure to download and install VSDC Free Video Editor to your PC.

How to open the Hue & Saturation color wheel in VSDC

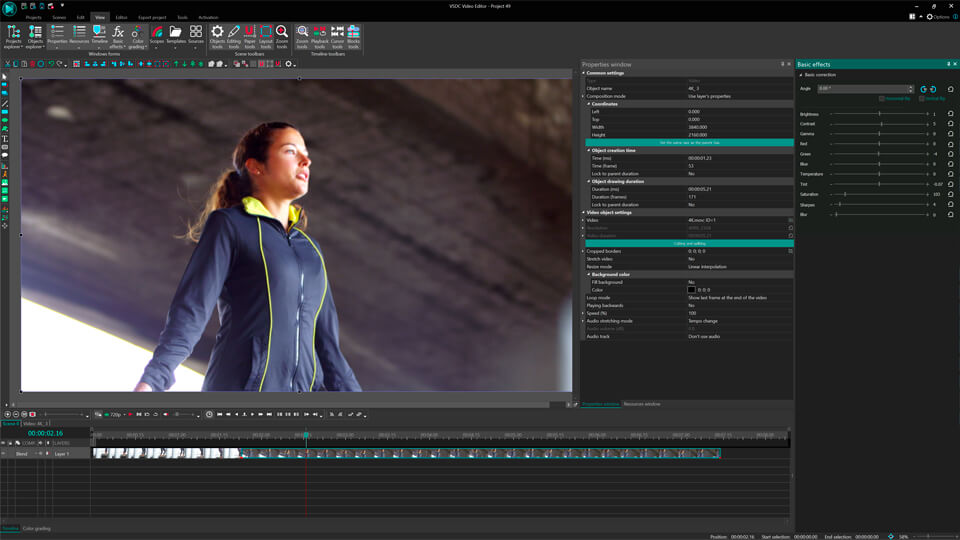
Once you’ve installed and launched the program, import the file you’re planning to work on. It can be an image or a video. Then click on the file and go to the View tab in the top menu. Choose the Basic effects icon – that will open the Basic effects window on the right-hand side of the editor. Scroll down a bit and you’ll see the “Hue and Saturation curves” dropdown menu. That’s exactly where you’ll find the right color wheel.

How to work with the Hue and Saturation curves - the basic principles

The idea behind working with the color wheel is based on creating control points on the inner circle of the wheel (it’s a white circle illustrated below) and moving them closer to the wheel edge or to its center.
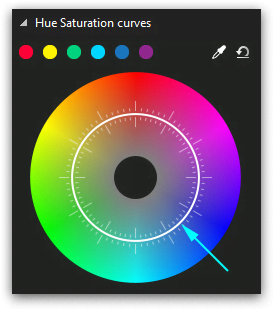
Hue Saturation curves

To create a control point, you need to make a double-click in the color area you’re planning to work with. In other words, if you’re planning to correct red tones in the picture, you’ll need to make a double-click on the inner (white) circle exactly where red tones are located. This will be your control point, and by dragging it closer to the center or the edge you’ll be increasing or decreasing saturation of the chosen color. Note, the edge of the specter correlates with maximum contrast, and its center – the opposite.
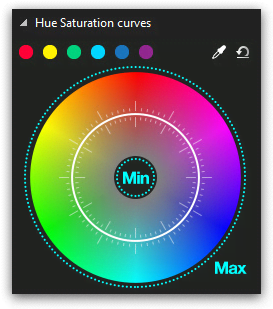
Areas of maximum and minimum contrast

If you move a control point around the circle, you’ll change the tones selected for correction. In other words, by moving a control point from one color sector to another, you change the tones that will be balanced but you’re not switching the colors in the video.
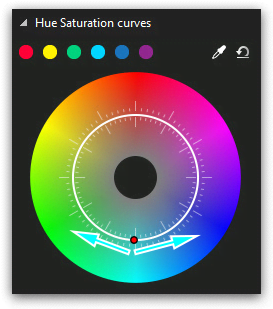
Changing tones of one color on the inner circle

You can change the position of control points by:

  • dragging them manually using the mouse
  • using your keyboard arrows

You might want to correct a specific color tone in the video without changing the rest of the tones. In this case, you’ll need to create three control points: one in the center of the color sector, and two more to the left and to the right from it. These additional points will separate the color area you’ll be working with on the wheel – see the illustration below.
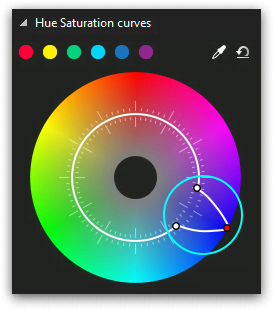
Setting main three control points

Note that in the upper side of the color wheel menu, there is a 6 color palette. Those are the main colors of the wheel: red, yellow, green, blue, dark blue, and purple. If you’re planning to correct any of these color tones in the video, click on it and you’ll get the three control point set automatically – just like illustrated below.
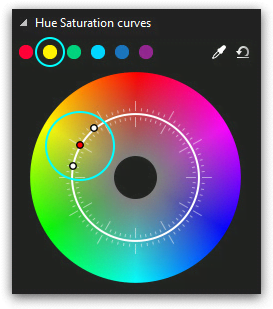
Main colors of the color wheel

If there is a specific color in the video you’d like to correct and you can’t find it on the wheel, use the eyedropper tool. It’s located in the top right corner of the Hue and Saturation dialog window. Click the eyedropper icon and place the mouse over the color you’d like to correct. Click on the color, and it will be precisely chosen on the wheel by the three-point set.
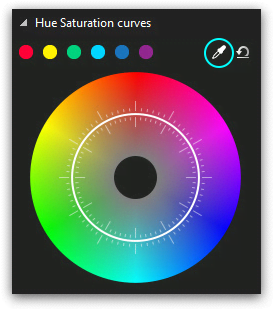
The eyedropper tool

In case after all the color correction manipulations you decide that the original picture looked better, just click the Undo icon in the top right corner of the dialog window. All the control point movements will be canceled and you’ll get the original video back.
The reset to default button

How to correct video colors with the Hue and Saturation curves: examples

Let’s do some practice, shall we? To give you a better idea of how the Hue and Saturation curves work, we’ll show you few common manipulations applied to an image. In the illustration below, you see a photo we’ve uploaded to VSDC and the HS dialog window with the color wheel.

Hue Saturation color wheel

Imagine you need to correct red tones in this photo. To do that, we’ll create a control point in the red tones sector on the wheel. We’ll place two more points to separate the red tone area in the specter because we aren’t planning to change the rest of the tones in the photo.
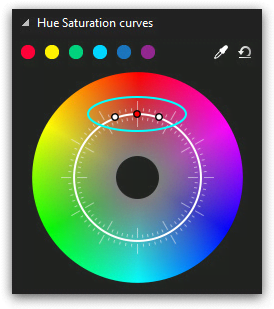
Select red tones for correction

To make the red tones more saturated, we’ll need to drag the main control point closer to the edge of the color wheel – as illustrated below.
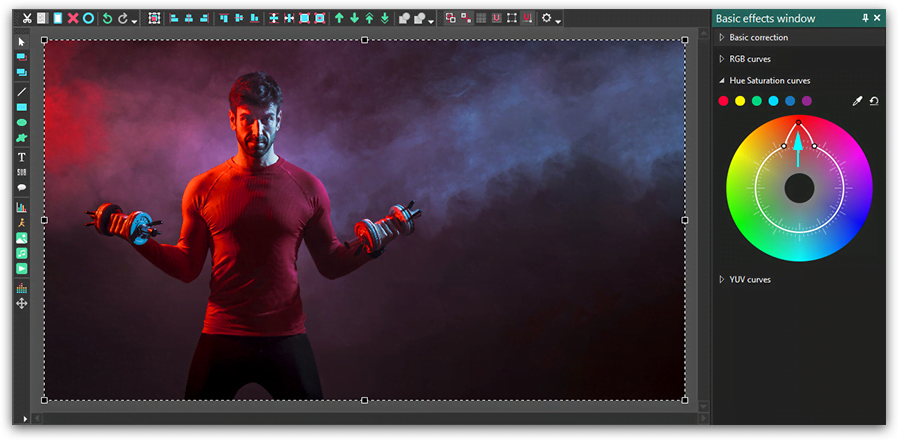
Make the red tones more saturated

To lower saturation level of the red tones, you need to move the main control point closer to the center of the specter – as illustrated below.
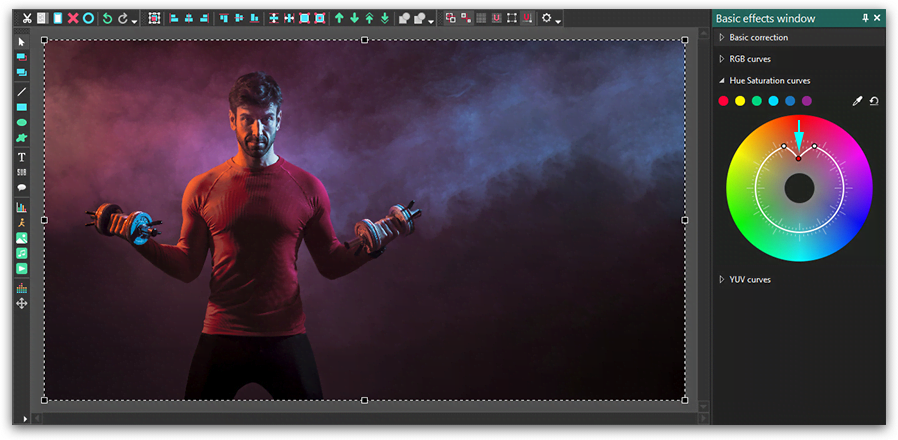
Lower saturation level of the red tones

If you want to completely desaturate the chosen color in the image or a video, you need to move the control point to the innermost position, as illustrated below.
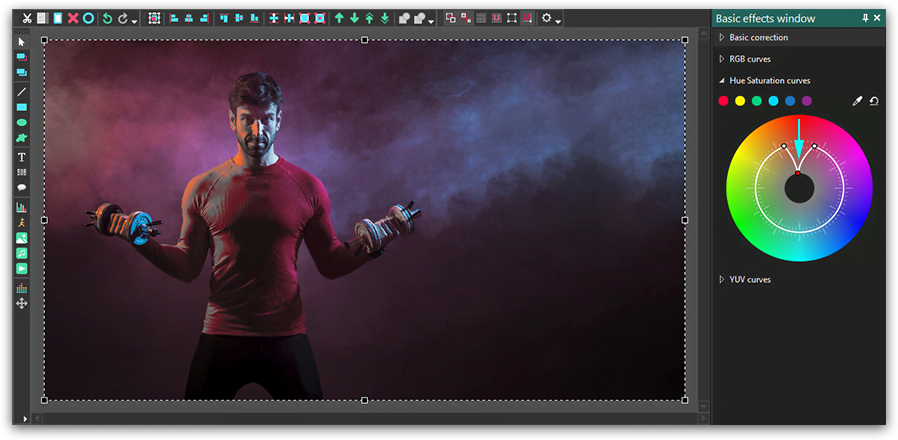
Make the color desaturated

Finally, if you’d like to achieve the popular effect when the entire video is black and white with only one color saturated, you can do it too. Just leave the control point in the chosen color sector unchanged, while dragging the two side control points to the innermost position. The trick Is illustrated below, and the only saturated color in the photo is obviously red.
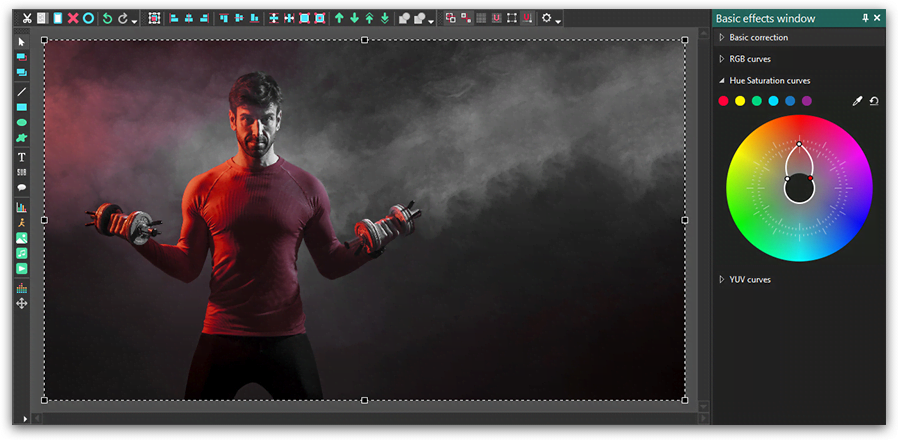
Black and white image with only one color saturated

Working with the Hue and Saturation curves is much easier than it may seem at first sight. Even if you've never performed video color correction, you’ll be able to significantly enhance any photo or video if you just get used to the principle of control point movements.

Feel free to message us on Facebook and subscribe to our YouTube channel to stay tuned with new tutorials.


You can get more information about the program on Free Video Editor' description page.

How to create a slideshow from photos in VSDC Free Video Editor

Assembling media content in a slideshow is a great way to share your experiences with friends and family. However, finding the right tool to do so may be challenging. PowerPoint seems to be one of the easiest options but has a limited set of features and won’t let you work with video files for instance. On the contrary, some video editing software may offer a rich toolset, but would also require its users to dip into the unwanted complexities of multilayer editing.

If you are looking for a sweet spot, download VSDC Free Video Editor with its powerful slideshow wizard. It has a comprehensive set of features packed into an intuitive interface anyone can master in seconds. Sounds too good to be true? See for yourself in this one-minute video guide on how to create a slideshow with VSDC.

Want to get into more detail? Proceed to the step-by-step guide on how to make a video from pictures below.

Step 1. Access the wizard

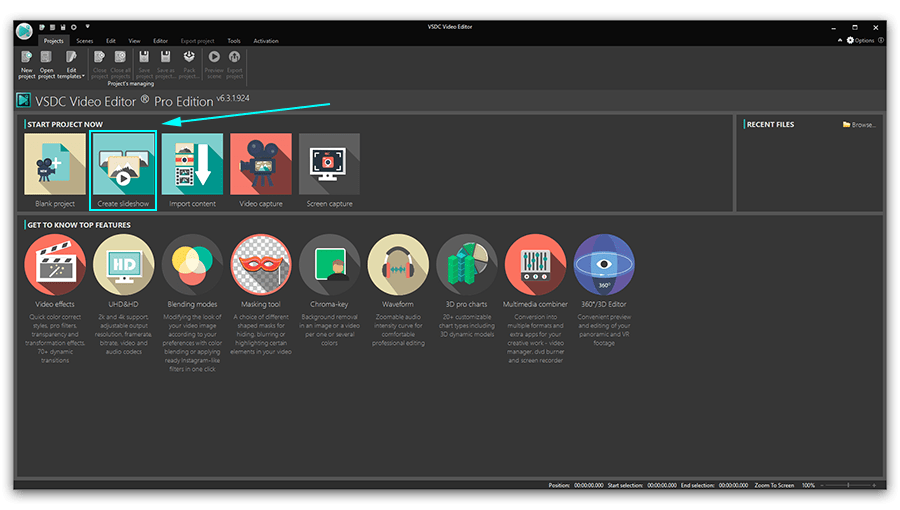
Upon downloading and installing VSDC, open it and click the “Create Slideshow” button available in the “Start Project Now” section. A new window will pop up. Here you can name your project and choose its parameters like height, width and resolution. Click “Finish” to save selected settings. You will be taken to the “Files sequence wizard” in a separate window.

VSDC Free Video Editor start screen

Step 2. Select the artifacts

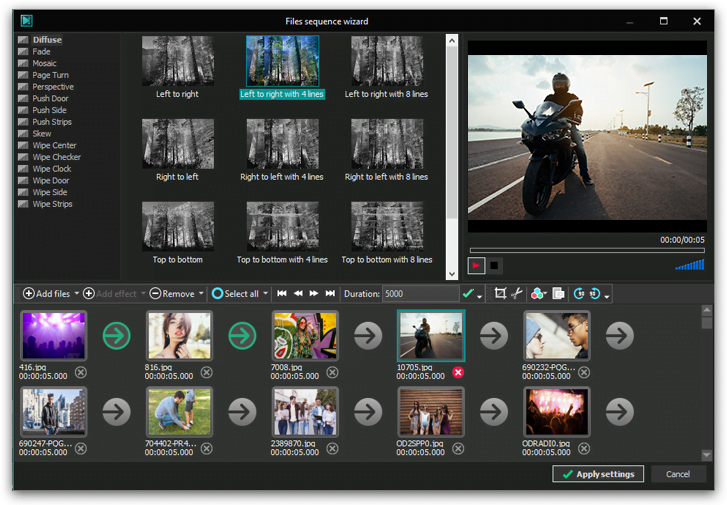
In order to import the content for your slideshow, proceed to the green “Add files” button and select the desired media files. Alternatively, you can follow the recommendations of the “Drag and drop media files here” box. After adding the files to the timeline, you can manipulate their placement with the same drag and drop method to make sure you got the right sequence.

Step 3. Apply magic

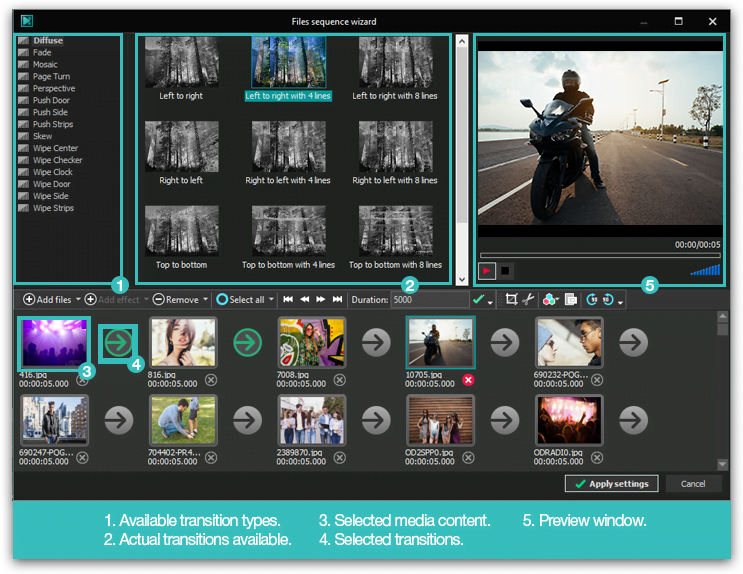
You’ve probably noticed that your media content is placed in rectangular boxes while the round sections in between with arrows inside remain intact. That’s because they are intended for your transitions – you’ll need them to create an actual video from your pictures. To start, proceed to the top left corner of the window. Here you will find the list of available transition types. Specific transitions of a certain type are located in the middle section. The preview window on the right-hand side allows you to check out the way various transition effects work. Drag and drop preferred transitions from the middle section right to the encircled arrows between your pictures.

Create a video from pictures in VSDC slideshow wizard

Step 4. Add a touch of enchantment

Don’t like the duration of a particular picture? Click the picture on the timeline and go to the “Duration” box above. Set the desired value and click “Enter”. Please note that the values in this box are expressed in 1/1000th of a second. So, in order to make your image last for a second, enter 1000. The same rule is applicable for your transitions too. Also, pay attention to the toolbox on the right from the “duration” section. Here you can cut, crop, rotate your images and apply filters to them, if necessary.

Step 5. Save your charming work

Click “Apply settings” in the bottom right corner of the window to save your slideshow efforts. The wizard window will close. You can always come back to the wizard by clicking the “properties window” on the right side of the screen and selecting the “Edit by using the wizard” button.

Now it’s time to export your project. Proceed to the “Export project” tab in the top menu. Select the format and the location on your desktop where you want to place the slideshow. Complete the process by clicking the red “Export project” button in the same title tab.

How to make a slideshow out of photos

Recap time: how to make a video from pictures

Please use the screenshot above as a reference guide. It indicates all the working areas that we have covered in this tutorial. Good luck with creating slideshows!


You can get more information about the program on Free Video Editor' description page.

How to use VSDC as a 4K video editing software: tips’n’tricks

Shooting ultra HD videos used to be a prerogative of video editing professionals, but those times are over. Nowadays action cameras are eagerly adopting this new format while video hosting services like YouTube are offering its users the ability to upload 4K clips introducing more and more amateurs to this new technology. But where do we stand with 4K video editing software? Is it already available to wide audiences?

According to numerous articles on the Internet if you are planning to work with 4K videos – the money spent on the actual camera is the least of your expenditures. They say that unless you are willing to invest over $2500 on computer upgrades, ultra HD video editing isn’t for you. Fortunately, the Internet is not always right and there are much cheaper ways to edit a 4K video. One of the easiest methods is to find the right software, capable of utilizing even average hardware to the full.  We suggest that you download free VSDC Video Editor. VSDC is known for its comparatively low system requirements and the capability to process 4K footage even on low-end computers with limited memory.

Below, we’ll help you get started with VSDC and provide a few tips on editing 4K videos in particular.

Video import

Upon completing the installation process, launch VSDC and click the “Import Content” button from the top menu. Select your 4K video from the computer. This way your video will be imported to the scene without quality loss and the whole editing scene will be adjusted to your ultra HD video parameters.

Color correction

Now it’s time for the actual editing. 4K videos work as a magnifying glass exaggerating the upsides as well as the downsides of your clips, so attention to detail is necessary.

How to edit 4K video: color correction features in VSDC

Ultra-realistic videos oftentimes deserve color correction to mask either the bad weather or poor lightning. To improve the color spectrum, proceed to the top left corner of the and select “Video Effects” >> “Adjustment”. Choose between available options to enhance contrast, gamma and other visual aspects of your clip.

Video export

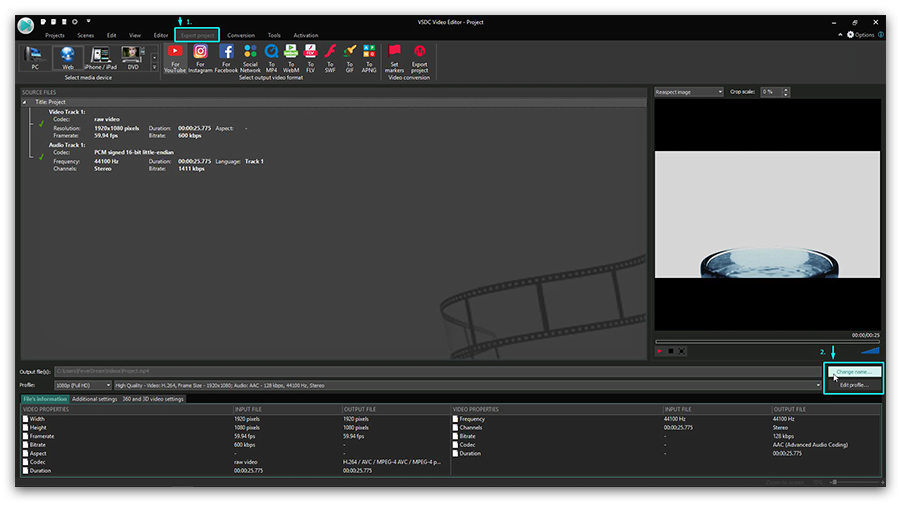
When you are done with editing, it’s time to export your full HD video. Proceed to the top menu and select “Export Project” >> “Web” >> “For YouTube”. Choose a name for your file and the location where you want to save it in the “Output file(s)” field. Complete the process by clicking the “Export Project” tab. This may take some time depending on your hardware.

If you still have any questions about exporting you 4k video, please refer to a one-minute video instruction below.

Want to reduce 4k?

If 4k is too cumbersome for you to work with or the video it doesn’t fit on your storage device you can always shrink the size of your clip with VSDC. For this matter import your video, select the “Export Project” tab and proceed to the “Edit Profile” section. Find the “Profile Filter” option to choose the necessary resolution. 1080 (Full HD) or 720 (HD) will most likely be more than enough for the intended outcome. Press “Apply Profile” to save changes and move on with exporting your project from the top menu.

Bonus features

If you are planning to edit many 4K videos you might want to increase the processing speed. This is made possible with the Pro version of VSDC that allows for hardware acceleration. The Pro version leverages the capacity of your video card (if the video card supports it) speeding up 4K video export.

If you purchased the Pro version, make sure you activate hardware acceleration in the program options. Hardware acceleration is not the only bonus you get with a Pro version of VSDC.

If you are shooting videos with an action camera, you will most definitely find video stabilization tool useful. You will find a detailed instruction on how to use it here. If you prefer visual guides, there is a video instruction for your convenience.

Another feature that may come in handy is advanced resizing. When you import a 4K video to the editor and resize it making it occupy only a part of your scene, you normally lose quality. Well, that’s not the case with the Pro version of VSDC. Advanced resizing methods will help you prevent quality loss and enjoy your videos in the best resolution possible. If you want to learn more about resizing and other advanced features of the pro version, feel free to refer to a detailed guide.

That’s it for now. Enjoy your 4K experience!


You can get more information about the program on Free Video Editor' description page.

Everything you need to know about making a cinemagraph in VSDC

Videos and images are fundamental assets of visual art in the digital era. Each has its own benefits and sometimes it’s hard to choose which format would be more suitable to convey the right emotion to the audience. This is where cinemagraph comes into play, allowing its advocates to make the best of image’s stillness and focus and at the same time enrich it with video dynamics for a more vivid picture.

In this tutorial, we will cover the most practical ways of creating a First things first: find the right softwareFirst things first: find the right software.

How to make a cinemagraph - tutorial from VSDC

First things first: find the right software

Many people choose image editing software as a starting point for making a cinemagraph and end up covered in piles of Photoshop tutorials. We suggest an opposite approach and strongly recommend downloading VSDC Video Editor for three reasons:

  • It is designed to work with motion videos and offers a number of video editing features, so it’s a better fit for cinemagraph than Photoshop;
  • The software has a completely free version that doesn’t impose any limitations for our purposes;
  • It doesn’t require much practice to become good at it.

How to make a cinemagraph: method #1

There are two ways to create a cinemagraph with VSDC. We’ll start with the free option first.

A video tutorial on Method #1 is available here:

  1. Open VSDC Free Video Editor.
  2. Select “Import Content” option in the main menu.
  3. Choose the video intended for cinemagraph from your desktop and click “Finish”. The Video will be added to the timeline.
  4. Use left-mouse click on the timeline to select the right moment in the video that you want to freeze and use as an image.
  5. Proceed to the “Cutting and splitting” tab in the top menu and select and wrench icon. In the drop-down list select the “Create snapshot” option. The image will be added to the resources window (under the “Images” section) on the right-hand side on the screen.
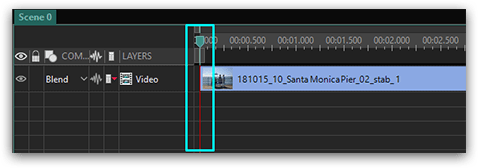
  6. Go back to the timeline and drag the time indicating “needle” to the very beginning of the video. This way the rest of the timeline items will be automatically added to the beginning of the clip.

    VSDC Free Video Editor timeline close-up

  7. Drag the snapshot to the preview area. It will automatically be added to the timeline.
  8. Choose the green “Add free shape” option in the left-hand side menu and press ok.
  9. Add the “Free shape” to the preview section by holding the left mouse button and dragging the mouse over the preview area.
  10. Double-click the “Free Shape” box on the timeline.
  11. Delete all the ShapePoints in the timeline.
  12. Proceed to the top menu, select the “Free Shape” tab and click the “Insert point” option.
  13. Use left mouse clicks to select exactly the area that you want to “come alive” in your cinemagraph.
  14. Go back to “Scene 0” in the left-hand side of the timeline.
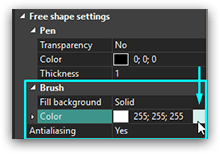
  15. Go to the “Properties” tab in the bottom right corner of the screen and select the black color for your free shape. Make sure you select the color under the “Brush” section, not under the “Pen” section.

    Free shape settings window in VSDC

  16. Right click the layer with your video on a timeline and choose “Cut”.
  17. Double-click the “Free Shape” box on the timeline.
  18. Proceed to the top menu, select “Video Effects --> Transparency --> Clipping”. The clipping box will be added to the timeline.
  19. Double-click the “Clipping” box.
  20. Use the right mouse click on the preview area and select “Paste”. You have now inserted the video in your Clipping object.
  21. Click the “Preview” button above the timeline to make sure you like the outcome.
  22. Proceed to the “Export project” tab in the top menu. Select the format and the location on your desktop where you want to place the cinemagraph.
  23. Finish the process by clicking the red “Export project” button in the same title tab.

Here is a graphic description of method #1. Basically, in this method, you are placing a free shape with a video inside it over a static image.

Creating a cinemagraph using a free shape object

How to make a cinemagraph: method #2

Method #2 uses the mask feature. It is an option for cinemagraph, but it requires you to buy the Pro version. A video tutorial on Method #2 is available here:

  1. Repeat the first 6 steps from method #1.
  2. Left click on the preview area. This way you will deselect the video layer on the timeline and ensure that the new objects will be added to the front layer.
  3. Drag the snapshot to the preview area from the resources window. It will automatically be added to the beginning of the timeline.
  4. Double-click the newly appeared Image layer on the timeline.
  5. Choose the green “Add Ellipse” option in the left-hand side menu and press ok. You may also use the Rectangle option for your purposes.
  6. Add Ellipse by holding the left mouse button and dragging the mouse over the preview area.
  7. Place the ellipse in such a way that it covers exactly the area that you want to “come alive” in your cinemagraph.
  8. Go to the “Properties” tab at the bottom right corner of the screen and select the black color for your Ellipse. Make sure you select the color under the “Brush” section, not under the “Pen” section.
  9. On the left-hand side of the timeline menu click the “Blend” button on the ellipse layer and choose the “Mask” option.
  10. Click the “Preview” button above the timeline to make sure you like the outcome.
  11. Proceed to the “Export project” tab in the top menu. Select the format and the location on your desktop where you want to place the cinemagraph.
  12. Finish the process by clicking the red “Export project” button in the same title tab.

Here is a graphic description of method #2. Basically, in this method, you are cutting out a hole in the static image to see the background video through it.

Creating a cinemagraph using masking feature

The major difference between the methods is indicated in the table below.


Method #1 (free version)

Method #2 (Pro version)

How many layers are there on the scene?

Two: Freeshape and Image (screenshot)

Two: Video and Image (screenshot)

What’s in the background layer?

Image (screenshot)

Video

Which layer is edited?

Layer with a Freeshape and a Clipping layer inside it.

Layer with an Image

Which effect is applied?

Inserting a Clipping effect with a video inside of it in a Freeshape

Inserting Ellipse or Rectangle with a MASK in the Image layer


You are all set now. Select a preferable method and get down to cinemagraphing. Good luck!

How to Reverse a Video with VSDC Free Video Editor

Video reversing has become a popular feature among both experienced and amateur video bloggers these days. There are many online applications designed for these purposes out there, but they don’t guarantee the security of your private content, have a very poor toolset and impose certain processing limitations that wouldn’t allow you to edit hefty high-quality videos.

This how-to guide is aimed to show you one of the fastest, easiest and yet reliable ways to impress your family and friends with this stunning effect.

How to quickly reverse a video in VSDC

First off, download free VSDC Video Editor. Unlike online editors, VSDC doesn’t require you to upload private content on the Internet. In addition, the free version of the editor doesn’t have those unpleasant limitations for video sizing, allowing you to work with high-quality videos shot with a GoPro for instance. Finally, the output video is free of any watermarks on it.

Once you are done with the installation process, launch the editor and click the “Import Content” button from the top menu.

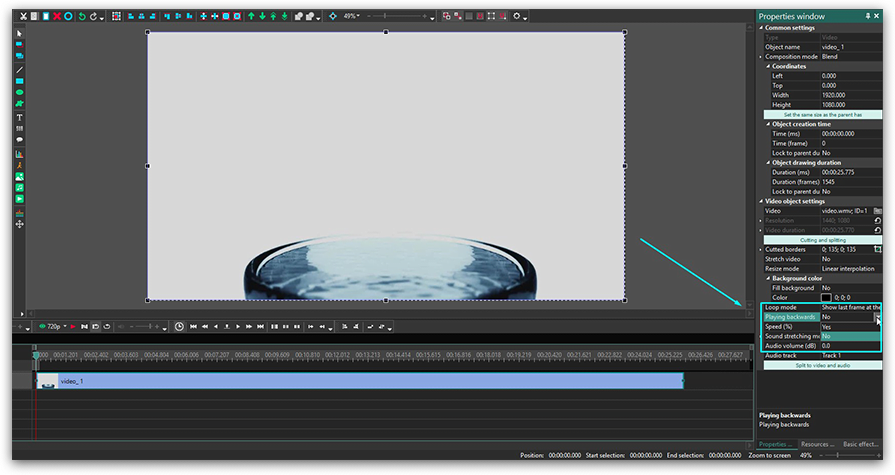
Select the desired video file from your computer with a double-click. Click “Finish” in the new window to complete the import. Now that you have imported the video, it is ready to be edited. Proceed to the side menu at the right corner of the screen (called Properties window). Find the “Playing backwards” section. You may have to scroll down to find it. By default, you will see a “no” to the right of this section indicating that the video hasn’t been reversed yet. Proceed to the dropdown section and select the “yes” value.

VSDC Editor. Reverse Video Menu

You are almost done. Now it’s time to save your video. Select the “Export project” tab at the top of your screen. Here you can choose the desired file format, the name for your video and the location where you want to save it. You may also choose the quality of the exported file in this menu.

VSDC Editor. Export Reversed Video Menu

As soon as you are ready, click the “Export project” tab again and select the red “Export project” button right next to the red flag. Wait for a brief moment until the export is complete and – voila! Go ahead and share your video with friends.

Now let’s recap the whole process.

Additional Tips and Tricks

Reversing a video is presumably not the only feature you might need when editing your clip. Cutting and splitting the video before export may also come in handy. For this matter, select the imported video on a timeline and go to the “Editor” tab at the top of your screen. Choose the necessary cutting and splitting tools to crop your video.

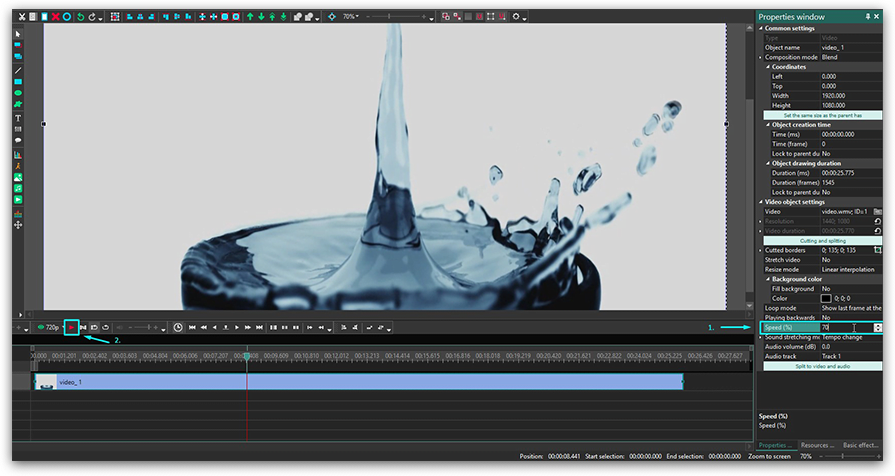
Another important feature is video speed adjustment. Remember the part of the menu with the “Playing backwards” section? Well, that’s exactly where the speed adjustment options are located. You will find the speed percentage indicator right under the “Playing backwards” setting.

VSDC Editor - Adjust Speed Menu

Type in the desired speed value and make sure you preview the altered speed video to see if you like the result. Here you will find more detailed guides on how to slow down or speed up your videos.

The last feature that we will cover in this tutorial is sound adjustment. Let’s be honest – reversed audio is rarely as good as a video. Luckily we don’t have to dig deep to find sound control options with VSDC Editor. We will return to the very same Properties window we used for the initial reverse and speed adjustments.

  1. Select the video on a timeline, scroll down the right-hand menu to the very bottom and you will see the “Audio track” setting.
  2. Choose the “Don’t use audio” option from the dropdown list and enjoy the silence.
  3. Alternatively, you may add a different soundtrack to it. To import new content, go to the top menu and select the “Editor” tab. Click the “Add an object” button and select “Audio” from the dropdown list. Choose the audio file you want to import and press “ok”.
  4. Adjust the length of your audio file with the same tools you used for cutting and splitting your video.
  5. Don’t forget to preview your work before exporting the clip.

You may learn more about working with the volume of video files in this tutorial.

Well, now you are armed and ready to reverse your video. If something remains unclear, feel free to refer to this brief video instruction to visualize the whole process.


You can get more information about the program on Free Video Editor' description page.

News

New Transition Addition Methods, RAW/BRAW Files Support and Free Waveform

Welcome to the next level of video editing with VSDC's latest release, Version 9.1! Packed with an array of fresh features and enhancements, this update is designed to make your video editing experience...

VSDC 8.3 – 100+ New Templates, Key Editor Window, AV1 and Enhanced GUI

Welcome to the latest VSDC update, Version 8.3! We've been working hard and we’re ready to present a feature-packed release for you to discover an exciting array of over 100 fresh free video templates,...

Free video editing in 2023: Unlock Your Creativity without Breaking the Bank

In today's digital world creativity reigns supreme. It offers endless possibilities for individuals and brands to captivate audiences and leave a lasting impression. With social media platforms at the...

The Best Online Video Editors in 2023: Benefits and Drawbacks

In today’s digital landscape, the popularity of video content is gaining momentum, with users increasingly turning to video creation both for personal advantage and professionally. When searching for...

VSDC 8.2 – Proxy File Support, Color Keyframes and Vectorscope

We are thrilled to unveil the highly anticipated VSDC video editor 8.2 update. Our team has been hard at work, ensuring that this release is packed with exciting features and enhancements to elevate your...

VSDC 8.1 Brings Multicam, Curve Line Object, Scrolling Text Effect, and More

We’re thrilled to introduce VSDC 8.1. The new version primarily caters to professional videographers, graphic designers, and artists, however, everyday video creators will benefit from the update as...

VSDC 7.2 Takes Its Color Correction Toolset to the Next Level (Plus, Other Updates)

It has been another productive couple of months for the VSDC team, and we’re thrilled to announce the release of VSDC 7.2 – the new version of our video editing suite. Although the majority of updates...

5 Free Pieces of Software for Video Color Correction

If you’re a video creator, there are three reasons why it’s crucial to learn color correction. First, it will help you enhance your videos and make them look professional. Second, it will allow you...

VSDC 7.1 Upgrades GUI and LUT Editor, Adds New Effects and Custom Shortcuts

The new version of VSDC includes two new video effects, expands the functionality of the LUT editor, and makes video editing more convenient by bringing an improved interface, optimized timeline, and custom...

10 Pieces of Truly Free Video Editing Software (with No Watermarks)

Seeing a watermark on your video after spending hours editing it feels infuriating. Yet a few video editing software developers are still using this practice to limit the free usage of their products....
 

Screen Recorder Box

This program allows you to capture the video of your desktop and save it on your PC in various formats. Coupled with a video editor, the program is a great tool for creating presentations, tutorials and demo videos.

Read more about Screen Recorder...


Video Capture Box

The program captures video from external devices and records it to computer in a free format. You can save video from video tuners, webcams, capture cards and other gadgets.

Read more about Video Capture...


Reviewed by


"VSDC Free Video Editor is a surprisingly powerful, if unconventional video editor"

- PC Advisor


"This video editor gives you tons of control and editing power"

- CNet


"The editor handles many common formats and boasts a good deal of capabilities when it comes time to alter lighting, splice video, and apply filters and transitions in post production"

- Digital Trends