 User Help Manual
  Learn FAQ
  Send us feedback
 ")


- Published by Amy Shao on June 30, 2026 Meet the new major update ...
- Published by Amy Shao on March 11, 2026 What is the best gift for...
- published Amy Shao 11/19/25 Meet the long-awaited VSDC 10.2 update: a new ve...
- Hi, I'm Mattea Wharton, a travel videographer from Seattle. For three years I ba...
Add cinematic bars to a video to achieve a widescreen movie effect
Adding cinematic bars is incredibly easy if you know the right tricks. VSDC Free Video Editor allows you to do that within less than a minute! The technique is simple – you literally add two black bars to your video and place them at the top and the bottom of a scene. No masking, no resizing, no video editing experience needed. See it for yourself in the video below:
Yes, we know that technically to create the “widescreen black bars” effect you should ideally use a professional camera and shoot in a widescreen aspect ratio (which is 21:9). This is exactly how Hollywood movies come out letterboxed – they are originally aimed at wide cinema theater screens, so when we watch them on TV with a standard 16:9 ratio, there is some black space left at the top and the bottom of a screen.
Anyway, since you’re here, you probably didn’t have a chance to shoot a video the right way, so we’re about to show you how to add cinematic black bars quick and easy.
But first, download VSDC Video Editor to your PC (it’s Windows only).
How to create widescreen black bars in VSDC: a step-by-step guide
- Launch the program and import your soon-to-be-Hollywood-style movie using the Import content button on the start screen.
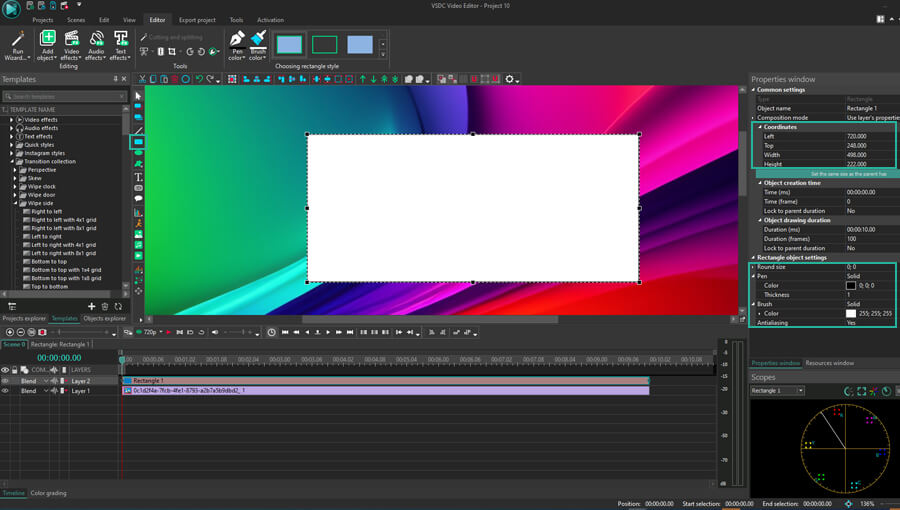
- Using the left-side menu, add a rectangle-shaped object to the scene as illustrated below.
- Paint the rectangle black using the Brush color icon from the menu at the top or the Properties window Brush color menu.
- To stretch the bar exactly to the width of the scene, in the Properties window click on the “Set the same size as the parent has” green button in the Properties window (again, illustrated below). The rectangle will take the space of the entire scene, so all you need is to manually adjust its height as desired.
- Once your cinematic bar looks the way you want, click on it using the right mouse button and select Duplicate to create an identical one.
- Place the widescreen bars at the top and the bottom of a scene as intended.
Note that some part of your video will get covered by the cinematic black bars overlay – this is an inevitable consequence of the method. The good news is you can adjust the height of the bars at any moment, that’s why we recommend previewing the movie before exporting it to make sure that no essential element of your footage is hidden behind the rectangles.
To preview the video, use the red triangle icon right above the timeline. If your video looks choppy or lags, simply change preview resolution – it’s a dropdown menu to the left from the Preview icon. Lagging typically happens when a video file is too large (especially if it is 4K), and it’s the result of the processor being overwhelmed by the volume of information. The less memory your PC has, the more likely you’re to experience the issue. Do not worry, it doesn’t affect the output quality in any way.
When you’re ready, go to the Export project tab and save the video in the required format. Remember that you can change every parameter of the video including its format, codec, quality, framerate, width and height using the “Edit profile” button.
Aside from the cinematic black bars, there are many more tricks you can apply to your video to make it look like a real movie, including the “Video inside text” effect, the picture-in-picture effect, and split screen”.
Feel free to message us on Facebook and subscribe to our YouTube channel to stay tuned with new tutorials.
Watch us on YouTube
 / @VSDCFreeVideoEditor
© 2011-2026, www.videosoftdev.com, FLASH-INTEGRO LLC. Privacy policy | Terms of use | About us
All trademarks referenced herein are the sole property of their respective owners.
Copying any materials from this site allowed only with written consent of Site Administration.