Video Editor

Use free video software to create and edit videos of any complexity from a family greeting card to a company presentation. Cut, merge video files, apply visual and audio effects, use filtration and image correction, make slideshows and add an appropriate soundtrack. Use multi-color Chroma Key and advanced parameters settings to give your video a professional look. All popular video and audio formats are supported.

Read more about Video Editor...

Video Converter

This program is intended for converting video files from one format to another. Nearly all popular video formats are supported (both reading and saving). In addition, the program drastically simplifies the task of converting videos for playback on specific multimedia devices, such as iPhone, Samsung Galaxy or Huawei P30 Pro. The program is extremely easy to use, has a modern interface and all necessary video processing functions.

Read more about Video Converter...

Audio Converter

The audio converter will help you convert audio files from one format to another. All key audio formats and codecs are supported. The program also allows you to manage playlists and meta tags, extract audio from video files and save these tracks on your computer in any format.

Read more about Audio Converter...

Audio CD Grabber

This audio tool is intended for grabbing audio tracks from compact discs and saving them to the user’s computer in any format. Nearly all popular audio formats and codecs are supported. The program can also extract track details from the FreeDB server for automatic file renaming and updating meta tags.

Read more about Audio CD Grabber...

Multifunctionality

Multifunctionality

A wide array of multimedia processing tools in one free video software suite.

High speed

High speed

Our programs use fast
and high-quality algorithms optimized for single and multi-core CPU’s.

Affordability

Affordability

VSDC video software is freely available for download to Windows OS-based PCs and laptops.

How to place two videos side by side for free with VSDC Video Editor

Let's take one popular video effect frequently used in cinematography and music clips: placing videos side by side. As a rule, we talk about a screen divided into two even parts, where videos are played simultaneously. Usually, it's the same video played in both parts of the screen, however, you can place two different videos side by side as well. The latter is called "split screen effect" and technically it's performed the same way - we have a separate tutorial about "split screen effect" here (https://youtu.be/fS1rKoqN9-s)

Let's briefly review the idea and see how to implement it in your movie at zero cost using VSDC Video Editor.

Why would you place two videos side by side?

For many reasons! This effect has been used in movies since the middle of previous century in such classic movies as Pillow Talk (1959) and Dressed to Kill (1980). So let your imagination fly. Here is a couple of ideas to borrow. You can show something happening at the same time in different places - as it was done in "Kill Bill vol.1". You can play with "Expectations and Reality" theme, as in "500 Days of Summer". You might want to show different perspectives by placing two shootings of the same object from two angles. Or you can just combine two theme-based videos to capture the viewer's attention.

Whether it's for comparative, visual, or creative reasons, placing videos side by side is quite an easy task, even though it might look complicated. In fact, it shouldn't take you longer than several minutes. This instruction will explain how to do it in a couple of steps with VSDC Free Video Editor.

Placing two videos side by side. Tutorial

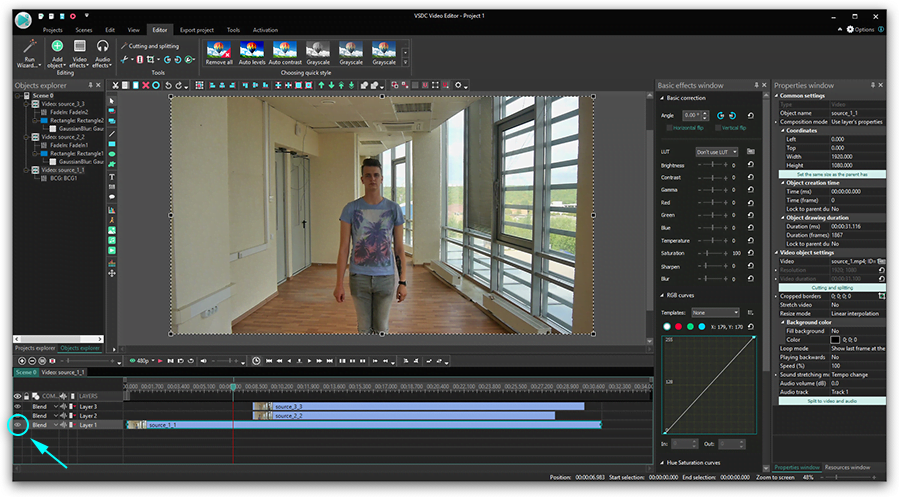
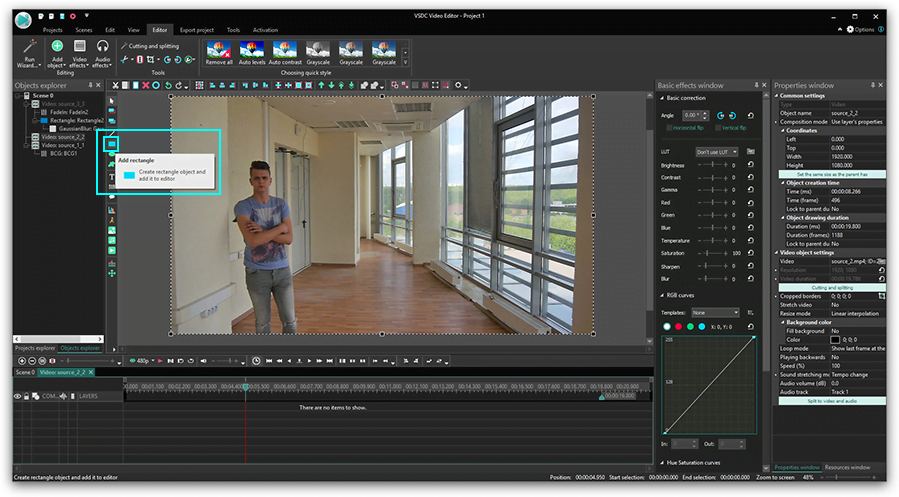
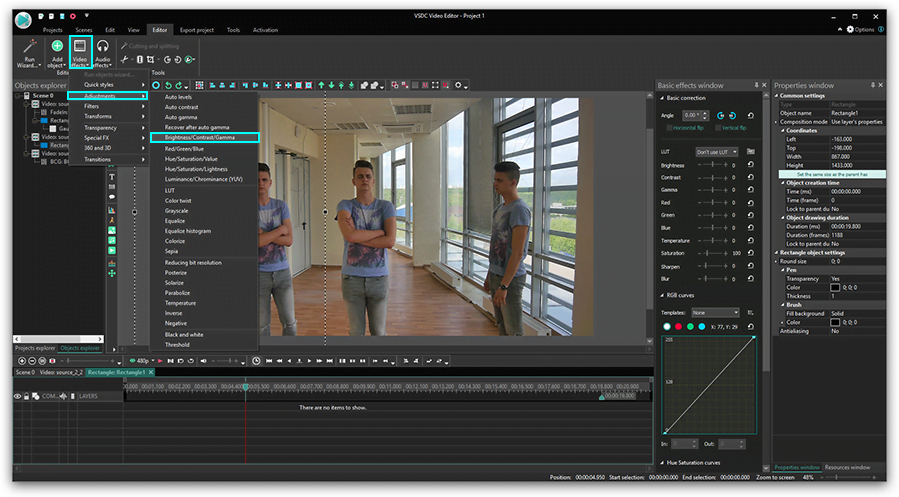
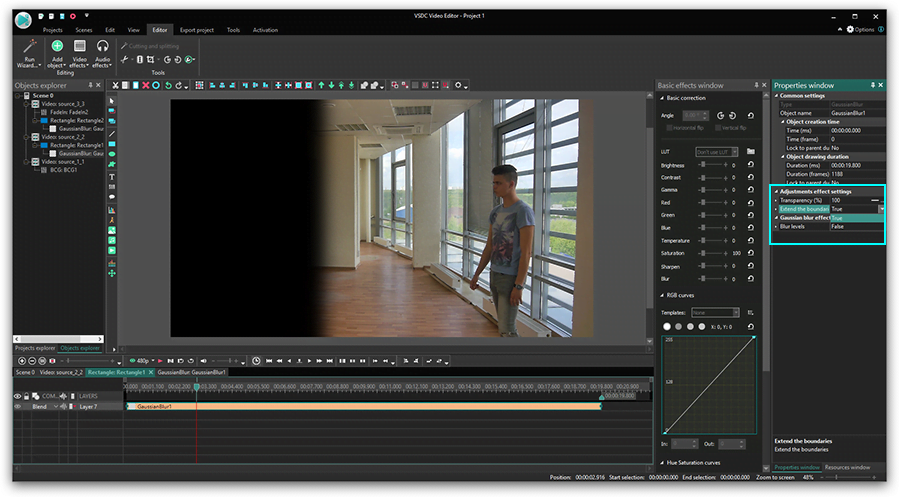
Add the first video to the timeline and drag it to fit the left part of the scene.

Add text

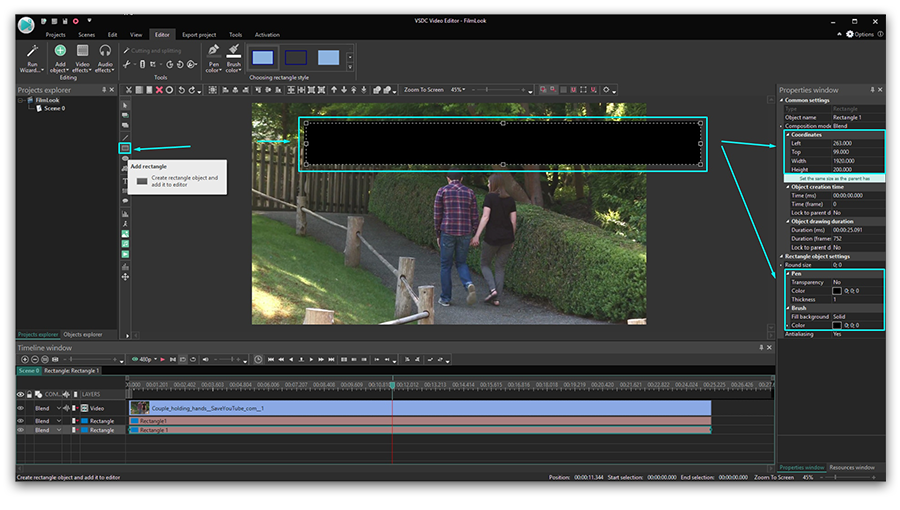
Halve the frame width using “Coordinates”. In this case, 1920/2=960. “Coordinates” are located in the “Properties Window” on the right of the scene.

Play with font’s setting

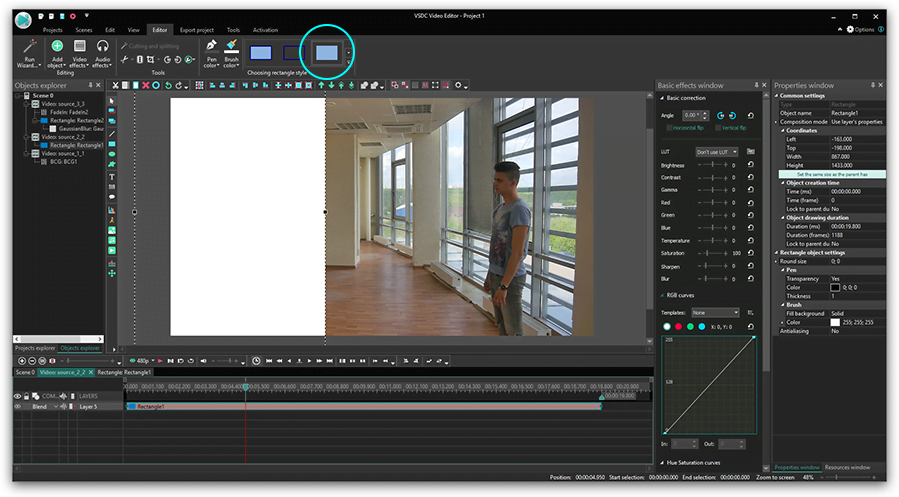
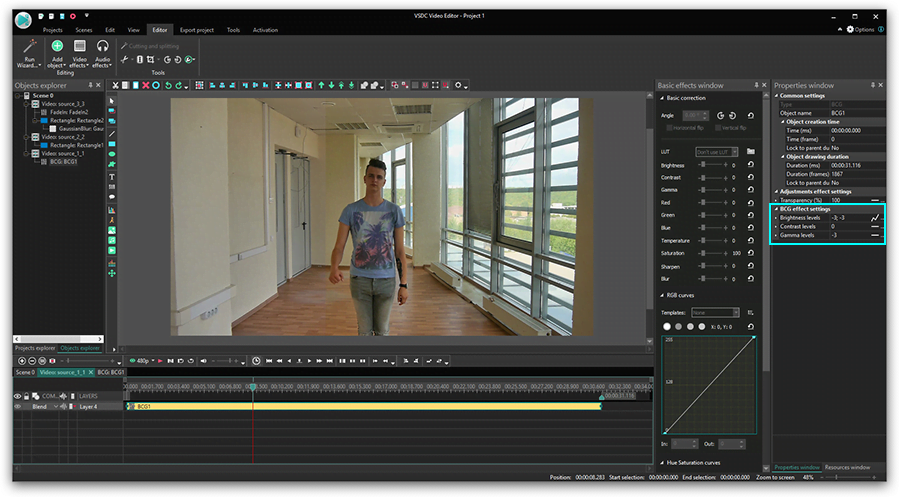
Stretch your video if necessary. If you are using two different videos, before starting, you might want to make sure they have equal or at least similar size and quality.

Add video object

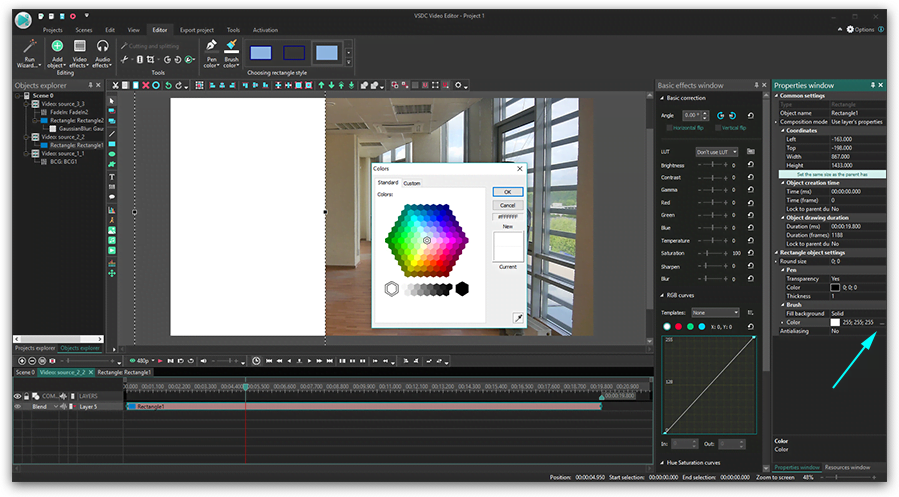
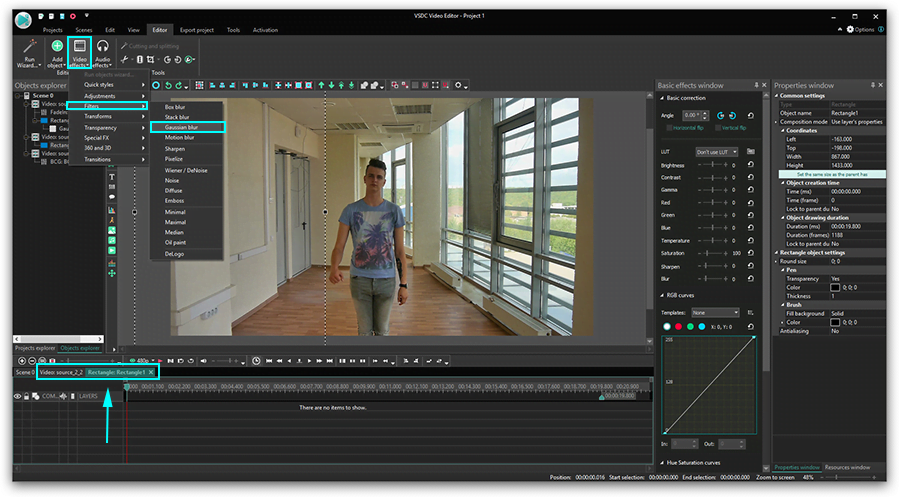
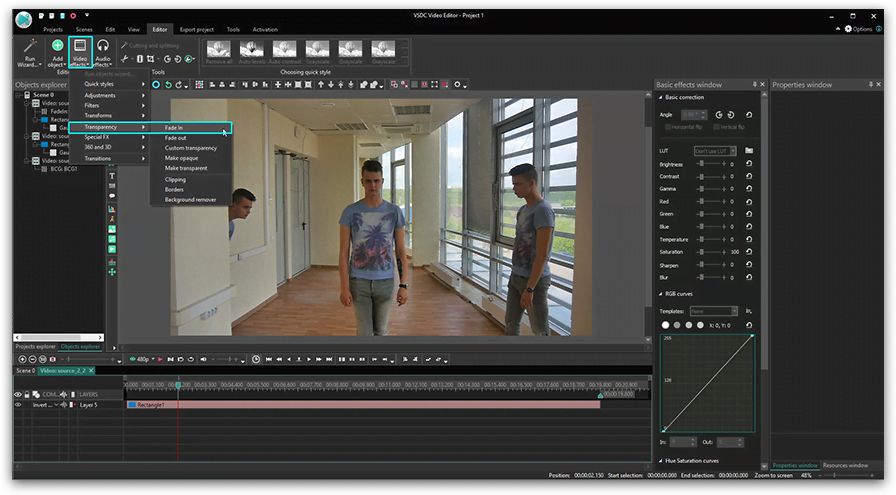
If you want the same video to be placed twice on the screen, in the right click menu select “Duplicate”. In case, you want to use different videos, import the second video to the editor and place it exactly under the first one on the timeline.

Select Source in mode

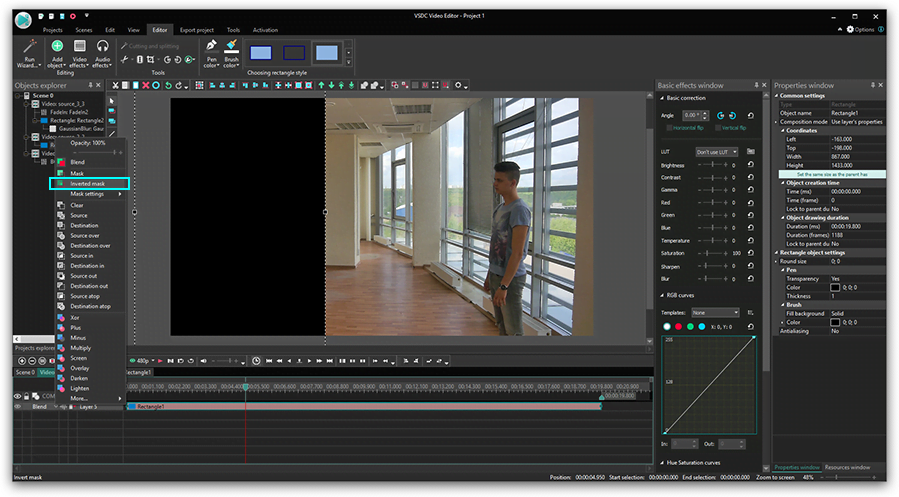
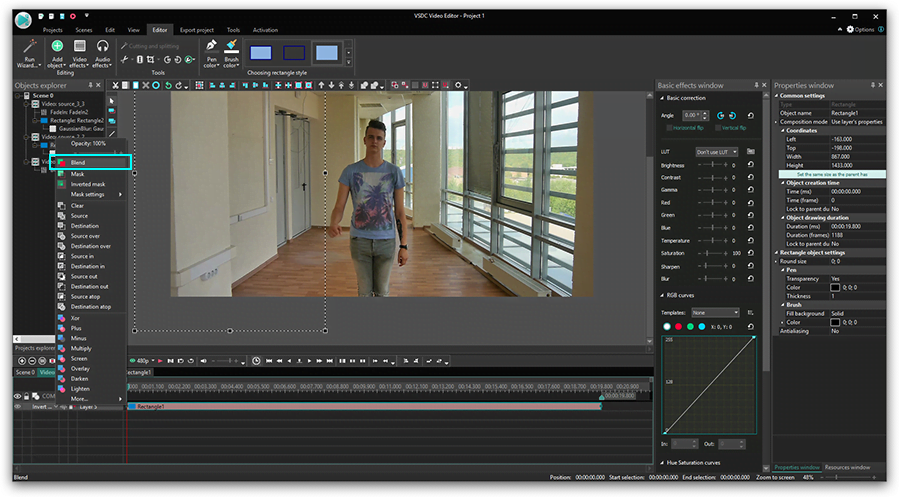
Drag the duplicated ot the second video to the right until they are evenly spread on the working area, depending on your needs.

Add video

Your side by side video is ready now!

As mentioned above, apart from combining the same videos, you can also create a split screen video using two or four or any other even number of different footage pieces. It's a great solution for a promo clip or a comparison presentation.

Hopefully, you enjoy using VSDC Free Video Editor. Join us on Facebook and let us know how it helps you implement your ideas!

To download VSDC Free Video Editor, please, proceed here - www.videosoftdev.com/free-video-editor/download

Find more awesome tutorials on our YouTube channel - www.youtube.com/user/FlashIntegro/videos


You can get more information about the program on Free Video Editor description page.

How to make your video look like a film using VSDC Free Video Editor

When you sit down to edit your video – even if it’s just a short vacation clip from your smartphone – we bet deep inside there is a spark of a real filmmaker ambition. And you probably want to make your video look like a film too! We absolutely get it. In fact, we hope nobody ever opens a video editing software thinking “Okay, let me just quickly throw together a few scenes without bothering if this whole movie will be a pleasure to watch”.

Creating cinematic look in VSDC Free Video Editor

And while we probably aren’t authorized to advice you on the directing part, we can definitely add two cents and show you how to apply a film look to a video using simple editing techniques. In this tutorial, you’ll learn how to achieve this Hollywood-style look by adding black bars, using RGB filters and Gradient.

The best part, you won’t spend much time on this, and you don’t really need experience or special knowledge – we’ll walk you through every step.

Step #1: Add black bars to a video to make it look cinematic

First, let’s see how to easily create black bars – or widescreen bars, or letterbox bars – whatever you call this “frame” instantly making any video look more cinematic as it was shot for movie theaters.

How to add black bars to a video for free

Using VSDC Free Video Editor (download it here if you haven’t done it yet), add a rectangle shape to the scene. Paint it black and stretch it to the width of the scene – you can do it manually or using the Coordinates in the Properties window on the right. You can also resize your black bar adjusting its height to your needs. Finally, place the rectangle at the bottom of the scene, right mouse click on it and Duplicate. Now you have two identical black bars – on for the top and one for the bottom.

Here is a 70-second video instruction for you to illustrate everything we’ve just talked about.

Feeling a bit more artsy already?

Step #2. Make your video look like film using color enhancement techniques

Now let’s work with color enhancement using available filters.

First, add the RGB filter to the scene. To find this filter, go to “Video effects”, select “Adjustments” and click on “Red/Green/Blue”. You’ll notice a new layer on the timeline, called RGB 1. On the right, you’ll also notice the Properties window for adjusting the color brightness levels. As you click on the arrows increasing or decreasing the number, you’ll see the immediate result in the Preview window. Keep adjusting until you’re happy with the result.

How to make a video look like a film using RGB filters

After working with the RGB filter, go back to “Video effects” – “Adjustments” – “Hue/Saturation/Value” and play with the levels as well.

Step #3 Use color gradient to make your video look like film

Finally, let’s step up your editing game and work with a more advanced tool used by professionals for achieving cinematic video look. We’ll show you how to use the Gradient tool.

The same way you added the black bars earlier, add another rectangle to the scene and set it to be the same size as the input file (Properties windows, option “Set the same size as parent has”). This rectangle will cover your entire video.

Now, open the gradient settings (illustration below). To do that, in the Properties window, scroll down to the “Brush” and use the Fill background dropdown menu. In the Gradient settings, choose “Photographic Toning” template (you can choose any other template if you like it more, this is just the example used for the tutorial) and Sepia Midtones Preset (again, this one has been used for this example). Click OK.

Using color gradient to achieve film look

On the timeline, open the Blend menu and choose the blending mode called “Screen”. You’ll see that the video now has an additional layer a color gradient has been applied to. Notice that you can drag the arrow to indicate the gradient vector. If you want, you can always go back to the gradient settings and change the preset or adjust the color intensiveness to achieve the desired result.

Watch a video tutorial below if you need a more detailed illustration of everything we’ve just talked about. And feel free to message us on Facebook!

Fancy more free editing tricks to make a video look like a film and achieve cinematic effects? Check out our tutorials on creating a “Video in text” mask, applying “Blending modes”, and using the “Picture in Picture” video effect.


You can get more information about the program on Free Video Editor' description page.


How to change image or video color with gradient tool in VSDC

The Gradient tool allows you to make a gradual blend between various colors. Photo and video making experts and those who are tech-savvy enough can benefit from ´Gradient´ tool in VSDC Video Editor to make their own smooth video transitions, apply advanced multiple color correction and create gradient background for text and subtitles. You can choose from gradient presets or create your own.

In this instruction, you can see an example how the eye color is changed in a few steps.

At first, add an image or a video where you'd like to change colors to the editor.

If it’s necessary, apply auto cropping. The corresponding button is on upper the toolbar. This option helps you to get rid of black bars in an image or a video and makes the object fit the scene.

After that, add a shape. In this case, we use the ellipse. You can find different shapes on the left toolbar. Then place it over the required area.

After that, select a colored type without borders on the bar above the scene.

Make a double click on the ellipse layer and add one more ellipse in order to apply the gradient tool on.

Then place it over the needed area.

Select a black color and adjust its position to cover the targeted area. To change the color of the ellipse, go to the properties window and click on the color option in the object settings.

Select an inverted mask from compositing modes on the timeline.

Go to the main scene, highlight the ellipse and apply the gradient tool. Go to the object setting and in “Fill background” select “Gradient”.

Open gradient settings and select the appropriate gradient type.

Among presets and templates select the one you like most of all.

Adjust the gradient vector.

To reach the desired result, apply different blending modes.


You can get more information about the program on Free Video Editor' description page.

How to clone yourself with VSDC Video Editor

Have you ever seen videos where the same character appears a few times in one frame simultaneously? Of course, you have. That's the famous "clone effect" widely used by Hollywood directors and some creative YouTubers. It can be achieved in most non-linear video editors that have a masking feature. The trick is, most of them may cost you an arm and a leg, while VSDC is the most affordable option you'll ever find.

In this tutorial we'll show you how to reproduce "clone effect" in VSDC. There are two ways to do it: you can use video masking feature available in VSDC PRO, or you can make use of Chroma Key. The latter option is available in the free version of VSDC Video Editor.

Method 1. Using Video Mask Tool

Here is the first tip: make sure to shoot your footage from the same place for each clone - it's very important for post-production. It’s also necessary to keep a distance between the clones when your record your actions in order avoid overlaps.

Moving on to the editing part. Add your footage to VSDC video editor. In this example, we have 3 videos for 3 clones. Once added, they must be adjusted on the timeline.

Use the eye icon to hide one of the layers from the scene, as it's shown on the screenshot below.

Click the "Hide object" button

Go to the second video and choose a rectangle style object to cover the area around the "clone".

Add a rectangle shape

In this case, we use a rectangle without borders. You can select an appropriate type of the shape on the toolbar above the scene.

Choose a rectangle without borders

Proceed to “Brush” - “Color” and click the advanced settings button to open the palette.

Select black in the palette

Choose black.

Click “Mask” and select “Inverted Mask” among composition modes on the timeline.

Select Inverted Mask

Once it's done, follow these steps:

  1. Adjust the fragment’s size right on the scene.
  2. Activate the hidden layer to make it visible again and go to the third video.
  3. Choose a rectangle to cover this image.
  4. Open “Composition Mode” on the timeline and select “Inverted Mask”.

If you see some inconsistencies, make required adjustments. For example, if it concerns light or colors, adjust these parameters. Open “Video Effects”- “Adjustments” and apply “Brightness/Contrast/Gamma”.

Apply Brightness/Contrast/Gamma

Looking at the preview, modify BCG values to achieve similarity in all the three images.

Modify BCG values

For even better results apply “Gaussian Blur” to each rectangle. Proceed to “Video Effects” - “Filters” and choose “Gaussian Blur”.

Apply Gaussian Blur

Find a fragment that you’d like to fix.

Click “Blend” to switch off mask tools to work with the area that needs blurring.

Click Blend to switch off mask tools

Select “True” in “Extend the boundaries” and increase blur levels.

Extend the boundaries of Gaussian Blur

Select ”Inverted Mask” again.

Preview the current result. Repeat the steps with blurring another rectangle, if necessary.

To make transitions between fragments smoother, select “Video Effects” - “Transparency” - “Fade In”.

Apply Fade In

Apply the same steps to the third video and enjoy the results!

Method #2. Using Chroma Key

The second method suits you if you shoot your footage using “Green screen”. In VSDC PRO you can use both background colors for Chroma Key - green and blue.

Here is a brief instruction on how to "clone" yourself on a video using Chroma Key effect.

  1. Add a new background to the editor.
  2. Add your "clone" videos shot with green background.
  3. Apply background remover effect with "Video effects” - “Transparent” - ”Background remover".
  4. Select the color on the scene using the dropper.
  5. Follow the same steps with the second and the third videos.

To download VSDC Free Video Editor, please, proceed here - http://www.videosoftdev.com/free-video-editor/download

Find more awesome tutorials on our YouTube channel - https://www.youtube.com/user/FlashIntegro/videos


You can get more information about the program on Free Video Editor' description page.

How to use the advanced settings of VSDC Video Editor?

The advanced settings available in the Pro version of the program are listed in this article along with instructions on how to use them.

1. Advanced sub-pixel resolution

The program uses this algorithm while applying various rotation and motion effects when some loss of information known as aliasing can occur. It removes aliasing and enhances the resolution of digital images.

Example subpixel resolution

2. Resizing

When you place a video or an image file to the scene saving the original resolution, you prevent the loss of image quality. Every time you resize the image so that it occupies only part of the screen, you lose its quality. The advanced resizing methods, such as Nearest neighbor interpolation, Cubic Interpolation, Supersampling interpolation and Lanczos interpolation are integrated in the Pro version of the program. To apply them to your image, please, follow these steps:

  • Open your file in the program How to open video file or image for editing
  • Select the position and the size of the object on the scene. Click the left mouse button and holding it down, set the size of the object, and then release the mouse button.
  • Click the added file on the timeline to open the Properties window tab.
  • Find the Resize mode line among the available parameters and select the appropriate method from the drop-down list.

    Advanced resizing mode

3. Audio waveform

If your video contains an audio track, only Pro version of the program lets you show the audio waveform clicking the corresponding icon on the timeline. It can be very useful when you need to cut out some audio fragments or while applying available audio effects. This feature helps you process the audio easily with visual assistance. To see the audio waveform of the loaded video, click the appropriate icon on the timeline and select the Show waveform from the drop-down menu.

waveform

4. Advanced Chroma key

The Chroma key option allows you to remove the background of your video or photo and replace it with a new one. This technique consists in making the selected colors transparent. The Free version of the program offers you the Chroma key option based on one color only, but the Pro version allows removing an unlimited number of colors from the image background. Let’s see how it works.

  • Open your file in the program (How to open video file or image for editing) and place it to the scene.
  • Click the file on the timeline and go to the Editor tab.
  • Click the Video effects button and select Transparency > Background remover.
  • Set the position and the duration of the selected effect.
  • Open the Properties window tab to adjust the effect parameters.
  • Click the Picker icon next to the Chromakey color field to select a color to remove.
  • Use the Add additional color to select more colors.
  • Configure other available parameters to achieve the best result: set the True value of the Adaptive alfa, define Min/Max brightness threshold, Min/Max chromaticity threshold, Similarity and Blend values. Increase the Kernal size parameter to enhance the efficiency of your editing.

    chroma key settings

  • Add an image file for a new background. Click it on the timeline, go to the Edit tab and click the To front button.

    ChromaKey

5. Hardware acceleration

This feature will be very useful for those who work with HD video. There's no doubt that video with HD quality has a large size and its processing can be time consuming. The Pro version of the program can treat HD files using the capacity of the video card, only if your video card supports it, so that the decoding and encoding of the video data goes faster.

To enable this option, go to the program options and check the corresponding boxes in the Acceleration Options category.

Full hardware options

6. Object motion

Sometimes you need to make a video with some moving objects. The Pro version of the program can create not only movement from one point to another, but a motion along spline and through a set of selected points .

  • Open your file in the program (How to open video file or image for editing) and place it to the scene
  • Add a Sprite object using the corresponding button on the toolbar, which will contain the Movement effect, and a moving object itself. The cursor will take the crosshair form allowing you to specify the position of a new object on the scene. You will see a black square representing a start position, it can be replaced by an image later.
  • Double click the Sprite line on the timeline.
  • Add the Movement effect using the corresponding button 
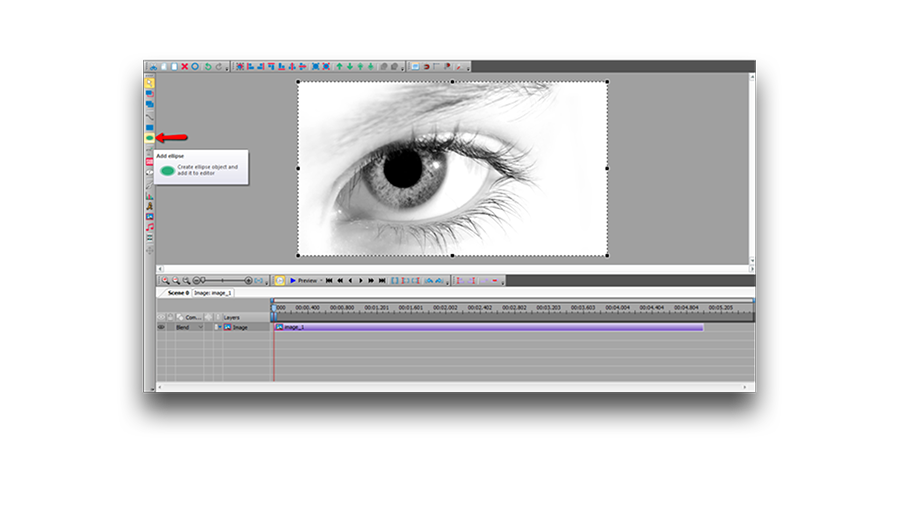
on the toolbar or clicking the Add object button on the Editor tab and selecting the Movement option from the menu.
  • Indicate the end position of the object on the screen dragging the start point to a new position with a mouse. This effect will be displayed on the scene as a vector, which intercrosses centers of the object in its start and final positions.

    Movement

  • Click the Start point or the End point icon appeared on the timeline to configure its parameters in the Properties window.

    Movement

    First, select the True value in the Path’s start point field. Then change the Mode type if necessary.

  • To create a more difficult trajectory, click the Movement button once again and continue the trajectory placing the next point on the scene.

    Movement

  • Add an image or a video using the corresponding buttons on the toolbar and place it instead of the black square on the scene.
  • Use the Preview to see the result of your editing.

    Movement result


You can get more information about the program on Free Video Editor' description page.

News

New Transition Addition Methods, RAW/BRAW Files Support and Free Waveform

Welcome to the next level of video editing with VSDC's latest release, Version 9.1! Packed with an array of fresh features and enhancements, this update is designed to make your video editing experience...

VSDC 8.3 – 100+ New Templates, Key Editor Window, AV1 and Enhanced GUI

Welcome to the latest VSDC update, Version 8.3! We've been working hard and we’re ready to present a feature-packed release for you to discover an exciting array of over 100 fresh free video templates,...

Free video editing in 2023: Unlock Your Creativity without Breaking the Bank

In today's digital world creativity reigns supreme. It offers endless possibilities for individuals and brands to captivate audiences and leave a lasting impression. With social media platforms at the...

The Best Online Video Editors in 2023: Benefits and Drawbacks

In today’s digital landscape, the popularity of video content is gaining momentum, with users increasingly turning to video creation both for personal advantage and professionally. When searching for...

VSDC 8.2 – Proxy File Support, Color Keyframes and Vectorscope

We are thrilled to unveil the highly anticipated VSDC video editor 8.2 update. Our team has been hard at work, ensuring that this release is packed with exciting features and enhancements to elevate your...

VSDC 8.1 Brings Multicam, Curve Line Object, Scrolling Text Effect, and More

We’re thrilled to introduce VSDC 8.1. The new version primarily caters to professional videographers, graphic designers, and artists, however, everyday video creators will benefit from the update as...

VSDC 7.2 Takes Its Color Correction Toolset to the Next Level (Plus, Other Updates)

It has been another productive couple of months for the VSDC team, and we’re thrilled to announce the release of VSDC 7.2 – the new version of our video editing suite. Although the majority of updates...

5 Free Pieces of Software for Video Color Correction

If you’re a video creator, there are three reasons why it’s crucial to learn color correction. First, it will help you enhance your videos and make them look professional. Second, it will allow you...

VSDC 7.1 Upgrades GUI and LUT Editor, Adds New Effects and Custom Shortcuts

The new version of VSDC includes two new video effects, expands the functionality of the LUT editor, and makes video editing more convenient by bringing an improved interface, optimized timeline, and custom...

10 Pieces of Truly Free Video Editing Software (with No Watermarks)

Seeing a watermark on your video after spending hours editing it feels infuriating. Yet a few video editing software developers are still using this practice to limit the free usage of their products....
 

Screen Recorder Box

This program allows you to capture the video of your desktop and save it on your PC in various formats. Coupled with a video editor, the program is a great tool for creating presentations, tutorials and demo videos.

Read more about Screen Recorder...


Video Capture Box

The program captures video from external devices and records it to computer in a free format. You can save video from video tuners, webcams, capture cards and other gadgets.

Read more about Video Capture...


Reviewed by


"VSDC Free Video Editor is a surprisingly powerful, if unconventional video editor"

- PC Advisor


"This video editor gives you tons of control and editing power"

- CNet


"The editor handles many common formats and boasts a good deal of capabilities when it comes time to alter lighting, splice video, and apply filters and transitions in post production"

- Digital Trends