Video Editor

Use free video software to create and edit videos of any complexity from a family greeting card to a company presentation. Cut, merge video files, apply visual and audio effects, use filtration and image correction, make slideshows and add an appropriate soundtrack. Use multi-color Chroma Key and advanced parameters settings to give your video a professional look. All popular video and audio formats are supported.

Read more about Video Editor...

Video Converter

This program is intended for converting video files from one format to another. Nearly all popular video formats are supported (both reading and saving). In addition, the program drastically simplifies the task of converting videos for playback on specific multimedia devices, such as iPhone, Samsung Galaxy or Huawei P30 Pro. The program is extremely easy to use, has a modern interface and all necessary video processing functions.

Read more about Video Converter...

Audio Converter

The audio converter will help you convert audio files from one format to another. All key audio formats and codecs are supported. The program also allows you to manage playlists and meta tags, extract audio from video files and save these tracks on your computer in any format.

Read more about Audio Converter...

Audio CD Grabber

This audio tool is intended for grabbing audio tracks from compact discs and saving them to the user’s computer in any format. Nearly all popular audio formats and codecs are supported. The program can also extract track details from the FreeDB server for automatic file renaming and updating meta tags.

Read more about Audio CD Grabber...

Multifunctionality

Multifunctionality

A wide array of multimedia processing tools in one free video software suite.

High speed

High speed

Our programs use fast
and high-quality algorithms optimized for single and multi-core CPU’s.

Affordability

Affordability

VSDC video software is freely available for download to Windows OS-based PCs and laptops.

How to Place Two (or More) Videos Side by Side

Most non-linear video editors allow you to place two videos side by side. This effect is also known as a “split screen” effect. Depending on what you’re trying to achieve, you can have the same video or two different videos play side by side. And once you get the hang of the technique, you’ll be able to use as many videos as you want.

In this tutorial, we’ll show you how to place videos side by side using VSDC Free Video Editor. It’s a lightweight non-linear video editor for Windows PC, and it’s perfect for this task because you can resize and adjust video files directly in the scene. Before getting started, you need to download VSDC from the official website.


Step 1. Import and resize your footage

Launch VSDC on your computer and import your video file. You can also just drag and drop it to the scene. Right-click on the video and select Properties - the Properties window will slide-in from the right-hand side. Find Common settings → Coordinates → Width.

Then halve the value of the frame width and manually type the new number. For example, if the original frame width was 1920, type 960.


Step 2. Prepare the second video

If you want to duplicate the original video, you can use Ctrl+C and Ctrl+V right on the working area. Alternatively, you can right-click on the original video, select Duplicate, and then paste the copy to the timeline. Since the created copy will have the same frame width, all you need is to drag it to the right and place the videos side by side.

Another option is to use two different videos in the scene. In this case, you want to make sure that both videos have the same size and quality. Otherwise, the difference will be noticeable and you’ll get a poor looking effect.

If you decide to go this route, drag the second video to the timeline and resize it the same way you resized the first video: go to the Properties window and halve the value in Coordinates → Width. Then, drag the video to the right side of the scene.
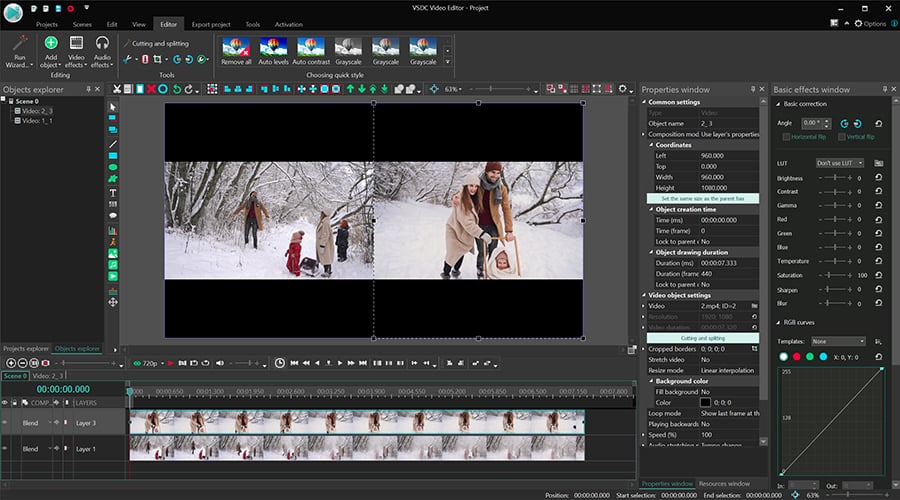
How to place two videos side by side

Keep in mind: on the timeline the two videos should be placed strictly one under another. That is, if you want them to play simultaneously. If you want one video to start with a delay, drag it to the right on the timeline. You can also have videos change on one side or another. For that, place videos on the same level on the timeline - one by one.

And your side by side video is ready now. Go to the Export project tab and save it to your PC in the required format.


Get inspired for your next split screen video

Side-by-side videos are great for promo clips, presentations, vlogs, and before-and-after comparisons. The split screen effect has also been used in movies since the middle of the 20th century. You can see split screens in such classic movies as Pillow Talk (1959) and Dressed to Kill (1980).

Split screen is an efficient way to show things happening at the same time in two different places, just like in Kill Bill vol.1.

It works well for showing different perspectives of the same object - or the same event. For instance, you may want to incorporate the “Expectations and reality” comparison, like the creators of 500 Days of Summer.
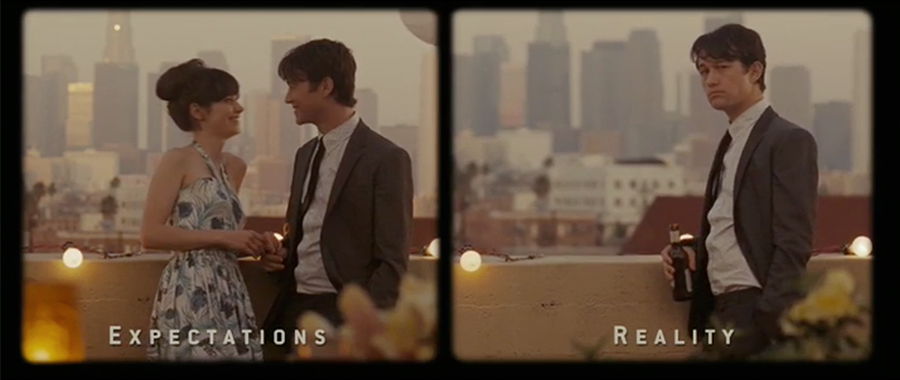
Split screen effect used in 500 Days of Summer to compare expectations vs reality

Once you get the concept, you’ll be able to create horizontal split screens (just change the height of a video file instead of its width) or make multiple videos play side by side.

Whether it's for comparative or creative reasons, placing videos side by side is quite an easy task even though it might look complicated at first. You’ll be able to recreate this effect within a couple of minutes even if you’re a complete newbie.

Feeling like trying something mode advanced? Check out this video tutorial for creating a diagonal split screen in VSDC Pro:

You may be interested in the previous lesson place two videos side by side.

How to Create a Motion Tracked Face Mask Using Face Landmarks

Starting from version 6.6, VSDC includes a new feature called Face Landmarks. Face Landmarks allow you to quickly place stylized masks on the face of a person in a video. You can select mask templates from the VSDC collection or upload your own image and use it as a mask. And yes, the mask will stay on the face and will be moving along, just like in Instagram or Snapchat.

In this quick tutorial, we’ll show you how to use Face Landmarks. Feel free to watch the video before reading the text version.


How to apply the Face Landmarks effect

The new feature is available under the Special FX menu, so to apply it, you’ll need to open Video effects, proceed to Special FX, and select Face Landmarks. By default, the effect will be applied from the current cursor position. If you want to apply it from the beginning of the scene, select the corresponding option in the pop-up “Object position settings” window.

Once you’ve applied the effect, it will appear in the new tab on the timeline; its settings will be available in the Properties window on the right-hand side. If you can’t find the Properties window, right-click on the effect layer and select “Properties”.

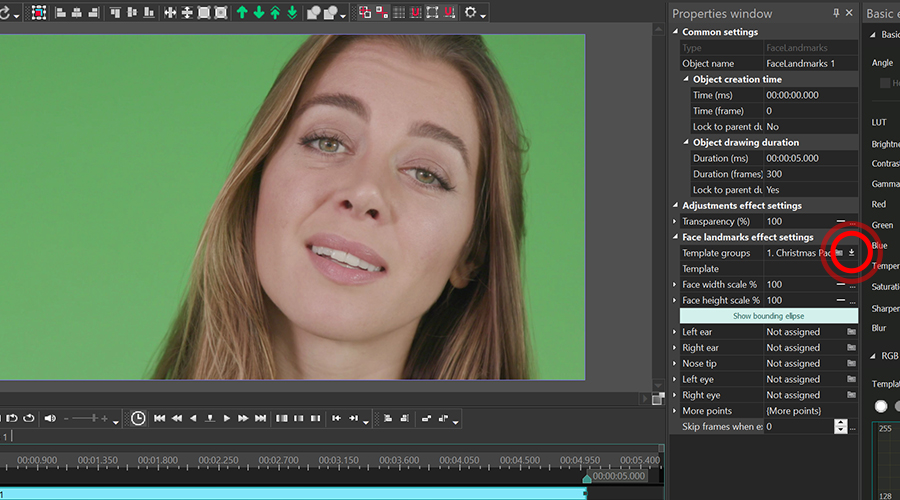
You can download mask templates directly from the VSDC gallery. Alternatively, hit “Download” to access the gallery from the program and get the desired collection of templates.

How to download mask templates to use with Face Landmarks in VSDC

Keep in mind that the Face Landmarks effect is powered by neural networks, so there is little you can customize. Essentially, all you can do is slightly adjust AI face detection, the sizing and the position of the mask.


Face Landmarks: effect settings overview

In the Properties window, find Face landmark settings. From there, you’ll be able to select a template, adjust the detected face oval scale, and correct mask position for each control point. Let’s overview these parameters, one by one.

Template group. If you have already downloaded the template collection to your PC, use the Browse icon to upload it to the editor. Then, select the desired template group using the dropdown menu.

Apply template. Each template group contains several templates. Use this dropdown menu to select the template you want to use in the video.

Face width scale and Face height scale allow you to correct the detected face oval based on the original dimensions.

Notice that the last two parameters allow you to set the Initial value and the Final value. This means you can change face oval width or height scale over time, and the mask will adjust accordingly. This might be useful if the face size in the video changes during the playback.

To display the face oval detected by the app, make a click on the Show bounding ellipse button.

The next set of parameters is dedicated to control points, a.k.a. face landmarks. By default, you can set up the following points:

  • Left ear
  • Right ear
  • Nose tip
  • Left eye
  • Right eye

On some occasions, you might need additional points to place the mask more precisely. Such additional points include:

  • Between eyes
  • Head top
  • Under nose
  • Face bottom
  • Under left eye
  • Under right eye

The default point detection works well most times. However, if you need to adjust the mask in any particular spot, you can do that. Simply click on the little triangle next to the point name to expand the set of available parameters.

Let’s take a closer look at these parameters to see how they affect the result when you tweak the settings.


Point settings

Use Rotation angle if you need to rotate the mask around the selected point, clockwise or counterclockwise.

Position angle helps you change the position of points located on the ellipse border.

Distance scale defines the distance between the point and the ellipse border. This parameter value is calculated based on the distance between the center of the face and the selected point.

Width means mask width.

Scale height allows you to correct the mask height.

The Transparency parameter allows you to make the mask less visible.

The Mirror image option flips the mask around the selected point.

Compensate face motion is the mode you want to apply when you need the mask to adjust its position based on face movements.

Similarly, if the face is jittering or shaking, you should use Jitter compensation.


Go ahead and test the new feature

Despite the lengthy description, using Face Landmarks is easy and straightforward. Download the new version of VSDC to your computer and try it for yourself. Remember to subscribe to VSDC YouTube channel if you want to stay tuned with the updates and learn new video editing tricks.

New Chroma Key Toolset in VSDC: Free and Pro Feature Overview

The new version of VSDC brings quite a few surprises, the updated Chroma Key toolset being one of them. We can’t be happier with the way it came out, and we’re sure you’ll love it too. The precision of chroma keying and the quality of the result is just outstanding, so even if you weren’t keen on removing backgrounds before, you probably will be after seeing how it works.

We suggest starting with this video tutorial about the HSL color space – the most exciting new feature in the Chroma Key toolset. Next, you can read the instructions covering the rest of the background removal properties.

If you haven’t downloaded VSDC 6.6 yet, you can do it here.


How to apply Chroma Key in VSDC

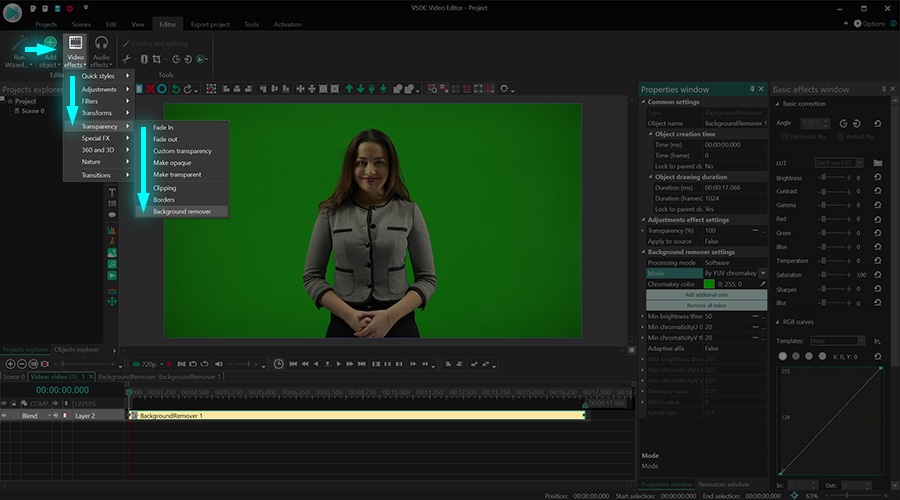
To get started, import your footage to VSDC, then open the Video effects menu and select Transparency - Background remover. The Object’s position settings window will pop up to indicate the point at which the Chroma Key effect should be applied to the footage. By default, the effect is applied from the cursor position to the remaining part of the file; if you’d like to change that – select the desired option and click OK.

How to apply Chroma Key in the new version of VSDC

Notice that once you apply the effect, you’ll be taken to a different tab on the timeline where the effect layer is located. The Properties window will slide-in from the right side – that’s where Chroma Key settings are located. If you can’t find the Properties window, right-click on the effect layer and select Properties from the context menu.

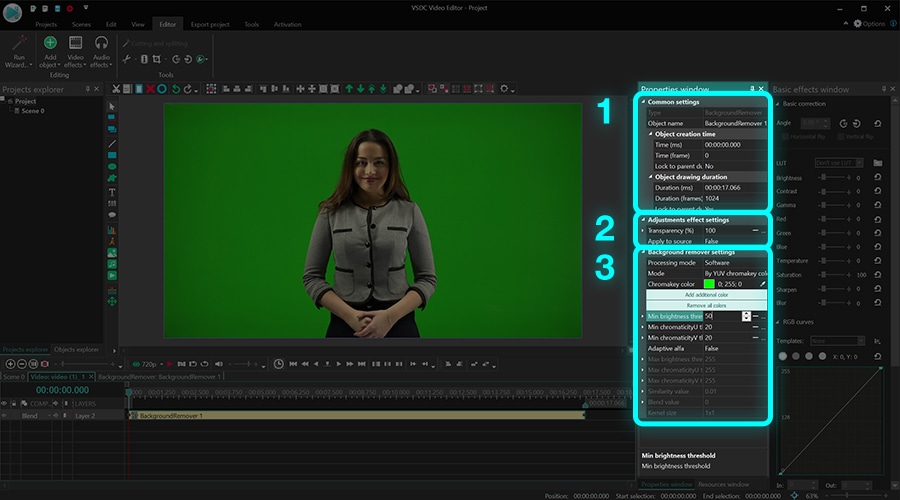
The Properties window contains three groups of settings:

  1. Common settings
  2. Adjustment effect settings
  3. Background remover settings

VSDC Chroma Key effect settings

Common settings allow you to add a title to the effect layer, change the moment when the effect appears in the video (by seconds or by frames), and the duration of the effect (in seconds or in frames).

Adjustment effect settings allow you to set the transparency level for the beginning and the end of the effect. This means you can either set a constant transparency value for the Chroma Key effect or you can have it gradually increase/decrease over time. To set the gradual change of the transparency level, you’ll be using the Initial value and the Final value. Keep in mind that 100% means full transparency and 0% means non-transparency.

For example, this is what the Chroma Key effect will look like if you set its Initial value at 100%, and the Final value at 10%:

Moreover, you’ll notice that many Chroma Key parameters provide you with the option to set the Initial value and the Final value as well. This means that if you want to set a dynamic background removal effect, you can do that, too. This feature comes in especially handy if the tone or the color of the background is changing during the playback.

Notice that the second line in this group of settings is titled Apply to source. “Apply to source” means that the changes will be applied directly to the original file you’ve uploaded – aka the source. By default, this option is deactivated to speed up rendering. If it’s deactivated, the software applies the chroma key effect to a scaled-down copy of the video. You should understand, however, that sometimes, scaling may lead to minor image corruption – especially, if the original file is not of the best quality. That’s why we always recommend using high-quality footage or, if you have a powerful PC, just switch this parameter to “True” and forget about scaling.

The last group of settings is called Background remover settings, and it allows you to fine-tune the Chroma Key effect parameters. We’ll take a close look at it below.

How to fine-tune Chroma Key effect in VSDC

In this part of the tutorial, we’ll go over the key parameters one by one and show you what difference each of them makes in the video.

The first parameter you want to look at is called Mode. Mode allows you to select the color space you want to work in.

In VSDC, you have three options:

  • By YUV chromakey color – available in the free version of VSDC
  • By HSL chromakey color – available in the Pro version of VSDC
  • By chromakey mask – available in the free version of VSDC

The first two modes enable you to work in two different color spaces: YUV and HSL. The third mode named “By chromakey mask” is different. It enables you to upload an image to VSDC and use it as a mask to remove all the colors displayed in the image from your video. We’ll talk more about each mode in a moment.

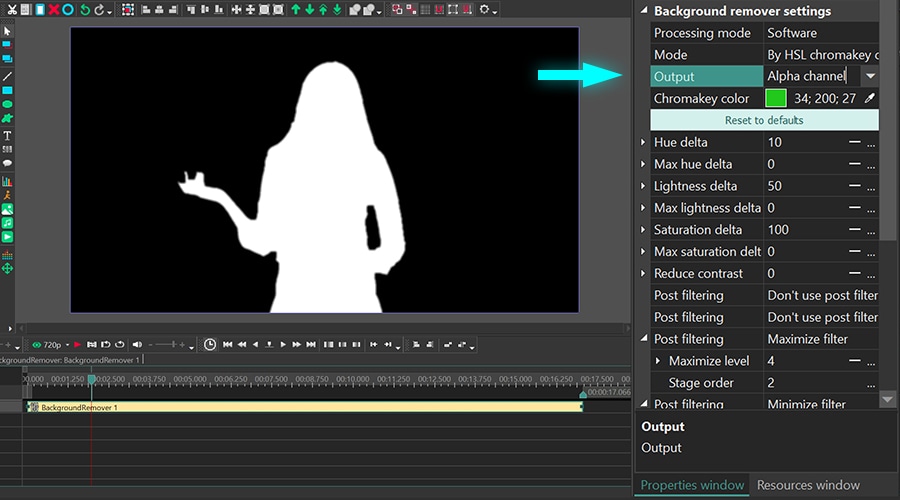
If you select the HSL mode, you can also change Output. You should always use the “Composite” output mode unless you’re using Chroma Key to create a mask. In that case, switch to “Alpha-channel”.

The next parameter, Chromakey color, allows you to select the color for removal. We always recommend using the eyedropper tool and selecting the tone manually because the default bright green color may not coincide with the color of your background.

Notice that in the YUV mode, you can Add additional color if you need to remove more than one color from the video.

The rest of the background remover settings are displayed based on the mode you’ve selected: YUV, HSL, or “By chromakey mask”. Let’s take a closer look at each mode below.

YUV color space

You’ve probably heard of the RGB color space or encoding system. YUV is another tyfpe of encoding system which defines a color space in terms of three components: one luminance (Y) and two chrominances (U and V).

When you select the YUV color space mode, you can change the values of these components using the following parameters:

  • Min/Max brightness (Y) threshold
  • Min/Max chromaticity U threshold
  • Min/Max chromaticity V threshold

These parameters are quite self-explanatory and they will help you remove the remaining green shades from the video if there are any. Each one defines the threshold for its own component. For instance, the color tones that are less bright than the minimum brightness threshold are removed from the video. In a similar way, the Min/Max chromaticity U threshold defines the threshold for blue color tones; the Min/Max chromaticity V threshold defines the threshold for the red color tones.

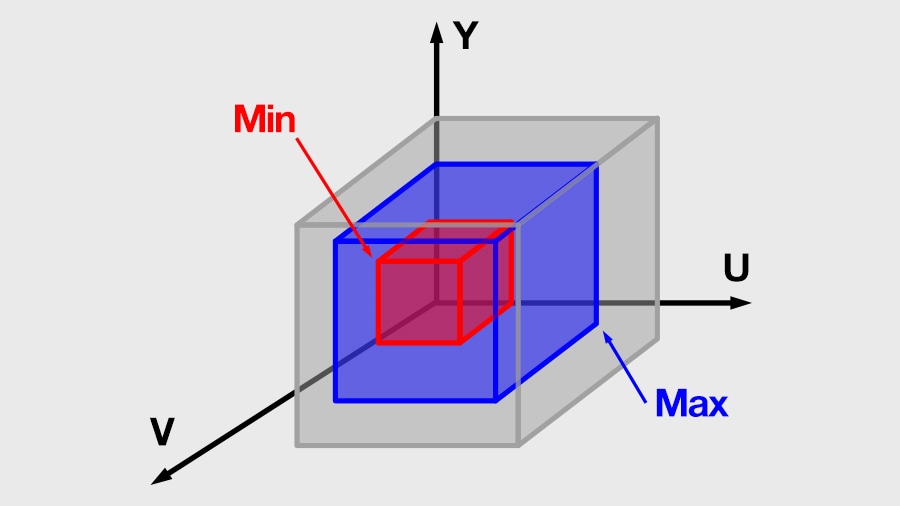
To visualize YUV color space in this context, imagine a three-layer cube where the minimum values form the deepest layer – the smallest red cube. Colors that fall into the space of the red cube will be removed from the video. The maximum values form the outer layer and the color values falling into this space will remain unchanged. Finally, the color values between the minimum and maximum are displayed as a spectrum of tones based on the effect transparency level you set up earlier.

YUV color space visualization

If all three components (Y, U, V) are equal to 0, no chroma key effect will be applied to the video. If all three components are set to maximum, you’ll see a black screen because all color values will be removed.

Note that if you switch Adaptive alpha from 'False' to 'True', you’ll activate additional parameters that will help you achieve better results:

  • Similarity value – this parameter sets possible color tone deviations. If it equals 0, the software will only remove the tone you’ve selected with the eyedropper. If you increase the value, the software will remove the tones that are close to the selected one.
  • Blend value – this parameter helps you smooth the border of the object after the background has been removed. The higher the value is, the smoother the border will be.
  • Kernel size – this parameter also helps you make the border of the object look smoother. The higher its value is, the larger border area will be edited.

HSL color space

HSL stands for Hue, Saturation, and Luminance (or Lightness). This color space is a Pro-level feature and it’s much more efficient at removing video backgrounds. Once you remove the background color using the eyedropper, the HSL parameters will help you achieve even better results. Let’s see how its parameters are different from the YUV mode.

Hue delta/Max Hue delta is a pair of parameters that sets a range of chroma key color tone variations based on their Hue values. The correct way to work with these parameters is to set Hue delta at 0 and start slowly increasing it until you see that most of the background is removed. Next, you should start increasing Max Hue delta to a value approximately twice as high as Hue delta making sure that you’re only removing the colors you want.

Lightness delta/ Мах Lightness delta – similarly, this parameter sets a range of chroma key color tone variations based on their Lightness values.

Saturation delta/ Max saturation delta sets a range of chroma key color tone variations based on their Saturation values.

Reduce contrast allows you to change the contrast level of the chroma key color (which is the color of the removed background). It’s convenient if you want to see the difference created by the effect, however, the value of this parameter doesn’t affect the resulting video.

The way Chroma Key works in the HSL color space is different from the way it works in YUV. Essentially, when you apply HSL, you create a mask by keying out the selected background color and making that space in the video transparent. To see the “mask”, switch Output to Alpha channel. The mask will look like a black-and-white image where the black space is the removed background.

How to view chromakey mask using the Alpha channel

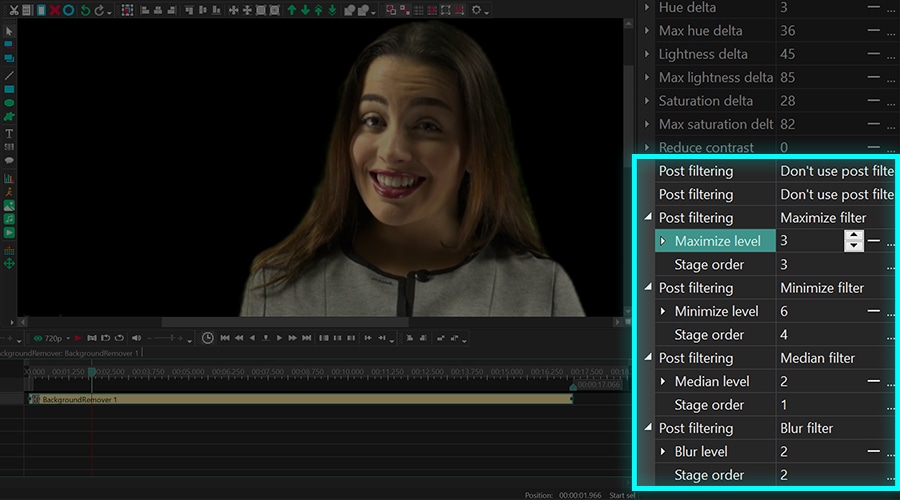
Take a closer look at the borders of the mask: it’s usually rough and uneven. Because of this, the video may look unprofessional when you replace the background with another image or footage. To fix it, you can apply up to 6 chromakey post-processing filters designed to smooth the border.

Post-processing filters allow you to make chromakey mask borders smoother

The filters are customizable. That means you can select their modes manually based on what you’re trying to achieve. Here are the modes available for each filter:

  • Maximize filter – this filter analyzes the area around each pixel and applies the maximum value to it.
  • Minimize filter – this filter analyzes the area around each pixel and applies the minimum value to it.
  • Median filter – this filter analyzes the area around each pixel and applies the median value to it.
  • Blur filter – this filter applies the median value to the pixels forming the border of the mask.

Each filter has two more parameters: Level (the size of the analyzed area) and Stage order (the order in which filters are applied).

Even with all filters having the same value, just by changing their order, you can achieve drastically different results:

By chromakey mask

The third Chroma Key mode in VSDC is called “By chromakey mask”, and it’s significantly different from the previous two modes. In this mode, you manually upload an image containing the colors you want to remove from the video; the software detects the image colors and keys them out.

Here is how it works:

  1. Switch to “By chromakey mask mode”.
  2. Upload a “Chromakey mask” – an image containing the colors that need to be removed from the video.
  3. Now, the software will compare the image and the video and remove all the coinciding colors from the video.

Once you do that, you can go ahead and tweak the parameters to achieve better results. Some parameters are similar to those in the YUV mode. So we’ll take a look at the unique parameters only:

Mask resize factor – this parameter allows for reducing the size of the uploaded image to speed up analysis. The higher its value, the smaller the image size is (which means there are fewer pixels to analyze). However, you should understand that the smaller the image is, the less precise the analysis will be, and that may affect the quality of color removal.

Resize mode – this parameter enables you to select one of the 5 image resizing modes:

  1. Nearest neighbor interpolation
  2. Linear interpolation
  3. Cubic interpolation
  4. Supersampling interpolation
  5. Lanczos interpolation

Time to add a new background

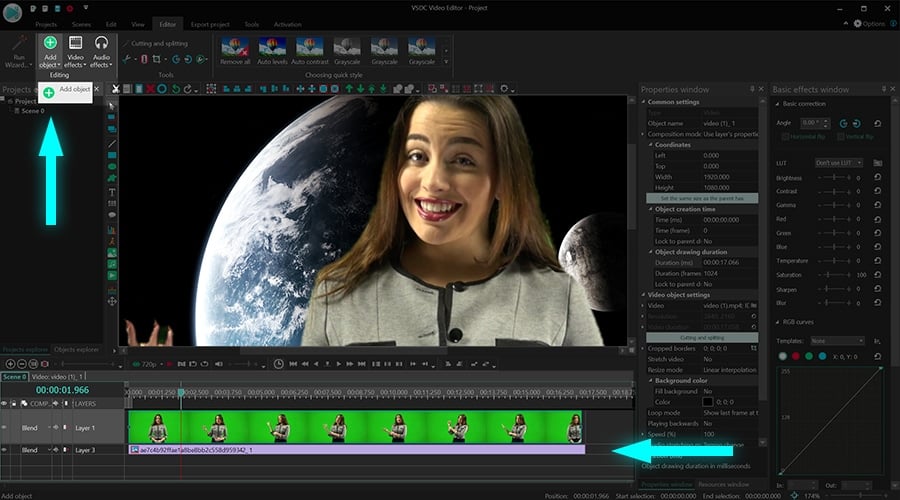
Whichever approach you choose to remove the background from your video, the most existing part is probably adding a new background which can be both a video or an image. Go back to the main timeline tab and use the Add object menu from the top of the interface to select the desired file from your computer. Then manually place the new background one layer below the chroma key mask as illustrated below.

How to add a new background to a video

Use the preview feature to make sure everything looks good. Remember that you can go back to the Chroma Key settings at any moment if you need to make adjustments. Just double-click on the green screen video to access the background remover effect layer and use the Properties window.

Go ahead and try it for yourself! Remember to subscribe to our YouTube channel to get notified whenever we publish new video tutorials.

Download VSDC 8.2 now

How to Use the Particle Effect in VSDC Free Video Editor

Particles is a beautiful effect you often see in music videos, sci-fi movies, and romantic clips. It’s a surefire way to create depth and achieve the desired atmosphere in a video. The most popular types of particles used for this effect are snowflakes, leaves, raindrops, and dust. However, any image can be used as a particle, including your own logo.

In this tutorial, we’ll show you how to apply the particle effect in VSDC Free Video Editor. It’s available starting from version 6.6, so make sure to download it from the official website.

Before moving to the text version of the tutorial, feel free to watch this video:

Once ready, visit the particle template gallery and download the collection you like. These templates are free, but you will only be able to open them in VSDC.

How to apply the particle effect in VSDC

To get started, import your video to VSDC and place the cursor on the timeline, right where you’d like the effect to start displaying. Next, open the Video effects menu, proceed to Nature, and select Particles – the effect layer will be added in a new timeline tab. From the right-hand side, you’ll see the Properties window: it contains three groups of settings you’ll be using to customize the effect.

The first group, titled Common settings, allows you to name the effect layer on the timeline, manually set the moment the effect appears in the video and the duration of the effect – in frames or in seconds.

The second group, Adjustments effect settings,contains one parameter: Transparency. Transparency defines the visibility level of the effect and can be either constant or dynamic. The latter means that you can gradually change the visibility of the particles, from transparent to non-transparent or back.

To apply the gradual change, you’ll need to use the parameters called Initial value and Final value. Keep in mind that 100 will mean that the particles are completely non-transparent and 0 will mean they are completely transparent. For instance, this is what the effect will look like if you set the Initial value at 10, and the Final value at 100.

The third group of settings is called Particle effect settings, and this is where you can change particle appearance and their movement style. We’ll take a closer look at this group of settings below.

How to select particle template

Once you apply the particle video effect, you’ll be able to change their size, movement speed and direction, quantity, and even position in the video. But first, you’ll need to select the type of particles you want to use. To do that, you’ll be using the Template groups and Template dropdown menus.

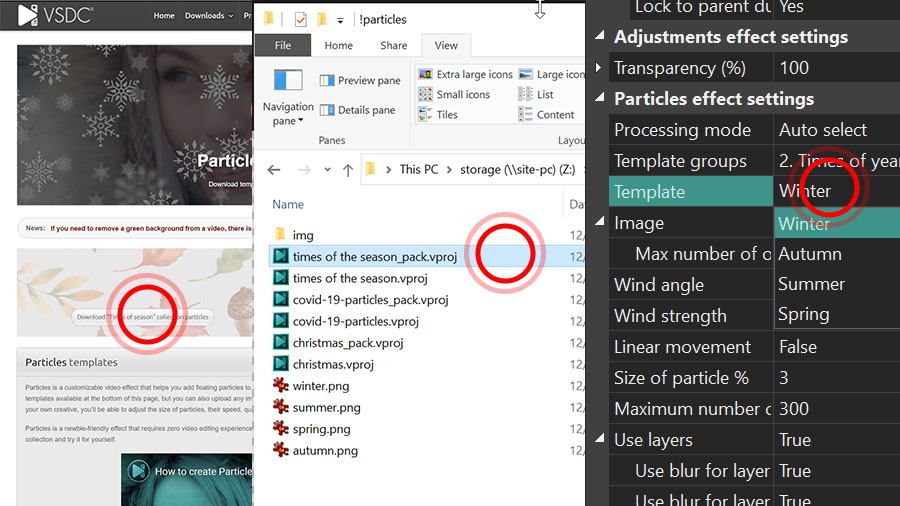
If you have already downloaded templates from the gallery, use the Browse icon to upload the template collection from your PC. If you have more than one collection uploaded, use the dropdown menu to select the one you need.

How to download particle effect templates for your video

Each collection has several templates. In our example, the collection named “Seasons” includes snowflakes, green leaves, orange leaves, and waterdrops. Use the Template dropdown menu to preview the particles available in the collection.

You can upload your own image and use it as a particle as well. To do that, click the Browse icon located in front of Image.

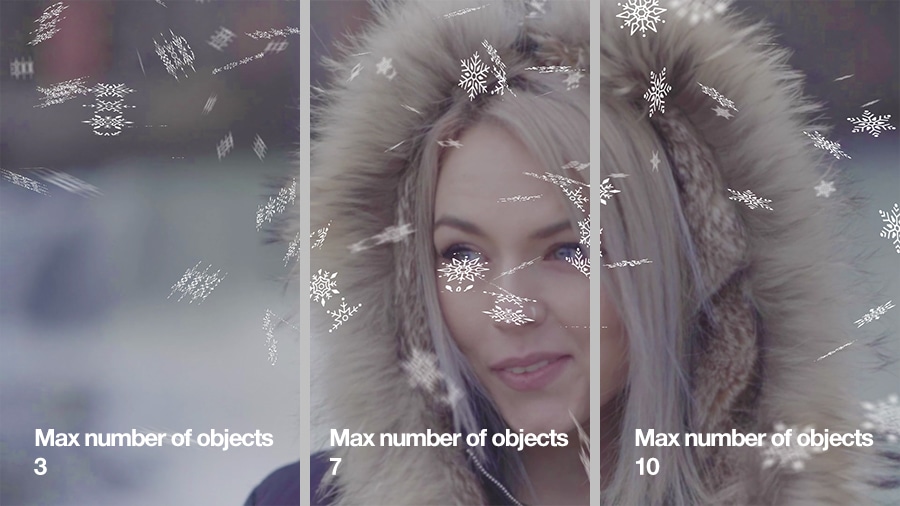
Notice that the Image parameter also allows you to set the Maximum number of objects. This is not, however, the number of particles displayed in the video. The maximum number of objects is the parameter defining into how many pieces the original particle image will be divided. If the maximum number of objects equals 1, the entire image will be displayed. If you increase the value to 2, the original image will be divided into two parts, and so on.

The maximum number of objects parameter in the Particle effect

Wind angle enables you to change the wind direction, which defines the direction of the particle movement. 

Wind strength affects the particle movement speed. The higher its value is, the faster the particles move.

The following parameter in the list of settings is called Linear movement and it has two modes: True and False. The former means that the particle movement will be linear and defined by the wind angle you’ve set up earlier. The latter means that the particle movement will be more chaotic.

Size of particle % and Maximum number of particles should be self-explanatory. Use these parameters to change the size and quantity of the particles displayed in a single frame.

The following parameter is called Use layers. It allows you to create depth and perspective by treating the three layers of the video – foreground, middle ground, and background – differently. If you activate the “True” mode, particles will be of different size on each layer. Plus, you’ll be able to blur and rotate them on the selected layers too.

Blur levels are applied to the particles located on the blurred layers and help you make them look less distinct.

Finally, the Rotate object option enables you to apply rotation to the particles. If you switch this parameter to “False”, there will be no rotation. If you activate rotation by switching to “True”, you’ll be able to set up rotation on each layer.

Try the new particle effect in your next video

The new effect gives you a lot of flexibility and provides yet another creative approach to movie making. Download the latest version of VSDC and try it for yourself.

Download VSDC 8.2 now

Want to stay tuned and find out more about the effects available in VSDC? Then subscribe to our YouTube channel.

How to Use Reframing to Achieve Perfect Slow Motion Video Effect

For amateur creators, the most obvious way to achieve a slow motion video effect is by reducing playback speed. However, this approach can be tricky. See, when you drastically reduce the speed of your footage, the video starts looking choppy. That’s quite disappointing.

In this quick tutorial, we’ll explain why simply reducing the playback speed is not enough to achieve a slow motion effect, and how to go about it using a feature called reframing.

Luckily, the new version of VSDC Free Video Editor includes two powerful reframing modes: Blending and Optical flow. So, before getting started, we recommend downloading it from the official website.

Watch the video tutorial to see how reframing works, and learn more about it below.

Why do slow-motion videos look choppy sometimes?

Suppose you want to reduce the speed of video playback from 100% to 10% of the original speed. When you do that, you technically reduce the number of frames per second – or the fps rate. And when you reduce the number of frames per second, you turn a video into stop-motion animation. The missing frames is what creates the stutter.

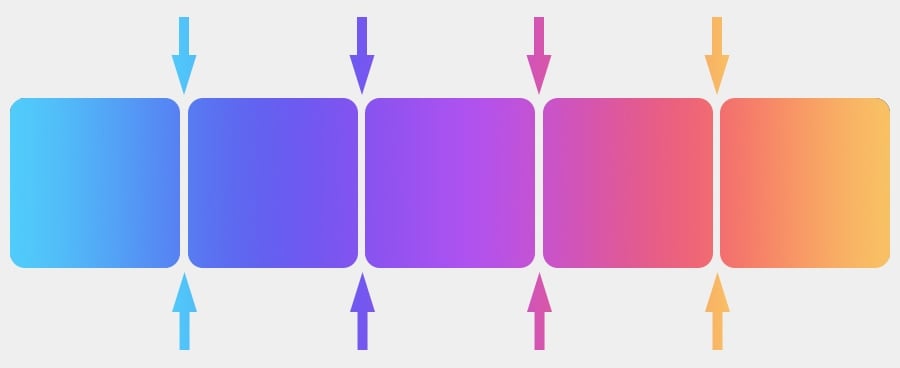
To help you visualize it, let’s take a gradient image as an example. An average video plays consistently, without hiccups; objects in the video move smoothly – just like the color transition in a gradient image:


Average video plays smoothly and objects’ movements are seamless - just like colors in gradient

When you reduce the playback speed to 10% (which is 10 times slower than the original video), you reduce the number of frames displayed per second by a factor of 10. That’s drastic. As a result, the video gets choppy. Going back to the gradient image metaphor, this is what it looks like:

When you reduce playback speed, you reduce the number of frames per second

To fix this and achieve a perfectly smooth slow-motion video effect, you’ll need to resort to reframing. Keep reading to find out what it is and how it works.


What is reframing and how does it work?

Reframing is an algorithm that allows for improving slow-mo videos with a low fps rate by creating additional frames.

There are three options available in VSDC Video Editor:

  • Simple reframing
  • Blending mode
  • Optical flow mode

Let’s take a closer look at each mode.

Simple reframing is how your slow-mo footage looks originally without frame interpolation. It’s the default mode.

Blending helps you achieve a smooth slow motion video effect by filling the space between frames with duplicates and overlapping them in a proportion defined by the algorithm.


Blending reframing mode creates frame duplicates and overlaps them

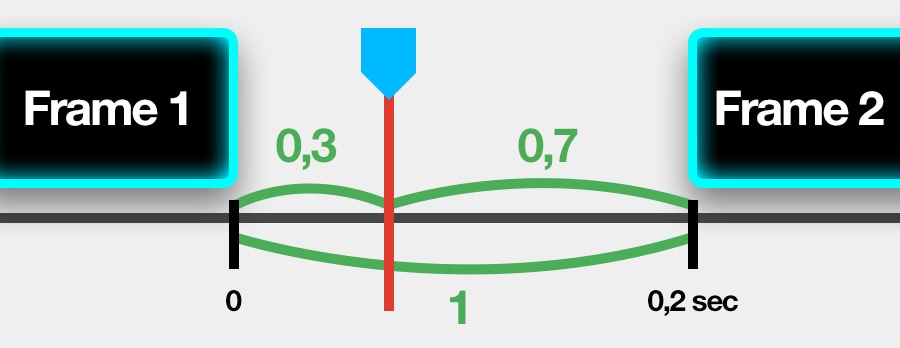
For those feeling geeky, here is how it works. The proportion in which frame duplicates will be overlapped is different at each moment in a video (see the illustration above). Suppose the cursor is moving from Frame 1 to Frame 2. If it has passed 30% of the way, the overlapping proportion will be the following: 70% of Frame 1 and 30% of Frame 2.


Visualization of the blending reframing algorithm

Since the cursor is still closer to Frame 1, the algorithm takes a major part of the image from that frame. As the cursor gets closer to Frame 2, the proportion will be changing. This approach is applied to every pixel of the video.

Optical flow is the most efficient reframing mode powered by artificial intelligence. In this mode, the software analyzes neighboring frames and, instead of duplicating them, it creates new unique ones.

Again, if you’re feeling geeky, the process looks as follows:

  1. First, the software predicts what a frame between Frame 1 and the cursor would look like if it existed.
  2. Second, the software performs a similar analysis for the space between Frame 2 and the cursor.
  3. The result you see on preview is a blend of these two predictions.


So, what is the best way to create an impeccable slow motion video?

Now that you know enough about how speed reduction works in video and what reframing is, you can easily answer this question.

Reducing playback speed is almost never enough to achieve a good-looking slow-motion effect. Most times, you need to apply reframing. The reframing mode you should choose – as well as the result – always depends on the original footage. The higher its quality, the better the reframing result will be.

Remember that the video preview quality also depends on your PC power. If you have a low-spec computer, the preview may appear choppy. In that case, we recommend waiting until after you’ve exported the video to judge the result.

News

New Transition Addition Methods, RAW/BRAW Files Support and Free Waveform

Welcome to the next level of video editing with VSDC's latest release, Version 9.1! Packed with an array of fresh features and enhancements, this update is designed to make your video editing experience...

VSDC 8.3 – 100+ New Templates, Key Editor Window, AV1 and Enhanced GUI

Welcome to the latest VSDC update, Version 8.3! We've been working hard and we’re ready to present a feature-packed release for you to discover an exciting array of over 100 fresh free video templates,...

Free video editing in 2023: Unlock Your Creativity without Breaking the Bank

In today's digital world creativity reigns supreme. It offers endless possibilities for individuals and brands to captivate audiences and leave a lasting impression. With social media platforms at the...

The Best Online Video Editors in 2023: Benefits and Drawbacks

In today’s digital landscape, the popularity of video content is gaining momentum, with users increasingly turning to video creation both for personal advantage and professionally. When searching for...

VSDC 8.2 – Proxy File Support, Color Keyframes and Vectorscope

We are thrilled to unveil the highly anticipated VSDC video editor 8.2 update. Our team has been hard at work, ensuring that this release is packed with exciting features and enhancements to elevate your...

VSDC 8.1 Brings Multicam, Curve Line Object, Scrolling Text Effect, and More

We’re thrilled to introduce VSDC 8.1. The new version primarily caters to professional videographers, graphic designers, and artists, however, everyday video creators will benefit from the update as...

VSDC 7.2 Takes Its Color Correction Toolset to the Next Level (Plus, Other Updates)

It has been another productive couple of months for the VSDC team, and we’re thrilled to announce the release of VSDC 7.2 – the new version of our video editing suite. Although the majority of updates...

5 Free Pieces of Software for Video Color Correction

If you’re a video creator, there are three reasons why it’s crucial to learn color correction. First, it will help you enhance your videos and make them look professional. Second, it will allow you...

VSDC 7.1 Upgrades GUI and LUT Editor, Adds New Effects and Custom Shortcuts

The new version of VSDC includes two new video effects, expands the functionality of the LUT editor, and makes video editing more convenient by bringing an improved interface, optimized timeline, and custom...

10 Pieces of Truly Free Video Editing Software (with No Watermarks)

Seeing a watermark on your video after spending hours editing it feels infuriating. Yet a few video editing software developers are still using this practice to limit the free usage of their products....
 

Screen Recorder Box

This program allows you to capture the video of your desktop and save it on your PC in various formats. Coupled with a video editor, the program is a great tool for creating presentations, tutorials and demo videos.

Read more about Screen Recorder...


Video Capture Box

The program captures video from external devices and records it to computer in a free format. You can save video from video tuners, webcams, capture cards and other gadgets.

Read more about Video Capture...


Reviewed by


"VSDC Free Video Editor is a surprisingly powerful, if unconventional video editor"

- PC Advisor


"This video editor gives you tons of control and editing power"

- CNet


"The editor handles many common formats and boasts a good deal of capabilities when it comes time to alter lighting, splice video, and apply filters and transitions in post production"

- Digital Trends