Video Editor

Download and use the free video software to create and edit videos of any complexity from a family greeting card to a company presentation. Apply vsdc free video editor for light edit hdr-video, any raw-video formats from cams - BRAW, ProRes RAW, any high resolution 4k or more due to video proxies technologies in the editor.
Cut, merge video files, apply visual and audio effects, use filtration and image correction, make slideshows and add an appropriate soundtrack. Use multi-color Chroma Key and advanced parameters settings to give your video a professional look.
All popular video and audio formats are supported.

Read more about Video Editor...

Video Converter

This program is intended for converting video files from one format to another. Nearly all popular video formats are supported (both reading and saving). In addition, the program drastically simplifies the task of converting videos for playback on specific multimedia devices, such as iPhone, Samsung Galaxy or Huawei P30 Pro. The program is extremely easy to use, has a modern interface and all necessary video processing functions.

Read more about Video Converter...

Audio Converter

The audio converter will help you convert audio files from one format to another. All key audio formats and codecs are supported. The program also allows you to manage playlists and meta tags, extract audio from video files and save these tracks on your computer in any format.

Read more about Audio Converter...

Animated Intro & Title Templates

Explore the VSDC Template Store with ready-made video templates for intros, animated titles, lower thirds, logo reveals, slideshows, glitch transitions, LUTs, and color grading presets. Drop a template into the VSDC Video Editor timeline, edit text, timing, and colors, and finish professional video projects in minutes.

Choose from 300+ exclusive packs of video transitions, LUT packs, text effects, GPS telemetry widgets, animated elements, and animated backgrounds for VSDC. All templates are fully customizable, support up to 4K resolution in 16:9, and help you build intros, wedding slideshows, travel videos, and tutorials much faster.

Store catalog

VSDC Cloud - Online video management

Keep your work safe, organized and always accessible! Back up your video projects, store media files online and access them from any device. Enjoy collaboration, share project updates and exchange files easily.

Online video editing management capabilities

Multifunctionality

Multifunctionality

A wide array of multimedia processing tools in one free video software suite.

High speed

High speed

Our programs use fast
and high-quality algorithms optimized for single and multi-core CPU’s.

Affordability

Affordability

VSDC video software is freely available for download to Windows OS-based PCs and laptops.

How to Use Video Editing Templates in VSDC

Quick start:

  • Open the Templates window
  • Search or browse for a template
  • Preview it before applying
  • Add it to the timeline
  • Customize it in the Properties window
  • Save your setup as a reusable custom template

Template access

Free: use and export without restrictions.

PRO: available for editing, but export requires VSDC Pro.

Premium: sold separately as template packs. After purchase and activation, both Free and Pro users can export projects that use them.

Anyone who edits videos knows how repetitive certain tasks can become: adding the same fade, applying the same color correction, or rebuilding the same title design project after project. Instead of recreating these settings every time, VSDC lets you save and reuse them as templates.

VSDC includes a built-in template library designed to speed up repetitive editing tasks. In this guide, we'll explain what VSDC templates are, how the Templates window works, how to search and preview templates, how to organize the library, and how to create and customize your own reusable presets.

This guide focuses on using, organizing, and creating templates inside VSDC. For information about purchasing and activating Premium template packs, see VSDC Premium Templates.

Download VSDC Free Video Editor

What Are Templates in VSDC?

In VSDC, the word "templates" covers much more than a small set of presets. The Templates window combines several groups of reusable editing elements:

  • Transition collection: transitions ranging from simple fades to more dynamic scene changes.
  • Templates: ready-made collections for social media, presentations, vlogs, slideshows, and other projects.
  • Video effects: color correction, stylization, distortion, and other visual effects.
  • Audio effects: equalizers, reverb, filters, and other sound-processing tools.
  • Text effects: animated titles, subtitles, intro screens, and other text-based designs.
  • Styles: reusable visual settings for different object types, including color palettes, gradient fills, and more.
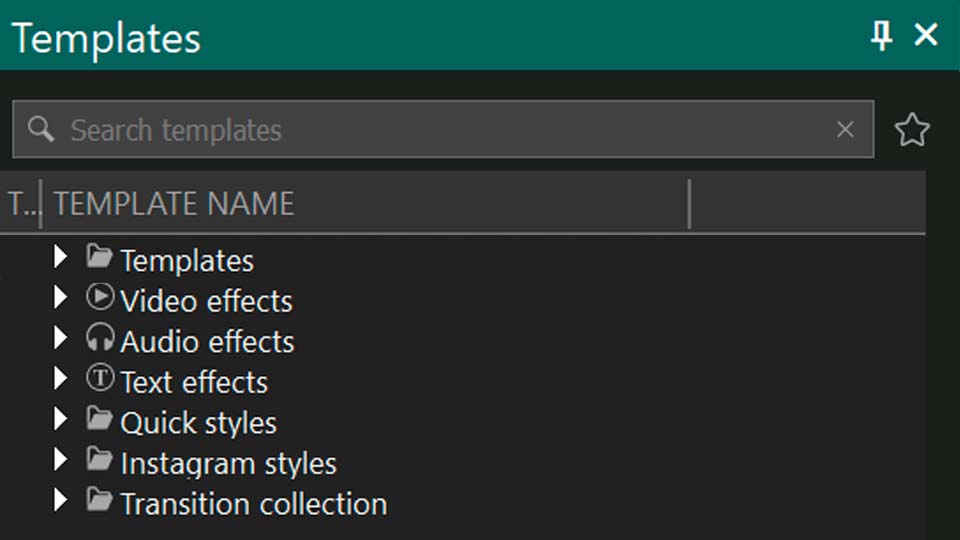
VSDC Template window showing transitions, video effects, text effects, styles and other template categories
The VSDC template library includes transitions, effects, styles, and ready-made template collections.

Free vs. PRO vs. Premium Templates

Templates are divided into three categories based on access and export requirements:

CategoryHow to recognize itAccess and export
FreeNo special badgeAvailable to all users and can be exported without template-related restrictions.
PROPRO badge and lock iconCan be applied in the editor, but exporting a project that uses them requires VSDC Pro.
PremiumCrown icon; blue means the template still needs to be downloaded, yellow means it is ready to usePurchased separately as template packs. After purchase and activation, both Free and Pro users can export projects that use them.

Besides ready-made templates, you can create your own reusable presets by combining effects, transitions, text objects, color settings, shapes, and animations. This is useful for recurring editing tasks or for keeping a consistent visual style across multiple projects.

How to Use the Templates Window

The Templates window is the main library for browsing and managing VSDC templates. In the classic workspace layout, it is usually available on the left side of the editor. If the window is hidden, open the View tab and enable Templates, or press Ctrl+9.

The window contains several tools that make it easier to work with a large template library:

  1. Search: the search bar at the top of the Templates window helps you quickly find a template by name.
  2. Preview: click the arrow on the right edge of the Templates window to open the template preview area. This lets you inspect a template before applying it.
  3. Quick Access: the vertical toolbar on the left side of the preview area lets you filter what is shown. The available buttons display all templates, thematic templates, video-effect templates, audio-effect templates, text-effect templates, transitions, or My Templates.
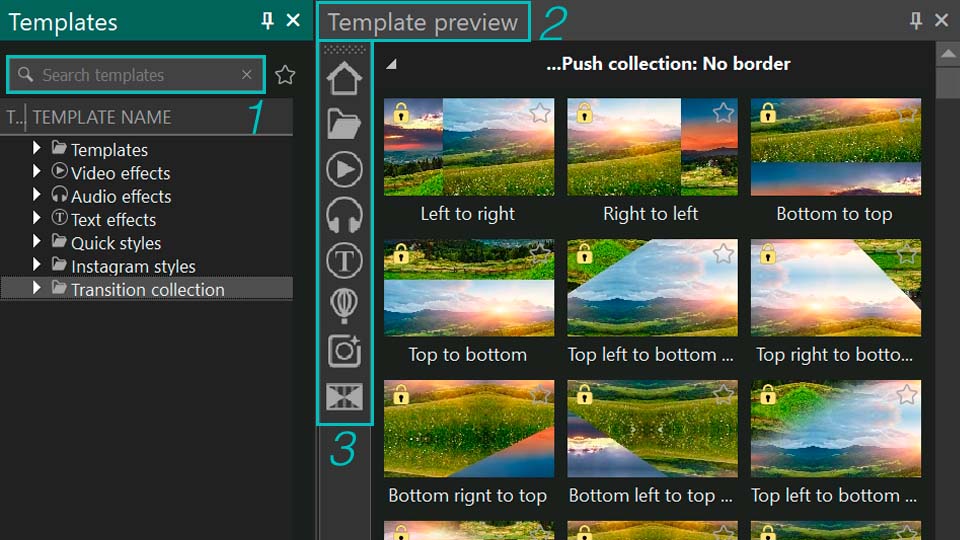
VSDC Templates window with the template preview panel and Quick Access categories
Open the preview area from the right side of the Templates window and use Quick Access to switch between template categories.

Customize the Quick Access Toolbar

The Quick Access toolbar can be customized. Right-click the toolbar and choose the option you need:

  • Quick access tools: hides the toolbar. To show it again, open the View tab and enable Quick Access.
  • Large icons: switches between large and small toolbar icons.
  • Customize: opens the Commands and Options settings window. In the Commands tab, you can drag available commands directly onto the Quick Access toolbar. The Options tab controls how tooltips are displayed.
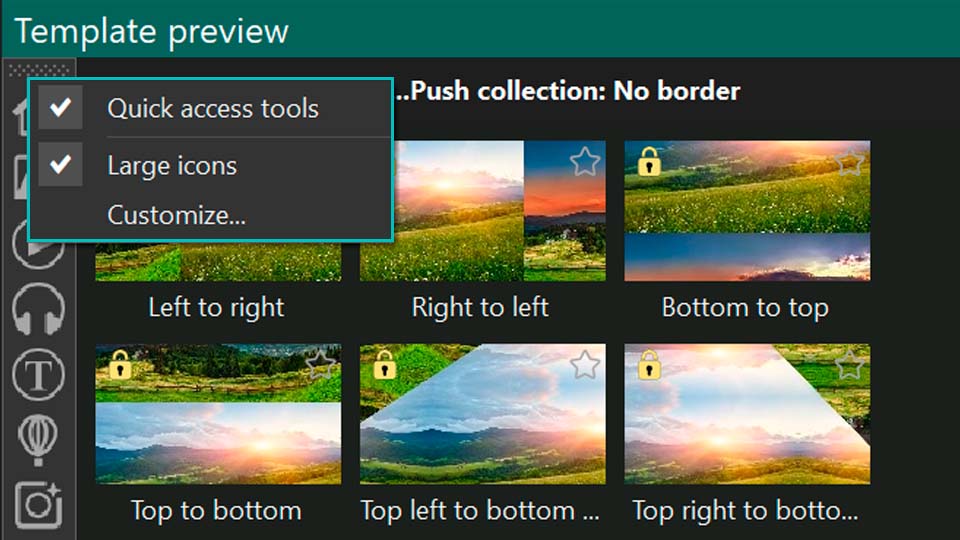
Quick Access toolbar settings in the VSDC Templates window
The Quick Access toolbar supports large or small icons and can be customized with additional commands.

Each template shown in the preview area has its own icon. To replace the icon, right-click it and select Change the icon. You can choose one of the built-in symbols or load your own image using the file option.
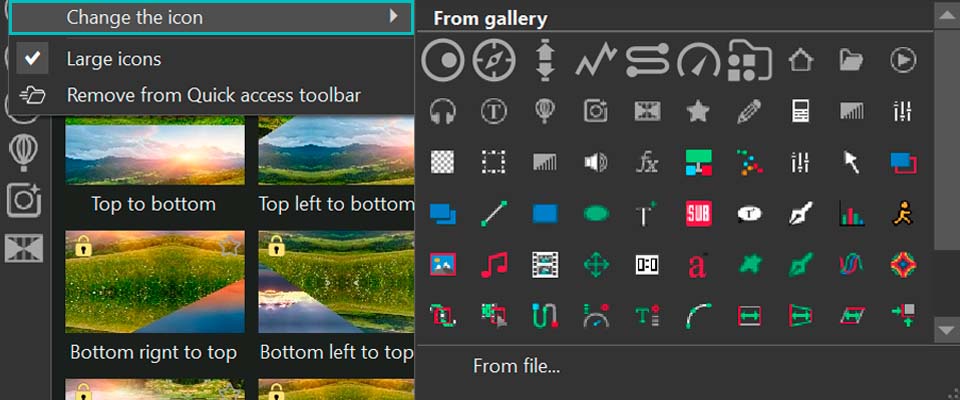
Change the icon command for a VSDC template
Template icons can be replaced with a built-in symbol or a custom image.

To remove an unwanted button from the Quick Access toolbar, right-click it and select Remove from Quick access toolbar. The shortcut can be restored later from the main Templates window.

Template Library Controls

The toolbar at the bottom of the Templates window contains several library-management controls:

  • Filter icon: filters the current search results and helps you keep only the required template type.
  • Plus icon: saves or adds a new template to the Templates window. This is the same control you can use when saving your own template.
  • Trash icon: removes selected templates from the Templates window.
  • Sync icon: synchronizes the local template library with the VSDC server. The library is updated over time with new Free, PRO, and Premium templates as well as updated versions of existing templates, so periodic synchronization keeps the local collection current.

Any downloaded or user-created template occupies disk space on your PC, so large libraries may also need occasional cleanup.

VSDC template library controls for filtering adding deleting and synchronizing templates
The bottom toolbar provides controls for filtering search results, adding templates, deleting items, and synchronizing the library.

How to Organize, Preview, and Manage VSDC Templates

To see the actions available for a template or template group, right-click it in the Templates window. The context menu contains the commands used to purchase, activate, save, organize, preview, and configure templates.
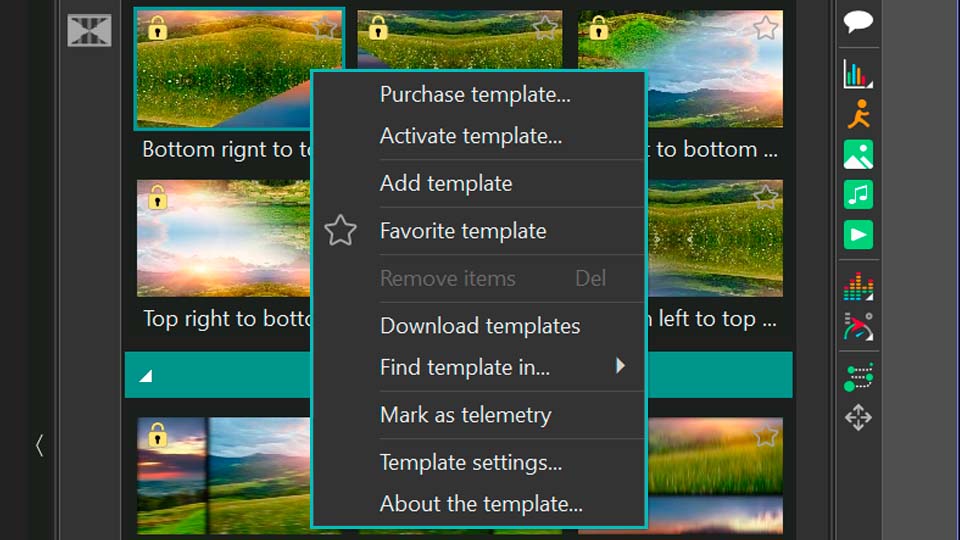
Context menu for a template in the VSDC Templates window
Right-click a template or folder to open the full list of available template commands.

Purchase, Activate, and Download Premium Templates

Purchase template is available for Premium templates and opens the corresponding purchase page. To make a purchased Premium template available for use, choose Activate template and enter the license key you received for it. Restart VSDC after activation to complete the process.

If a Premium template or template group has already been purchased but is not installed locally, use Download templates to download it into VSDC.
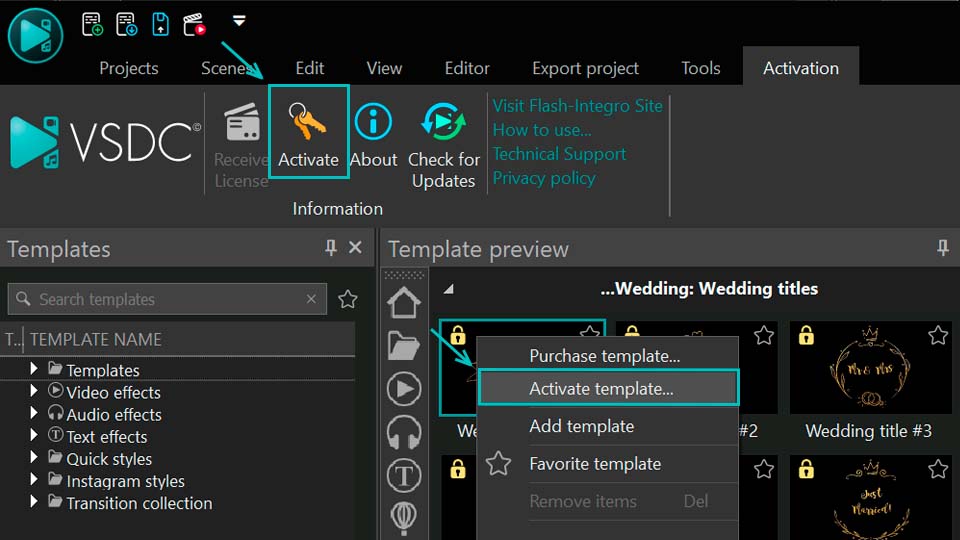
Premium template purchase activation and download commands in VSDC
Premium templates can be purchased, activated with a license key, and downloaded from the Templates window.

Add Templates and Build a Folder Hierarchy

Add template saves a user-created effect or group of objects in the Templates window. Select the object or effect on the timeline, choose the destination folder in the Templates window, right-click the folder, and select Add template.

Add child template saves the new template inside another template, creating a hierarchy for editing. Add folder creates a folder at the same level as the selected item, while Add child folder creates a folder inside the selected item.
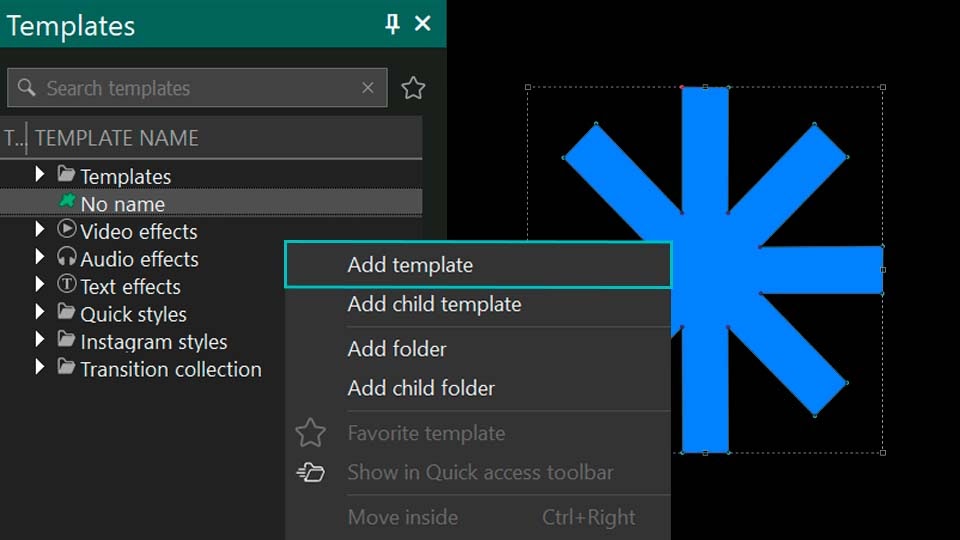
Add Template and Add Child Template commands in VSDC Video Editor
Use Add template or Add child template depending on where the new template should appear in the library hierarchy.

Favorites and Quick Access

Favorite template adds a template to Favorites. To display favorite templates later, click the star icon next to the search bar or use the filter at the bottom of the Templates window and select Show Favorites.

Show on Quick access toolbar adds a selected template or template group to the Quick Access toolbar. The same command can restore a Quick Access icon that was removed earlier. For example, if you remove the Video effects shortcut, find the Video effects group in the Templates window, right-click it, and select Show on Quick access toolbar.

Move, Remove, Expand, and Collapse Items

Move inside moves the selected item one level down into another item located above it at the same hierarchy level. Move outside performs the reverse operation and moves the selected item one level up.

Remove items deletes the selected item from the Templates window. Expand/Collapse all child templates expands or collapses all nested items in the tree at once, which is faster than opening each node manually.
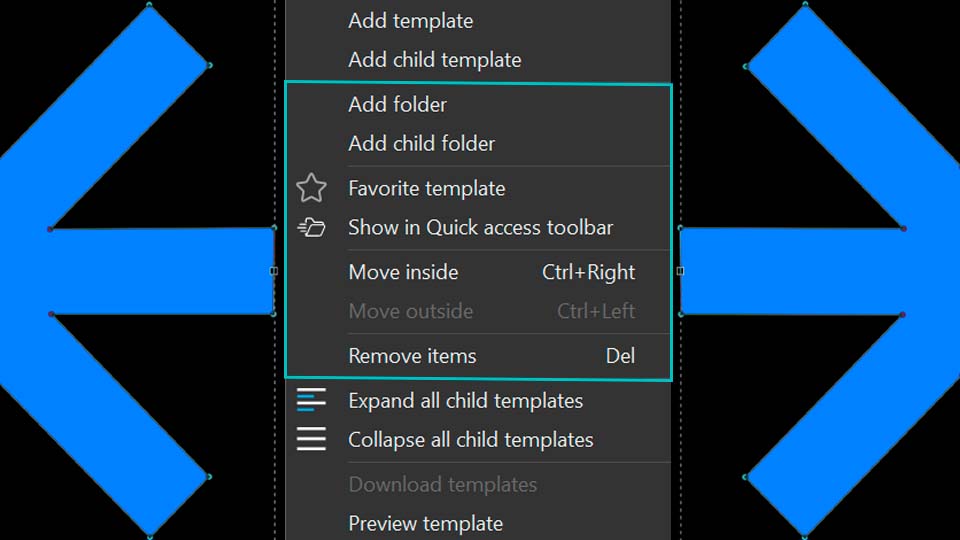
VSDC template library options for favorites Quick Access moving and organizing items
Templates can be marked as favorites, added to Quick Access, moved through the hierarchy, and expanded or collapsed as groups.

Preview a Template Before Applying It

Preview template opens the preview area so you can evaluate the contents of a template before applying it to the project.

Mark a Template as Telemetry

Mark as telemetry adds the selected template to the telemetry template collection. The technical workflow can be demonstrated with any suitable template; for example, if you mark Wedding title #8 as telemetry, it will then appear in the telemetry template browser.

To open that browser, go to the Objects toolbar on the left side of the main preview area, click Add telemetry, and choose Telemetry templates. In the Telemetry templates window, click the vertical Templates label on the left to expand the complete list. A template previously marked as telemetry can then be found in this collection. Use Unmark as telemetry to remove it from the telemetry selection.

For the complete GPS workflow, see How to add GPS and telemetry overlays to video in VSDC.

Template Settings Explained

Select Template Settings from the context menu to configure the template. The most important options are described below.

Included in effect presets

This option controls whether a template variation is available in the Presets list of the corresponding effect. The Crop video effect is a useful example. Expand it in the Templates window and you can see several variants, including Crop, Crop and resize, and Crop only. If Included in effect presets is enabled for these variants, they appear in the Presets parameter of the Crop effect in the Properties window.

To verify this, place one of the Crop variants on the timeline, select it, open its Properties window, and expand Presets. The available Crop variants will be listed there. If you disable Included in effect presets for a specific variant such as Crop and resize, that variant will no longer appear in the Crop effect's Presets list, although the template itself remains in the Templates window.

Use as a transition

If a template should work as a transition, for example in a slideshow, enable Use as a transition. When that template is used, VSDC automatically places it at the end of the parent object so it can create a transition to the next object.

Use Template Duration

If Use Template Duration is disabled, the template stretches to cover the full duration of the parent object. When the option is enabled, VSDC uses the duration stored inside the template itself.

You can see the difference with the Fairy light template. Open its Template Settings and disable Use Template Duration, then place the template inside an object on the timeline: the template will stretch to the full duration of the parent. Next, enable Use Template Duration and place the same template inside the same parent object again. The two instances of the same template will have different durations because the second one keeps the duration defined in the template.

Thumbnails path / Path to template preview video

These parameters configure the template preview. You can assign an image and/or a video that demonstrates how the template works before it is used in a project.

About Template

About Template is intended for Premium templates. It opens the web page for the selected template so the user can proceed to its purchase page.
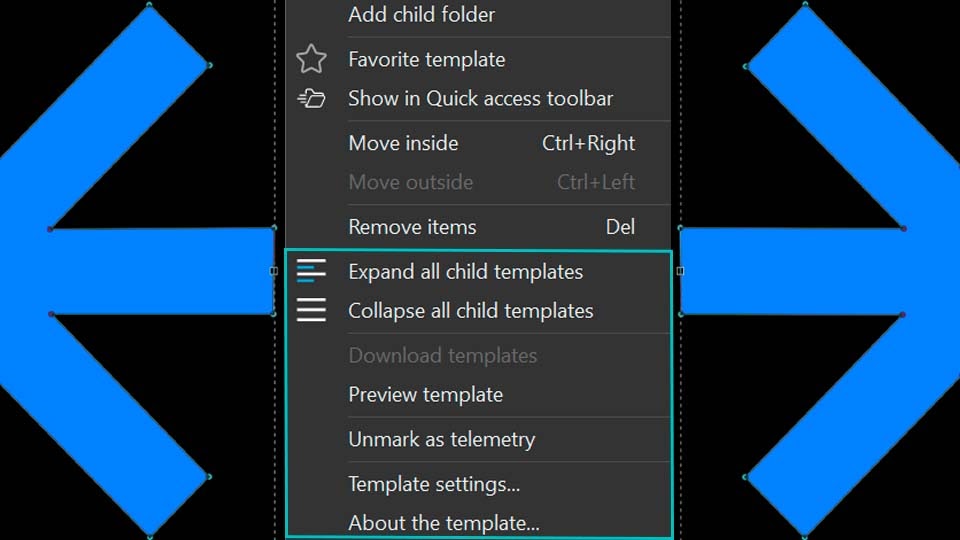
Template Settings window in VSDC with preset transition duration and preview options
Template Settings control preset visibility, transition behavior, template duration, and preview media.

How Template Timing Works in the Properties Window

Once a template is on the timeline, its behavior is controlled through the Properties window. We will not repeat every property here because a template can contain different VSDC object types such as video, audio, text, or effects. The timing parameter that matters most when configuring or creating a template is Lock to parent object duration, which appears in both the Object creation time and Object drawing duration sections.
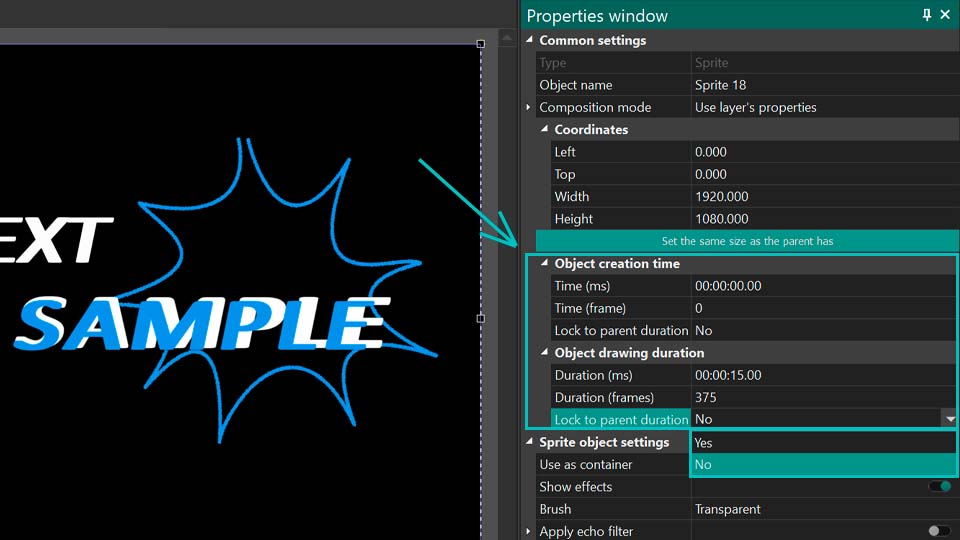
Lock to parent object duration settings for Object creation time and Object drawing duration in VSDC
The same Lock to parent object duration parameter appears in the Object creation time and Object drawing duration sections.

The two occurrences of the parameter affect different boundaries of the child object. Their behavior is as follows:

ParameterValue YESValue NO
Object creation timeThe beginning of the child object stays in place when the beginning of the parent moves.The beginning of the child object moves together with the beginning of the parent.
Object drawing durationThe end of the child object moves together with the end of the parent.The end of the child object stays in place when the end of the parent moves.

Because these two settings can be combined, the same template can react differently when the start or end of its parent object is changed. Let's look at all four combinations.

1. Object creation time: NO / Object drawing duration: NO

With both values set to NO, the beginning of the child object (the template) moves together with changes to the beginning of the parent, while the end of the child object does not depend on changes to the parent's end.

If you move the end of the parent object, the child object does not react. If you move the beginning of the parent, the beginning of the template moves in the same direction by the same time offset. The duration of the child object does not change, so its end also moves by the same amount. In other words, the entire child object moves as a single unit.

2. Object creation time: NO / Object drawing duration: YES

In this combination, the beginning of the child object moves together with the beginning of the parent, while the end of the child object is linked to the end of the parent.

If you move the end of the parent to the right or left, the end of the template moves in the same direction by the same time offset. The beginning of the template remains in place, so the template's duration changes.

If you move the beginning of the parent, the beginning of the template moves in the same direction by the same amount. The end of the child object remains in place, so the template's duration changes again.

3. Object creation time: YES / Object drawing duration: NO

Here, the beginning of the child object stays in place when the beginning of the parent moves, and the end of the child object stays in place when the end of the parent moves. With this combination, VSDC moves the child boundary that is opposite to the parent boundary being changed.

  • If the beginning of the parent moves, the end of the child moves in the same direction, because the child's beginning must remain fixed.
  • If the end of the parent moves, the beginning of the child moves in the same direction, because the child's end must remain fixed.

The child object's duration changes in both cases.

4. Object creation time: YES / Object drawing duration: YES

With both values set to YES, the beginning of the child object stays in place when the beginning of the parent changes, while the end of the child object follows the end of the parent.

Changing the beginning of the parent has no effect on the child object. If you move the end of the parent, the end of the child moves in the same direction by the same time offset. The child object's duration remains unchanged, so its beginning also moves together with its end by the same amount. As a result, the whole child object shifts while keeping its original duration.

Summary of the Four Combinations

CombinationChild durationBehavior
NO / NODoes not changeThe entire child object moves when the parent's beginning moves; moving the parent's end has no effect.
NO / YESChangesOnly one child boundary moves: the beginning when the parent's beginning moves, or the end when the parent's end moves.
YES / NOChangesOnly one child boundary moves: the beginning when the parent's end moves, or the end when the parent's beginning moves.
YES / YESDoes not changeThe entire child object moves when the parent's end moves; moving the parent's beginning has no effect.

These combinations let you define exactly how a template should respond when the timing of its parent object changes in a new project.

How to Create Your Own VSDC Template

When working with templates, it is useful to think of a template as a ready-made project or object setup that you want to reuse. Creating your own template therefore comes down to building the required composition on the timeline and saving it inside VSDC.

Step 1: Build the Future Template

Create the effect or composition you want to save. It can be a transition, a combination of video and audio effects, an image with configured properties, a group of shapes, text objects, animation, or another reusable combination. Configure every element in the Properties window before saving the template.

Step 2: Select All Template Elements

When the setup is complete, select all timeline objects that should be included in the future template.

Step 3: Save the Template in the Templates Window

Open the Templates window. You can save the template in either of two ways:

  • Create your own folder first: right-click in the Templates window, choose Add folder or Add child folder, and enter a name. Then right-click the new folder, choose Add child template, and name the template.
  • Save directly: right-click in the Templates window and choose Add template, or click the plus icon at the bottom of the Templates window, then enter a name for the new template.
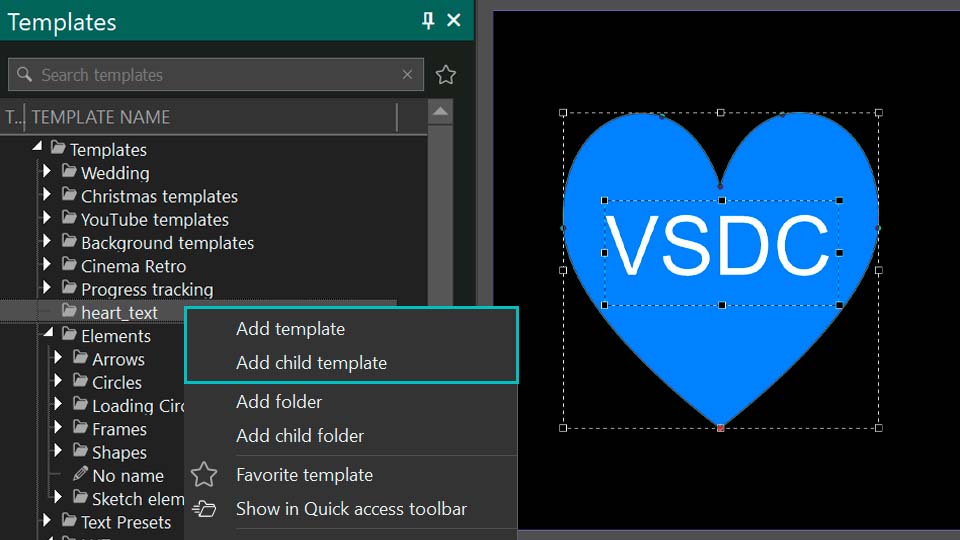
Saving a custom template in the VSDC Templates window
Create a folder and child template or save the selected timeline objects directly as a new template.

Step 4: Open Template Settings

Right-click the saved template in the Templates window and select Template Settings.

Step 5: Configure the Saved Template

Set the required options in the Template Settings window. These can include Included in effect presets, Use as a transition, Use Template Duration, telemetry-related options, and preview-media paths, depending on how the template is intended to be used.
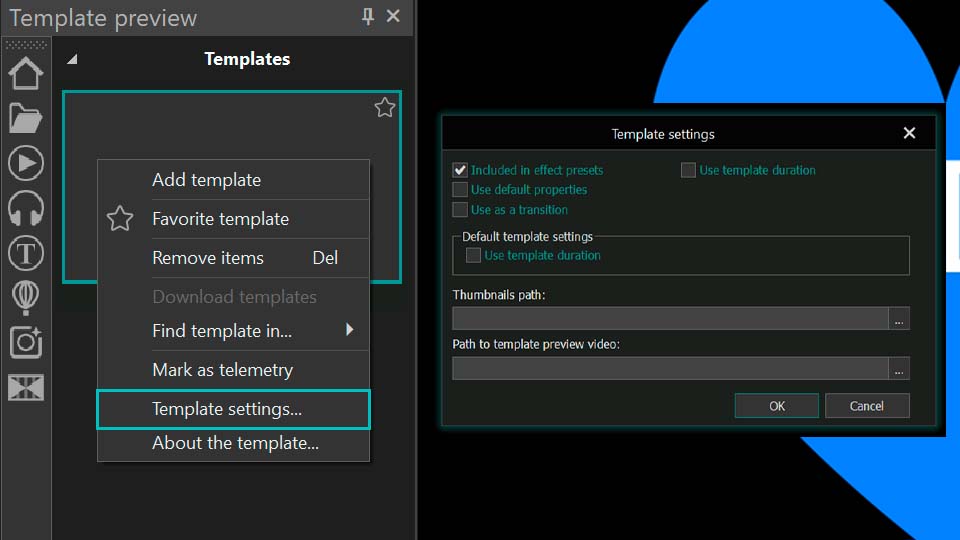
Template Settings for a newly created custom VSDC template
After saving the template, open Template Settings and configure its behavior for future projects.

Conclusion

The Templates window can save a significant amount of time when you reuse the same effects, transitions, titles, color settings, or animated elements across projects. You can start with built-in Free, PRO, or Premium templates, organize the library around your workflow, and save your own editing setups as reusable custom templates.

For questions about VSDC or template activation, use our support form.

Frequently Asked Questions

How do I save my own template in VSDC?

Select the objects you want to reuse on the timeline, open the Templates window, and either click the plus icon or right-click and choose Add template. Then enter a name for the template.

Are VSDC templates free?

VSDC includes Free, PRO, and Premium templates. Free templates are available without template-related restrictions. PRO templates can be used in a project, but exporting the final video requires VSDC Pro. Premium template packs are purchased separately; after purchase and activation, both Free and Pro users can export projects that use them.

Why can't I export a project that uses some templates?

If a template has a PRO badge, exporting requires VSDC Pro. If it has a Premium crown, you need to purchase and activate the template pack that contains it.

How do I activate a purchased Premium template?

Open the Templates window, right-click the purchased template, choose Activate template, and enter the license key you received for it. Restart VSDC after entering the key so the activation is finalized.

How do I mark a template as a favorite?

Right-click the template and select Favorite template. To show only favorites, enable Show Favorites or click the star icon next to the search bar.

How do I add a template to the Quick Access toolbar?

Right-click the template or folder and select Show in Quick access toolbar. To remove an icon, right-click it on the toolbar and choose Remove from Quick access toolbar.

What does "Lock to parent object duration" do?

The parameter controls how a child object reacts when the start or end of its parent changes. Under Object creation time, YES keeps the child's start in place while NO makes it move with the parent's start. Under Object drawing duration, YES makes the child's end move with the parent's end while NO keeps the child's end in place.

How do I preview a template before applying it?

Select Preview template from the context menu, or open the preview area using the arrow on the right side of the Templates window.
How to Recover Lost Files in Your VSDC Project

Quick start:

  • Open your VSDC project.
  • Confirm the missing files warning.
  • Click Search and select the folder containing your media.
  • Use Locate if you need to reconnect an individual file.
  • Check that all required files are online.

Requirements

Version: VSDC 11.2 or later

Edition: Available in the free version

Use case: Missing media after moving folders, reconnecting memory cards or external drives

You’re probably familiar with this scenario: you move or rename a folder containing images and videos, open your project in the video editor, and instead of your familiar timeline, you’re greeted with a string of warning dialogs about missing files. In the past, you had to locate each of those files manually and relink them to the project one by one. That ate up a huge amount of time, especially when you were working with lots of media.

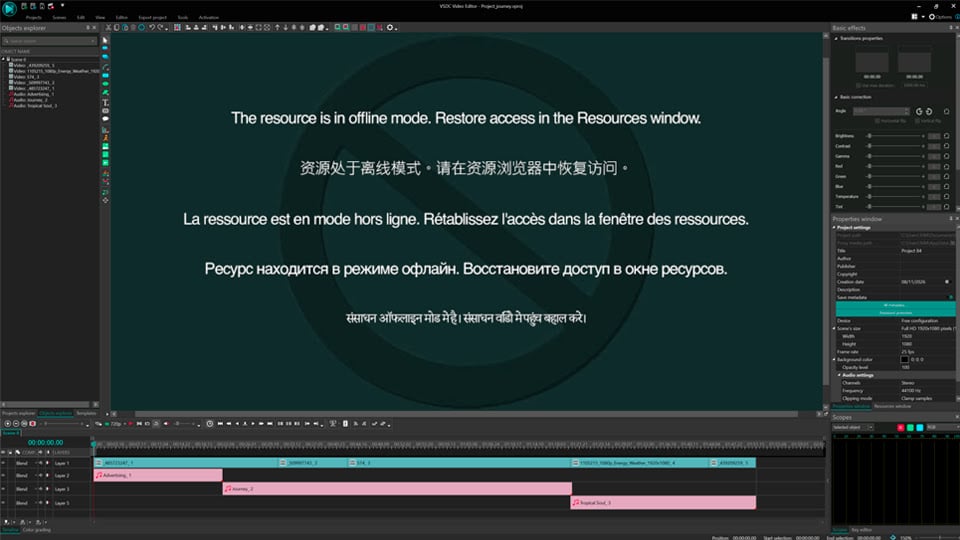
This is especially common when editing footage from multiple camera memory cards or external drives. You might import clips directly from different memory cards, swap them during editing, or store your footage across several drives. When a card is removed, a drive is disconnected, or Windows assigns it a different drive letter, VSDC may lose access to the original media and mark the files as "Offline". Fortunately, you don't have to rebuild your timeline. Once the source files are accessible again, VSDC can help you find and relink them while preserving your edits.

In the VSDC free video editor, this issue is now a thing of the past! Version 11.2 and later include a dedicated tool that automatically finds and restores lost files.

In this article, you’ll learn how to quickly recover missing files or, if needed, remove them from your project.

Before you start, make sure you have VSDC version 11.2 or newer installed. If not, download the latest version of the editor using the link below.

Download the Free VSDC Video Editor

Two ways to search for lost files

In the missing files list window, there are two recovery options available.

The first is the Search option. When you click this button, you select a folder to scan, after which VSDC automatically analyzes the specified directory and all its subfolders, finds and relinks all project files that are detected there. This method is ideal if you remember where you moved the source files but don't know the exact location of each individual file. The algorithm restores all lost files from the selected folder in a single operation.

If some files are still not found, they will remain in the "Offline" status, and then you simply need to run the search again, specifying a different path.

Working with multiple memory cards or external drives? If your project uses footage stored across several devices, reconnect the appropriate card or drive and run Search for the folder containing your missing files. If some files remain "Offline", connect the next device and repeat the search using its location. This allows you to restore media from different storage devices without locating every file individually.

Searching a folder for missing project media in VSDC.

The second method is the Locate option. If you know exactly where a specific file is located, select it in the list and click Locate. After that the standard Windows Explorer window will open, where you can manually point to the path of that file. It is important to pay attention to the "Relink others automatically" option, which is located in the tool window.

If this option is enabled, the program will scan the folder where the selected file is located and automatically relink all other lost files from the same directory.

If you leave the option disabled, only the file you manually specified will be restored.

Locating a missing file and optionally relinking other media in the same folder.

For convenience, an error protection feature is provided: if you accidentally select a file that does not match the original, VSDC will warn you about a significant discrepancy in parameters and ask for confirmation, so you will never replace one file with another due to carelessness.

If you want to postpone the search for some files for later, simply close the window. It will reappear the next time you open the project.

Recovering files via the Resources window

When you have already closed the missing files window and are inside the project, you can also restore a file without using the separate search window.

To do this, right‑click on an offline object on the timeline and select "Find object in…", then "Resources window". The Resources window will open automatically, and the required file will be highlighted. Right‑click on it again, choose "Settings" and at the bottom of the window that opens, click the "Import" button. Specify the new location of the file on your computer. After confirmation, the file instantly switches to the "online" status and updates on the timeline. All effects, trimming and positioning settings applied to it will be preserved.

Relinking an offline file through the Resources window.

Removing lost files from the project

If some files are no longer needed, you can remove them from the project and the most convenient way to do this is also through the Resources window. Why is this necessary? If you leave lost files in the project, the program will show a warning about missing items every time you open it and prompt you to find them via the file search window.

To avoid this unnecessary pop‑up, simply locate the unwanted file in the Resources window (using the same method as described in the "Recovering files via the Resources window" section), right‑click on it and select "Delete" or press the Delete key.

Removing an unnecessary missing file from project resources.

Conclusion

We have tried to gather in this article all the main ways of working with lost files, so that you can quickly bring them back into the project or get rid of unnecessary ones. We hope that this article was useful to you and will help you avoid unnecessary complications in your work.

Frequently asked questions (FAQ)

What if the files were not moved but renamed?

Automatic search in VSDC 11.2 searches for files by their content, not just by name. If a file was simply renamed but remains in the same folder, the program will find it when scanning the directory.

What if my camera memory card or external drive is disconnected?

First, reconnect the memory card or external drive containing your original media. If VSDC still shows the files as "Offline", the file paths may have changed, for example, because Windows assigned a different drive letter. Use Search to scan the folder containing your footage, or Locate to reconnect a specific file manually. If your project uses files from multiple cards or drives, repeat the process for each device. VSDC can relink media only when the original files or their copies are accessible.

Can I recover files that were permanently deleted?

If the file is physically deleted from the disk, VSDC cannot recover it. You will need to use third‑party data recovery software or find a backup copy of the file and replace it with that.

Do lost files take up space in the project?

No. Offline files do not take up disk space, they are merely links to media. However, they remain in the project structure, so VSDC will report them as missing.

Does this feature work in the free version of VSDC?

Yes, the smart search for lost files is available in the free version of VSDC starting from update 11.2.

How long does folder scanning take?

It depends on the number of files and the depth of folder nesting. In most cases, scanning takes from a few seconds to a couple of minutes.

Can I undo the relinking if I made a mistake?

Yes, you can always mark the file as offline again through the Resources window.

More helpful resources for you

We have prepared a selection of articles about various features of VSDC free video editor for you. Here you will find answers to questions that arise for everyone involved in video editing: how to achieve smooth slow motion, how to remove camera shake, how to adjust colors to make your video look cinematic, and much more!

Please remember that you can switch the language on any page to your preferred language.

You can find even more articles on our website.

Follow us on social media Facebook, X, Reddit or Discord and visit our channel, you will find plenty of useful and interesting videos there!

We will be happy to hear your questions and suggestions at This email address is being protected from spambots. You need JavaScript enabled to view it.

How to Recover Lost Files in Your VSDC Project

Quick start: Recover missing project files

  1. Open your VSDC project.
  2. Confirm the missing files warning.
  3. Click Search and select the folder containing your media.
  4. Use Locate if you need to reconnect an individual file.
  5. Check that all required files are online.

Requires VSDC 11.2 or later. Available in the free version.

You’re probably familiar with this scenario: you move or rename a folder containing images and videos, open your project in the video editor, and instead of your familiar timeline, you’re greeted with a string of warning dialogs about missing files. In the past, you had to locate each of those files manually and relink them to the project one by one. That ate up a huge amount of time, especially when you were working with lots of media.

In the VSDC free video editor, this issue is now a thing of the past! Version 11.2 and later include a dedicated tool that automatically finds and restores lost files.

In this article, you’ll learn how to quickly recover missing files or, if needed, remove them from your project.

Before you start, make sure you have VSDC version 11.2 or newer installed. If not, download the latest version of the editor using the link below.

Download the Free VSDC Video Editor

Two ways to search for lost files

In the missing files list window, there are two recovery options available.

The first is the Search option. When you click this button, you select a folder to scan, after which VSDC automatically analyzes the specified directory and all its subfolders, finds and relinks all project files that are detected there. This method is ideal if you remember where you moved the source files but don't know the exact location of each individual file. The algorithm restores all lost files from the selected folder in a single operation.

If some files are still not found, they will remain in the "Offline" status, and then you simply need to run the search again, specifying a different path.

Searching a folder for missing project media in VSDC.

The second method is the Locate option. If you know exactly where a specific file is located, select it in the list and click Locate. After that the standard Windows Explorer window will open, where you can manually point to the path of that file. It is important to pay attention to the "Relink others automatically" option, which is located in the tool window.

If this option is enabled, the program will scan the folder where the selected file is located and automatically relink all other lost files from the same directory.

If you leave the option disabled, only the file you manually specified will be restored.

Locating a missing file and optionally relinking other media in the same folder.

For convenience, an error protection feature is provided: if you accidentally select a file that does not match the original, VSDC will warn you about a significant discrepancy in parameters and ask for confirmation, so you will never replace one file with another due to carelessness.

If you want to postpone the search for some files for later, simply close the window. It will reappear the next time you open the project.

Recovering files via the Resources window

When you have already closed the missing files window and are inside the project, you can also restore a file without using the separate search window.

To do this, right‑click on an offline object on the timeline and select "Find object in…", then "Resources window". The Resources window will open automatically, and the required file will be highlighted. Right‑click on it again, choose "Settings" and at the bottom of the window that opens, click the "Import" button. Specify the new location of the file on your computer. After confirmation, the file instantly switches to the "online" status and updates on the timeline. All effects, trimming and positioning settings applied to it will be preserved.

Relinking an offline file through the Resources window.

Removing lost files from the project

If some files are no longer needed, you can remove them from the project and the most convenient way to do this is also through the Resources window. Why is this necessary? If you leave lost files in the project, the program will show a warning about missing items every time you open it and prompt you to find them via the file search window.

To avoid this unnecessary pop‑up, simply locate the unwanted file in the Resources window (using the same method as described in the "Recovering files via the Resources window" section), right‑click on it and select "Delete" or press the Delete key.

Removing an unnecessary missing file from project resources.

Conclusion

We have tried to gather in this article all the main ways of working with lost files, so that you can quickly bring them back into the project or get rid of unnecessary ones. We hope that this article was useful to you and will help you avoid unnecessary complications in your work.

Frequently asked questions (FAQ)

What if the files were not moved but renamed?

Automatic search in VSDC 11.2 searches for files by their content, not just by name. If a file was simply renamed but remains in the same folder, the program will find it when scanning the directory.

Can I recover files that were permanently deleted?

If the file is physically deleted from the disk, VSDC cannot recover it. You will need to use third‑party data recovery software or find a backup copy of the file and replace it with that.

Do lost files take up space in the project?

No. Offline files do not take up disk space, they are merely links to media. However, they remain in the project structure, so VSDC will report them as missing.

Does this feature work in the free version of VSDC?

Yes, the smart search for lost files is available in the free version of VSDC starting from update 11.2.

How long does folder scanning take?

It depends on the number of files and the depth of folder nesting. In most cases, scanning takes from a few seconds to a couple of minutes.

Can I undo the relinking if I made a mistake?

Yes, you can always mark the file as offline again through the Resources window.

More helpful resources for you

We have prepared a selection of articles about various features of VSDC free video editor for you. Here you will find answers to questions that arise for everyone involved in video editing: how to achieve smooth slow motion, how to remove camera shake, how to adjust colors to make your video look cinematic, and much more!

Please remember that you can switch the language on any page to your preferred language.

You can find even more articles on our website.

Follow us on social media Facebook, X, Reddit or Discord and visit our channel, you will find plenty of useful and interesting videos there!

We will be happy to hear your questions and suggestions at This email address is being protected from spambots. You need JavaScript enabled to view it.

Why HDR video looks dull and how to fix it in VSDC

Published by Amy Shao on May 11, 2026

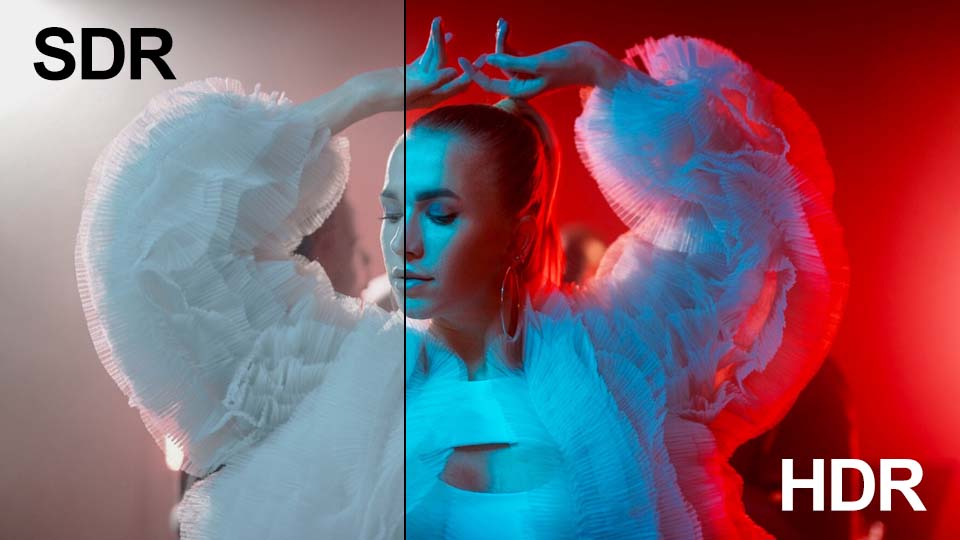
SDR vs HDR

If you shoot video on an iPhone, GoPro or a professional camera, you've likely encountered this situation: you open your footage on your computer, expecting to see the vibrant sunset you wanted to capture, but on the screen there is a dull image lacking the brightness that made you frame the shot or record the video in the first place.

Why does it happen?
Your video or photos were recorded in HDR, but when you work with this type of footage on a standard (SDR) timeline or watch it on a regular monitor, the software has to figure out how to squeeze the expanded color and brightness range into the limited SDR format. Now you can take control of this process right in VSDC! Keep reading to find out how. We'll run a quick experiment and break down exactly what each setting does.

Make sure you have version VSDC 10.1 or higher installed

In this article:

  • Display mode: auto detection, SDR, HDR
  • Color profiles: standard and enhanced
  • Brightness: adjusting nominal peak brightness
  • Tone mapping: algorithms and levels
  • Additional options for improving results
  • Wrapping up
  • Frequently asked questions about HDR

Display mode: auto detection, SDR, HDR

So, we've added an HDR video (learn how to add files to the editor here), clicked on it on the timeline and opened the properties window. Now expand the "Video object settings" section, then the "Video" parameter and find the "HDR mode" option.

There are three options here. Let's start with the simplest one: "Auto detect". You might think that after selecting this one, the editor would figure everything out on its own and give you the best result. But that's not what happens because you're still left with the same dull image. Why? VSDC automatically squeezes the expanded HDR range to fit the specs of a regular monitor. If your screen doesn't support HDR, auto mode simply cuts off all the extra information and leaves only the SDR data. Keep in mind that conversion to SDR only happens if the original file has the right metadata.

Next up, let's choose "Force SDR mode". What's changed? In this mode the editor ignores the color and brightness data your camera captured and only reads the part meant for standard (SDR) screens. In other words, VSDC treats your HDR file just like any regular video. This option works well if you're quickly putting together a rough cut.

Now let's activate "Force HDR mode". On the screen you'll see all the brightness and color that was captured in the original file. However, if you're using a standard monitor, you might run into a funny side effect: the image may look either oversaturated or way too dark. It happens because VSDC is now showing all the available data, but your screen simply doesn't know how to display it properly. To get the look right, you'll need to tweak a few additional settings.

Activating HDR Mode. How to enable HDR mode in VSDC, visual differences between SDR (Standard Dynamic Range) and HDR (High Dynamic Range) content.

Color profiles: standard and enhanced

Expand the "HDR mode" section by clicking the small triangle icon to the left of it. When you select either "Auto detect" or "Force HDR mode", additional options become available. The most important one is "Color profile".

Start with "Standard color profile". This is a universal and fairly straightforward mode. It works on any computer, but it's generally slower, and colors tend to look less natural.

Now choose "Enhanced color profile". This mode is more advanced and designed for modern PCs. It utilizes your graphics card to accurately convert HDR colors and brightness into standard SDR format. The resulting image will closely match the original.

If you select "Enhanced color profile" but your PC does not have a dedicated graphics card, the software will automatically fall back to "Standard color profile" to ensure compatibility.

HDR Color Profiles in VSDC. Standard and extended color profiles for HDR in VSDC, showing how each affects color reproduction and dynamic range.

Brightness: adjusting nominal peak brightness

When you select "Standard color profile", the "Nominal peak luminance" setting becomes available. It defines the maximum brightness level your screen is capable of displaying. The value can range from 0 to 10,000 units. By default, it is set to 100 which is considered standard for typical SDR screens. Don't forget to enable the toggle switch to apply the setting.

Let's look at the two extremes of this setting: minimum and maximum.

  • Nominal peak luminance = 1
    In this case, the video editor is forced to compress the entire brightness range of the original HDR video into a narrow spectrum from 0 (black) to 1 (maximum brightness within this artificial range). Anything in the source file that exceeds a value of 1 — which could be, for example, 99% of the brightness information — is simply clipped and replaced with the maximum allowable value of 1. As a result, all colors that were originally bright and varied blend into a single white wash.
  • Nominal peak luminance = 10,000
    Here the editor assumes your screen can display brightness up to 10,000 units even if, in reality, the physical maximum of your screen is, say, only 500. The editor distributes all colors from dark to bright white across the specified range of 0 to 10,000. However, since your actual screen cannot output brightness beyond 500 units, all information in the 500–10,000 range is effectively lost. The result is an image that looks gray and dull.

Therefore, the key in this case is to find the right balance, taking into account your screen's capabilities and the desired visual outcome.

Nominal Peak Luminance. The concept of nominal peak luminance, examples of different luminance values and how they impact the brightness and highlight details in HDR video.

Tone mapping: algorithms and levels

Now let's look at the "Tone mapping" option. This setting controls how the program compresses bright colors and light from HDR video so they display correctly on a standard screen.

VSDC offers several built-in tone mapping algorithms. The way colors and brightness are redistributed in the frame depends on which algorithm you choose. The image on screen will look different with each option — you can select the one you prefer.

If you're not satisfied with the result after choosing an algorithm, try enabling the "Level" parameter. This option is available in "Force HDR mode" and "Auto detect" HDR modes. It allows you to make the color compression stronger or weaker.

When you enable "Level", a default value is automatically set for each algorithm. The image with the parameter turned off looks the same as when it's turned on with the default value.

To adjust the image, simply move the level slider away from the default setting. Increasing the value makes the video brighter, while decreasing it makes the image duller.

Tone Mapping. Tone mapping with various example settings, showing how different tone mapping values affect the rendering of bright and dark areas in an HDR image.

Additional options for improving results

Two additional options can help you fine-tune the color more precisely.

"Signal peak override" allows you to specify the maximum brightness present in your video. Let's see how this works together with the parameter we discussed earlier:

  • Nominal peak luminance tells the program what brightness your monitor is capable of.
  • Signal peak override tells the program what brightness is present in the video itself.

For example, set "Nominal peak luminance" to 40, meaning your monitor can only display 40 nits. Set "Signal peak override" to 20,000 because the video contains extremely high brightness. The software sees that your monitor can't handle that level, so it makes the image look duller and darker to fit the screen's capabilities.

Or set "Signal peak override" to 2 if the video has very little brightness. The software knows your monitor is capable of far more, so it artificially boosts the image to make it look brighter.

Important: both parameters can be enabled or disabled as needed. If they're turned off, the software reads the values from the video file's metadata (if present).

Another option that might be useful to you is "Desaturation intensity". If the colors still look dull after all the adjustments — which often happens at low peak brightness levels — just add +10–20% saturation. The lower the value set for this parameter, the less saturated the colors will be.

Nominal Peak Luminance and Signal Peak Override. The difference between nominal peak luminance and signal peak override.

Wrapping up

Working with HDR in VSDC is easier than it seems. Once you understand the logic behind the settings, you'll never be left frustrated by dull, washed-out images — and more importantly, you'll be able to quickly restore the brightness and saturation that made your videos and photos worth capturing in the first place.

Frequently asked questions about HDR

1. Why does my HDR video look dull on my computer?
When playing HDR video on a standard (SDR) monitor, the software automatically compresses the expanded color and brightness range to fit within the narrower SDR limits. As a result, the image loses saturation.

2. Which HDR display mode should I choose?
If you want maximum brightness and vibrancy, select "Force HDR mode". For quick draft editing, "Force SDR mode" works well. "Auto detect" mode only functions when metadata is present in the file and often produces predictable results, though not always optimal.

3. What is "Enhanced color profile" and when should I use it?
"Enhanced color profile" uses your graphics card to more accurately convert HDR colors to SDR. It delivers an image that closely matches the original but requires a modern PC with hardware acceleration support.

4. How do I properly adjust peak brightness?
The "Nominal peak luminance" parameter defines the maximum brightness level your screen is capable of. Adjust this value based on your monitor's specifications and the desired visual outcome. Setting it too low will result in an overexposed image, while setting it too high will make the image look gray and dull.

5. Can I use these HDR settings for videos from a GoPro or iPhone?
Yes, VSDC supports HDR files from GoPro, iPhone and most modern cameras. All the settings described in this article work with any HDR video.

We hope you enjoyed exploring these settings with us! Don’t stop here: keep experimenting with your own projects. We’re sure you’ll achieve even better results that you’ll want to share.

If you have questions or creative ideas to share, we'd love to hear from you at This email address is being protected from spambots. You need JavaScript enabled to view it. or through our social networks: Facebook, X, Reddit or Discord. And remember to check out our YouTube channel for more inspiration!

Refund & Return Policy

This Refund & Return Policy explains how refunds and returns work for digital products purchased directly from videosoftdev.com, including VSDC Video Editor licenses, paid templates, LUT packs, GPS telemetry widgets, animated elements, and animated backgrounds (collectively, the “Products”).

1. Digital products and delivery

All Products offered on this website are delivered digitally. After completing your purchase, you receive an order confirmation and download information by email. Delivery is instant and performed online – no physical shipping or shipping fees apply.

2. 30-day money-back guarantee

We want you to be fully satisfied with your purchase. If you experience technical issues, the Product does not work as described, or you are otherwise not satisfied, you may request a refund within 30 days from the date of purchase.

Our team may first try to help you resolve the issue (for example, by providing troubleshooting steps, updated files, or usage guidance). If the problem cannot be resolved or you prefer not to continue, we will issue a refund in accordance with this Policy.

3. Eligibility for a refund

The following conditions generally apply to refund requests:

  • The request is submitted within 30 days of the original purchase date.
  • The purchase was made directly through videosoftdev.com or our official checkout provider.
  • The Product has not been used in a way that violates the license terms or applicable law.

We may ask you to provide additional information (such as a description of the issue, screenshots, or project details) to help us understand the problem and improve our Products.

4. Non-refundable cases

While we aim to be fair and flexible, we may decline a refund in the following situations:

  • The refund request is submitted more than 30 days after the purchase date.
  • The request concerns a feature or use case that is not included in the Product description or system requirements.
  • There is evidence of abuse of the refund policy, including repeated refund requests for different Products.
  • The purchase was made through a third-party reseller or marketplace. In that case, their own refund policy applies.

5. How to request a refund

To request a refund, please contact our support team and include the following information:

  • Your full name
  • The email address used for the purchase
  • Order number or transaction ID
  • The name of the Product you purchased
  • A brief description of the issue or reason for your request

You can reach us via the contact form on the website or by using the support email provided in your order confirmation. We review each request individually and typically respond within a reasonable time frame.

6. Refund method and timing

Approved refunds are issued to the original payment method used at the time of purchase. Processing times may vary depending on your bank, card issuer, or payment provider, but in most cases refunds are completed within several business days after approval.

We do not charge any additional fees for processing a refund. However, your bank or payment provider may apply their own fees in accordance with their terms and conditions.

7. Exchanges and replacement files

If you received a corrupted file, cannot access your download, or believe you have received the wrong Product, please contact us. In many cases we can quickly resolve the problem by providing new download links or updated files instead of a refund.

8. Changes to this policy

We may update this Refund & Return Policy from time to time to reflect changes in our Products, services, or legal requirements. The effective date of the latest version will be indicated at the top of this page. Continued use of our Products after any changes have been posted constitutes your acceptance of the revised Policy.

9. Contact us

If you have any questions about this Refund & Return Policy or need assistance with your order, please contact our support team using the email This email address is being protected from spambots. You need JavaScript enabled to view it. or contact form on videosoftdev.com.

Page 1 of 43

News

VSDC 11.3 Update: AI Video Generator, Templates & Telemetry

What's new in VSDC 11.3AI image and video generation directly in VSDCAI-powered image editingNew handheld camera, lens correction, and Audio Spectrum templatesExpanded Garmin and DJI telemetry overlaysKey...

VSDC 11.2: Smart search for lost files, GPS data and video sync, H.266 (VVC), accelerated proxy generation even for 4K/8K, keyframe support for shapes and brand-new designer templates

Published by Amy Shao on June 30, 2026 Meet the new major update to VSDC Free Video Editor: version 11.2! Remember how much time you used to spend hunting for lost files in your projects?...

VSDC 11.1 Adds Direct Insta360 Video Editing, GPS Overlays and Auto-Save

Published by Amy Shao on March 11, 2026 What is the best gift for a creative person? New possibilities, of course. With the VSDC 11.1 update, editing footage from Insta360 cameras becomes...

VSDC 10.2: GPS Gauges for GoPro and Other Action Cameras, Selective Export, Metadata Editing, Extended Codecs and Smarter Workflow

published Amy Shao 11/19/25 Meet the long-awaited VSDC 10.2 update: a new version packed with incredible features and significant enhancements designed to empower all of you, from hobbyists to professionals. GPS...

Major VSDC 10.1 Update: Advanced HDR, GPS Telemetry, New Effects, Great Variety of New Templates and Tools For Different Needs

published Amy Shao 6/10/25 The wait for something new and unusual is finally over! The update is here and it isn’t just another version: it’s VSDC 10.1! VSDC 10.1 Update: Advanced HDR, GPS Telemetry,...

VSDC Christmas Update 9.4: Enhanced Effect Management, 100+ Background Templates and Streamlined Editing

This holiday season embraces new beginnings with the latest update of VSDC Video Editor! We’ve listened to your feedback and decided to focus on enhancing the tools you love most—all while laying the...

How VSDC Free Became My Secret Weapon for Watermark (Free 4K Editing in 2025)

Hi, I'm Mattea Wharton, a travel videographer from Seattle. For three years I battled with video editors that slapped ugly watermarks on my videos until I found VSDC. This free no-subscription editor completely...

VSDC 9.3: 150+ Templates, Text Transformer, Sprite Auto-Detect and GUI Update

Change is all about improvement, and this process wouldn't be possible without your input. After carefully reviewing your feedback, we’ve addressed several key issues and introduced updates designed...

Best Special Effects Software

Intro In 2024 the options range for creating visual effects is incredibly diverse and it becomes more and more challenging to identify the top choices. Here you can find a guide to the top visual FX...

VSDC 9.2: AI Segmentation Models, 300+ Transitions, VSDC Cloud and New Templates Pack

Are you ready to explore new heights with the latest major VSDC update? Finally, Version 9.2 is here! Packed with groundbreaking features, including the new AI-powered Segmentation tool, this update offers...
 

Screen Recorder Box

This program allows you to capture the video of your desktop and save it on your PC in various formats. Coupled with a video editor, the program is a great tool for creating presentations, tutorials and demo videos.

Read more about Screen Recorder...


Video Capture Box

The program captures video from external devices and records it to computer in a free format. You can save video from video tuners, webcams, capture cards and other gadgets.

Read more about Video Capture...

VSDC Video Editor Reviews & Ratings (Trustpilot, Capterra & Media)

VSDC Free Video Editor is rated 4.5/5 by real users on Trustpilot and Capterra. Here are a few reviews and quotes from creators and tech media.

Overall rating: 4.5/5 based on 200+ reviews on Trustpilot and 89 reviews on Capterra.

★★★★⯪

VSDC Free Video Editor is the best free video editor for Windows I’ve used, from color grading to picture-in-picture and cinematic results.

— Ejikeme Eloka Augustine

Source:Trustpilot

★★★★☆

Easy-to-use interface and quick export to social media make VSDC a versatile video editing tool for everyday projects.

— Karen C., E-Learning

Source:Capterra

★★★★☆

A feature-packed non-linear video editor for Windows that can compete with many paid video editing solutions.

— TechRadar

Source:TechRadar review

★★★★★

The free VSDC editor saved my YouTube channel – a powerful video editing software for chroma key, text effects and picture-in-picture.

— Paul Roberts

Source:Trustpilot

★★★★★

Fast and simple for YouTube videos with green screen, zoom, color tools and creative effects in one app.

— Marie R., Media Production

Source:Capterra

★★★★★

One of the best free video editor options for Windows users, ideal for GoPro, YouTube and family videos.

— VidProMom, YouTube creator

Source:Media reviews

★★★★★

I’ve been using VSDC for years; editing is easy and the final videos look great for my personal and professional projects.

— Long-time VSDC user

Source:Trustpilot

★★★★★

Great value and faster than many other free tools; I quickly create videos for YouTube, Instagram and Facebook with features my audience loves.

— Rabika B., Marketing & Advertising

Source:Capterra

★★★★★

VSDC offers many features you don’t usually find in free editors, including picture-in-picture, stabilization and modern codec support with no watermarks.

— Tech media review

Source:Media reviews