 User Help Manual
  Learn FAQ
  Send us feedback
 ")


- Published by Amy Shao on June 30, 2026 Meet the new major update ...
- Published by Amy Shao on March 11, 2026 What is the best gift for...
- published Amy Shao 11/19/25 Meet the long-awaited VSDC 10.2 update: a new ve...
- Hi, I'm Mattea Wharton, a travel videographer from Seattle. For three years I ba...
Free 360 Video Editor and 3 Tips for Making the Most Out of It
The world of video production is moving fast. Just a couple of years ago we were excited about having a GoPro and the perspectives of shooting in 4K. Today, on Amazon, you’ll find a dozen of cameras capable of shooting 360° videos and available at any budget – from less than $100 to over $1000.
But what about 360 video editors? How is video editing software market catching up with the camera manufacturers? Apparently, quite well. Along with expensive software developers like Adobe, freeware providers have recently joined the 360°-degree club too. So, even if you broke your piggy bank to purchase that cutting-edge camera, it doesn’t mean you’ll have to break another one for purchasing a program to edit what you’ve shot. You can edit spherical videos at zero cost.
In this post, we’ll review VSDC, free 360° video editing software for Windows, and share a few tips on how to make the most out of it taking 360° video specs into consideration.
Download VSDC – Free Video Editing Software for Windows
But first, how is a 360° video editor different from regular one?
The answer is – barely.
Don’t let the terminology intimidate you. The difference between editing a regularly-angled video and the one shot in 360° degrees, is that you first need to “flatten” the latter to achieve a convenient user-friendly view if you’re planning to cut out a fragment or add text. This process is called rendering, and different tools render 360° videos in a slightly different manner. For instance, here is how a 360° video looks in VSDC after you import it and flatten to a 120-degree panorama angle that is much easier to work with.
How to open a 360° video for editing?
Launch VSDC and import your 360° video file – it will be automatically placed on the timeline. After that, go to the Video Effects tab in the top menu, choose 360 and 3D and click on the 360 to 2D option.
Depending on the camera type, your video will either look like a panorama or a divided screen. In the case of the latter, you’ll need to change the type of 360 video. To do that, go to the Properties window on the right and choose between Equirectangular format and Equi-Angular Cubemap. After you get the right view, choose a 90-degree angle or a panoramic 120-degree angle. You can also move around the sphere – both horizontally and vertically. In the same Properties window, choose X angle or Y angle and either change the values using arrows or manually drag the cursor on the timeline. Below is a video instruction on how to perform everything we’ve just talked about.
Moving the sphere, you get full control of the picture and can always check what’s seen from other angles to cut out the unnecessary fragments.
Cutting and merging a 360° video in VSDC
Cutting an unnecessary fragment out of a spherical footage is not different from cutting a regular video. Once you’ve imported the 360 video to VSDC and rendered it to 2D, scroll through the timeline and use the Cutting and Splitting menu at the top to get rid of the bad shots. Note that when you remove a fragment of a video, that time period is removed from your entire spherical footage. Merging files and adding transitions is just as simple.
Important: when you finish the editing process, you’ll need to remove the “360 to 2D” effect before saving your file. Otherwise, the video will be saved as flat 2D footage. To remove the “360 to 2D” effect, simply click on it on the timeline and hit Delete.
Adding titles and images in a 360° video editor
When you add objects – titles or images – to a 360° video, keep in mind you’re not placing them on a flat surface, but on a spherical one. In other words, the edges of the added object will be slightly curved to fit the shape of the video. Use the X-angle and the Y-angle properties to find the area you want to work with and then go to the Add object tab in the top menu. If you want to add a title, choose “Text” and use the built-in text editor to adjust the style of your title.
As a rule of thumb, you want to place titles at a natural eye level or slightly above it to make sure they get seen. Another recommendation provided by Jamie Stark at Stanford Journalism is keeping the font below 35 pt. so that it would look big enough for comfortable reading but not too big to avoid excessive curving.
Adding images works the same way. Go to “Add object” tab and choose Image, then import a file from your PC.
Important: if you want a title or an image to be attached to a specific area on the 360 video, you need to add it before rendering it to 2D. After adding a text object, you need to export the video “as is” and then open it in VSDC once again if you need to make further edits.
If you add a title after the rendering process, the title will stay exactly where you place it in the frame and will be seen in the same spot even when the viewer “looks around” just like in the illustration above.
Exporting a 360° video after editing
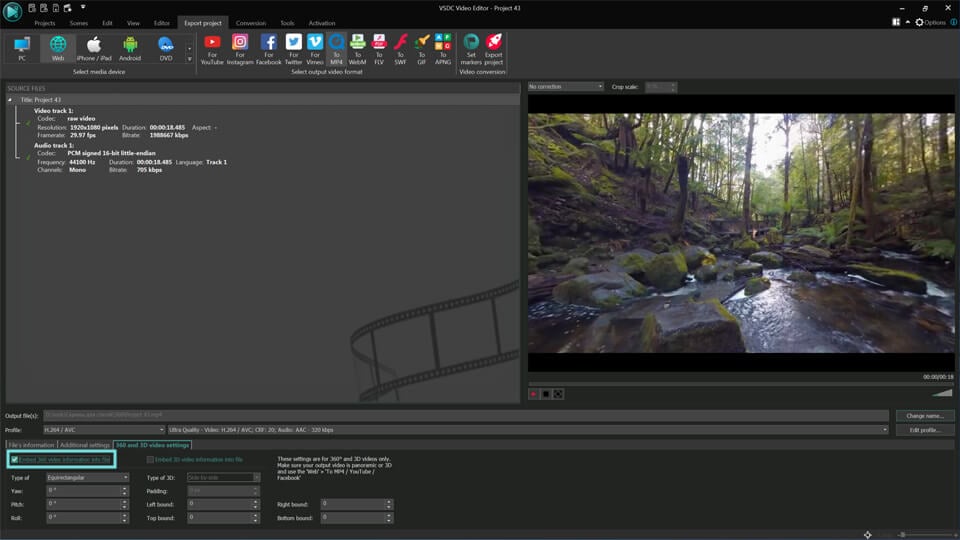
Once you’re finished editing the video, go to Export project tab in the top menu and choose the option that fits your goals. For the highest quality, use Web export profile and MP4 format. Then go to the bottom menu and open 360 video settings tab. YouTube, Facebook and some other 360 video players require each spherical video file to contain metadata that enables 360° playback. That’s why the “Embed 360 video information into file” box must be checked and the 360 video type chosen correctly. Otherwise video players will not be able to recognize your file as a 360° video and may display it as flat 2D footage.
Keep in mind, that 360° videos are typically much larger than regular videos but trying to reduce the size by lowering the quality is never a good idea. So keep this parameter as high as possible. We talk about how important resolution is a couple of paragraphs later.
If you’re planning to upload the video to Facebook or YouTube, choose For YouTube or For Facebook export profiles. They are pre-configured to match these social networks video upload requirements, so we always recommend using them when applicable. For Facebook, 720p will be the maximum resolution acceptable, however for YouTube, you can always set a higher resolution if your original video quality allows that. To change video resolution, open a drop-down Profile menu and choose between 4K, 2K, and 1080p.
Tips for working with 360° video
Although we’ve mentioned that using a 360° video editor is not too different from editing regular footage, there are some general tips you should be aware of before you get to the post-production process.
Use additional equipment when recording
360° cameras have plenty of unbeatable advantage, but you’ll also need to learn a couple of tricks to operate them. One is remembering that literally everything around your device is being recorded. When you have a regular camera with a limited viewpoint, you are in control of what will be in the footage. With a spherical camera, it’s not just unexpected passersby, but your face and even your fingers are being recorded pretty close if you’re holding it in your hand. To avoid that, you might want to use a monopod or a tripod if you want the camera to be shooting independently.
Don’t get too close to the objects you’re shooting
Another important rule is keeping at least a couple of foot distance between the camera and the object you’re recording. Being too close will create the unnecessary fisheye effect and stretch the image. Besides, you should place the camera at the same spot where you imagine a viewer’s eye level would be if they were present to witness the events you recorded. Finding unusual angles might add an interesting perspective for a moment, but you should always think of those who will be watching the video and choose the most convenient viewpoint.
Keep the resolution as high as possible
Video quality is crucial when it comes to 360° videos, especially knowing that some viewers may actually watch your movie with a headset expecting a great experience. You should also remember that YouTube and Facebook 360° video players are known to compress quality drastically. That’s why when shooting, you want to set the highest resolution possible and when you export it from the video editor, you want to keep it the same.
If you choose VSDC as your 360° video editor, remember that it allows you to keep the highest output quality. So, when you have a chance to shoot in 4K – do it, because after editing you’ll be able to export the video with zero quality loss.
Frequently asked questions
1. How to start working with 360° video in VSDC?
Simply import your file into the program and the editor will automatically recognize the format.
To make the video editable, you need to apply the "360° to 2D" effect. You can do this either through the Editor menu (select "Video Effects" → "360° & 3D") or via the right-click context menu on the file in the timeline (choose "Video Effects" → "360° & 3D").
2. Are there any differences between editing 2D and 360° video in VSDC?
Once the 360° to 2D effect is applied, the editing process is essentially the same as working with regular 2D video, the same tools and editing operations can be used.
3. Are panoramic video and 360° video the same thing in VSDC?
Not exactly. All 360° videos are considered panoramic, but not all panoramic videos are spherical 360° videos. "Panoramic video" is a broader term that covers various wide‑format videos, while "360° video" is its full spherical variant that provides a complete view in all directions.
If you have any further questions, feel free to send them to us at: This email address is being protected from spambots. You need JavaScript enabled to view it..
Watch us on YouTube
 / @VSDCFreeVideoEditor
© 2011-2026, www.videosoftdev.com, FLASH-INTEGRO LLC. Privacy policy | Terms of use | About us
All trademarks referenced herein are the sole property of their respective owners.
Copying any materials from this site allowed only with written consent of Site Administration.