


 Видео редактор
 Видео конвертер
 Аудио конвертер
 Каталог шаблонов
 Cloud
Cloud


Quick start:
- Open the Templates window
- Search or browse for a template
- Preview it before applying
- Add it to the timeline
- Customize it in the Properties window
- Save your setup as a reusable custom template
Template access
Free: use and export without restrictions.
PRO: available for editing, but export requires VSDC Pro.
Premium: sold separately as template packs. After purchase and activation, both Free and Pro users can export projects that use them.
Anyone who edits videos knows how repetitive certain tasks can become: adding the same fade, applying the same color correction, or rebuilding the same title design project after project. Instead of recreating these settings every time, VSDC lets you save and reuse them as templates.
VSDC includes a built-in template library designed to speed up repetitive editing tasks. In this guide, we'll explain what VSDC templates are, how the Templates window works, how to search and preview templates, how to organize the library, and how to create and customize your own reusable presets.
This guide focuses on using, organizing, and creating templates inside VSDC. For information about purchasing and activating Premium template packs, see VSDC Premium Templates.
Download VSDC Free Video Editor
What Are Templates in VSDC?
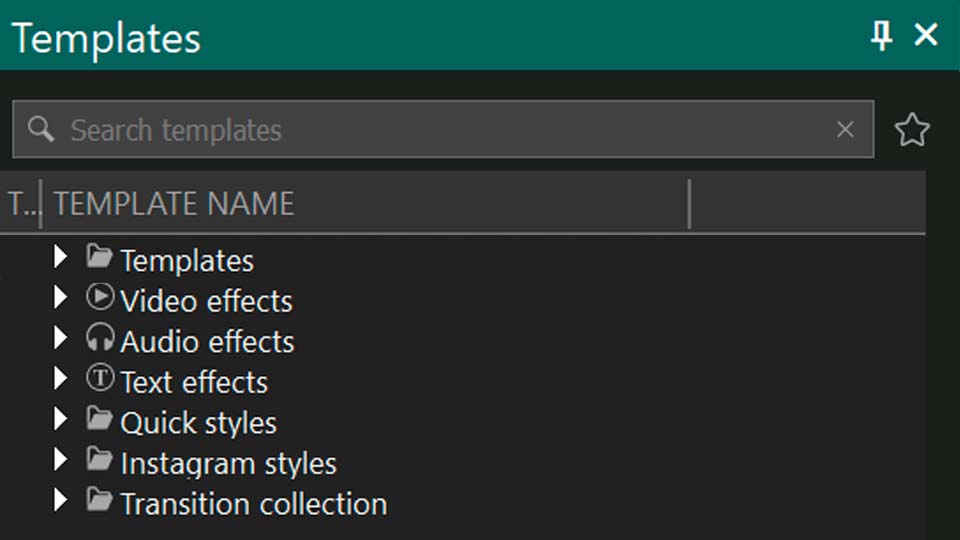
In VSDC, the word "templates" covers much more than a small set of presets. The Templates window combines several groups of reusable editing elements:
- Transition collection: transitions ranging from simple fades to more dynamic scene changes.
- Templates: ready-made collections for social media, presentations, vlogs, slideshows, and other projects.
- Video effects: color correction, stylization, distortion, and other visual effects.
- Audio effects: equalizers, reverb, filters, and other sound-processing tools.
- Text effects: animated titles, subtitles, intro screens, and other text-based designs.
- Styles: reusable visual settings for different object types, including color palettes, gradient fills, and more.
Free vs. PRO vs. Premium Templates
Templates are divided into three categories based on access and export requirements:
| Category | How to recognize it | Access and export |
|---|---|---|
| Free | No special badge | Available to all users and can be exported without template-related restrictions. |
| PRO | PRO badge and lock icon | Can be applied in the editor, but exporting a project that uses them requires VSDC Pro. |
| Premium | Crown icon; blue means the template still needs to be downloaded, yellow means it is ready to use | Purchased separately as template packs. After purchase and activation, both Free and Pro users can export projects that use them. |
Besides ready-made templates, you can create your own reusable presets by combining effects, transitions, text objects, color settings, shapes, and animations. This is useful for recurring editing tasks or for keeping a consistent visual style across multiple projects.
How to Use the Templates Window
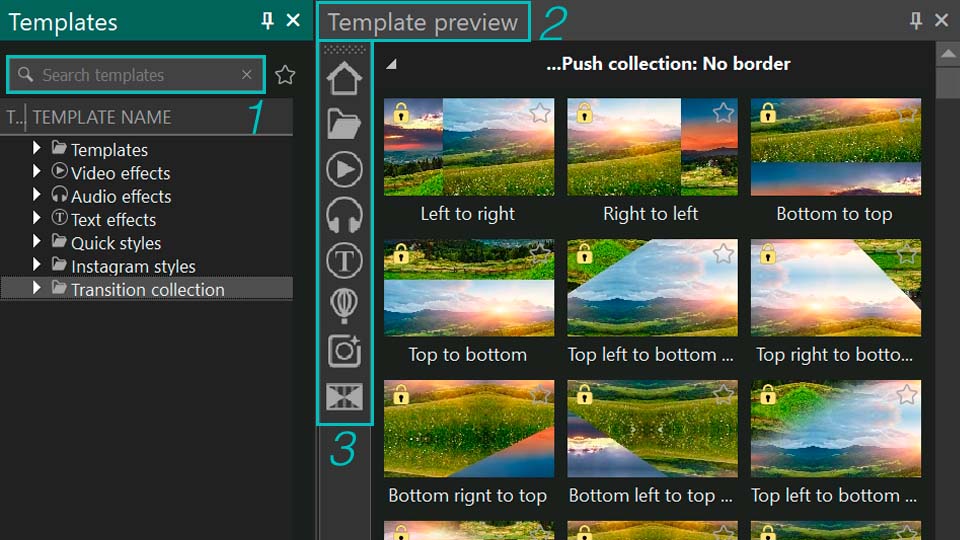
The Templates window is the main library for browsing and managing VSDC templates. In the classic workspace layout, it is usually available on the left side of the editor. If the window is hidden, open the View tab and enable Templates, or press Ctrl+9.
The window contains several tools that make it easier to work with a large template library:
- Search: the search bar at the top of the Templates window helps you quickly find a template by name.
- Preview: click the arrow on the right edge of the Templates window to open the template preview area. This lets you inspect a template before applying it.
- Quick Access: the vertical toolbar on the left side of the preview area lets you filter what is shown. The available buttons display all templates, thematic templates, video-effect templates, audio-effect templates, text-effect templates, transitions, or My Templates.
Customize the Quick Access Toolbar
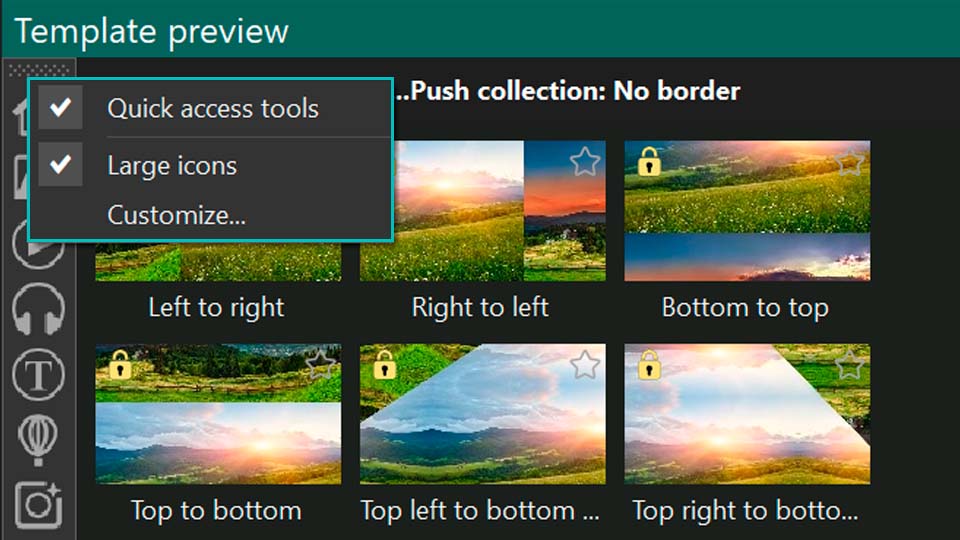
The Quick Access toolbar can be customized. Right-click the toolbar and choose the option you need:
- Quick access tools: hides the toolbar. To show it again, open the View tab and enable Quick Access.
- Large icons: switches between large and small toolbar icons.
- Customize: opens the Commands and Options settings window. In the Commands tab, you can drag available commands directly onto the Quick Access toolbar. The Options tab controls how tooltips are displayed.
Each template shown in the preview area has its own icon. To replace the icon, right-click it and select Change the icon. You can choose one of the built-in symbols or load your own image using the file option.
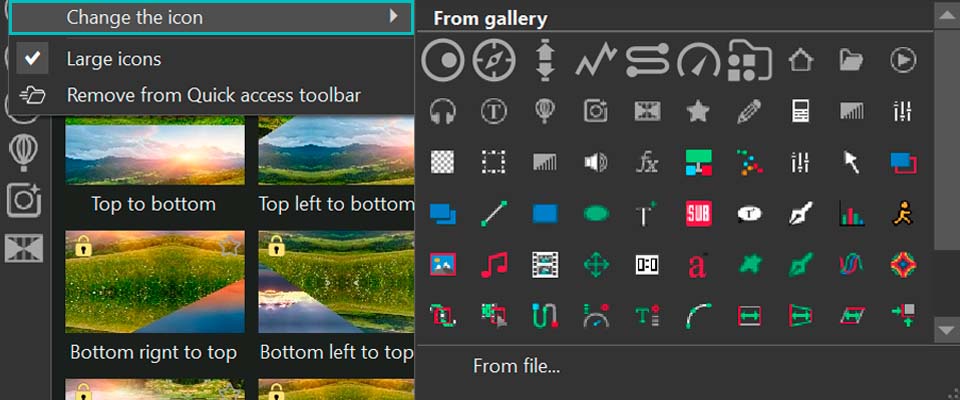
To remove an unwanted button from the Quick Access toolbar, right-click it and select Remove from Quick access toolbar. The shortcut can be restored later from the main Templates window.
Template Library Controls
The toolbar at the bottom of the Templates window contains several library-management controls:
- Filter icon: filters the current search results and helps you keep only the required template type.
- Plus icon: saves or adds a new template to the Templates window. This is the same control you can use when saving your own template.
- Trash icon: removes selected templates from the Templates window.
- Sync icon: synchronizes the local template library with the VSDC server. The library is updated over time with new Free, PRO, and Premium templates as well as updated versions of existing templates, so periodic synchronization keeps the local collection current.
Any downloaded or user-created template occupies disk space on your PC, so large libraries may also need occasional cleanup.

How to Organize, Preview, and Manage VSDC Templates
To see the actions available for a template or template group, right-click it in the Templates window. The context menu contains the commands used to purchase, activate, save, organize, preview, and configure templates.
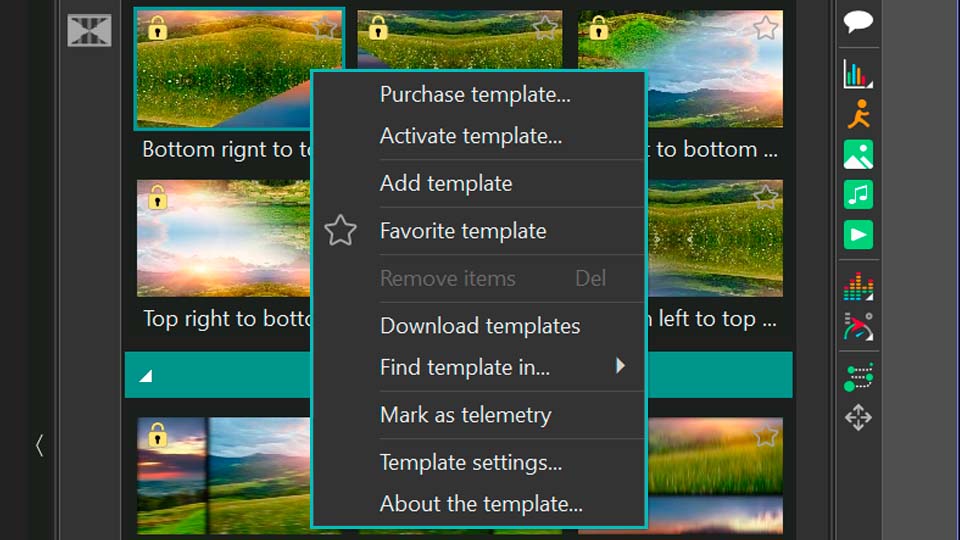
Purchase, Activate, and Download Premium Templates
Purchase template is available for Premium templates and opens the corresponding purchase page. To make a purchased Premium template available for use, choose Activate template and enter the license key you received for it. Restart VSDC after activation to complete the process.
If a Premium template or template group has already been purchased but is not installed locally, use Download templates to download it into VSDC.
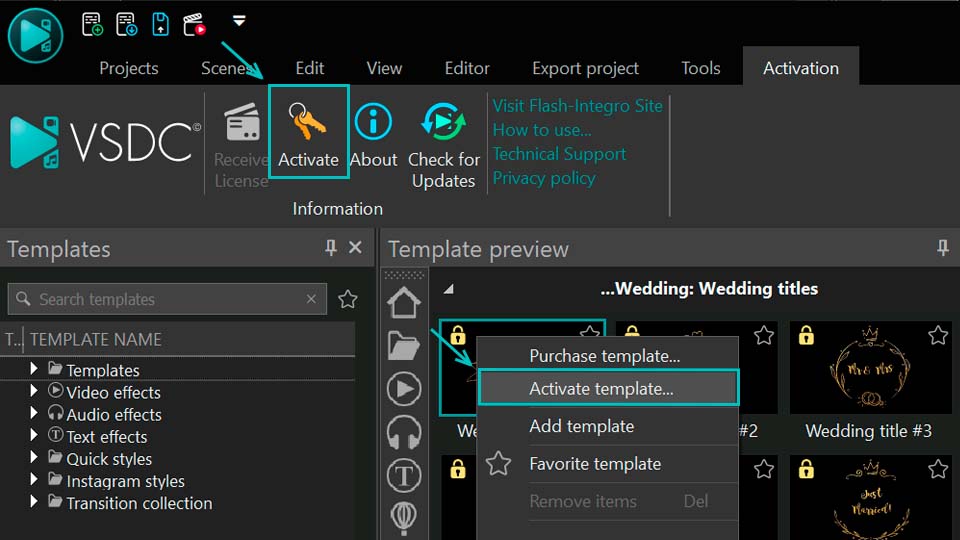
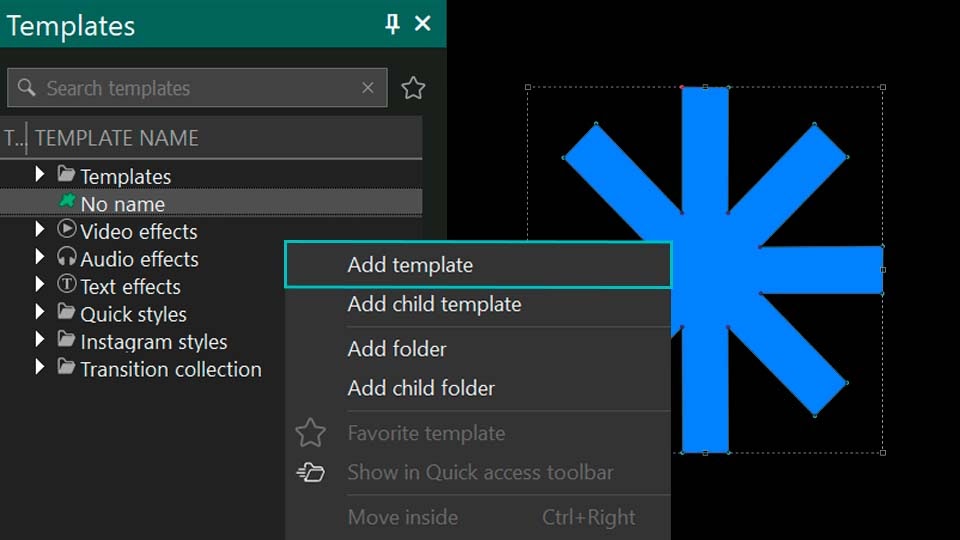
Add Templates and Build a Folder Hierarchy
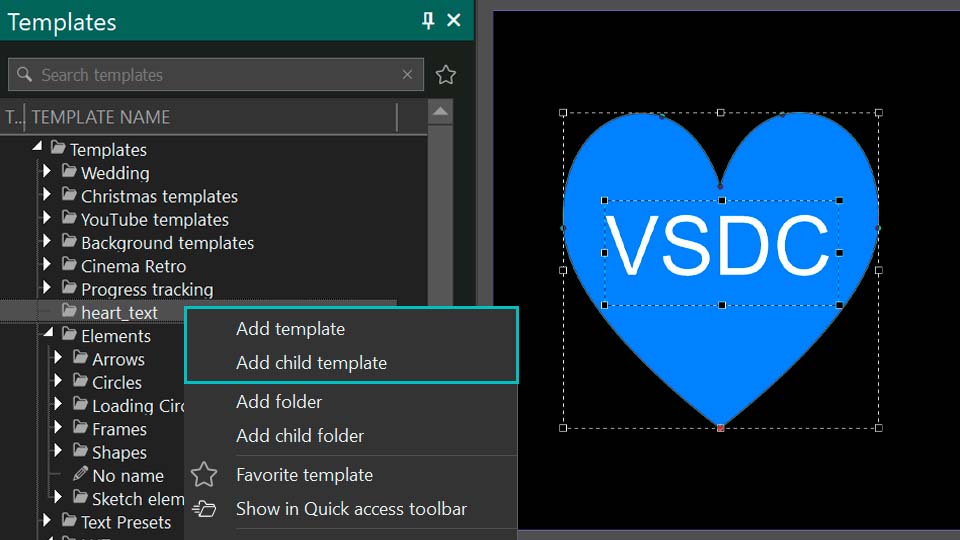
Add template saves a user-created effect or group of objects in the Templates window. Select the object or effect on the timeline, choose the destination folder in the Templates window, right-click the folder, and select Add template.
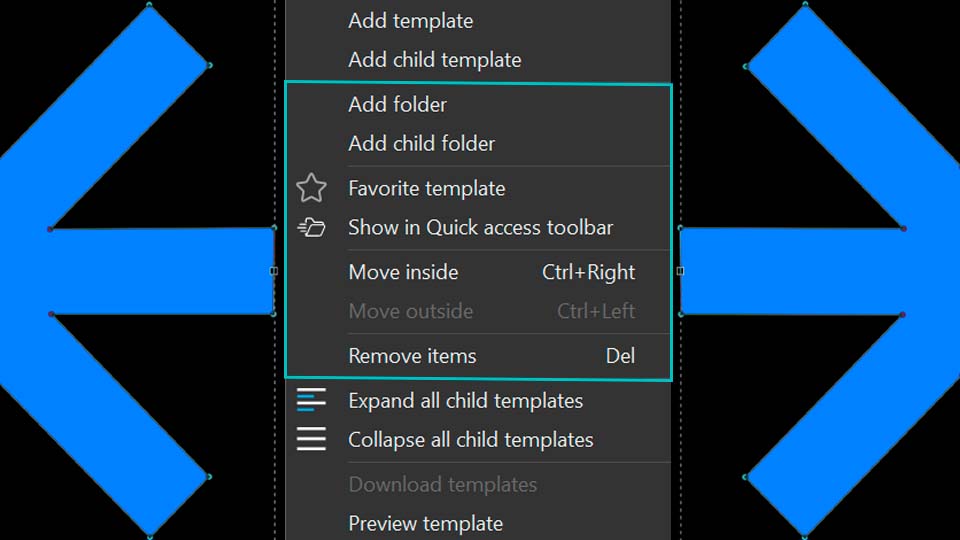
Add child template saves the new template inside another template, creating a hierarchy for editing. Add folder creates a folder at the same level as the selected item, while Add child folder creates a folder inside the selected item.
Favorites and Quick Access
Favorite template adds a template to Favorites. To display favorite templates later, click the star icon next to the search bar or use the filter at the bottom of the Templates window and select Show Favorites.
Show on Quick access toolbar adds a selected template or template group to the Quick Access toolbar. The same command can restore a Quick Access icon that was removed earlier. For example, if you remove the Video effects shortcut, find the Video effects group in the Templates window, right-click it, and select Show on Quick access toolbar.
Move, Remove, Expand, and Collapse Items
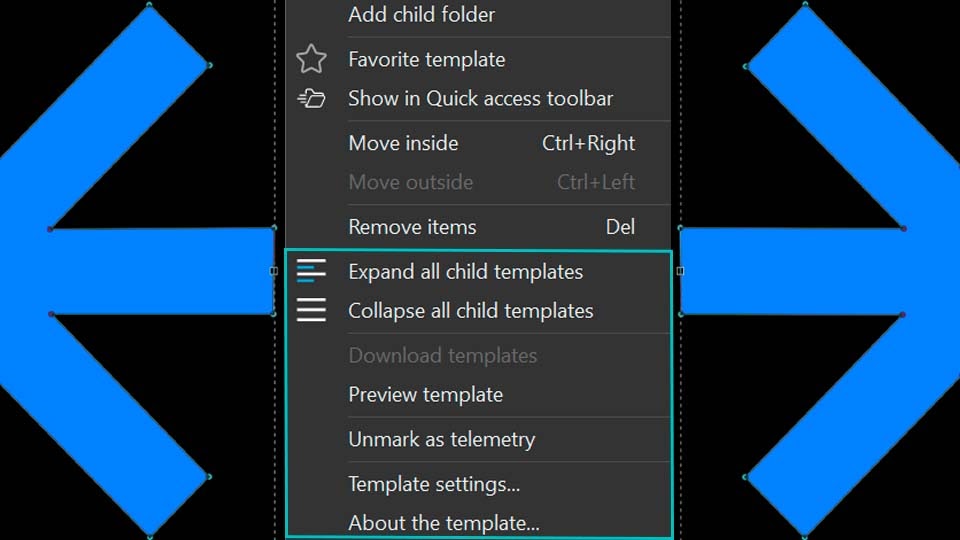
Move inside moves the selected item one level down into another item located above it at the same hierarchy level. Move outside performs the reverse operation and moves the selected item one level up.
Remove items deletes the selected item from the Templates window. Expand/Collapse all child templates expands or collapses all nested items in the tree at once, which is faster than opening each node manually.
Preview a Template Before Applying It
Preview template opens the preview area so you can evaluate the contents of a template before applying it to the project.
Mark a Template as Telemetry
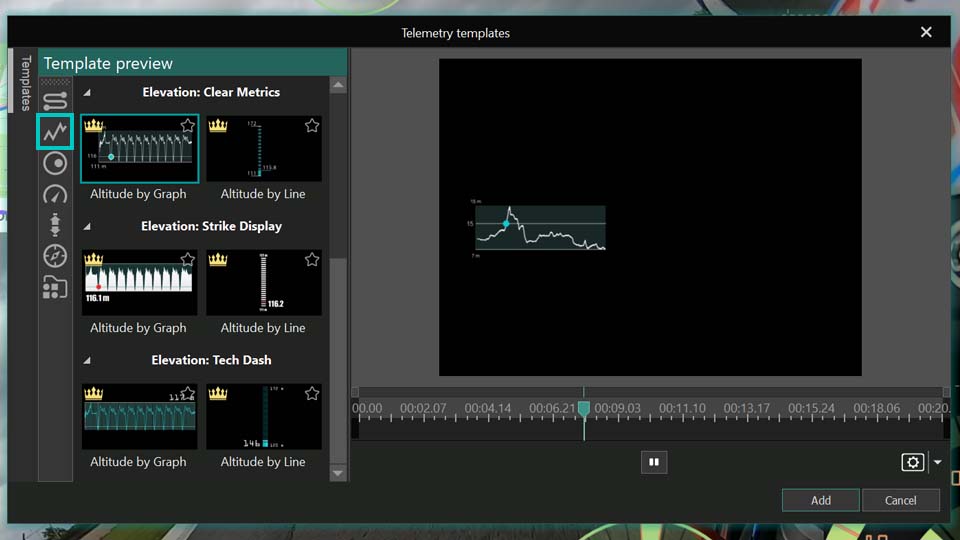
Mark as telemetry adds the selected template to the telemetry template collection. The technical workflow can be demonstrated with any suitable template; for example, if you mark Wedding title #8 as telemetry, it will then appear in the telemetry template browser.
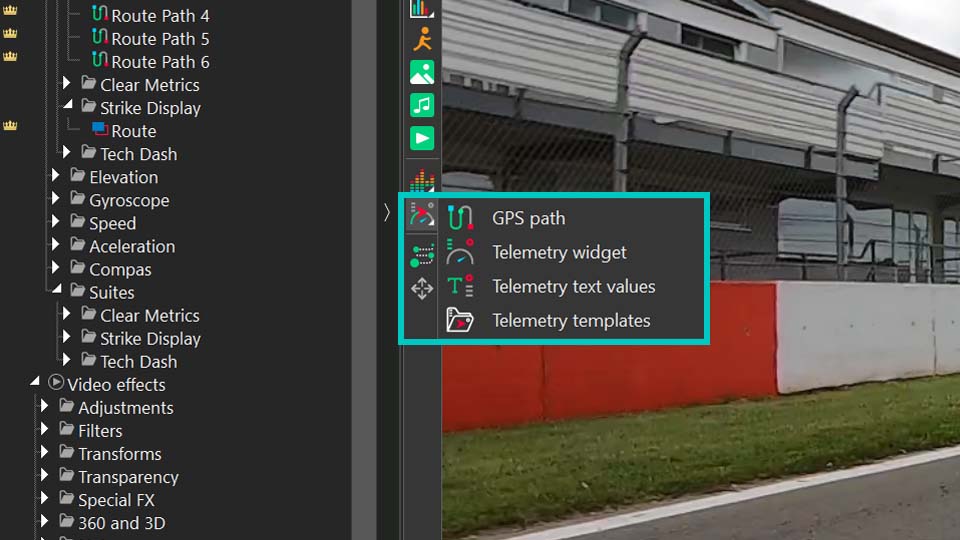
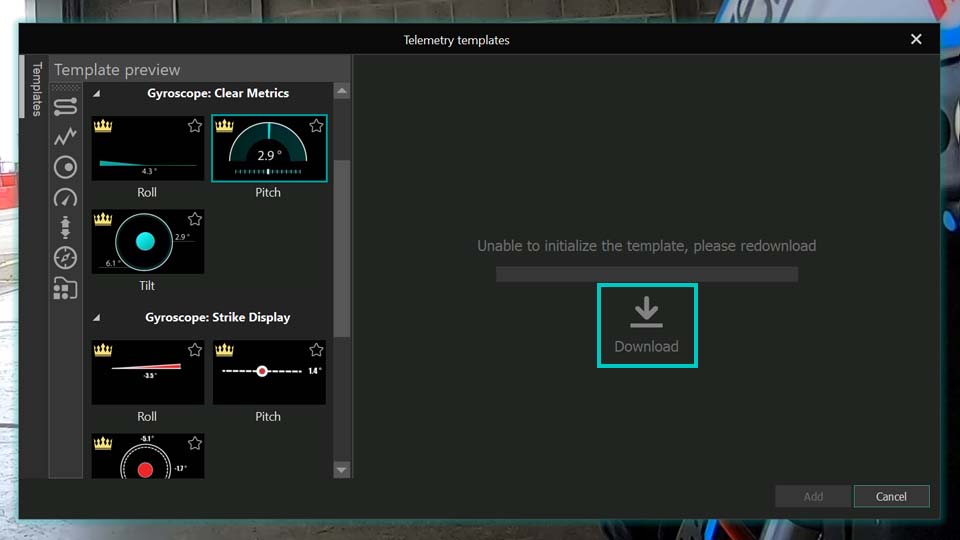
To open that browser, go to the Objects toolbar on the left side of the main preview area, click Add telemetry, and choose Telemetry templates. In the Telemetry templates window, click the vertical Templates label on the left to expand the complete list. A template previously marked as telemetry can then be found in this collection. Use Unmark as telemetry to remove it from the telemetry selection.
For the complete GPS workflow, see How to add GPS and telemetry overlays to video in VSDC.
Template Settings Explained
Select Template Settings from the context menu to configure the template. The most important options are described below.
Included in effect presets
This option controls whether a template variation is available in the Presets list of the corresponding effect. The Crop video effect is a useful example. Expand it in the Templates window and you can see several variants, including Crop, Crop and resize, and Crop only. If Included in effect presets is enabled for these variants, they appear in the Presets parameter of the Crop effect in the Properties window.
To verify this, place one of the Crop variants on the timeline, select it, open its Properties window, and expand Presets. The available Crop variants will be listed there. If you disable Included in effect presets for a specific variant such as Crop and resize, that variant will no longer appear in the Crop effect's Presets list, although the template itself remains in the Templates window.
Use as a transition
If a template should work as a transition, for example in a slideshow, enable Use as a transition. When that template is used, VSDC automatically places it at the end of the parent object so it can create a transition to the next object.
Use Template Duration
If Use Template Duration is disabled, the template stretches to cover the full duration of the parent object. When the option is enabled, VSDC uses the duration stored inside the template itself.
You can see the difference with the Fairy light template. Open its Template Settings and disable Use Template Duration, then place the template inside an object on the timeline: the template will stretch to the full duration of the parent. Next, enable Use Template Duration and place the same template inside the same parent object again. The two instances of the same template will have different durations because the second one keeps the duration defined in the template.
Thumbnails path / Path to template preview video
These parameters configure the template preview. You can assign an image and/or a video that demonstrates how the template works before it is used in a project.
About Template
About Template is intended for Premium templates. It opens the web page for the selected template so the user can proceed to its purchase page.
How Template Timing Works in the Properties Window
Once a template is on the timeline, its behavior is controlled through the Properties window. We will not repeat every property here because a template can contain different VSDC object types such as video, audio, text, or effects. The timing parameter that matters most when configuring or creating a template is Lock to parent object duration, which appears in both the Object creation time and Object drawing duration sections.
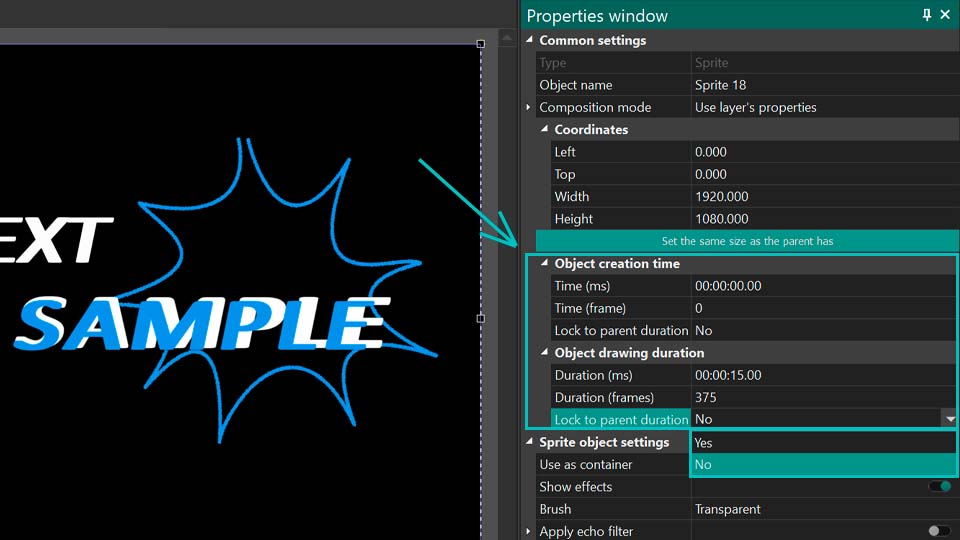
The two occurrences of the parameter affect different boundaries of the child object. Their behavior is as follows:
| Parameter | Value YES | Value NO |
|---|---|---|
| Object creation time | The beginning of the child object stays in place when the beginning of the parent moves. | The beginning of the child object moves together with the beginning of the parent. |
| Object drawing duration | The end of the child object moves together with the end of the parent. | The end of the child object stays in place when the end of the parent moves. |
Because these two settings can be combined, the same template can react differently when the start or end of its parent object is changed. Let's look at all four combinations.
1. Object creation time: NO / Object drawing duration: NO
With both values set to NO, the beginning of the child object (the template) moves together with changes to the beginning of the parent, while the end of the child object does not depend on changes to the parent's end.
If you move the end of the parent object, the child object does not react. If you move the beginning of the parent, the beginning of the template moves in the same direction by the same time offset. The duration of the child object does not change, so its end also moves by the same amount. In other words, the entire child object moves as a single unit.
2. Object creation time: NO / Object drawing duration: YES
In this combination, the beginning of the child object moves together with the beginning of the parent, while the end of the child object is linked to the end of the parent.
If you move the end of the parent to the right or left, the end of the template moves in the same direction by the same time offset. The beginning of the template remains in place, so the template's duration changes.
If you move the beginning of the parent, the beginning of the template moves in the same direction by the same amount. The end of the child object remains in place, so the template's duration changes again.
3. Object creation time: YES / Object drawing duration: NO
Here, the beginning of the child object stays in place when the beginning of the parent moves, and the end of the child object stays in place when the end of the parent moves. With this combination, VSDC moves the child boundary that is opposite to the parent boundary being changed.
- If the beginning of the parent moves, the end of the child moves in the same direction, because the child's beginning must remain fixed.
- If the end of the parent moves, the beginning of the child moves in the same direction, because the child's end must remain fixed.
The child object's duration changes in both cases.
4. Object creation time: YES / Object drawing duration: YES
With both values set to YES, the beginning of the child object stays in place when the beginning of the parent changes, while the end of the child object follows the end of the parent.
Changing the beginning of the parent has no effect on the child object. If you move the end of the parent, the end of the child moves in the same direction by the same time offset. The child object's duration remains unchanged, so its beginning also moves together with its end by the same amount. As a result, the whole child object shifts while keeping its original duration.
Summary of the Four Combinations
| Combination | Child duration | Behavior |
|---|---|---|
| NO / NO | Does not change | The entire child object moves when the parent's beginning moves; moving the parent's end has no effect. |
| NO / YES | Changes | Only one child boundary moves: the beginning when the parent's beginning moves, or the end when the parent's end moves. |
| YES / NO | Changes | Only one child boundary moves: the beginning when the parent's end moves, or the end when the parent's beginning moves. |
| YES / YES | Does not change | The entire child object moves when the parent's end moves; moving the parent's beginning has no effect. |
These combinations let you define exactly how a template should respond when the timing of its parent object changes in a new project.
How to Create Your Own VSDC Template
When working with templates, it is useful to think of a template as a ready-made project or object setup that you want to reuse. Creating your own template therefore comes down to building the required composition on the timeline and saving it inside VSDC.
Step 1: Build the Future Template
Create the effect or composition you want to save. It can be a transition, a combination of video and audio effects, an image with configured properties, a group of shapes, text objects, animation, or another reusable combination. Configure every element in the Properties window before saving the template.
Step 2: Select All Template Elements
When the setup is complete, select all timeline objects that should be included in the future template.
Step 3: Save the Template in the Templates Window
Open the Templates window. You can save the template in either of two ways:
- Create your own folder first: right-click in the Templates window, choose Add folder or Add child folder, and enter a name. Then right-click the new folder, choose Add child template, and name the template.
- Save directly: right-click in the Templates window and choose Add template, or click the plus icon at the bottom of the Templates window, then enter a name for the new template.
Step 4: Open Template Settings
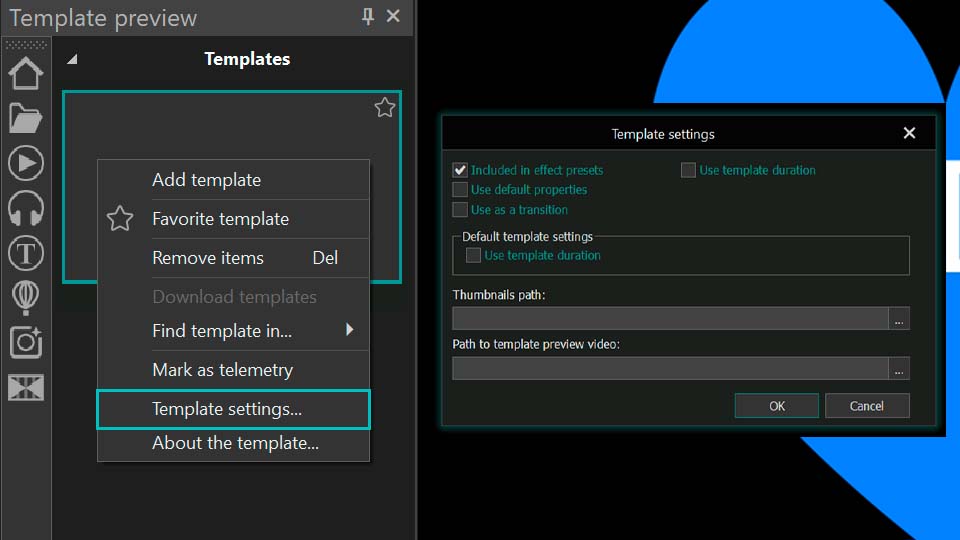
Right-click the saved template in the Templates window and select Template Settings.
Step 5: Configure the Saved Template
Set the required options in the Template Settings window. These can include Included in effect presets, Use as a transition, Use Template Duration, telemetry-related options, and preview-media paths, depending on how the template is intended to be used.
Conclusion
The Templates window can save a significant amount of time when you reuse the same effects, transitions, titles, color settings, or animated elements across projects. You can start with built-in Free, PRO, or Premium templates, organize the library around your workflow, and save your own editing setups as reusable custom templates.
For questions about VSDC or template activation, use our support form.
Frequently Asked Questions
How do I save my own template in VSDC?
Select the objects you want to reuse on the timeline, open the Templates window, and either click the plus icon or right-click and choose Add template. Then enter a name for the template.
Are VSDC templates free?
VSDC includes Free, PRO, and Premium templates. Free templates are available without template-related restrictions. PRO templates can be used in a project, but exporting the final video requires VSDC Pro. Premium template packs are purchased separately; after purchase and activation, both Free and Pro users can export projects that use them.
Why can't I export a project that uses some templates?
If a template has a PRO badge, exporting requires VSDC Pro. If it has a Premium crown, you need to purchase and activate the template pack that contains it.
How do I activate a purchased Premium template?
Open the Templates window, right-click the purchased template, choose Activate template, and enter the license key you received for it. Restart VSDC after entering the key so the activation is finalized.
How do I mark a template as a favorite?
Right-click the template and select Favorite template. To show only favorites, enable Show Favorites or click the star icon next to the search bar.
How do I add a template to the Quick Access toolbar?
Right-click the template or folder and select Show in Quick access toolbar. To remove an icon, right-click it on the toolbar and choose Remove from Quick access toolbar.
What does "Lock to parent object duration" do?
The parameter controls how a child object reacts when the start or end of its parent changes. Under Object creation time, YES keeps the child's start in place while NO makes it move with the parent's start. Under Object drawing duration, YES makes the child's end move with the parent's end while NO keeps the child's end in place.
How do I preview a template before applying it?
Select Preview template from the context menu, or open the preview area using the arrow on the right side of the Templates window.


 Присоединяйтесь к нам
  Смотрите нас на YouTube
 / @VSDCFreeVideoEditor