Video Editor

Use free video software to create and edit videos of any complexity from a family greeting card to a company presentation. Cut, merge video files, apply visual and audio effects, use filtration and image correction, make slideshows and add an appropriate soundtrack. Use multi-color Chroma Key and advanced parameters settings to give your video a professional look. All popular video and audio formats are supported.

Read more about Video Editor...

Video Converter

This program is intended for converting video files from one format to another. Nearly all popular video formats are supported (both reading and saving). In addition, the program drastically simplifies the task of converting videos for playback on specific multimedia devices, such as iPhone, Samsung Galaxy or Huawei P30 Pro. The program is extremely easy to use, has a modern interface and all necessary video processing functions.

Read more about Video Converter...

Audio Converter

The audio converter will help you convert audio files from one format to another. All key audio formats and codecs are supported. The program also allows you to manage playlists and meta tags, extract audio from video files and save these tracks on your computer in any format.

Read more about Audio Converter...

Audio CD Grabber

This audio tool is intended for grabbing audio tracks from compact discs and saving them to the user’s computer in any format. Nearly all popular audio formats and codecs are supported. The program can also extract track details from the FreeDB server for automatic file renaming and updating meta tags.

Read more about Audio CD Grabber...

Multifunctionality

Multifunctionality

A wide array of multimedia processing tools in one free video software suite.

High speed

High speed

Our programs use fast
and high-quality algorithms optimized for single and multi-core CPU’s.

Affordability

Affordability

VSDC video software is freely available for download to Windows OS-based PCs and laptops.

How to Add Matrix Falling Code Effect to Video

If you’re a fan of the Matrix trilogy, like us, you’ll be thrilled to hear that the falling code effect is now available in the premium version of VSDC Video Editor. Unlike ready-made overlays, the effect is easily customizable, so you can adjust the look to your needs. For example, you can switch from letters to runes, change the color of the code, the size and speed of falling symbols, and even the depth at which they’re falling.

In this tutorial, we’ll show you how to add the Matrix effect to your video within minutes — no need for video editing or coding experience. Feel free to check the video tutorial first and jump to the text version below for a more detailed settings description.

DOWNLOAD VSDC

Step 1. Import your footage to the scene

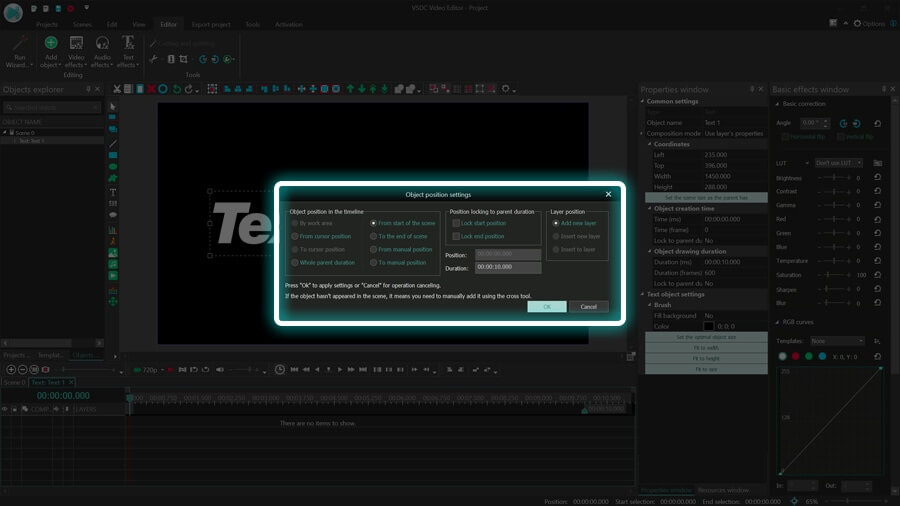
If you’re new to VSDC, the best way to import your footage to the scene is by using the Import content button on the start screen and following the pop-up helping prompts.

Import content

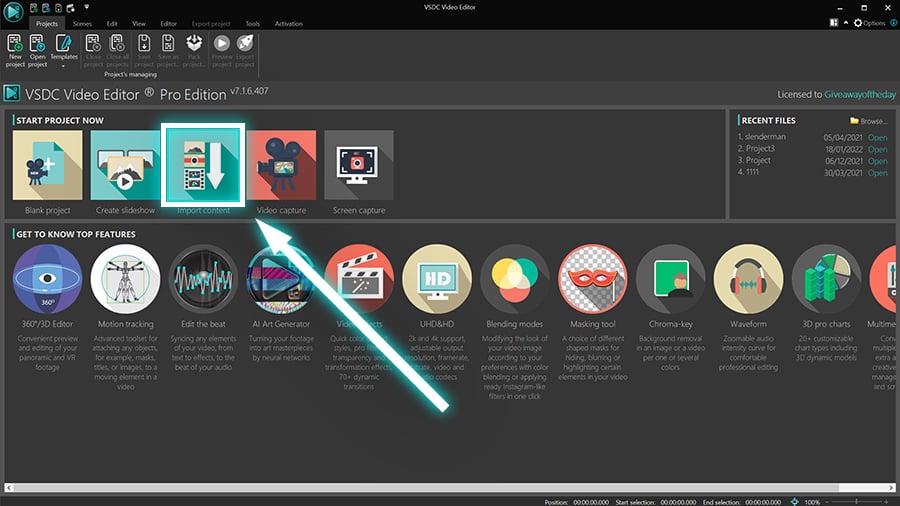
This way, the editor will create a project with the same size, aspect ratio, and fps rate as in your video. Once you import the file, the video will automatically appear on the timeline, so you can start editing right away.

Step 2. Add the falling code effect to your video

To add the Matrix effect to your video, go to the Template window and type “Matrix”. Although the effect comes with several presets, for the purpose of this tutorial, we’ll use the default configuration and show you how to switch between presets later.

Template window and type Matrix

Drag the Matrix effect to the scene and preview the result. This is the default version of the falling code effect, and if it works for you, feel free to leave it as-is and proceed to export. Note that you can apply the same effect to a video, an image, a shape, or a piece of text.

In the following sections, we’ll show you the falling code presets and customization options.

Step 3. Customize the effect

To open the effect settings menu, double-click the footage on the timeline; then select the layer with the effect (it’s called “Matrix”) and proceed to the Properties window on the right side.

Dropdown menu in the Properties window

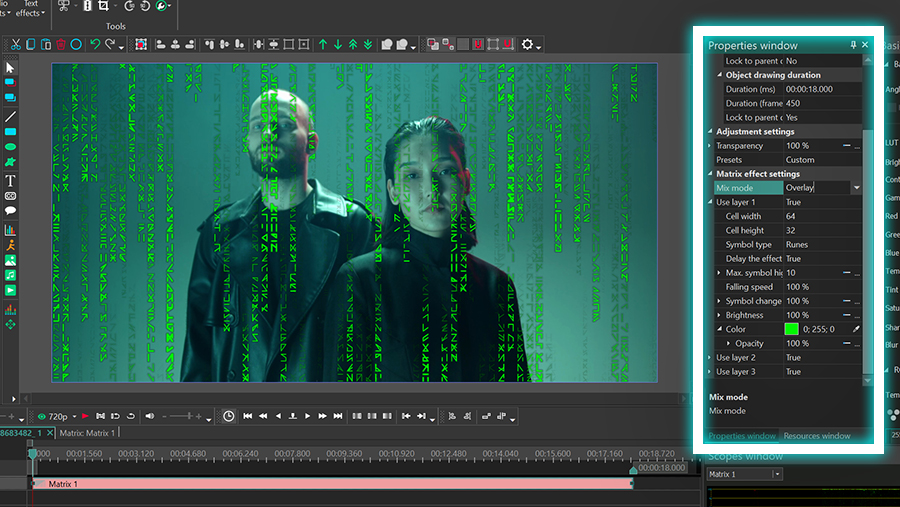
If you can’t find the Properties window, make a right-mouse-click on the effect layer and select Properties from the context menu. From there, you’ll have plenty of tools to experiment with. Some of the parameters allow you to change the overall look of the effect; others allow you to customize the look of the symbols. We’ll start with the former group of settings.

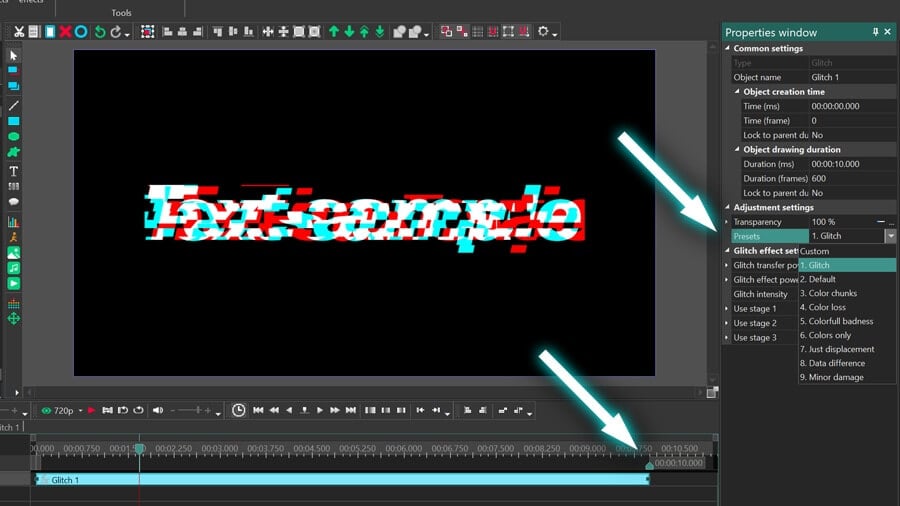
Try different presets

Effect presets come in handy if you want to quickly try different styles. For example, you may want the falling code to be black-and-white or paint it rainbow colors. Presets are available under a dropdown menu in the Properties window. Feel free to just switch between them to see how they look.

Regardless of the preset you decide to go with, you’ll be able to customize the size of the symbols, their falling and changing speed, color and brightness. We’ll have a look at each parameter in a few moments.

Adjust effect opacity

Apart from the preset menu, Adjustment settings include an important parameter called Transparency. This parameter helps you change the visibility of the effect. By default, it is set to 100% which is the maximum visibility. When you decrease the value, the lines of falling code become less opaque – as simple as that.

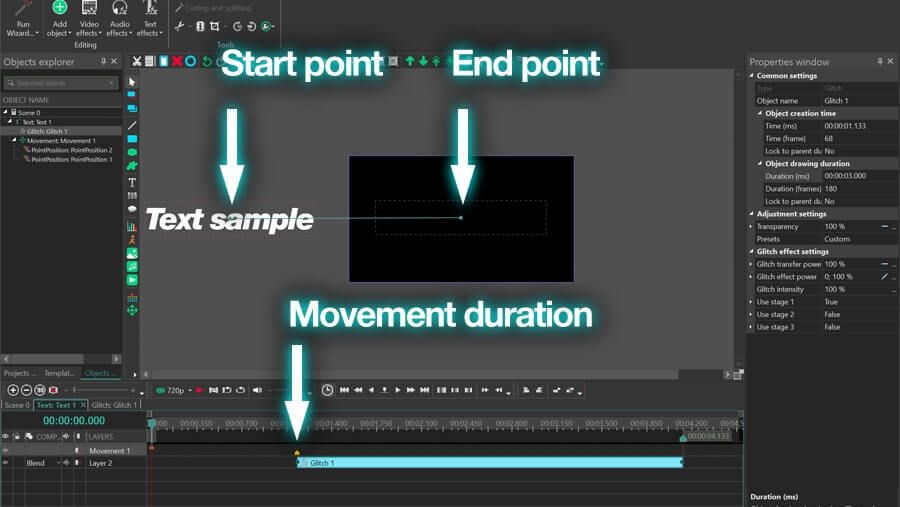
The cool thing about VSDC is that you can set a constant Transparency value or make it gradually change over time by using the Initial value and Final value options. For example, if we set the Initial value at 0% and leave the Final value at 100%, the effect will gradually go from being completely transparent to visible:

Keep in mind that many other effect parameters in VSDC allow you to set the initial and final values. The way they work will be the same every time: the former defines the parameter value at the beginning of the effect, and the latter defines the parameter value at the end of the effect.

Switch between Mix modes

The last parameter that changes the overall look of the effect is called Mix mode, and it’s located directly in the Matrix effect group of settings. Mix modes define how the falling code will be blended with the video or image. For example, by default, the falling code effect works as an overlay. However, if you switch to Source in, the symbols will work as a mask shaping the original image as they fall.

To preview all modes, open the dropdown menu and select them one by one:

Now, before we start talking about ways to modify symbols directly, let’s talk about the way they are layered in this effect.

Understanding layers

You may not have noticed it yet, but some lines of code are falling in the foreground (layer 1), middle ground (layer 2), and background (layer 3) of the scene. You can dissect these layers and customize the falling symbols on the layer of your choice – or even remove them from any of the layers entirely.

For example, this is what the effect looks like if we gradually remove the falling code from the background and middle ground:

Layers can help you achieve depth – especially if you’re willing to go the extra mile and adjust symbols differently on each layer.

For the purpose of this tutorial, we’ll only be working with layer 1, but keep in mind that the parameters for all three layers are identical.

Cell height and width

When you expand the Use layer 1 menu, the first two parameters are called Cell width and Cell height. Essentially, the values of these parameters define the number of symbol cells placed horizontally (width) and vertically (height). The higher the value is, the more cells there will be – and the smaller the symbols will appear.

Here is an example of what the effect looks like when you increase or decrease cell width and height values.

The smallest value you can put for these parameters is 1; the biggest value is 1024.

Symbol type

The following parameter is called symbol type, and it allows you to switch between alphabet letters and runes. In the illustrations above, we’ve used both options, so you probably got the idea by now.

Delay the effect

This option is set to True by default, and that means that the falling code effect will start appearing gradually from the top – as in the original movie intro. If you switch this option to False, code lines will be visible right away.

Max. symbol highlighting

This parameter defines how many pieces of falling code are simultaneously highlighted. The minimum value here is 0, and the maximum value is 1024. Obviously, when you choose the value for this parameter, you should keep the number of symbols(defined by cell width and height), in mind.

Here is what the effect looks like if we gradually increase the number of highlighted symbols, starting from zero:

Notice that without highlighting (if you put 0 as the value), the symbols are invisible. You can also gradually increase or decrease highlighting over time by using the initial and final values.

Falling speed

If you want to slow down or speed up the lines of code, simply tweak this parameter, as it’s pretty self-explanatory. The default value here is 100%, but you can put any value from 10% to 10000%.

Symbol change rate

Symbol change rate defines how fast symbols change within a cell. This parameter defaults to 100%, and you can use the initial and final values to make the effect more dynamic.

Brightness

Use the Brightness parameter to make code symbols brighter or darker. Values for this parameter range from -1000 to 1000, and you can make them change dynamically during the playback.

Color and opacity

Finally, it’s possible to change the color of the falling code for the selected layer and adjust the opacity of symbols as well. Just choose the desired color from the palette or use the eyedropper tool to select a color from the video.

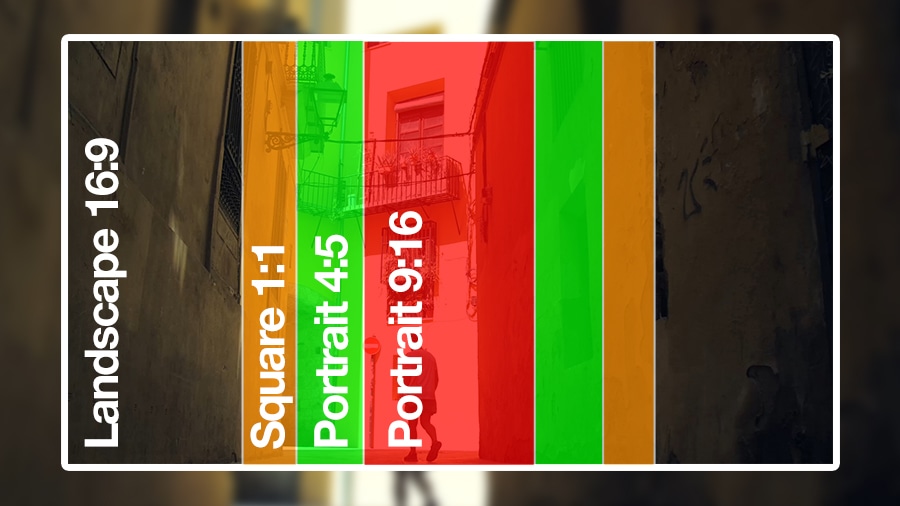
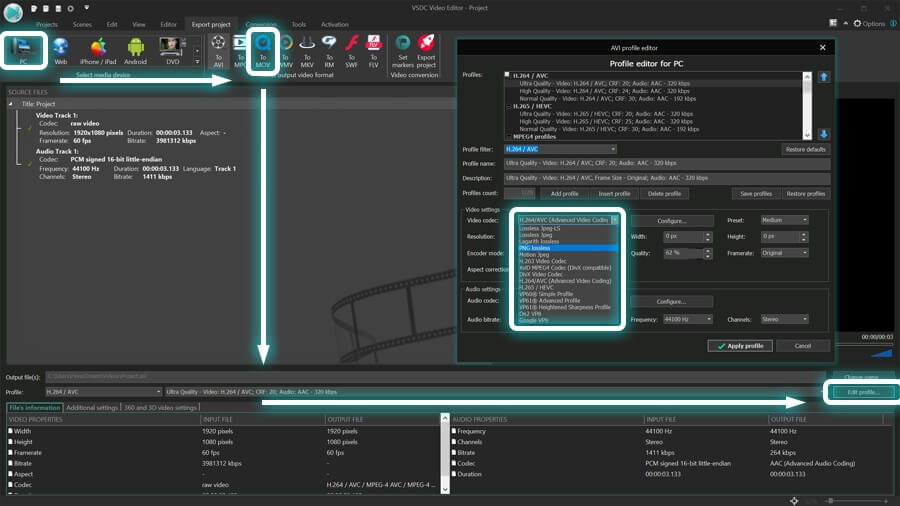
If you’re happy with the result, head over to the Export tab and proceed to Export project. From there, you can select the social media platform your video is intended for, and adjust the quality settings if needed.

Get creative with the Matrix effect in your videos

If you’re using VSDC version 7.1 or later, the Matrix effect is already available in your video effects menu. Go ahead and try it for yourself. Remember that you can apply the falling code to the entire scene or a separate object, such as an image, a title, or even a mask. Use it for creating unique cinemagraphs, spectacular transitions, and creative overlays.

Download VSDC Video Editor

Have any questions? Feel free to email us at This email address is being protected from spambots. You need JavaScript enabled to view it. or DM us on Facebook.


You can get more information about the program on Free Video Editor description page.

How to Apply Instagram Size to Your Videos on PC

Even if you shoot your videos on a smartphone, sometimes you may need to edit them on your PC before publishing. That is especially relevant if you want to add advanced-level effects or use the same footage for different Instagram video types.

To help you out, we’ve created a guide to adapting any footage to a perfect Instagram video size using VSDC, free video editor for Windows PC. VSDC is great for minor video alterations as well as professional video production, color correction, and special FX – and most importantly, it leaves no watermark on your videos after export.

Recommended Instagram video size for feed posts

The editor provides convenient, pre-configured profiles for Instagram, so there’s no need to manually adjust the width and height of the video.

Let’s go ahead and see how to quickly resize a video for Instagram feed, Instagram stories, Reels, and IGTV.

Download VSDC Free Video Editor

How to apply correct Instagram video size

The easiest way to resize video for Instagram on PC is by creating a blank project for Instagram. This way, your footage will automatically adjust to the Instagram aspect ratio requirements. Here is how it works.

Step 1. Create a blank project

Launch VSDC on your computer and hit Blank project to create a new, custom-sized project. In the pop-up settings window, select Instagram and open the Resolution menu to see your options.

Depending on the type of publication you’re creating, you should consider the following dimensions:

  • Video for Instagram feed – 4:5 or 1:1 (max. 1080x1080 or 1080x1350)
  • Video for Instagram stories, Reels, and IGTV – 9:16 (max. 1080x1920)

Notice that for all three resolutions – vertical, square, and landscape – different options are available. As a rule of thumb, you want to choose the highest quality to keep the best look of the video.

When you’re done, hit Finish.

Step 2. Import your video

Once you’ve opened the scene, import your video using the Add object menu or the toolset on the left-hand side. Notice that the video will be placed within the resolution you selected previously. This means that the gaps between the scene size and the video size will be filled with the background color.

By default, the background color is black, but you can change it in the pop-up settings window at the first step.

Step 3. Resize the video

At this point, you have two options. You can either export the video “as is" (with gaps) or resize it to fit the size of the scene. In the former case, proceed to the Export tab and save your movie. In the latter case, hit the Crop button and select Custom region.

In the pop-up cropping window, proceed to Set size in accordance with the scene’s aspect ratio ➝ Set the maximum size. Notice that the resizing frame is interactive, and you can shift it to make sure the framing is right.

Once you’re happy with framing, hit OK.

Step 4. Export your video

If you’re ready to export the video, go to the Export project tab and hit Export project to start conversion. Notice that your project parameters are already selected: it’s the profile configuration you’ve set at the beginning. However, you can still adjust the profile using the options in the dropdown menu.

And that’s it! This way, you’ll be able to quickly resize your video for Instagram feed, stories, IGTV, and Reels.

What are the recommended Instagram video settings?

The general requirements for all Instagram videos are:

  • MP4 format (also known as MPEG-4)
  • H.264 codec
  • 30 fps (frames per second)
  • 1080px maximum width

A lower 600px width resolution is acceptable, but of course, it would worsen the viewing experience for your audience. Remember that Instagram is the most visual social media platform, and striving for quality pays off, especially if you’re using it to promote your brand or blog.

For the best Instagram video dimensions and aspect ratio, you have a couple of options.

For a regular feed post, you can use any aspect ratio between 1.91:1 (Landscape mode) and 4:5 (Portrait mode) . Obviously, the latter is more efficient if you want to grab the attention of your followers because it takes more space on a smartphone screen. The best Instagram video dimensions here will be 1080 x 1350 and 864 x 1080 pixels. If you didn’t use the vertical mode to shoot the video though, it might be better to choose the good old square aspect ratio (1:1). In that case, the 1080 x 1080 is the way to go.

For Stories and Reels, the ideal aspect ratio is 9:16 or 1080 x 1920 pixels. This is a vertical-only space and, ideally, you’ll need to shoot in a portrait mode to make the video look authentic.

Finally, for IGTV, you can either upload a vertical video with a 9:16 aspect ratio, or a horizontal video with an aspect ratio of 16:9. But keep in mind that when an IGTV video is watched in the feed, it’s loaded in a portrait mode, so vertical orientation wins again.

Bonus. How to quickly cut a video into parts for Instagram

If your video is longer than the allowed maximum, you can quickly split the video file into parts with the desired duration. This is especially relevant if you’re planning to publish a sequence of videos for Instagram Stories or a carousel.

The easiest way to split the file before export is by using markers. While in the Editor tab, place the playhead where you want to split the file and select the marker tool. In the pop-up window, switch to Segmentation marker and hit OK.

Following the same steps, create as many markers, as you need. Once ready, switch to the Export project tab and open Additional settings. Check the box “By markers" and uncheck the box “Join scenes to single".

Proceed to export the project. The video will be saved into multiple files based on the markers you’ve created. And since you can now upload videos to Instagram from a desktop, all you need to do is open your account in the browser and upload files.

Final tips on posting Instagram videos

Applying the right Instagram video size isn’t that tricky, as long as you understand the dimensions and framing. Here are the final recommendations before you jump to working with your content:

  • make sure your video is in MP4 format. If it’s in a different format, use a video converter.
  • keep in mind that Instagram may compress the quality of your video. To maintain the highest quality, pay attention to your camera settings and use lossless file transfer solutions.
  • use subtitles where applicable. Remember that most people scroll through the feed with sound off, so create text insertions if your message loses its clarity when muted.

Finally, consider using social media management software for scheduling Instagram publications. Not only does it save time, but it also allows you to conveniently post right from your desktop. If you’ve never heard of social media management tools, Buffer and Hootsuite are great tools to start.

Questions about adjusting video size? Let us know by sending a message via Facebook page or drop us a line at This email address is being protected from spambots. You need JavaScript enabled to view it..


You can get more information about the program on Free Video Editor description page.

How to Make God Rays Effect in a Video – Step-by-Step Tutorial

God rays, also called 3D light rays, are a beautiful illusion you can see in nature when direct light pierces through gaps in the clouds or a surface that contains holes. Because of their volume and shape, these light rays resemble torches or columns coming straight from the sky – hence the name of the artistic effect.

If you want to add the God rays effect to your video, VSDC Pro can help you achieve that within minutes. You’ll be able to use the effect on added objects, such as titles, shapes, logos, and images with a transparent background, as well as on videos. But most importantly, you’ll be able to make the effect dynamic as if the light source is moving around the scene.

This is what it’s going to look like:

In the tutorial below, we’ll walk you through the effect setup and show you how to change the length, brightness, and color of the light rays. Plus, you’ll learn how to achieve a stunning look by gradually increasing or decreasing the intensity of the effect over time!

Before getting started, make sure to download the latest version of VSDC Video Editor.

Apply the God rays effect to the object

For this tutorial, we’re going to apply the effect to a piece of text – however, the principles of working with other image and video files are exactly the same.

For starters, import your media file to the editor or create a blank project and add an object to the scene. Click the object using the right mouse button and proceed to Video effects. Select Nature - God rays.

Once you make the selection, an Object position settings window will pop up indicating that the effect will be applied to the file starting from the cursor position. Later, you’ll be able to manually change the duration of the effect and shift its position on the timeline if you want to.


Access the Properties window

As soon as you apply the effect, you’ll be prompted to the second tab of the timeline where the “Godrays” layer is located. Click it with the right mouse button and select Properties. The Properties window housing the effect settings will slide in from the right side.

The Properties window contains three groups of settings:

  • Common settings
  • Adjustment settings
  • God rays effect settings

Each group allows you to fine-tune the effect on different levels. Let’s have a more in-depth look at what you can do at each level.

Common settings overview

The first group is called Common settings and it lets you do the following:

  • change the name of the layer on the timeline
  • set up the moment when the effect appears in the scene – by typing the exact second or frame
  • define how long the duration of the effect should be – by typing the exact number of seconds or frames

If you’re happy with the default settings of the effect, feel free to skip this group and move on to the next one.

Adjustment settings overview

The second group is called Adjustment settings. It allows you to change the level of effect transparency, extend the boundaries of the effect area, and select presets.

The Transparency parameter defines the level of visibility of the effect. The higher the Transparency value is, the more visible the effect. You can set a constant Transparency value or make it change over time using the parameters called Initial value and Final value. To give you an idea of how it looks, below is a gradual Transparency increase from 0% to 100%

The next parameter in the group is called Extend boundaries, and it only makes sense to change it if you’re applying the God rays effect to an object smaller than the scene size – such as an icon, a piece of text, or an image.

By default, the length of the light rays is defined by the object’s borders. For example, if you’re applying it to a piece of text, we’re talking about the frame where the text is located. This way, if the Extend boundaries parameter is deactivated (set to False), the light rays will be cut by the frame. If the Extend boundaries parameter is activated (set to True), the light rays will extend to their natural length.

Finally, the third parameter in the group allows you to select one of the effect presets from the menu. To continue with the manual setup, leave the ‘Custom’ option selected.

God Rays effect settings overview

The last group of settings is designed to help you achieve a more precise, custom look of the effect. We’re going to show you what each parameter means, and how it changes the overall appearance of the rays.

Polar coordinates

The first parameter is called Polar coordinates, and it only makes sense to pay attention to it if you are creating a dynamic effect where the source of light will be moving around. If you keep the Polar coordinates mode activated (set to True), you’ll be able to make the light source move around the polar system of coordinates.

If you deactivate the mode (set it to False), you’ll be able to make the light source move around the XY system of coordinates.

In both cases, to imitate the light source movement, you’ll need to expand the parameters and type the Initial value and Final value for the coordinates. For example, if you’re using the Polar coordinate system, you can type the light source angle and distance from the object for the beginning of the effect and the end of it. When you do that, the light source will be moving from the initial point to the final point throughout the duration of the effect, as illustrated above.

Similarly, if you’re using the XY coordinate system, you’ll be able to set the XY coordinates for the beginning and the end of the effect.

Show/hide center

If you want to keep the effect’s position constant, ignore the previous parameter and click the Show/hide center button to make the center of the effect visible and manually place it in the scene.

Tip: if you are using the coordinates to create a dynamic effect, you can check its position at any given moment on the timeline by moving the playhead and using the Show/hide center button.

Light intensity and Brightness

Light intensity and Brightness directly affect the look of the light rays. As the names of these parameters suggest, the former defines how powerful the light source is, and the latter defines the brightness of the light.

By default, both parameters are set to 100%, and as you start decreasing this value, you’ll notice how the look of the effect gradually changes. See what going from 100% to 0% looks like for both parameters:

As you can see, for Light intensity, 0% means the full absence of the light rays; meanwhile, for Brightness, 0% means the full absence of light (and therefore, disappearance of the object).

Mode

Mode helps you smoothen the light rays and make them look more natural. To see the difference between the two modes, just switch from ‘Normal’ and ‘Smooth’ and look at how the rays change.

Keep in mind that the ‘Smooth’ mode requires a bit more PC resources, so it may work a little slower on your PC.

Ray length

This parameter is also self-explanatory. As you change its value, you also change the length of light rays.

Although this parameter directly affects the length of light rays, it’s important to note that other parameters, such as Brightness and Light intensity, may indirectly affect the length of light rays as well. For example, high brightness or a very powerful light source will visually extend rays.

Noise strength

The Noise strength parameter adds fractal noise to the effect and can also be set up dynamically – through the Initial and Final values.

Chromatic shift

The last parameter is designed to add a touch of color to the God rays effect. By default, it’s set at 0% which means the light rays are white. As you start increasing the Chromatic shift value, you’ll notice how light rays start taking color, based on the Channel order selected in the dropdown menu below.

The default channel order is RGB, which means the effect will contain Red, Green, and Blue – in that sequence precisely. The rest of the channels are abbreviated with the same logic: for instance, GBR means Green, Blue, Red; GB means Green and Blue; B means Blue. This way, you can apply a single color or multiple colors to the effect.

Time to practice

Now that you know how to work with the God rays effect in a video, it’s time to practice. Go ahead and try to use it in your next project. It’s easy to apply, and it works especially well for transitions, intros, and outros.

Got any questions about the effect? Email us at This email address is being protected from spambots. You need JavaScript enabled to view it.

Looking for inspiration for your next video? Check our YouTube channel.

How to Make Glitch Text Effect in a Video

If you go online, you’ll find plenty of sources featuring glitched text effect templates. However, since templates may not always look exactly the way you need, in this tutorial, we’ll show you how to create your own glitchy text for a video – using VSDC, a free video editor for Windows.

Even if you’re a complete newbie, worry not. It’s a quick and easy trick that requires zero video editing experience. Once you get the hang of the effect, you’ll be able to apply it to text titles, logos, and images in your video. Feel free to watch the tutorial first, and then jump to the text description below, as it contains an extended version with a couple of animation tricks.

Download VSDC Free Video Editor.

Step 1. Add a piece of text to the scene

Launch VSDC on your computer and create a blank project. Then use Shift +T to add a piece of text to the scene, and design it to your taste using the editor at the top. Note that you can modify any aspect of the text including the font, size, thickness, color, alignment, and everything in between.

How to add a text to the scene in VSDC Video Editor

The duration of the text in the video is indicated on the timeline; you can stretch or shorten it manually using the handlers.

Before adding the text to the scene, you can import a background video or image using the Add object menu at the top. However, for the sake of this tutorial, we won’t do that. Once we’re done with the effect, we’ll export it as a text animation with transparent background, so that later we can use it as an overlay for any other project.

Step 2. Apply the glitch effect to the text

Once you’re done stylizing your text, double-click it on the timeline and open the Video effects menu. Proceed to Special FX ➝ Glitch. The pop-up window indicates that the effect will be applied from the playhead position on the timeline. This means you can make text glitchy from the moment it appears in the scene or from a certain moment later - based on where the playhead is.

The pop-up window indicating the effect’s location on the timeline

When you hit OK, the Glitch effect layer will be added to the timeline. Go to the Properties window on the right to preview different effect presets and select the one you like the most. (If you can’t find the Properties window, make a right-mouse-button click on the effect layer, and select Properties from the menu).

Glitched text effect in VSDC

Each preset brings a different type of distortion. Feel free to try them all before making the decision, and keep in mind that you can apply several presets to the same piece of text as well. To do that, simply duplicate the effect layer on the timeline using the Ctrl+C; Ctrl+V hotkeys, place the duplicate under the original, and select a different preset for it.

You can also place multiple glitch presets on the same track so that one distortion type turns into another.

Adjust the glitch effect intensity

Presets are the quickest way to customize the Glitch effect in VSDC. However, you can perform much deeper customization and precisely achieve the look you want. For example, you can make the distortion gradually intensify as the video goes on. Just expand the Glitch effect power parameter in the Properties window and type 0% for the Initial value (leave 100% for the Final value).

As a result, glitching will be light at the beginning and come to its full power by the end of the effect’s duration.

Similarly, you can use the Transparency parameter to make the distortion effect gradually appear in the scene, while keeping it at full intensity. To learn more about other parameters, read a detailed guide to working with the Glitch effect in VSDC.

Step 3. Animate glitched text in your video

Most creators use glitched text for title intros or captions. Whatever the case is, it’s typically a brief appearance of the text in the scene. This means that apart from the glitch effect, you may want to apply some animation too. Let’s talk about the easiest options that can help you create a simple, yet full-fledged intro.

Add text movement

The free version of VSDC allows you to add a single-vector movement path which makes an object (a piece of text in this case) move from point A to point B. For example, suppose you want the text to slide in from the side of the scene like this:

To do that, place the text outside the scene, double-click on it, and hit Shift + M to apply the Movement tool. Next, using a mouse click, indicate where in the scene the text should stop moving.

How animate glitched text in VSDC

Keep in mind that the duration of the movement is indicated by the yellow marker on the timeline. The closer the marker is to the beginning of the timeline, the faster the movement will be. In our example, the movement duration is 2 seconds, and the glitch effect kicks in after the movement stops. Remember that you can manually change the duration of the effect on the timeline, as well as the moment when it appears.

Use text animation effects

In addition to movement, you may want to consider other animation effects designed specifically for text.

Under the Text effects menu at the top, you’ll find the following options:

  • Recoloring – text color and opacity animation
  • Shift position – symbols slide into the placeholder from a pre-selected area
  • Glyph FX – symbols rotate or get zoomed in

Each effect is customizable, and if you’d like to learn how to use them, give a read to this guide.

Apply fade-in or fade-out transitions

Finally, to smoothen the appearance or disappearance of the text in the video, consider using transitions. There are plenty of them in the Video effects menu, however, for the sake of this tutorial, we’ll use the simple Fade out transition.

To apply the transition, go back to the main timeline tab and proceed to Video effects ➝ Transparency ➝ Fade Out.

By default, the Fade Out transition will be applied to the end of the text layer, but again, you can manually shift it on the timeline.

Export the glitched text animation

Ready to save your project? Then head over to the Export project tab and select the desired settings. The most popular option is Web ➝ YouTube, however, feel free to select whatever works for your goals.

If you need to export this animation with a transparent background, select PC ➝ MOV and hit the Edit profile button under the preview window. Then make sure to select the PNG lossless codec.

How to export a glitched text animation with transparent background in VSDC

This way, you’ll be able to overlay your text animation using any video editing software supporting alpha channel, including VSDC itself.

And you’re done!

Searching for more ideas for your next project? Subscribe to our channel for weekly tutorials.


You can get more information about the program on Free Video Editor description page.

How to Create Your Own LUTs in VSDC

Of all color correction tools, LUTs are everyone’s favorite. They’re a quick, easy, and versatile way to make an average image or video look cinematic. That’s why we’re so thrilled to announce that starting version 6.9, VSDC includes a built-in LUT editor. Not only can you apply imported LUTs to your videos – but you can also edit them and even create your own custom LUTs.

But most importantly, if you’re using VSDC Pro, you’ll be able to export LUTs you’ve created and use them in 3rd-party photo and video editors.

In this tutorial, we’re going to show you how the LUT editor works in VSDC. But before we get started, let’s answer one important question.

What is a LUT, exactly?

LUT, or a Look Up Table, is a set of values defining how the color tones should be modified. You can think of a LUT as a pre-configured color correction template.

Each LUT contains a table with information on what hue, saturation, and lightness values should be for each color tone. When you apply a LUT to an image, it compares the original values with the table values and changes the original accordingly.

LUTs are insanely popular because they can help you compensate the lack of proper lighting during the shooting, replace one color with another, and achieve a cinematic look.

How to create a new LUT in VSDC

To get started, import your image or video to the scene. From there, you can do the following:

  • apply one of the built-in LUTs from the VSDC menu
  • apply any 3rd-party LUT you’ve found on the Internet
  • create your own LUT and tailor it to your needs

For the purpose of this tutorial, we’re going with the third option.

To create a new LUT, you need to open the Resources window (if you can’t find it, click View in the menu at the top and select Resources window). Then click with the right mouse button anywhere in the Resources window and proceed to Add resources -> Create LUT.

Your new LUT will be added to the list of resources and named “Empty lut 1.cube.” Double-click the image or video to open it and drag the LUT from the Resources window to the scene. Keep in mind that by default, the LUT will be added from the playhead position on the timeline, so you may want to adjust it.

Now that you’ve created an empty LUT and applied it to the footage, double-click its icon in the Resources window to open the LUT editor.

The editor looks like a pop-up window featuring an HSL histogram and a compact menu on the right side. In the following section, we’ll explain what each option means and how you can fine-tune your video with this toolset.

How to change LUT settings

Let’s start with a quick overview of the LUT editor window.

The white spots on the histogram help you identify which color tones are used in the video. Predominant color tones produce more saturated white spot areas.

If you switch between two types of histograms – perspective and orthographic – you’ll notice that the white spot pattern changes as well.

The reason why the color tones are reflected differently is that the perspective histogram includes lightness values, meanwhile, the orthographic histogram excludes them. Essentially, this means you should use the perspective histogram if you’re trying to correct overexposed or underexposed footage – because you’ll want to see the lightness values on the gradient before adjusting them.

Once you’ve selected the histogram type, you can also adjust the number of rays. The more rays there are, the more control points the histogram grid will have – and the more precisely you’ll be able to correct color tones.

Control points on the grid are interactive. Go ahead and select any of them to see their Hue, Saturation, Lightness values on the right. You can also toggle the HSL sliders or just grab any control point and drag it around to get an idea of how things work.

Now that you’re familiar with the histogram and control points, let’s see how moving them in different directions can change the look of your footage.

Saturation control settings

On the histogram, less saturated colors are located in the center, so the closer to the edges we get, the higher saturation is. For example, if you’re working with raw footage, its color tones are typically unsaturated. That’s why the white spots on the histogram will be located primarily in the center.

To increase saturation for all color tones in the video at once, select the circle of control points that includes all the white spots (which means all the color tones in the video) and expand it by toggling the saturation slider on the right side.

Similarly, if you want to increase or decrease saturation for a particular color tone, you can select control points in that color tone section and drag them closer to the center or closer to the edge.

Hue control settings

Hue values change when we move points around the histogram. Essentially, you can replace any color with another one by changing its hue. Suppose you want to replace all green color tones in the video with blue or red. To do that, select all control points in the green section and drag them to the replacement color section.

Notice that as we’re changing the hue, the white spots are migrating as well because the overall color scheme of the video is rewritten. Video creators use this trick to switch cool tones to warm tones, or vice versa, adjust the look of certain objects, or even enhance skin tones.

Quick tip. If you need to select a particular color tone in the video, but you’re unsure how to identify it on the histogram, use the eyedropper tool from the right-side menu. Click the eyedropper icon and head to the preview window to find the color tone you want to work with. As you move the eyedropper around, you’ll notice two little squares on the histogram: purple and green.

The purple square shows which part of the histogram contains the color the eyedropper is currently pointing at. The green square shows the nearest control point on the grid; to select it, click the color.

Lightness control settings

Finally, let’s have a look at the Lightness control. What it does should be self-explanatory: it allows you to make the color tones in the video darker or brighter. The cool part is that you can adjust brightness for all color tones or selected color tones only. For example, suppose you want to make green tones brighter. This is what it will look like:

However, if you want to brighten or darken all color tones in the video, you’ll need to select the corresponding circles on the grid. For instance, let’s make all color tones in the video a bit darker, and then darken the less saturated ones even more.

Now that we’ve covered the basics of working with Hue, Saturation, and Lightness controls, let’s have a look at the rest of the toolset.

Quick control point selection

As you may have noticed from the video examples above, you can select individual control points by clicking them directly. You can also select multiple control points by either clicking them one by one or selecting the area on the grid where they’re located. However, you can also use the point selection tools right under the HSL sliders:

  • Select central point – use this option to select the central point only
  • Select outer circle – use this option to select all the control points in the outer circle
  • Select ray – use this option to select a ray of points (indicate the desired ray by selecting at least one control point in it)
  • Select circle – use this option to select a circle of points (similarly, you’ll need to indicate the desired circle first by selecting at least one point in it)
  • Increase/Decrease selection – use this option to increase or decrease the number of selected points based on the initial selection. For instance, if you’ve selected a single point, this option will select or unselect neighboring points. If you’ve selected a circle of points, this option will select or unselect neighboring circles.
  • Select all – use this option to select all the control points on the grid.

If you need to prevent a specific control point, a ray, or a circle of points from moving, use the Pin button.

Similarly, you can use the Pin nearest button to lock the neighboring points.

How to export your LUT from VSDC

Once you’ve finished working on the LUT, go up to the Title field and give it a name. To export the LUT from VSDC and use it in 3rd-party editors, simply click Export in the bottom left corner and select the output folder on your PC. Keep in mind that LUT export is only available in VSDC Pro.

Ready to create your first LUT?

By now, you should have a clear idea of how to create a new, custom LUT for your needs. Although we’ve covered the process of creating a LUT from scratch, keep in mind that you can follow the same steps to edit an existing LUT. Simply apply any LUT from the library and open the Resources to find that LUT in the list of resources and access the editor window.

You can craft LUTs to replicate the color grading of virtually any movie and replicate its visual style. We've even crafted our own custom LUT for the Oppenheimer movie, which you can download (VSDC-oppenheimer-lut.cube) and utilize in your projects to achieve this distinctive aesthetic.

Have any questions? Feel free to email us at This email address is being protected from spambots. You need JavaScript enabled to view it. or DM us on Facebook.


You can get more information about the program on Free Video Editor description page.

News

New Transition Addition Methods, RAW/BRAW Files Support and Free Waveform

Welcome to the next level of video editing with VSDC's latest release, Version 9.1! Packed with an array of fresh features and enhancements, this update is designed to make your video editing experience...

VSDC 8.3 – 100+ New Templates, Key Editor Window, AV1 and Enhanced GUI

Welcome to the latest VSDC update, Version 8.3! We've been working hard and we’re ready to present a feature-packed release for you to discover an exciting array of over 100 fresh free video templates,...

Free video editing in 2023: Unlock Your Creativity without Breaking the Bank

In today's digital world creativity reigns supreme. It offers endless possibilities for individuals and brands to captivate audiences and leave a lasting impression. With social media platforms at the...

The Best Online Video Editors in 2023: Benefits and Drawbacks

In today’s digital landscape, the popularity of video content is gaining momentum, with users increasingly turning to video creation both for personal advantage and professionally. When searching for...

VSDC 8.2 – Proxy File Support, Color Keyframes and Vectorscope

We are thrilled to unveil the highly anticipated VSDC video editor 8.2 update. Our team has been hard at work, ensuring that this release is packed with exciting features and enhancements to elevate your...

VSDC 8.1 Brings Multicam, Curve Line Object, Scrolling Text Effect, and More

We’re thrilled to introduce VSDC 8.1. The new version primarily caters to professional videographers, graphic designers, and artists, however, everyday video creators will benefit from the update as...

VSDC 7.2 Takes Its Color Correction Toolset to the Next Level (Plus, Other Updates)

It has been another productive couple of months for the VSDC team, and we’re thrilled to announce the release of VSDC 7.2 – the new version of our video editing suite. Although the majority of updates...

5 Free Pieces of Software for Video Color Correction

If you’re a video creator, there are three reasons why it’s crucial to learn color correction. First, it will help you enhance your videos and make them look professional. Second, it will allow you...

VSDC 7.1 Upgrades GUI and LUT Editor, Adds New Effects and Custom Shortcuts

The new version of VSDC includes two new video effects, expands the functionality of the LUT editor, and makes video editing more convenient by bringing an improved interface, optimized timeline, and custom...

10 Pieces of Truly Free Video Editing Software (with No Watermarks)

Seeing a watermark on your video after spending hours editing it feels infuriating. Yet a few video editing software developers are still using this practice to limit the free usage of their products....
 

Screen Recorder Box

This program allows you to capture the video of your desktop and save it on your PC in various formats. Coupled with a video editor, the program is a great tool for creating presentations, tutorials and demo videos.

Read more about Screen Recorder...


Video Capture Box

The program captures video from external devices and records it to computer in a free format. You can save video from video tuners, webcams, capture cards and other gadgets.

Read more about Video Capture...


Reviewed by


"VSDC Free Video Editor is a surprisingly powerful, if unconventional video editor"

- PC Advisor


"This video editor gives you tons of control and editing power"

- CNet


"The editor handles many common formats and boasts a good deal of capabilities when it comes time to alter lighting, splice video, and apply filters and transitions in post production"

- Digital Trends