 User Help Manual
  Learn FAQ
  Send us feedback
 ")


Video Editor
Download and use the free video software to create and edit videos of any complexity from a family greeting card to a company presentation. Apply vsdc free video editor for light edit hdr-video, any raw-video formats from cams - BRAW, ProRes RAW, any high resolution 4k or more due to video proxies technologies in the editor.
Cut, merge video files, apply visual and audio effects, use filtration and image correction, make slideshows and add an appropriate soundtrack. Use multi-color Chroma Key and advanced parameters settings to give your video a professional look.
All popular video and audio formats are supported.
Video Converter
This program is intended for converting video files from one format to another. Nearly all popular video formats are supported (both reading and saving). In addition, the program drastically simplifies the task of converting videos for playback on specific multimedia devices, such as iPhone, Samsung Galaxy or Huawei P30 Pro. The program is extremely easy to use, has a modern interface and all necessary video processing functions.
Audio Converter
The audio converter will help you convert audio files from one format to another. All key audio formats and codecs are supported. The program also allows you to manage playlists and meta tags, extract audio from video files and save these tracks on your computer in any format.
Audio CD Grabber
This audio tool is intended for grabbing audio tracks from compact discs and saving them to the user’s computer in any format. Nearly all popular audio formats and codecs are supported. The program can also extract track details from the FreeDB server for automatic file renaming and updating meta tags.
 Video Editor
 Video Converter
 Audio Converter
 Audio CD Grabber

Multifunctionality
A wide array of multimedia processing tools in one free video software suite.

High speed
Our programs use fast
and high-quality algorithms optimized for single and multi-core CPU’s.

Affordability
VSDC video software is freely available for download to Windows OS-based PCs and laptops.
News:
- published Amy Shao 6/10/25 The wait for something new and unusual is finally...
- This holiday season embraces new beginnings with the latest update of VSDC Video...
- Change is all about improvement, and this process wouldn't be possible without y...
- Intro In 2024 the options range for creating visual effects is incredibly dive...
How to Create a Neon Text Effect in a Video
Neon signs are making a comeback. You may have already noticed them in music videos, vlog backgrounds, commercials, and movie intros. While not being overly distracting, the neon text effect can become a stylish addition to your video and make it more memorable.
In this tutorial, we’ll show you how to add a neon text sign to a video using VSDC Free Video Editor. Then, we’ll show you how to place it behind an object, and add the perspective or flickering effects. Before getting started, download VSDC from the official website.
Step 1. Add a background to the scene
The best way to start a project in VSDC is by using the Import content button on the start screen. For this effect, you can use both images and videos as a background. However, keep in mind that neon signs always look better in front of dark or even monochrome footage. If your background isn’t dark enough, feel free to use the Adjustments settings from the Video Effects menu to correct the brightness and the contrast.
Pro tip: before you move on to the next step, we recommend selecting a text font or at least checking some examples for inspiration. The built-in VSDC text editor does contain quite a few fonts you can use in your video. However, you may want to visit free font libraries for something artsy and download additional fonts to your PC. Once you do that, VSDC will automatically include them in the list of options.
Check this roundup of beautiful fonts that will look stunning with the neon light effect.
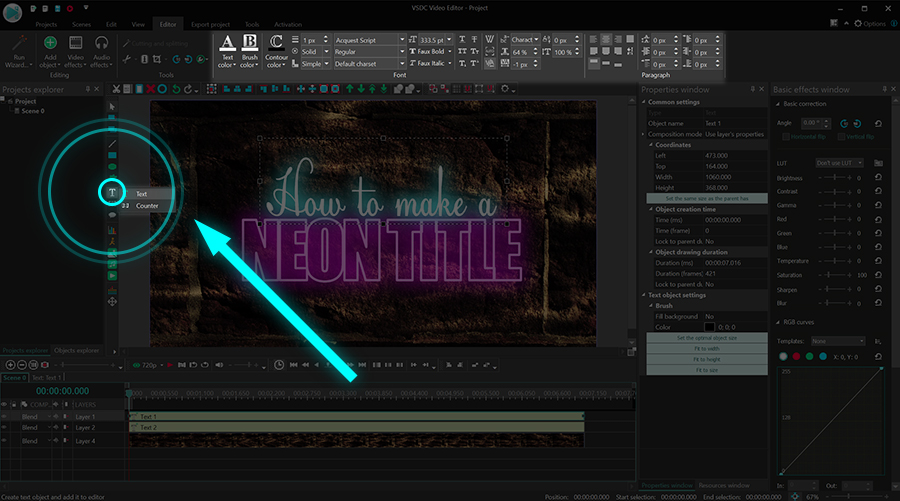
Step 2. Type the text for the sign
Using the menu on the left-hand side, select Text and add it to the scene. Use the text editor at the top to change the size, font, alignment, and other settings. Keep in mind that you’ll be able to make adjustments at any point.
For our example, we used the following parameters:
- Fonts: Acquest Script and Impact
- Text color 1: white; contour color 1: none
- Text color 2: none (to make letters hollow, set text color opacity at 0%); contour color 2: bright pink - plus, we’ve increased the contour thickness to 12px
When selecting the color, you want to go for a bright one. For example, you can use white letters and then add a bright color neon light to it. You can also use bright blue, green, or pink for the text - in this case, the sign will be of less contrast with the background.
Step 3. Add a shadow effect to imitate neon glow
To imitate the shining around the text, we’ll be using the Shadow effect. Open the Video Effects menu, proceed to Nature, and select Shadow. Then go to the Properties window on the right-hand side and set 0 for the following parameters:
- Light angle
- Shadow distance
This will place the shadow in maximum proximity to the text. However, you can also hit the Show/hide center button and use a little cross to drag the shadow around.
Next, open the Shadow color selection and choose the color of the glow. The best options are bright blue, bright pink, or green. However, feel free to use any colors of your choice.
Lastly, increase Shadow max size to your taste. This parameter defines how big the shadow is or, in this case, how far the neon light will shine. To increase the brightness even more, tweak the Intensity control as well. Once ready, go ahead and export your video.
Now that you have a better idea of how this effect works, let’s see how you can use neon text signs in your videos – besides just placing them in the middle of the screen.
Neon text effect examples for your video
Essentially, you can apply the same effects to the neon text you would apply to any object:
- create transitions
- change perspective angle
- use special effects such as Glitch, movement, motion tracking, and more
If you keep your eyes open, you’ll start noticing neon signs in the media more often – and this is how you find ideas for your inspiration. Below are three examples you can practice on.
1. Neon text behind an object
One impressive way to use a neon sign effect in a video is to place it behind an object. For example, if you’re working on a character intro, this trick might be exactly what you need.
Keep in mind that you’ll need a video with a green background to recreate this example. Once you remove the background using Chroma Key, create a neon text sign following the instructions above and move it one layer below the video on the timeline. This way the sign will be placed behind the character or an object in the video.
Watch our video guide if you want to learn more about placing text behind objects.
2. Neon sign attached to a surface
If you want to create an illusion of a neon sign attached to a surface, for example, a wall, a billboard sign, or a ground, you’ll need to apply the Perspective effect. To do it, just select the text object either on the scene or on the timeline, then open the Video Effects menu, find Transforms, and select Perspective. Then go to the Properties window on the right-hand side to adjust the angle.
In addition to the perspective effect, in this example, we’ve also used a simple free movement effect. You can find out more about it in this tutorial.
3. Flickering neon sign (Pro-level)
When we released our neon text tutorial on YouTube, a few people asked for the flickering effect. To be fair, flickering does make the neon text in a video look even more natural and eye-catching. However, to recreate it, you’ll need to upgrade to VSDC Pro which is available at $19.99 per year.
VSDC Pro comes with quite a few features you’ll find helpful if you’re serious about your video editing hobby. For instance, you’ll get video masking, motion tracking, audio waveform, advanced Chroma Key, and most importantly, the non-linear parameter change feature.
This means you’ll be able to make any effect change its intensity over time. For example, to achieve the flickering effect below, we’ve set the Shadow intensity level to jump between the high and low values multiple times. As a result, the neon glow becomes bright, then almost disappears, and becomes bright again.
To recreate this example, access the Shadow effect properties, find Intensity and click on the graph line to switch from the Linear parameter change to the Parameter change along the curve. Then hit the three-dot icon to open the graph on the timeline.
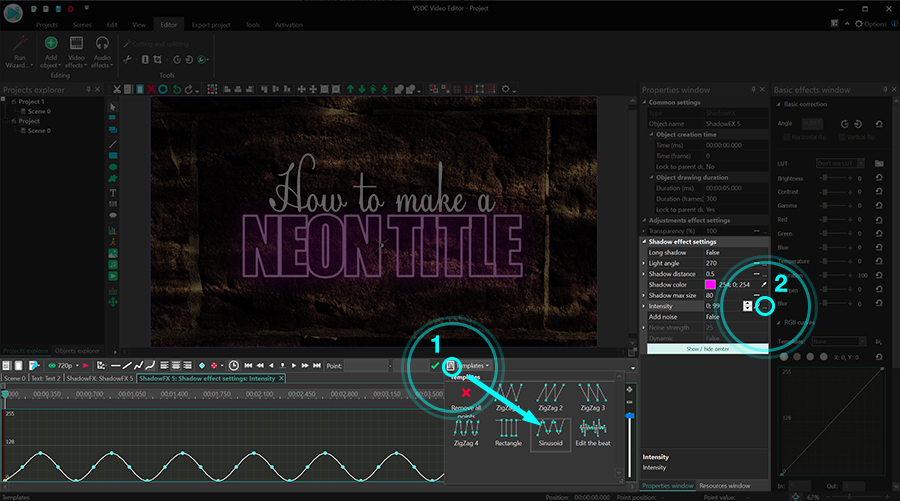
A double-click anywhere on the graph creates a new control point that defines the value of the parameter. In other words, by clicking at the top of the graph, you apply a high Shadow Intensity value for that moment on the timeline; by clicking at the bottom, you apply a low Shadow Intensity value. As you form the curve, the Shadow Intensity value changes from high to low to high again, and it looks like a flickering effect in the video.
Add a realistic neon light sign to your video for free
Once you get the hang of this technique, you’ll be able to apply it to other objects added to the scene including shapes, icons, PNG images with a transparent background, and even videos. Go ahead and try it for yourself!
Got any questions? DM us on Facebook or leave a comment on our YouTube channel.


This program allows you to capture the video of your desktop and save it on your PC in various formats. Coupled with a video editor, the program is a great tool for creating presentations, tutorials and demo videos.

The program captures video from external devices and records it to computer in a free format. You can save video from video tuners, webcams, capture cards and other gadgets.

"VSDC Free Video Editor is a surprisingly powerful, if unconventional video editor"
- PC Advisor

"This video editor gives you tons of control and editing power"
- CNet

"The editor handles many common formats and boasts a good deal of capabilities when it comes time to alter lighting, splice video, and apply filters and transitions in post production"
- Digital Trends
© 2011-2025, www.videosoftdev.com, FLASH-INTEGRO LLC. Privacy policy | Terms of use | About us
All trademarks referenced herein are the sole property of their respective owners.
Copying any materials from this site allowed only with written consent of Site Administration.