Video Editor

Download and use the free video software to create and edit videos of any complexity from a family greeting card to a company presentation. Apply vsdc free video editor for light edit hdr-video, any raw-video formats from cams - BRAW, ProRes RAW, any high resolution 4k or more due to video proxies technologies in the editor.
Cut, merge video files, apply visual and audio effects, use filtration and image correction, make slideshows and add an appropriate soundtrack. Use multi-color Chroma Key and advanced parameters settings to give your video a professional look.
All popular video and audio formats are supported.

Read more about Video Editor...

Video Converter

This program is intended for converting video files from one format to another. Nearly all popular video formats are supported (both reading and saving). In addition, the program drastically simplifies the task of converting videos for playback on specific multimedia devices, such as iPhone, Samsung Galaxy or Huawei P30 Pro. The program is extremely easy to use, has a modern interface and all necessary video processing functions.

Read more about Video Converter...

Audio Converter

The audio converter will help you convert audio files from one format to another. All key audio formats and codecs are supported. The program also allows you to manage playlists and meta tags, extract audio from video files and save these tracks on your computer in any format.

Read more about Audio Converter...

Audio CD Grabber

This audio tool is intended for grabbing audio tracks from compact discs and saving them to the user’s computer in any format. Nearly all popular audio formats and codecs are supported. The program can also extract track details from the FreeDB server for automatic file renaming and updating meta tags.

Read more about Audio CD Grabber...

Multifunctionality

Multifunctionality

A wide array of multimedia processing tools in one free video software suite.

High speed

High speed

Our programs use fast
and high-quality algorithms optimized for single and multi-core CPU’s.

Affordability

Affordability

VSDC video software is freely available for download to Windows OS-based PCs and laptops.

How to Activate VSDC Premium Template Packs to Fix Export Issues

Solved: Learn how to properly activate your VSDC premium templates and resolve export warning messages with this comprehensive guide.

Understanding the Premium Template Activation Process

Have you purchased a VSDC premium pack but still can't export your project? Are you seeing warning messages during export? This typically indicates the activation process wasn't fully completed.

Don't worry - this common issue has a straightforward solution. Follow our step-by-step guide to ensure everything is set up correctly.

VSDC premium template notification screen

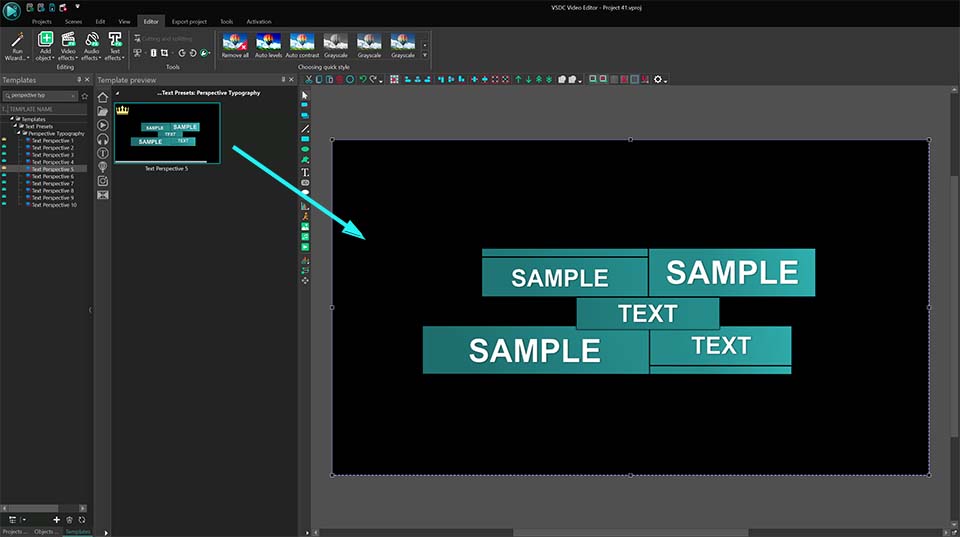
Initial Setup: Using Premium Templates

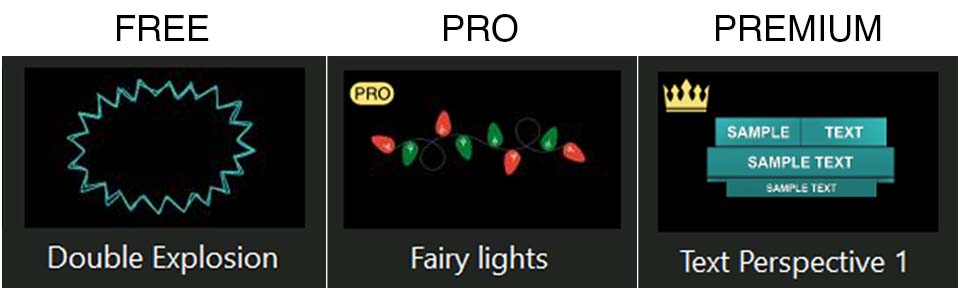
The process begins when you incorporate a premium template into your project. A notification will appear informing you that the content requires purchase. This occurs in both Free and Pro versions of VSDC, as these templates are separate products designed by our team to accelerate your editing workflow.

When this message appears, you have two options:

  • Remove the premium template from your timeline
  • Purchase the pack by clicking the "Unlock" button in the warning message
VSDC purchase form and license key email

Receiving Your License Key

After completing your purchase, you'll receive an email containing your license key in the format: X-XXXXXX-XXXXXX-XXXXXX-XXXXXX along with activation instructions.

Important: Ensure you have access to the email address used for purchase at this stage.

VSDC license key activation methods

Two Methods to Activate Your Premium Pack

After purchasing, you must enter the received license key into the editor. Without this final step, you cannot export projects using premium templates.

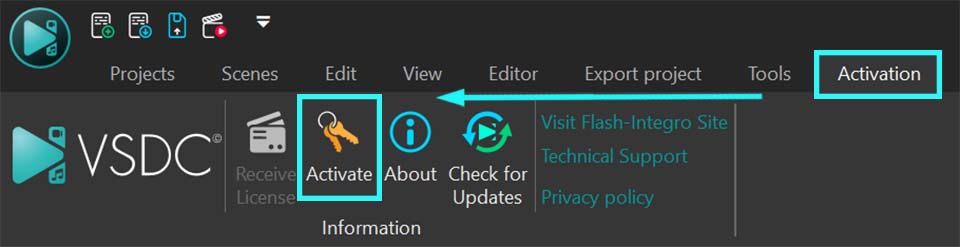
Method 1: Activation via Application Menu (Recommended)

This method provides direct access to the software's licensing system.

  1. Open VSDC Video Editor and start a new or existing project
  2. Access the Activation Tab from the top menu bar
  3. Select "Activate" from the dropdown menu
  4. Enter your license key in the dialog box
  5. Carefully paste or type your key
  6. Confirm the entry and restart VSDC

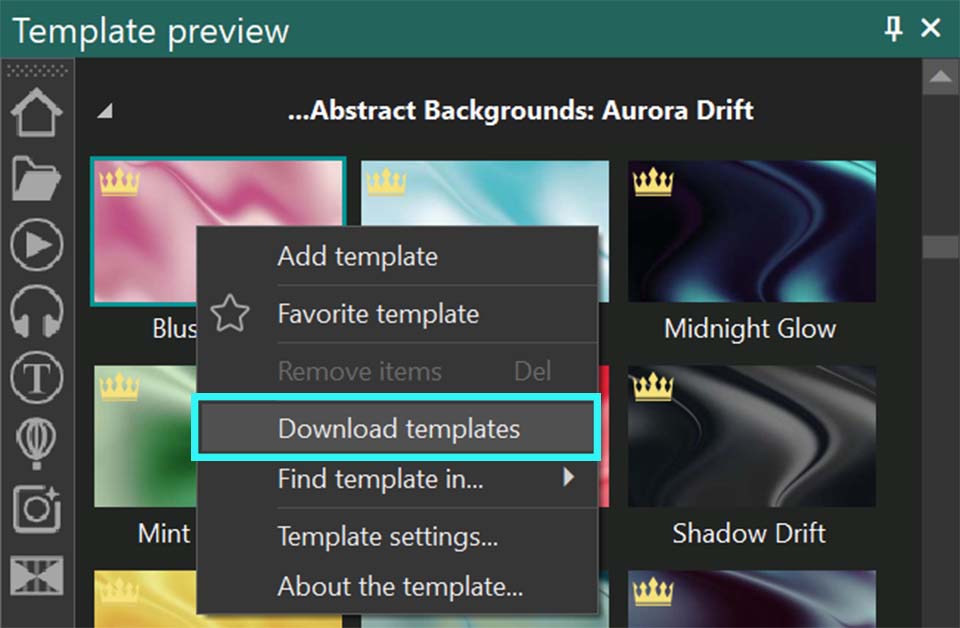
Method 2: Contextual Activation from Templates Window

This method allows activation directly from the resource you're using.

  1. Open VSDC Video Editor and start a new or existing project
  2. Right-click on any template from the premium pack in the Templates window
  3. Select "Activate template"
  4. Input your license key when prompted
  5. Fully restart VSDC to complete activation

Verifying Successful Activation

After restarting the software, the activation process is complete. The program will no longer display warning messages for previously locked templates, and you can export projects without limitations.

Frequently Asked Questions (FAQ)

I purchased a pack and entered the key, but I'm still getting the warning on export. What should I do?

This typically occurs because the application wasn't fully restarted. Close VSDC completely and reopen it. Activation only finalizes after a restart. If problems persist, verify you copied and pasted the entire key correctly without extra spaces.

Do I need the VSDC Pro version to use premium template packs?

No. Premium template packs are separate products that can be purchased and activated in both Free and Pro versions of VSDC. The warning and activation process is identical for both editions.

I'm getting an "Invalid Key" error. What does this mean?

This usually indicates the key was entered incorrectly. Ensure you're typing or pasting the key in the exact format: X-XXXXXX-XXXXXX-XXXXXX-XXXXXX. Check for confused characters (number 0 vs letter O, number 1 vs letter l) and remove any extra spaces at the beginning or end.

Will my premium pack activation expire?

Yes, each license key is valid for one year. After this period, you need to renew your license.

Where can I see the full catalog of available template packs and their descriptions?

Browse the complete collection of premium template packs on our official website. You'll find high-quality previews, detailed descriptions of each pack's contents (intro scenes, transitions, etc.), and current pricing. View the full catalog here.

Need Additional Help?

If you couldn't find the answer you were looking for, please contact our support team at This email address is being protected from spambots. You need JavaScript enabled to view it..

Create Dynamic Background Images and Wallpapers in VSDC

published Heinz Neuhauser 9/1/25

How to create an animated gradient logo in VSDC

You’ve probably seen those mesmerizing, dynamic wallpapers where colors melt and swirl together, creating a hypnotic flow of motion and light. Often featured on smartphone lock screens they’re hard to ignore because they are so vivid, fluid and captivating. Surprisingly, you can recreate those stunning color flows yourself using VSDC PRO. All it takes is a bit of imagination because the rest is easily done with the VSDC tools!

And if you're working with the free version, you can still craft beautiful static designs which will be just like you wish them to be and what’s more, they will be only YOURS.

So don’t wait, dive into the article and start creating!

Static Color Designs (FREE)

To begin, let’s go over the features available in the free version of VSDC for this task. Start by creating a new project: either click "Blank Project" on the start page or select "New Project" from the top menu in the Projects tab. Since we’re designing a smartphone background, you’ll need to choose the appropriate resolution. If your desired resolution isn’t listed in the settings window that appears when launching the project, you can manually adjust the width and height right there.

Common smartphone resolutions include:

  • 1080x1920 (Full HD, standard for many devices)
  • 1440x2560 (Quad HD, for high-end phones)
  • 1242x2688 (iPhone Pro Max variants)
  • 1125x2436 (iPhone X/XS/11 Pro)

How to Set Project Size and ResolutionA guide to inputting the exact height and width for your project's dimensions

Next, use the Free Shape tool to create the background. Make sure the shape covers the entire scene. If you’re using VSDC version 10.1 or later, you can access the built-in gallery of premade shapes. Just left-click the Free Shape option, select "From gallery" and pick a shape that fits your design: in this case, we’ll use the square and stretch it to fill the scene completely.

To apply a point gradient to your shape, click it on the timeline to access its settings in the Properties window. Locate the Brush option and set it to "Point gradient".

After that double-click your free shape on the timeline to reveal its control points. These points will determine the gradient distribution. Select the first point, then go to the Properties window of the selected point. Enable "Brush gradient settings" and adjust the color as needed. Repeat this process for each point.

Preparing to select colors for a custom gradient background by enabling the correct mode.

In our example the free shape consists of four main points, so the gradient is based on four colors. If you need a smoother or more complex gradient with additional colors, you’ll need to create more points when initially designing the free shape.

If you notice that a certain color appears too bright or not bright enough, you can adjust it by selecting the corresponding point in the properties and modifying the "Weight" parameter to achieve the desired look.

Choosing your palette and using the Weight parameter to control color blending

Now that your gradient image is ready, it’s time to save it! Head over to the Editor tab and locate the green circle with a wrench icon (the repair tool), then select "Create a snapshot". Instantly, your image will appear in the Resources window, from where you can export it by right-clicking on it and choosing the corresponding option. Once saved, transfer it to your phone and set it as a wallpaper.

Exporting a Static Background with SnapshotUsing the snapshot tool to create a still image of your gradient design

Of course, such images can be created not just for smartphones, but for a wide range of other purposes as well.

How Your Gradient Wallpaper Looks on a Phone
Displaying the final static background as it appears on a mobile device

Make Your Images Dynamic Using Color Keyframes (PRO)

If you upgrade to the PRO version, you can enhance your image with dynamic effects. To achieve this, we'll need to define keyframes and assign specific color values to them. Let's create an animated gradient where each corner of the image cycles through a color sequence.

For this project the initial colors are set as follows: the top right corner is blue, the top left is yellow, the bottom right is purple and the bottom left is green.

Activating the keyframe functionality to start animating color changes over time

Click on any Free Shape point on the timeline and locate the Color option. Click on the three dots in the corner of this setting to launch the Key Editor.

For easier workflow in the Key Editor, let's rename the "Color*" tab to "1" (which corresponds to the color this point has). We'll repeat this sequence for each of the four points we have on the timeline. Since there are four points in total, you should end up with four tabs in the Key Editor.

Renaming and organizing editor tabs for a more efficient animation process

For each of these points, we’ll set three keyframes. Please keep in mind that the display time for the first keyframe is the same across all points: the second keyframe shares another uniform timing, and so on.

Take the point we named with number one as an example. For us it is a blur color. Let’s move the cursor to approximately the 2.5-second mark and click the diamond icon to add a keyframe in the Key Editor. Repeat the same steps for the 5-second and 7.5-second marks.

By default, all newly added keyframes for a given point retain the original color value assigned to that point (for us it is blue). The same process applies to the remaining points of the free shape.

Now let’s set the colors for each keyframe. Go to the tab 1 in the Key Editor, find the second keyframe, double-click it and choose, for example, yellow color. We’ll set the colors for keyframe in each tab like that:

The top-right corner (blue): blue → yellow → green → purple → blue.
The top-left corner point (yellow): yellow → green → purple → blue → yellow.
The bottom-right corner point (purple): purple → blue → yellow → green → purple.
The bottom-left corner point (green): green → purple → blue → yellow → green.

The Key Editor adjusts the position of each point based on your chosen color, allowing you to alter the shade or even the color itself by simply moving the point, though the final result ultimately comes down to personal preference.

Adding and manipulating color keyframes to create dynamic motion

Click the Play option and see the result! So nice, isn’t it?

The final result of smoothly transitioning colors in a dynamic background

If you want it to be more eye-catching, you can easily spice it up with the tracking point feature. Go to Scene 0 and double-click on the timeline. Locate the “Add tracking point” option in the Objects toolbar, click on it and position it anywhere in the preview window.

Adding a Tracking Point for Animated Effects
Using the add tracking point tool to attach and animate a light source

In the Properties window enable the Brush gradient settings and set the color value for the future running light, adjust its opacity and weight to your desire.

Configuring the Brush for Light Effects
Adjusting the Brush tool's Color, Opacity and Weight to design light streaks

After that you’ll need just to set the trajectory that your running light will follow. For that double-click your tracking point on the timeline and choose another tool from the Objects toolbar: Movement. Click this tool and choose the place where the running light should come by clicking on this place on the scene. If you want to continue the trajectory, choose the point you’ve just added, click the movement tool again and add another point. You can create as many trajectories as you wish. If you want to learn more about the Movement tool, please read this article.

And that’s the result, just an example of what can be done using VSDC!

Showcasing the completed effect with flowing colors and a moving light trail

Explore more VSDC tutorials and unlock the full potential of your creativity. If you have any questions, we are always happy to hear from you at This email address is being protected from spambots. You need JavaScript enabled to view it..

Don’t forget to watch our video tutorials on YouTube and follow us on other social media.

Instantly Add GPS Stats to Your Track Videos - Just One Click!

Your Track Video + GPS Telemetry: Easy One-Click Overlay!

If you’re a PRO user who loves capturing adventures with GoPro, Insta360, Suunto, Garmin or TomTom devices or any smartphone tracking app, you’ll love the latest VSDC Video Editor 10.1 update!

Thanks to full support for the popular GPX format (GPS Exchange Format), VSDC now makes it easy to display your GPS route, speed, altitude, acceleration, tilt angle and more. Whether you're tracking a mountain hike with your Garmin watch or capturing a drone flight path, chances are you're working with a GPX file. This lightweight format stores tracks, waypoints and routes, making it incredibly versatile across GPS devices, fitness apps and even action cameras. With just a few clicks you can import your telemetry file, choose a display style and enrich your footage with dynamic motion graphics!

The settings for a trajectory created from this info in VSDC allow you to precisely control its appearance and animation. You can adjust the line thickness, select a brush style for the path and enable a gradient between two colors to visualize parameters like speed or altitude. The feature also includes options to display the current position along the route and automatically add text labels with point names. The timing of the route's appearance and the duration of its drawing animation can be manually adjusted, enabling synchronization with other elements in your project.

Why This Matters:

  • Enhance storytelling by showing your journey’s data visually
  • Perfect for athletes analyzing performance (cycling, drones, motorsports)
  • Great for travel creators adding maps to adventures
  • Ideal for educators explaining GPS concepts

This is a PRO feature but everyone can try it for free in VSDC! Download now and enhance your videos today.

How to Make Dynamic Curve Lines with Variable Thickness, Gradients and Animation in VSDC

published Amy Shao 7/29/25

Curve Line Tool: New Features You Need to Know!

One of the most exciting upgrades in VSDC 10.1 is the enhanced Curve Line tool, now featuring variable line thickness, rounded edges, soft borders, customizable blur settings and many more. This combination lets you achieve great effects from natural-looking handwriting with adjustable thickness to professional glows, smooth light trails and depth effects (similar to 3D) using soft edges and blur. Want to discover how these improvements can transform your videos? Keep reading for all the details!

New Curve Line Properties

Let's begin by exploring the upgraded curve line functionality. First, add a curve line to your scene and select it on the timeline to view all available properties in the right-hand panel. Among the familiar options (if you need more details, please, check out this article again), you'll find several new settings under the "Curve Line Extra Settings" section in the Properties window. These are what we'll focus on today.

If this section is inactive, toggle the nearby slider to enable it, then expand the section by clicking on the left arrow.

Exploring additional customization options for curve lines

The first property you'll see is "Cap mode" that is useful for customizing your curve line's ends. Click on the arrow to reveal four options: "Caps on both ends" adds smoothing caps to all open ends, "Start cap only" or "End cap only" applies the effect to just one side and "No caps" keeps ends unmodified. Choose the one which is better for your needs.

Tip: for organic, hand-drawn effects, "Caps on both ends" typically works best. "Start cap only" is ideal for directional elements like growing lines, while "End cap only" works well for flowing designs like light trails. For sharp technical precision in UI/UX designs, choose "No caps".

This setting directly relates to the next one: "Cap style". Here you'll find three ways to display stroke ends: "Round" creates smooth semicircular caps ideal for organic shapes, "Square" extends the cap by half the stroke width for technical designs and "Rectangle" stops strokes precisely at endpoints for clean cuts.

Enabling the next option, "Round Edges", automatically softens your curve line by rounding all sharp corners into smooth arcs, creating natural-looking shapes.

For finishing touches, don’t forget to try two key smoothing options. The first one, Feathering, creates gradual transitions between your curve and background: adjust its intensity for anything from subtle glows to fully blended edges. The second one, Blurring, offers even softer results, giving your lines an ethereal quality. Its intensity is adjustable too.

Let's explore how much creative potential they unlock and create a project together.

How to Change Line Width Dynamically

Now that you're familiar with the new curve line settings, let's put this knowledge into practice. A frequently requested feature, dynamic line thickness, is finally here, and we're about to explore exactly how it works.

Simply try setting different values for the Thickness parameter of each point of your curve line. When each point has a different value for this setting, the editor automatically creates smooth transitions between them, producing gradual tapering effects along the curve segment.

To adjust the line thickness at a specific point, simply click on the desired one along the curve with CTRL pressed, and the Properties window will immediately display all customizable parameters for that selected point. Just enable the “Curve line thickness settings” and assign your desired value in the Thickness option.

Modifying the point thickness of a curved line for varied visual effects

Need more control points? Select the Curve Line tool, choose "Insert point", then click anywhere along your curve to add new points. Remember that holding CTRL while dragging point handles lets you fine-tune your curve's smoothness using Bezier vectors.

Let’s see this in action: create a сurve line with three points, setting the thickness to 100 at the first point, 300 at the second and 500 at the third. Notice how the line tapers, mimicking natural brushstrokes or calligraphy. This smooth interpolation between values becomes even more eye-catching when combined with rounded caps for polished endings, soft blur and thickness for self-drawing effects.

Demonstrating a curve line with dynamically changing thickness values

Design Challenge

Let’s dive into a creative experimentation and see how its variable thickness capabilities work in action. We’ll choose a reference image and try to recreate it inside the VSDC video editor.

A sample picture used to test new curve line settings and styles

The image we’re working with is not only based on the use of variable line thickness, but it’s also perfectly symmetrical, this detail plays to our advantage. Start by adding the reference image to the scene as a visual guide. Then carefully trace one of the portions (for example, just the left side) of the design and plot each curve point manually while assigning specific thickness values. As you work, you'll immediately see these tapered variations create flowing movement along the lines. Once satisfied with your traced section, simply toggle the eye icon on the timeline to hide the reference layer or remove it entirely.

Using the curve line tool to recreate or trace elements from the reference image

After that, to organize the drawing, group all created curve lines into a sprite: select them on the timeline, right-click and choose “Convert to sprite” from the menu.

Grouping multiple curve line objects into one unified sprite for easier navigation

The next step is to create a mirrored version of the sprite to complete the right half of the image. Make a copy of the sprite, click on it and apply the Flip effect from the “Video effects” >> Transforms” to it. This effect will be added to your duplicate sprite on the timeline. Click on it to open the Properties window and choose the type of flip depending on your image. For our experimentation, we choose the horizontal flip for the Direction option . Align the two halves on the scene to achieve a reflection.

Creating a mirrored or repeated version of the original sprite for design consistency

With both halves in place, you can now enhance the look by applying a color scheme. If you want to shift the overall mood of the image, consider using one of the gradient background templates available in VSDC. To do that, first convert the two mirrored sprites into one unified sprite using the same method as before. Then go to the Templates window and find the “General backgrounds” section under “Background templates”. For this example, we’ll use the “Fuchsia Gradient” template. Drag the template into your unified sprite either directly on the timeline or by dropping it onto the scene. Ensure it's placed on the top layer for proper compositing and make sure the “Use as container” parameter is set to “No, use effects and clipping” for it in the Properties window. Then change the composition mode of the layer with gradient template to “Source in”. You can do it in the left part of the timeline under the Composition mode section.

Using the Source In blending mode to merge layers with transparency effects

The result is a stylized symmetrical artwork elevated by rich gradient tones.

The outcome of applying curve line adjustments, grouping, and composition modes

You can choose from free, PRO or premium templates (learn more about each category in this article).

If you're after something even more dynamic, try animating the lines. The Curve Line tool includes a parameter called “Visible length”, which allows you to simulate the effect of a line being drawn in real time. This opens up opportunities for creating impressive visuals where the image gradually appears as if sketched by an invisible hand. All you need is just click on your curve lines on the timeline, expand this option for each of them and set Initial and Final values as needed.

In just a few steps, VSDC lets you recreate complex illustrations, mirror them with precision, apply vibrant gradients and animate every stroke.

Do you like the result?

We hope you enjoyed exploring these settings with us! Don’t stop here: keep experimenting with your own projects. We’re sure you’ll achieve even better results that you’ll want to share.

If you have questions or creative ideas to share, we'd love to hear from you at This email address is being protected from spambots. You need JavaScript enabled to view it. or through our social networks: Facebook, X, Reddit or Discord. And remember to check out our YouTube channel for more inspiration!

VSDC Premium Templates: What They Are & How to Use Them

Edit Faster with VSDC Templates: Free, PRO & Premium Options

Spotted the crown-marked templates in the VSDC Template Window? Do you know what they’re for? The answer is already here!

These are Premium templates, designed to help you create eye-catching videos! With them you can create professional-looking videos in just a few minutes, saving time on setting up animations, transitions and many other elements.

These ready-made templates provide everything you need for a wide range of tasks: beautiful backgrounds, stylish and unique titles, smooth transitions between slides, images or videos, vibrant and emotional LUTs and even pre-configured slideshows where all you need to do is add your media! Best of all – most of these templates include PRO features, but even if you're using the FREE version, you can still export your project without limitations just by purchasing these templates!

Navigating the Template Window in VSDC

Before we dive into activating and applying Premium templates, let’s first explore how all templates are organized in the Template window. There are three main categories: Free templates, PRO templates and Premium templates. Here’s how you can easily distinguish them.

The Difference Between Free, PRO and Premium Templates in VSDC

Free Templates

Free templates are available to all VSDC Video Editor users and do not have any special markings, so questions about them rarely arise.

You can access a wide variety of free options and easily find what you need using the search bar in the Template window.

PRO Templates

PRO templates are marked with a PRO label and a small lock icon in the Template Preview window (to view them, click the small arrow on the right side of the Template window). These templates are available for all users to apply, but only PRO version holders can export them.

Premium Templates

Premium templates, as mentioned earlier, are marked with crowns, and in the Template Preview window, they also have lock icons. The color of the crown indicates whether the template has been downloaded from the server: a blue crown means the template has not been downloaded yet, while a yellow crown means the download is complete and the template is ready to use.

Please note that in case the crown icons are not displayed, it's better to browse the templates through the Template Preview window.

These templates are available for all users to edit in the video editor, but exporting a project with them is only possible after purchasing the full collection or collections that include the applied template. Once purchased, both Free and PRO users can export their projects with these Premium templates.

How to Activate a Premium Template using VSDC Catalog

The VSDC Catalog is the easiest way to explore and purchase the best template collections for your needs. It provides a complete overview of all available packs, allowing you to preview each collection, watch a short demo video and read descriptions outlining their purpose and functionality.

Do you prefer transitions, animated backgrounds or something else? Browse through the available collections and pick the perfect option for your project!

Once you've made your choice, click BUY, fill out the checkout form and complete your order. After purchasing, you will receive a unique activation key via email. To activate your template collection:

  • Go to the Activation tab in VSDC
  • Click “Activate” and enter the key you received via email when purchasing the template collection
  • Restart your video editor.

Activation Process. The Option for Activating Templates

After activation, open the Template window, find your purchased collection and start using the templates! To ensure smooth access, download the templates before applying them by selecting the ones you need, right-clicking and choosing the “Download templates” option. Once the crowns turn yellow, the templates are ready to use.

Download Templates Option - How to Download a Template

How to Activate a Premium Template inside the Video Editor

Here the process is even simpler because you get a preview of how the template will look in your project before purchasing. Let’s say you apply a template, and when exporting the project, a notification appears indicating the use of a premium feature (marked as an Image, Template or Sprite with a lock icon).

Notification Indicating the Use of a Premium Feature. Example Notification of Using a Premium Feature

If you decide to export your project with this template, you’ll need to purchase it. Simply click on the Unlock in the window that appears during the export stage. This will take you to the checkout page, where you can complete your purchase. Once you receive your activation key via email, activate your collection through the Activation tab in VSDC and restart the video editor.

Working with Templates: Applying, Customizing and Adapting for Your Project

When using templates, the main goal is often to save time and effort by simplifying complex tasks. After all, why reinvent the wheel when you can use a ready-made solution? But here’s the best part—you can customize templates in a way that makes them uniquely yours!

For example, let’s take a text-based template from the Premium Perspective Typography pack. Say you want to create a standout headline. Open the Template window, find the Perspective Typography folder and preview different templates. Choose a template—for instance, Text Perspective 5—and drag it onto the scene or the timeline.

Text-Based Template. Using the Text Perspective 5 Template

If the template hasn't been purchased yet, you'll notice a lock icon on the timeline and a notification in the bottom-right corner stating: "This is a Premium template available only for previewing. To export the project, please purchase it".

A Lock Icon on the Timeline. Indication that the Template is not Purchased

You can fully customize the template before purchasing. Since it appears as a sprite, you can explore its structure and modify individual elements—such as animation speed, color, Zoom intensity, etc.—before deciding to buy the pack.

Changing the Color of Text-Based Template

For another example, let’s see a premium LUT template. When you apply it to a video object, it’s automatically applied within that object. Unlike text-based templates, LUT templates are easier to adjust since they contain a single effect. You can modify them directly through the Properties window (don’t forget to select the LUT object on the timeline). Just click on Edit LUT there and adjust the color grading based on your desired tone and mood.

In our example, we use the “Golden Hue” template (the “Filmic Tones” LUT collection):

Edit the LUT Property

The Result Before/After Using the LUT. Using the “Golden Hue” Template

The only type of templates that work differently than previously described are transitions (this applies to Free, Pro and Premium templates). Typically, transitions are used between two videos to create a smooth visual flow from one to the next. To apply a transition, press and hold the ALT key, then use the left mouse button to drag the edge of the second video over the first one until a line appears between them. Finally, select the transition you want and drag it onto the space between the two objects.

There aren’t as many customization options for transitions as in the previous examples, but you can always adjust the transition duration. By extending the area between the two objects where the transition is applied, you can increase its duration, making it smoother. Conversely, by reducing this area, you can shorten the transition time, making it quicker and more abrupt.

See the example video with the transition Push top to bottom:

Now you know everything about our Premium Templates! We hope this article has been helpful to you. Learn more about the capabilities of VSDC Video Editor and what you can create with it.

Have you seen all our new premium packs? Share your thoughts with us on our Facebook, YouTube, X, Reddit or Discord!

If you have any questions or suggestions, feel free to reach out to our support team via email—we’d love to hear from you at This email address is being protected from spambots. You need JavaScript enabled to view it.!

Page 1 of 39

News

Major VSDC 10.1 Update: Advanced HDR, GPS Telemetry, New Effects, Great Variety of New Templates and Tools For Different Needs

published Amy Shao 6/10/25 The wait for something new and unusual is finally over! The update is here and it isn’t just another version: it’s VSDC 10.1! VSDC 10.1 Update: Advanced HDR, GPS Telemetry,...

VSDC Christmas Update 9.4: Enhanced Effect Management, 100+ Background Templates and Streamlined Editing

This holiday season embraces new beginnings with the latest update of VSDC Video Editor! We’ve listened to your feedback and decided to focus on enhancing the tools you love most—all while laying the...

How VSDC Free Became My Secret Weapon for Watermark (Free 4K Editing in 2025)

Hi, I'm Mattea Wharton, a travel videographer from Seattle. For three years I battled with video editors that slapped ugly watermarks on my videos until I found VSDC. This free no-subscription editor completely...

VSDC 9.3: 150+ Templates, Text Transformer, Sprite Auto-Detect and GUI Update

Change is all about improvement, and this process wouldn't be possible without your input. After carefully reviewing your feedback, we’ve addressed several key issues and introduced updates designed...

Best Special Effects Software

Intro In 2024 the options range for creating visual effects is incredibly diverse and it becomes more and more challenging to identify the top choices. Here you can find a guide to the top visual FX...

VSDC 9.2: AI Segmentation Models, 300+ Transitions, VSDC Cloud and New Templates Pack

Are you ready to explore new heights with the latest major VSDC update? Finally, Version 9.2 is here! Packed with groundbreaking features, including the new AI-powered Segmentation tool, this update offers...

How Black and White Movies Were Colorized

Are you a fan of classic black and white films? Ever been curious about how they would appear if they were in color? Many filmmakers have pondered the same, leading to numerous classic movies being colorized....

The Best Online Video Editors in 2025: Benefits and Drawbacks

May 15, 2025 published by Amy Shao In today’s digital landscape, the popularity of video content is gaining momentum, with users increasingly turning to video creation both for personal advantage and...

New Transition Addition Methods, RAW/BRAW Files Support and Free Waveform

Welcome to the next level of video editing with VSDC's latest release, Version 9.1! Packed with an array of fresh features and enhancements, this update is designed to make your video editing experience...

VSDC 8.3 – 100+ New Templates, Key Editor Window, AV1 and Enhanced GUI

Welcome to the latest VSDC update, Version 8.3! We've been working hard and we’re ready to present a feature-packed release for you to discover an exciting array of over 100 fresh free video templates,...
 

Screen Recorder Box

This program allows you to capture the video of your desktop and save it on your PC in various formats. Coupled with a video editor, the program is a great tool for creating presentations, tutorials and demo videos.

Read more about Screen Recorder...


Video Capture Box

The program captures video from external devices and records it to computer in a free format. You can save video from video tuners, webcams, capture cards and other gadgets.

Read more about Video Capture...


Reviewed by


"VSDC Free Video Editor is a surprisingly powerful, if unconventional video editor"

- PC Advisor


"This video editor gives you tons of control and editing power"

- CNet


"The editor handles many common formats and boasts a good deal of capabilities when it comes time to alter lighting, splice video, and apply filters and transitions in post production"

- Digital Trends