 User Help Manual
  Learn FAQ
  Send us feedback


Video Editor
Download and use the free video software to create and edit videos of any complexity from a family greeting card to a company presentation. Apply vsdc free video editor for light edit hdr-video, any raw-video formats from cams - BRAW, ProRes RAW, any high resolution 4k or more due to video proxies technologies in the editor.
Cut, merge video files, apply visual and audio effects, use filtration and image correction, make slideshows and add an appropriate soundtrack. Use multi-color Chroma Key and advanced parameters settings to give your video a professional look.
All popular video and audio formats are supported.
Video Converter
This program is intended for converting video files from one format to another. Nearly all popular video formats are supported (both reading and saving). In addition, the program drastically simplifies the task of converting videos for playback on specific multimedia devices, such as iPhone, Samsung Galaxy or Huawei P30 Pro. The program is extremely easy to use, has a modern interface and all necessary video processing functions.
Audio Converter
The audio converter will help you convert audio files from one format to another. All key audio formats and codecs are supported. The program also allows you to manage playlists and meta tags, extract audio from video files and save these tracks on your computer in any format.
Animated Intro & Title Templates
Explore the VSDC Template Store with ready-made video templates for intros, animated titles, lower thirds, logo reveals, slideshows, glitch transitions, LUTs, and color grading presets. Drop a template into the VSDC Video Editor timeline, edit text, timing, and colors, and finish professional video projects in minutes.
Choose from 300+ exclusive packs of video transitions, LUT packs, text effects, GPS telemetry widgets, animated elements, and animated backgrounds for VSDC. All templates are fully customizable, support up to 4K resolution in 16:9, and help you build intros, wedding slideshows, travel videos, and tutorials much faster.
VSDC Cloud - Online video management
Keep your work safe, organized and always accessible! Back up your video projects, store media files online and access them from any device. Enjoy collaboration, share project updates and exchange files easily.
 Video Editor
 Video Converter
 Audio Tools
 Templates store
 Cloud
Cloud

Multifunctionality
A wide array of multimedia processing tools in one free video software suite.

High speed
Our programs use fast
and high-quality algorithms optimized for single and multi-core CPU’s.

Affordability
VSDC video software is freely available for download to Windows OS-based PCs and laptops.
News:
- Published by Amy Shao on June 30, 2026 Meet the new major update ...
- Published by Amy Shao on March 11, 2026 What is the best gift for...
- published Amy Shao 11/19/25 Meet the long-awaited VSDC 10.2 update: a new ve...
- Hi, I'm Mattea Wharton, a travel videographer from Seattle. For three years I ba...
How to Apply test
The Paint Brush transition is a popular effect that imitates brush strokes. You can use it to gradually move from one scene to another by either covering the video with a paint brush stroke by stroke, or revealing the next image from under a coat of paint. Here is what it looks like:
From this tutorial, you’ll find out how to apply this effect in your videos and tailor it to your vision. The Paint Brush effect is available in VSDC starting version 6.8, so make sure to download it before moving one with the tutorial.
How to apply Paint Brush transition in VSDC
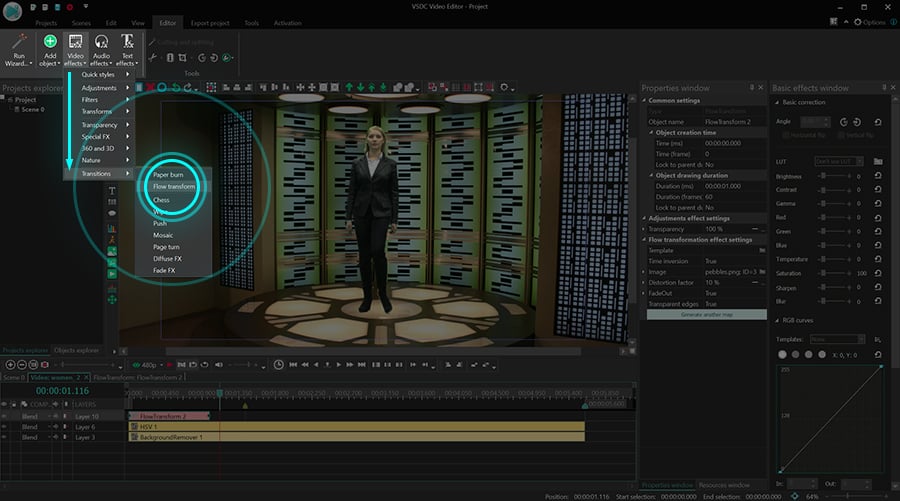
Once you download VSDC, launch it on your computer and import your footage. We recommend using the Import content button unless you want to apply custom parameters to the project. Next, select the video you want to apply the transition to, open the Video effects menu, proceed to Transitions and select Paint Brush.

The Object position settings window will pop up indicating that the transition will be added to the end of the scene. Click OK to proceed and preview the result. Notice that if you want to stretch the duration of the transition, you’ll be able to do it manually. We’ll talk more about it in the following section.
How to access Paint Brush transition settings
To open the effect settings, first make a double-click on the video you’ve applied the effect to. You’ll find yourself in a new tab with the effect layer named PaintEffect. Make a right click on it and select Properties. The Properties window will slide-in from the right.
The Properties window for the Paint Brush transition includes 3 groups of settings:
- Common settings
- Adjustment settings
- Chess settings - Paint Brush effect settings

Let’s go over each group of settings and see what they do.
Common settings
The settings in the first group allow you to rename the transition effect layer, type the exact moment when the transition should begin (in seconds or in frames) and set its duration (in seconds or in frames). Keep in mind that you can also manually move and stretch the effect layer right on the timeline using the handlers.
Adjustment settings
The Adjustment settings consist of a single parameter, named Transparency. Transparency enables you to adjust the opacity level for the paint strokes. For example, if you leave the default value (100%), the paint will be completely non-transparent. However, if you decrease the value, you’ll start getting the see-through effect.
If you expand the Transparency parameter, you can access the Initial and Final values. These values enable you to set the opacity level for the beginning of the Paint Brush effect and the end of it, thus creating a smoother transition between scenes.
Paint Brush effect settings
The settings in the third group allow you to tailor the effect to your needs. For instance, you can change the direction and angle of the brush strokes, choose the brush width, and more.
Directly
The first parameter in this group is named Directly, and it refers to the direction of transition. If you leave this parameter deactivated, the paint brush will gradually cover your footage, stroke by stroke. If you activate this parameter, the transition will work in the opposite way and gradually uncover video from a coat of paint.
Stroke angle
The following parameter allows you to change the brush stroke angle. By default, the brush moves under a 45-degree angle, however, you can change this value to your taste. For example, in the illustration below, you can see how the strokes will look if you use a 90-degree and a 30-degree angles.
In addition to the Stroke angle, you can activate the option called Opposite side and change the side where the brush starts moving. For example, by default, the paint brush moves from right to left. In this case, the opposite side direction will be from left to right.
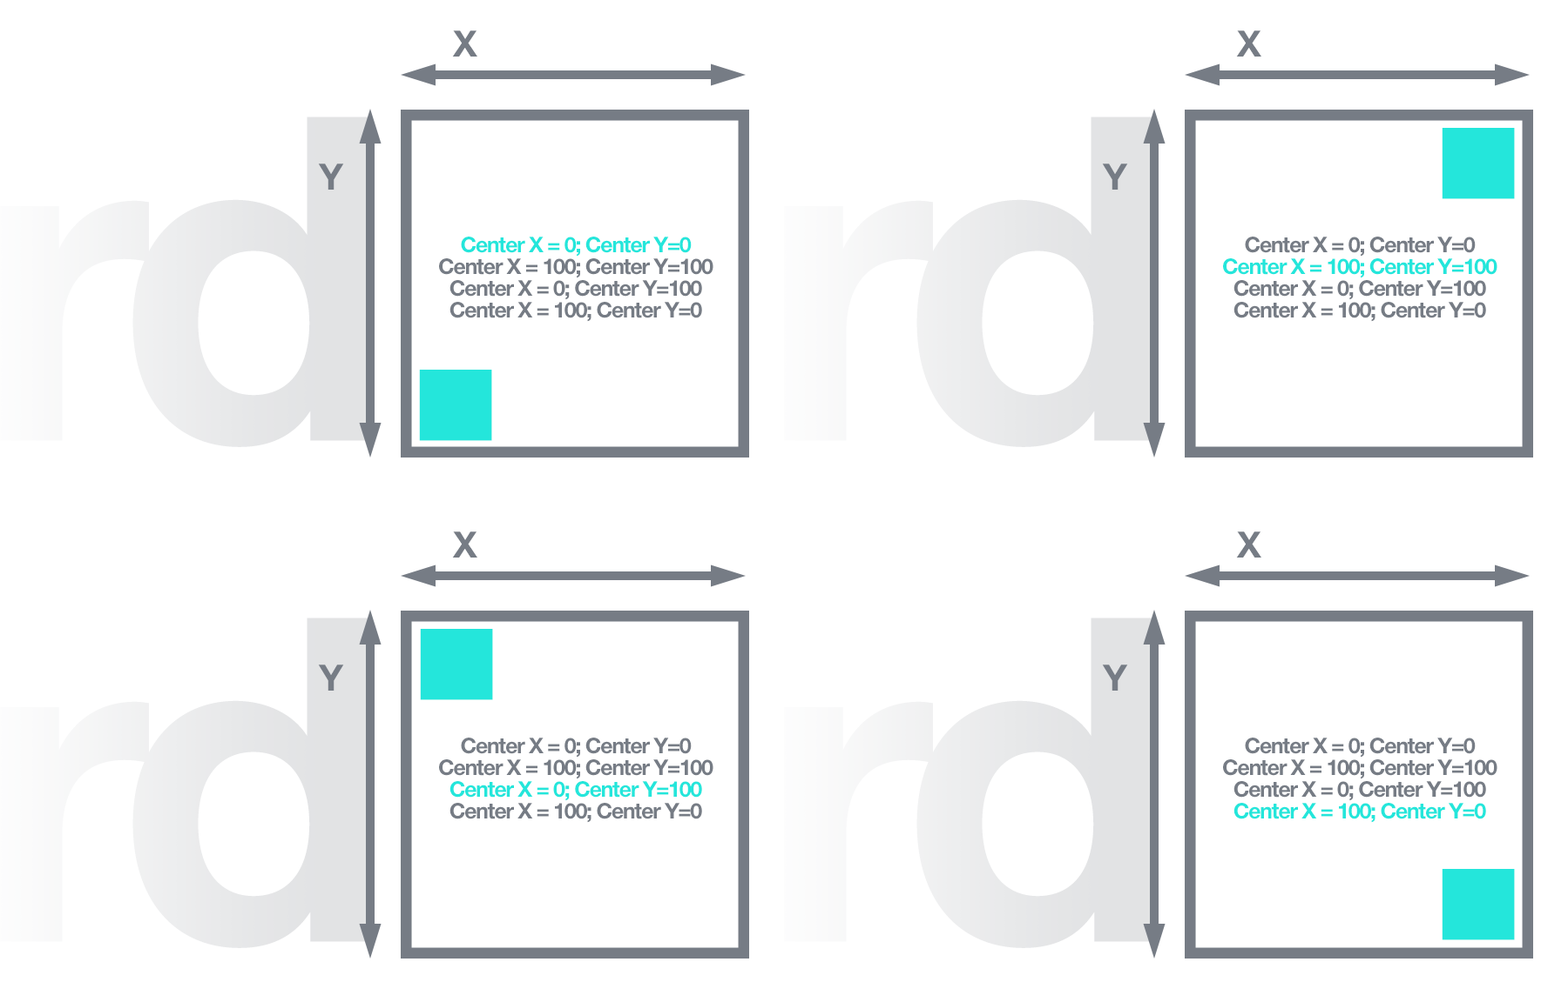
Starting corner
This parameter defines the corner where the effect starts. There are 4 self-explanatory options you can choose from: left-top, right-top, left-bottom, and right-bottom.
Brush width
Brush width is rather self-explanatory as well. This parameter defines how wide and thick brush strokes are, and you can leave its value consistent or make it dynamic. For example, if you set the Initial value at 10% and the Final value at 50%, each subsequent brush stroke will be thicker.
Blur
This parameter adds blur to the paint and makes brush strokes less defined. The higher the value, the more blurred the strokes will be. As a matter of fact, if you type 100%, the effect will resemble spray paint.
Brush movement direction
Brush movement direction is the brush movement pattern defining the order in which brush strokes are applied. The are 5 options you can choose from:
- Non-continuous – each subsequent brush stroke will start on the same side of the scene.
- Continuous – each subsequent brush stroke starts on the opposite side of the scene.
- Area-based – the scene gets divided into several areas, and each area gets covered with paint
- Random (same angle) – each brush stroke appears in a random place on the scene under the same angle.
- Random (random angle) – each brush stroke appears in a random place on the scene under a random angle.
Overlap coefficient
Overlap coefficient defines the percentage of brush strokes that appear on the scene at the same time. For example, if the total number of brush strokes required to cover the scene entirely is 12, and the overlap coefficient equals 30%, at any given moment, you’ll be seeing 4 brush strokes instead of just one.
Try the Paint Brush transition for free
The new Paint Brush transition effect is available in the free version of VSDC Video Editor, so if you liked this tutorial, go ahead and download VSDC from the official website.
Feel free to message us on Facebook and make sure to subscribe to our YouTube channel for a weekly doze of video editing inspiration.
 Download the latest version of VSDC
This program allows you to capture the video of your desktop and save it on your PC in various formats. Coupled with a video editor, the program is a great tool for creating presentations, tutorials and demo videos.

The program captures video from external devices and records it to computer in a free format. You can save video from video tuners, webcams, capture cards and other gadgets.
VSDC Video Editor Reviews & Ratings (Trustpilot, Capterra & Media)
VSDC Free Video Editor is rated 4.5/5 by real users on Trustpilot and Capterra. Here are a few reviews and quotes from creators and tech media.
Overall rating: 4.5/5 based on 200+ reviews on Trustpilot and 89 reviews on Capterra.
★★★★⯪
VSDC Free Video Editor is the best free video editor for Windows I’ve used, from color grading to picture-in-picture and cinematic results.
— Ejikeme Eloka Augustine
Source:Trustpilot
★★★★☆
Easy-to-use interface and quick export to social media make VSDC a versatile video editing tool for everyday projects.
— Karen C., E-Learning
Source:Capterra
★★★★☆
A feature-packed non-linear video editor for Windows that can compete with many paid video editing solutions.
— TechRadar
Source:TechRadar review
★★★★★
The free VSDC editor saved my YouTube channel – a powerful video editing software for chroma key, text effects and picture-in-picture.
— Paul Roberts
Source:Trustpilot
★★★★★
Fast and simple for YouTube videos with green screen, zoom, color tools and creative effects in one app.
— Marie R., Media Production
Source:Capterra
★★★★★
One of the best free video editor options for Windows users, ideal for GoPro, YouTube and family videos.
— VidProMom, YouTube creator
Source:Media reviews
★★★★★
I’ve been using VSDC for years; editing is easy and the final videos look great for my personal and professional projects.
— Long-time VSDC user
Source:Trustpilot
★★★★★
Great value and faster than many other free tools; I quickly create videos for YouTube, Instagram and Facebook with features my audience loves.
— Rabika B., Marketing & Advertising
Source:Capterra
★★★★★
VSDC offers many features you don’t usually find in free editors, including picture-in-picture, stabilization and modern codec support with no watermarks.
— Tech media review
Source:Media reviews
 Like us on Facebook
 Follow us on Twitter
Watch us on YouTube
 / @VSDCFreeVideoEditor
© 2011-2026, www.videosoftdev.com, FLASH-INTEGRO LLC. Privacy policy | Terms of use | About us
All trademarks referenced herein are the sole property of their respective owners.
Copying any materials from this site allowed only with written consent of Site Administration.