 User Help Manual
  Learn FAQ
  Send us feedback
 ")


Video Editor
Download and use the free video software to create and edit videos of any complexity from a family greeting card to a company presentation. Apply vsdc free video editor for light edit hdr-video, any raw-video formats from cams - BRAW, ProRes RAW, any high resolution 4k or more due to video proxies technologies in the editor.
Cut, merge video files, apply visual and audio effects, use filtration and image correction, make slideshows and add an appropriate soundtrack. Use multi-color Chroma Key and advanced parameters settings to give your video a professional look.
All popular video and audio formats are supported.
Video Converter
This program is intended for converting video files from one format to another. Nearly all popular video formats are supported (both reading and saving). In addition, the program drastically simplifies the task of converting videos for playback on specific multimedia devices, such as iPhone, Samsung Galaxy or Huawei P30 Pro. The program is extremely easy to use, has a modern interface and all necessary video processing functions.
Audio Converter
The audio converter will help you convert audio files from one format to another. All key audio formats and codecs are supported. The program also allows you to manage playlists and meta tags, extract audio from video files and save these tracks on your computer in any format.
Animated Intro & Title Templates
Explore the VSDC Template Store with ready-made video templates for intros, animated titles, lower thirds, logo reveals, slideshows, glitch transitions, LUTs, and color grading presets. Drop a template into the VSDC Video Editor timeline, edit text, timing, and colors, and finish professional video projects in minutes.
Choose from 300+ exclusive packs of video transitions, LUT packs, text effects, GPS telemetry widgets, animated elements, and animated backgrounds for VSDC. All templates are fully customizable, support up to 4K resolution in 16:9, and help you build intros, wedding slideshows, travel videos, and tutorials much faster.
VSDC Cloud - Online video management
Keep your work safe, organized and always accessible! Back up your video projects, store media files online and access them from any device. Enjoy collaboration, share project updates and exchange files easily.
 Video Editor
 Video Converter
 Audio Tools
 Store templates
 Cloud
Cloud

Multifunctionality
A wide array of multimedia processing tools in one free video software suite.

High speed
Our programs use fast
and high-quality algorithms optimized for single and multi-core CPU’s.

Affordability
VSDC video software is freely available for download to Windows OS-based PCs and laptops.
News:
- Published by Amy Shao on March 11, 2026 What is the best gift for...
- published Amy Shao 11/19/25 Meet the long-awaited VSDC 10.2 update: a new ve...
- Hi, I'm Mattea Wharton, a travel videographer from Seattle. For three years I ba...
- published Amy Shao 6/10/25 The wait for something new and unusual is finally...
The Ultimate Guide to Creating a Stop Motion Video on Computer
Stop motion animation is currently gaining a new wave of popularity. It’s unbelievable how the technique that used to dominate the storytelling genre for kids is now used for all types of videos! It serves perfectly to illustrate tutorials, promote products, show work in progress, or just impress and entertain your audience.
And if you’re a parent of school-age children, you might already know that making stop motion videos can be a perfect DIY project to keep kids busy at home!
The best part about it? Stop motion is super easy to shoot even if you have absolutely zero experience, zero professional equipment, and zero budget. All is required is a bit of creativity and patience.
From this article, you’ll learn how to create stop motion videos. We’ll walk you through the setup process, the shooting, and editing. This is a no-budget tutorial, which means you probably already have all the things you’ll need:
- Any camera. Smartphone, GoPro, DSLR – it doesn’t matter
- Laptop (we’ll be using a Windows PC)
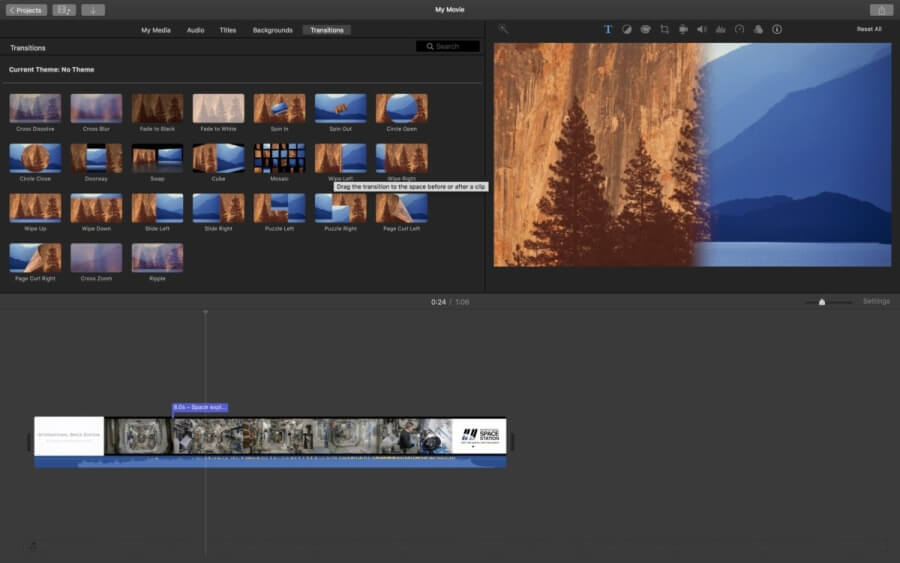
- VSDC Free Video Editor (if you’re on Mac, use iMovie)
Need ideas, too? At the end of the article, we’ll share 7 easy ideas for stop motion animation that you can borrow for your project.
Before we get to practice though, let’s make sure we have the theory sorted out.
Still confused about what stop motion is?
If you know nothing about stop motion, at first, it looks like magic. Just think about it. Objects – dolls, Lego parts, food, or pieces of paper – move around and change their shapes! All without human presence.

In reality, a stop motion video is just a bunch of photos of an object taken between the moments when you manually change its position or shape.
Here is what the process looks like: you place an object, take a photo, make a teeny-tiny change, take another photo, make another change, take another photo, and so on. When you stitch all the photos together and play their sequence at high speed, it looks as if the object is moving independently.
The smaller the changes are, and the more frames you take, the more realistic your stop motion animation will look. We’ll talk about all these details in a couple of paragraphs.
How to make a stop motion video step by step
Now that you have an idea of how stop motion animation works, let’s see exactly how you can bring your ideas to life.
Step one: create a storyboard
If you’re making your first stop motion video, it’s always a good idea to have a plan. And if you get your plan sketched – that’s even better. Storyboards will help you with that.
A storyboard is a visual breakdown of your stop motion animation – either by frames or by groups of frames. This is what your storyboard may look like:
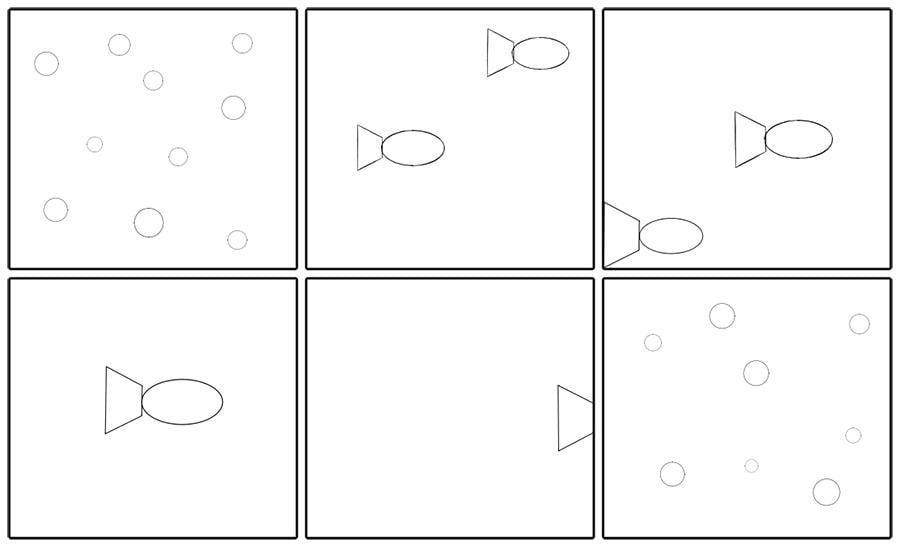
Source: Storyboard
Depending on your project, you will need to take from dozens to hundreds of photos. Sometimes, it can be overwhelming. Having a storyboard will help you ensure everything is going according to the scenario and you’ve shot all the frames you need.
You can create your own storyboard from scratch or find templates on Pinterest. Feel free to pick one and print it out for your convenience. Some creators prefer writing a bullet list of frames instead of sketching them. And if you decide to go that route – it’s up to you.
Step two: set up your camera
While the objects in your stop motion video will be moving, your camera shouldn’t. It is crucial for the frame to stay steady.
Sure, you will be able to fix minor frame shifts with the help of video editing software. However, to avoid that extra work, we strongly recommend using some sort of stabilization for the camera. You want to place it in one spot and leave it there until the end of shooting. Ideally, you shouldn’t even touch the shutter button.
What can you use? Depending on your camera, the ideal solutions would be a tripod, a gimbal, a selfie stick, a mount, or a car holder. If you have none of these, shooting will be less convenient, but still possible. Just keep in mind that once you find the position for the camera, you cannot move it even one bit.
Want to go the extra mile? Search for DIY ideas for an overhead camera rig or a smartphone stabilizer and use them to be on the safe side.
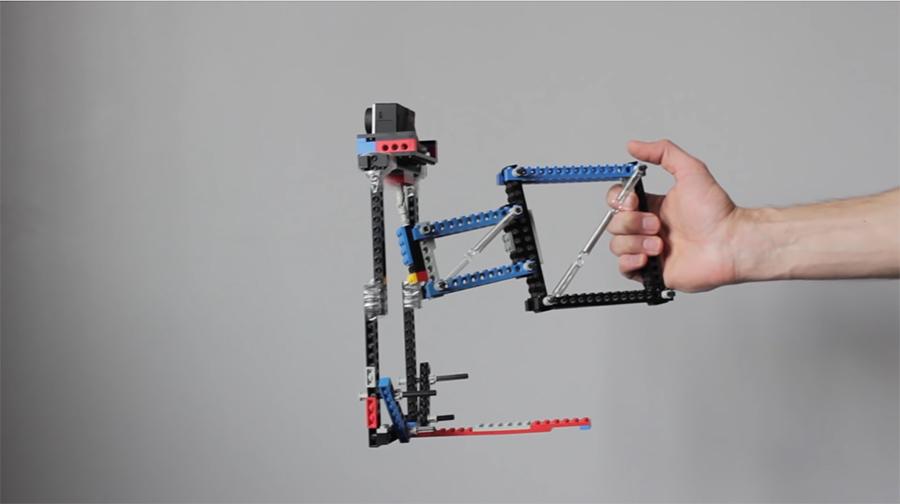
Source: Nofilmschool
Step three: start making pictures
You have the scenario, the props, and the camera waiting. Time to start the photoshoot.
Now, you might be wondering how many frames you need to take. To answer this question, we’ll need to do some math.
Regular non-animated videos typically contain anywhere from 30 to 120 frames per second. When you’re making a stop motion video, you want to have at least 10 frames per second for a decent looking animation.
The number of frames has a direct impact on the resulting animation. The more frames per second a video has, the smoother the motion looks.
Based on the number of frames, you can estimate how long your stop motion video will be. For example, if you’ve shot 100 photos and you stick to the 10 frames per second rate, the duration of your video will be 10 seconds. If you, however, decide to make a smoother 25 fps animation, the same 100 photos will result in a 4-second video.
The other way to think about it is the duration of each frame. If you want to create a 10 fps stop motion video, there should be 10 frames within one second. That means each frame’s duration will be 1/10 of a second or 0.1 sec. If you set the duration at 0.04 sec for each frame, you’ll get a 25 fps stop motion animation, and so on.
This brings us to a popular question:
How many frames are in 30 seconds of animation?
The answer is: it depends on the frame rate you select. If you choose 10 fps, there will be 300 frames in 30 seconds of animation. If you set a 20 frames per second rate, the animation will look much smoother, but it will require 600 frames. Easy!
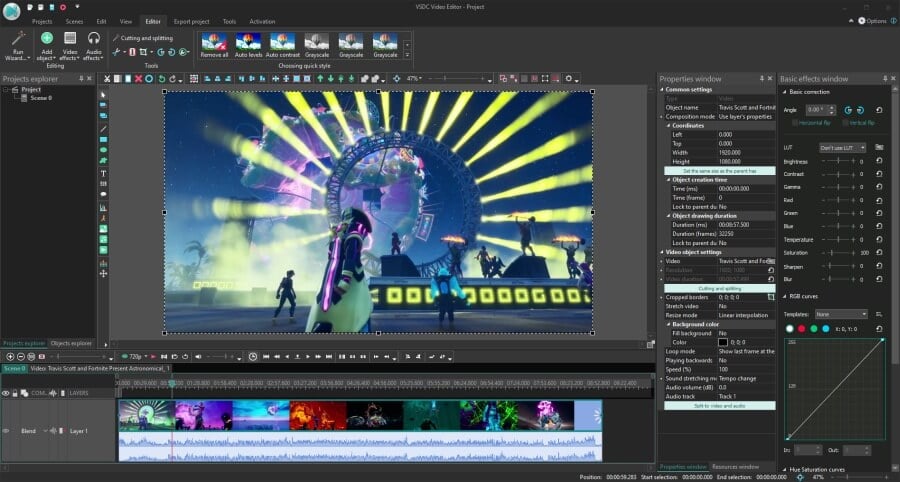
Step four: merge photos in VSDC
VSDC Free Video Editor provides a convenient way to create stop motion animation. Once you’ve taken all the photos and uploaded them to your computer, here is what you need to do:
- Launch VSDC on your computer and start a blank project
- Go to the left-hand side menu and select Animation
- In the Pop-up object’s settings window, hit OK
- Go to the Properties window and click Edit animation object
- Set the width and the height based on the resolution of your photos
- Set the desired frame rate
- Select and delete the embedded .PNG file
- Hit Add images
- Select the photos from your computer and hit OK

And this is it! Use the preview feature to make sure your stop motion video looks the way you expected.
Note, that you’ll be able to change the frame rate at any point. Just select the animation layer on the timeline and go to the Properties window. Then hit the Edit animation object button and adjust the frame rate. Each time the frame rate changes, the duration of the video will be changing accordingly.
Step five: add titles
You might want to add titles or captions that will appear at the selected moment and provide context for your story. You can easily add various text objects to a video in VSDC.
Use the left-hand side toolbar to create a text object and adjust its appearance: size, font, color, style, and other parameters. Next, drag the text to the designated area in the scene and set the moment when it should appear. To do that, you can just manually drag the text layer on the timeline or find the Object creation time parameter in the Properties window and set the exact frame (or second) when the text should appear. In the same window, specify how long the text should stay in the scene.
Step six: add audio
No matter what your story is about, you probably don’t want to end up with a silent movie.
To add music, use the Shift + A shortcut and import an audio file from your computer. Then cut it if needed, change the volume, apply the fade-in effect – in other words, tailor the audio to your needs.
One of the go-to places with a large collection of royalty-free music and sound effects on the Internet is the YouTube audio library, but feel free to check out other marketplaces offering similar collections.
Step seven: export your stop motion video
When you’re done editing the video, go to the Export project tab and select the desired format. The best options would be the “Web –> for YouTube” profile or “Web -> GIF”.
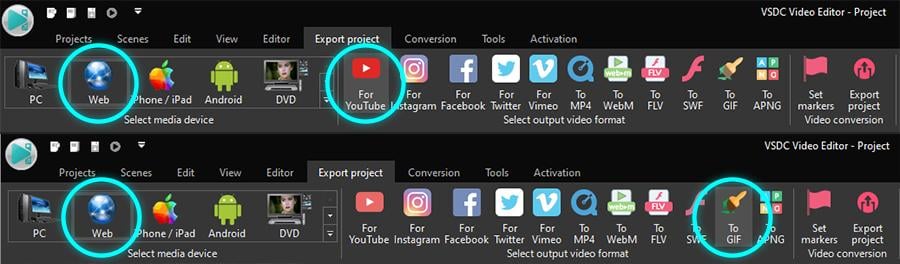
Note that you’ll be able to adjust the quality, the resolution, and the framerate using the Edit profile button located under the preview window.
How to make a stop motion video: tips for beginners
Before you dive right into the shooting process, check out these quick tips to avoid common beginner’s mistakes.
Tip 1. Keep it steady
We can’t stress it enough: the area where you’re shooting, the camera, the camera settings, and the light must be steady while you’re taking pictures. If you’re shooting on an iPhone or a tablet, Rob from the Science Filmmaking Tips channel recommends downloading an app to control the shutter button remotely, so you don’t have to touch the device every time to take a shot. Another option is using time-lapse apps that will help you take pictures automatically with time intervals. They are called intervalometers, and they minimize manipulations with the camera during the photoshoot.
Tip 2. Watch the shadows
… and don’t rely on the sunlight. That’s a small addition to the previous tip about keeping the light steady. If you’re shooting near the window or outdoors, the light in your photos will vary from picture to picture. And unless having a changing light is a part of your story plot, it may mess up the result.
Tip 3. If you can’t find the desired sound effect, record it
Sometimes, the free sound effects available in online libraries are not what you are looking for. Other times, you just don’t know how to describe the sound you need, and therefore it’s hard to search for.
If that happens to you, consider recording your own sounds or voice commentaries.
7 Stop motion video ideas for beginners
For this chapter, we’ve compiled a list of popular stop motion video ideas to get your creative juices flowing. Most of these videos are created with a 30 frames per second rate.
Toys come alive
You’ve probably seen Lego stop motion videos hundreds of times, so how about we skip this idea and go straight to animating one of your favorite toys? This adorable stormtrooper walk is created by Snooperking for the Videvo marketplace and it looks way too real!
Work or growth in progress
Okay, we know this is not exactly the same pepper, but you can borrow this idea and apply it to lots of scenarios showing a dynamic over time. On the Internet, you’ll find stop motion videos of plants, flowers, pets, bellies, and babies growing. Some of those took months to shoot, but the result is surely worth it.

Drawing and painting
Want to take the artist out of the picture? Then create an illusion of a drawing that appears on a piece of paper by itself.

Wrinkled paper
Paper is often used for stop motion animation, both as a stage prop and a background. The video below is courtesy of Videezy, and if you have a channel on YouTube, you can use this idea for a video intro or an outro.

Visual tutorials
Stop motion is a perfect technique to illustrate and explain almost everything, including science and technology, even if you know nothing about filmmaking! Check out this short animation illustrating file downloading from the global network to a local folder.
Cooking videos
What can be more satisfying than cooking videos? Perhaps, cooking videos with no people in them. Just look at this pasta marching to the saucepan! Feeling hungry yet?
Marketing videos
If you are a business owner, you know that video marketing is at its peak right now. You also know that video production can be pricey. Unless you know how to make stop motion videos! Shoot your product in action, create an explainer video or a fun teaser for social media. The opportunities are endless.

How long does it take to make a stop motion video? (it’s probably faster than you thought)
We hope you have a clear idea of how to make a stop motion video and now are off to a great start!
But here comes another popular question: how long will it take you to shoot your first animation? Well, that entirely depends on your approach and the storyline.
Let’s try to do basic calculations for a simple project. Say, you want to create a 30-second stop motion animation and you have everything ready for the shoot. If you use an intervalometer app, and it’s set to take pictures every 10 seconds, it will take you about an hour to shoot enough frames for a 10 fps video (given that you’ll be able to move fast and change the object’s position within those 10-second intervals). Double that if you want to go for 20 frames per second. Add another hour (give or take) for the setup, image uploading, and merging – and voila! You have a 3-4 hour project for a rainy day.
Sounds like fun? Then happy editing and good luck.


This program allows you to capture the video of your desktop and save it on your PC in various formats. Coupled with a video editor, the program is a great tool for creating presentations, tutorials and demo videos.

The program captures video from external devices and records it to computer in a free format. You can save video from video tuners, webcams, capture cards and other gadgets.
VSDC Video Editor Reviews & Ratings (Trustpilot, Capterra & Media)
VSDC Free Video Editor is rated 4.5/5 by real users on Trustpilot and Capterra. Here are a few reviews and quotes from creators and tech media.
Overall rating: 4.5/5 based on 200+ reviews on Trustpilot and 89 reviews on Capterra.
★★★★⯪
VSDC Free Video Editor is the best free video editor for Windows I’ve used, from color grading to picture-in-picture and cinematic results.
— Ejikeme Eloka Augustine
Source:Trustpilot
★★★★☆
Easy-to-use interface and quick export to social media make VSDC a versatile video editing tool for everyday projects.
— Karen C., E-Learning
Source:Capterra
★★★★☆
A feature-packed non-linear video editor for Windows that can compete with many paid video editing solutions.
— TechRadar
Source:TechRadar review
★★★★★
The free VSDC editor saved my YouTube channel – a powerful video editing software for chroma key, text effects and picture-in-picture.
— Paul Roberts
Source:Trustpilot
★★★★★
Fast and simple for YouTube videos with green screen, zoom, color tools and creative effects in one app.
— Marie R., Media Production
Source:Capterra
★★★★★
One of the best free video editor options for Windows users, ideal for GoPro, YouTube and family videos.
— VidProMom, YouTube creator
Source:Media reviews
★★★★★
I’ve been using VSDC for years; editing is easy and the final videos look great for my personal and professional projects.
— Long-time VSDC user
Source:Trustpilot
★★★★★
Great value and faster than many other free tools; I quickly create videos for YouTube, Instagram and Facebook with features my audience loves.
— Rabika B., Marketing & Advertising
Source:Capterra
★★★★★
VSDC offers many features you don’t usually find in free editors, including picture-in-picture, stabilization and modern codec support with no watermarks.
— Tech media review
Source:Media reviews
Watch us on YouTube
 / @VSDCFreeVideoEditor
© 2011-2026, www.videosoftdev.com, FLASH-INTEGRO LLC. Privacy policy | Terms of use | About us
All trademarks referenced herein are the sole property of their respective owners.
Copying any materials from this site allowed only with written consent of Site Administration.