 User Help Manual
  Learn FAQ
  Send us feedback
 ")


- Published by Amy Shao on June 30, 2026 Meet the new major update ...
- Published by Amy Shao on March 11, 2026 What is the best gift for...
- published Amy Shao 11/19/25 Meet the long-awaited VSDC 10.2 update: a new ve...
- Hi, I'm Mattea Wharton, a travel videographer from Seattle. For three years I ba...
How to make a reaction video on your computer: the ultimate guide
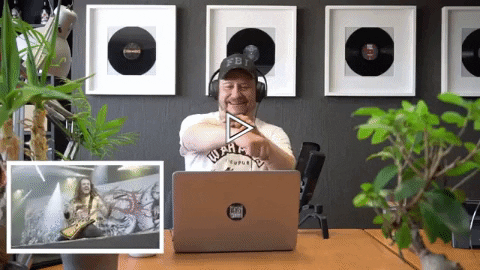
Reaction videos are one of the most popular genres on YouTube. They are such a big trend, there is even a Wikipedia page for this phenomenon! So, if you want to shoot one hoping to get those extra views for your channel, that’s a brilliant idea.
In the tutorial below, we’ll show you how to make reaction videos on your computer step by step, covering preparation, editing, and publishing. For the second stage, we’ll be using VSDC – a free video editing suite for Windows.
It’s perfect for reaction videos because it includes every tool you might need in the process:
- A webcam video recorder
- A desktop screen recorder
- And a video editor with a picture-in-picture effect
All of that is completely free with no watermarks or trial periods.
Now, without further ado, let’s get started.
What is considered a reaction video?
As New York Times Magazine puts it, the idea behind reactions videos is having people “watching screens on which people watched screens”. Originally started by Fine Brothers, reaction videos usually include one of the following:
- A person or a group of people reacting to something, sometimes unaware of being recorded.
- You – the creator – recording your own reactions to a video or a game, for instance.
From a practical standpoint, the only difference is whether you will need to mount (maybe even hide) a camera to record other people’s reactions or use the web camera connected to your PC.
How to shoot a reaction video and avoid common mistakes
If you’ve never recorded reaction videos, you may encounter few hidden pitfalls. The most common ones are shaky footage, bad sound, and… lack of emotions.
Here is a rule of thumb. If you want to make a captivating reaction video, the reaction in it must be very visual. Ideally, extreme. Facial expressions and sounds people make when they see something they absolutely love or hate are the cornerstone of a great reaction video. So, if you are going to choose clips to react to, keep in mind that their main goal is to provoke emotions. Otherwise, there’s little point to record it in the first place.
Here are some ideas for reaction videos if you need inspiration:
- React to a new video by a well-known artist
- Or an old video by an absolutely unknown, foreign band
- React to commercials from the 90s
- Record someone’s reaction to a big moment in a movie
- Record different people’s reactions to the same piece of news
- React to your viewers’ comments
- React to your own old videos or photos
- Utilize the Fine Brothers’ idea and use your young siblings or grandparents to record their reactions to some modern world facts (but ask their permission first)
Now, another critical point here is having high-quality sound and a stable camera. Keep in mind that if you’re recording someone’s reaction while the video is playing loudly, your mic will capture both – the sound of the video and the voices. So you may want to use an external microphone close to the person being recorded to get a decent sound. If you’re recording your own reactions, using a headset is a good idea.
Removing camera shakiness is not too difficult with video stabilization software, but it’s always better if you ensure its stable position instead. Consider a tripod or a steady surface if you’re using an external webcam.
How to make a reaction video: the editing part
If you already have both videos – the emotion-provoking footage and the recording of someone’s reaction to it saved on your computer – it’s time to put them together. You’ll be surprised how quick and easy the editing part will be!
- Launch VSDC and hit the “Import content” button on the start screen. Select the original video you’ve recorded reaction to from your PC. A “Project settings” window will pop up, just click “Finish”.
- Now the footage is placed in the scene, and you need to add the video with the reaction. To do that, use the green “Add object” button from the top menu and select “Video”. Upload the second file to the program. The “Object position settings” window will pop up – select “Add a new layer” in the last column. This way, the second video will be layered over the original footage.
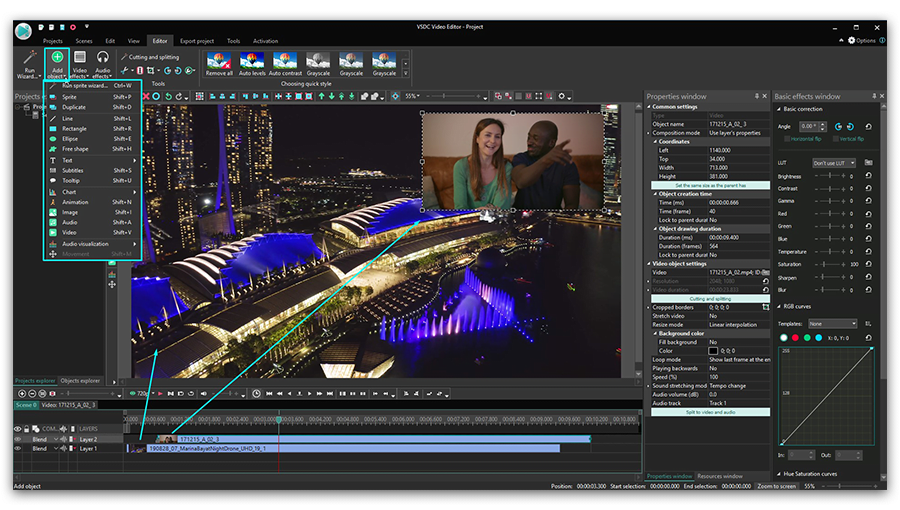
- Resize it using handles and drag to the corner of the scene. Typically, it’s the top or the bottom right corner, but it’s really up to you where to place it. Ideally, it should be aligned with your gaze, but it’s not always the case, especially when you’re recording someone else’s reaction.
- At this point, you have both videos in the scene. All you need to do is synchronize their appearance by shifting the layers along the timeline and using the Preview button to see how everything looks.
Quick tip: to make the synchronization process easier, think of control points. They can be sounds or visual notes that will tell you exactly what part of the video the viewers are watching. For example, let’s say you’re recording your friend’s reaction while they are watching a big moment in a movie. Notice what exactly they say or do when they start watching the video and let it be your marker when you start aligning the footage. - If you need to trim any of the files, VSDC has a quick tool to split video into parts, and if you need to adjust the volume, here is the guide to help you.
- To export the final version, go to the Export project tab, select "Web --> For YouTube", and hit "Export project".
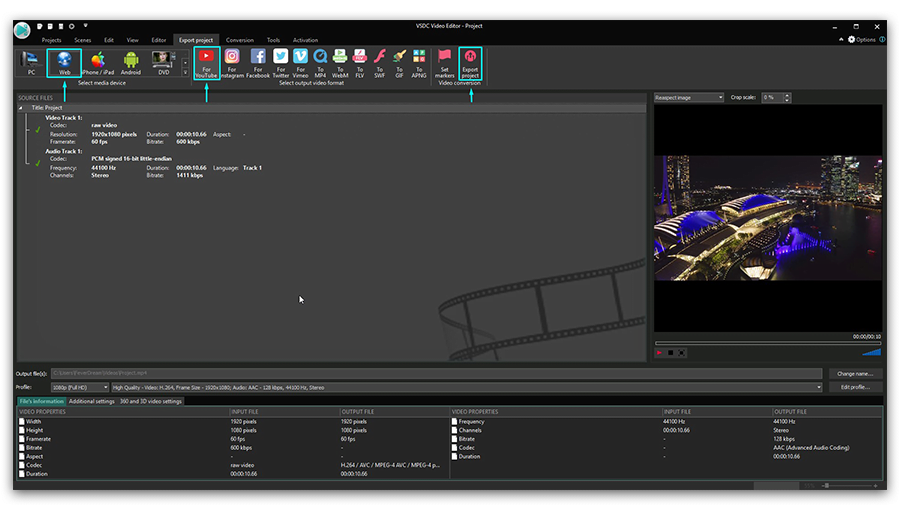
- If you want the project to export faster, choose to upgrade when the program prompts you to. If not, click “Continue”.
- At the last step, you’ll see a popup suggesting you upload your video to YouTube directly from the program. Note that if you select to do so, you’ll be asked to log in to your Google account.
How to record your own reaction video in VSDC
Remember we mentioned VSDC offers a desktop screen recorder and a webcam video capturing tools on board? Along with the editor, it makes a perfect combination if you want to record your own reactions. Here is a brief guide:
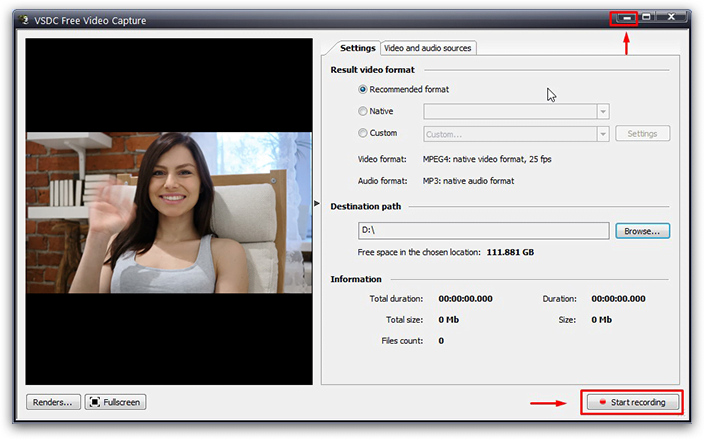
- Launch VSDC Free Video Capture. It comes as a part of the package, so it will be installed to your PC automatically.
- Connect it to your webcam and hit “Start recording”. Then minimize the window.
- Launch VSDC Free Screen Recorder.
- Adjust the frame to define the area on the screen you want to record and hit “Record” in the top left corner of the frame.
- Now you’re recording your desktop screen and yourself simultaneously. It’s time to either open the video you want to record your reaction to or launch the video game – depending on what your idea is.
Quick tip: VSDC is surprisingly lightweight and requires minimum PC resources. However, if you have a really low-spec computer, having so many apps launched at the same time will not be easy for your processor. So if you start experiencing crashes and hiccups, consider alternative ways to record the video. For example, use a webcam that’s not connected to your PC and just upload the video file later. Or launch the video you’re recording reaction to on a separate device. - Once finished, stop and close both recorders. The recorded videos are typically saved to the following folder: C:\Users\Owner\Videos\Recorded Videos\
- Launch VSDC Free Video Editor, import the recordings, and follow the steps described in the instruction above.
In the process, you may need to split, cut, and crop the unwanted parts of the footage, add text or remove audio. Here are the guides to help you with these tasks:
- How to split a video into parts
- How to remove audio from video
- How to add text to a video
- How to crop video borders
How to make a reaction video without getting a copyright strike from YouTube?
You’ve surely heard of the copyright law and YouTube being strict about it.
When it comes to reaction videos, there is a lot of controversy. On the one hand, the doctrine of fair use comes into play (read all about it here). That is, using copyrighted materials is considered acceptable as long as you add commentary, criticism, research, news reporting, or teaching elements to the video. On the other hand, such definition may sound vague and lead to misunderstanding. To avoid misinterpretation, we suggest you familiarize yourself with 4 factors of fair use. According to those factors, your video can’t be serving commercial purposes, it shouldn’t prevent the copyright owner from gaining profit from his original content, and it’s always recommended to include bits of the original work rather than using it entirely.
In other words, if you cite the original source, give credits, treat the original work respectfully, and use just fragments of someone else’s video, chances are it will be considered fair use.
That said, we are unable to provide legal advice on that matter, so if you have any doubts, you might want to consult with a lawyer.
What to do next
Now that you know how to make a reaction video, check out the YouTube channel called React. It is started by the Fine Brothers – the ones who made the reaction video genre famous, so you will learn from the best. Then download VSDC to your computer and jump on creating your own. Good luck!
You can get more information about the program on Free Video Editor' description page.
Watch us on YouTube
 / @VSDCFreeVideoEditor
© 2011-2026, www.videosoftdev.com, FLASH-INTEGRO LLC. Privacy policy | Terms of use | About us
All trademarks referenced herein are the sole property of their respective owners.
Copying any materials from this site allowed only with written consent of Site Administration.