 User Help Manual
  Learn FAQ
  Send us feedback
 ")


- Published by Amy Shao on June 30, 2026 Meet the new major update ...
- Published by Amy Shao on March 11, 2026 What is the best gift for...
- published Amy Shao 11/19/25 Meet the long-awaited VSDC 10.2 update: a new ve...
- Hi, I'm Mattea Wharton, a travel videographer from Seattle. For three years I ba...
A Beginner's Guide to Video Masking Software

What if we told you that by the time you finish reading this text you'll learn about one well-kept Hollywood post-production secret? Which is (wait for it) video masking software.
That's right, with this technique alone you'll be able to reproduce some of the most mind-blowing effects, such as making the same person appear in the same frame multiple times. Like in Friends, where Lisa Kudrow played twin sisters - Phoebe and Ursula Buffay; or in Legend, where Tom Hardy played both twin brothers.
And not only that. Video masking is irreplaceable and constantly used for more trivial tasks - such as blurring faces and objects, removing them from the scene entirely, adding reflections, coloring a particular part of the video, creating a "video playing inside of a text" effect, and even creating a "ghost look" - that's when a person looks half-transparent and you can see objects behind. Not too shabby, huh?
In this article we'll talk about the concept of video masking and its most popular use cases beginners will be able to recreate easily.
Looking for a budget-friendly program to perform video masking? Check out VSDC for Windows and iMovie for Mac.
Do I need particular video masking software?
While we've used that term a couple of times already, there is no such a thing as "video masking software". Masking is rather a feature most non-linear video editors have.
For screenshots and video tutorials in this particular article we're using VSDC. It is video editing software for Windows, and you can download it here. VSDC is free, however, masking is considered a part of the Pro version available at $19,99 per year. If you're on Mac, the most budget-friendly video editor with masking capabilities will be iMovie. You can download iMovie here.
If you feel confident enough to jumpstart with professional solutions, you should consider breaking the piggy bank for such post-production programs as Adobe Premiere Pro ($239,88 per year) and Pinnacle (starts with $59,95).
So what the heck is video masking?
Technically speaking, the masking feature helps you outline an area in a video you want to hide, reveal, or modify. This particular area will be considered - and hereinafter called - a mask. If you've ever worked with Photoshop or its alternatives, the terminology sure sounds familiar.
Practically speaking, video masking software enables you to manually choose a particular area in a video and work with it as if it was a standalone object. Here are few examples.
- You can copy the outlined fragment and duplicate it in a scene - and create a clone effect or a freeze frame clone effect.
- You can apply a particular filter to the outlined part - and blur faces or car numbers in a video, and keep them covered even if they are moving.
- You can layer that outlined part on another image or video - and create a text mask or recreate the famous annoying orange effect. The eyes and the mouth of the orange are nothing but masks. They were “cut out” from another video and placed over the orange. We won’t be able to explain why it’s so annoying though.
Is it me, or there are different masks available out there?
Once you start digging deeper into the topic, you'll probably notice here and there video editing geeks mentioning clipping masks or inverted masks when talking about video masking software. These terms describe the video mask application technique, not the tool.
Clipping mask
The first video masking technique we’ll review is called clipping mask. To apply a clipping mask means to add an image or a shape through which the video will be visible. That image is typically a .PNG file with a transparent background. It is called either a clipping mask or a clipping path. Once you apply the effect, the visible part of the video will be "clipped" by the borders of the image, and whatever is outside will not be seen.us
Here is an example of how a clipping mask was used in the famous GTA San Andreas video game opening.
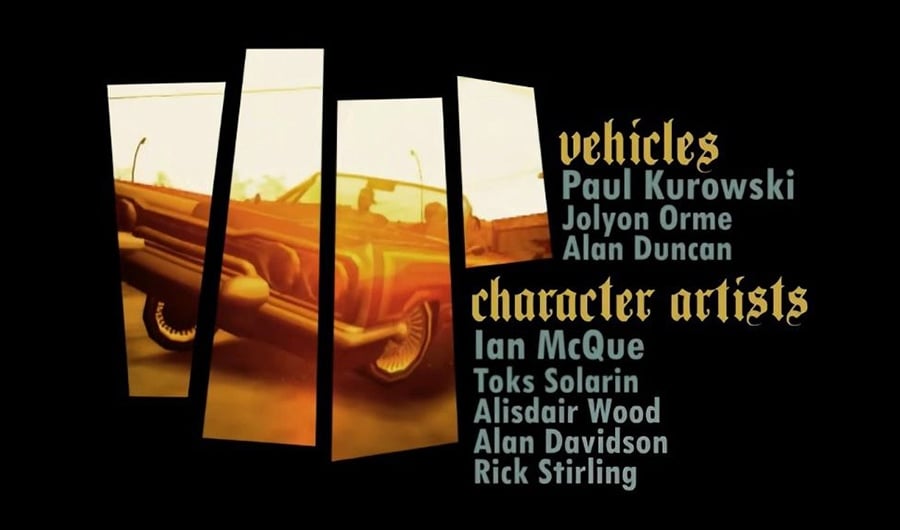
Keep reading to find out how to recreate a clipping mask in VSDC within a few clicks.
Inverted mask
Compared to the clipping mask, an inverted mask blends two videos or images in a reversed way. This means if you place an image A on the timeline, then layer an image B over it and apply the inverted mask, the image B will be seen through the "empty" (black) areas of the image A.
A great example of the inverted mask technique is the popular "Video inside text" effect often referred to as a "Text mask".
Amazing video masking software effects you should definitely try
We hope you got the idea of what video masking can help you achieve. Now let's get practical, shall we? We've briefly mentioned some popular tricks - continue reading if you'd like to learn about how to use them in your projects.
Blur a face or any other object you need to hide in the video
Blurring or pixelating something in a piece of footage is arguably the most popular video masking effect, and you have surely seen it a million times. It is often used in movies, in the news, on security camera records, anonymous interviews, on drone-recorded videos to hide the GPS coordinates - you name it.
Technically, you simply choose an area that must be hidden from a viewer's eye and apply masking to it, so that the blurring effect will only appear on that chosen area.
To achieve your goal, you want to use the Inverted mask in VSDC:
- Once you've imported your footage to VSDC, go to Video Effects -> Filters -> Pixelize. The entire video will get pixelated, but don’t get confused - it’s a part of the process. You can also use the Properties window on the right-hand side to tweak the filter settings and make the mask more pixelated.
- Double-click on the effect on the timeline - the "Pixelize” tab will open.
- Click on the Add object option at the top and select Ellipse, Rectangle or a Free Shape for your mask. Place the object on the area that will be pixelized.
- Go to the right-hand side menu and click on the Composition menu to select “Mask”.
- Then switch the Invert mask mode from No to Yes.
This is how you blur an object! Easy enough, isn't it?
The very same way you can apply any other video filter or effect to a chosen area - and it doesn't have to be simple blurring.
Sometimes you might need a mask to follow a moving object. Say, if it's a person who doesn't stay still in the video and whose face must be hidden at all times. That will require you to use motion tracking along with masking, and we encourage you to watch a detailed how-to tutorial below to see how it works.
Create a video playing in text effect in less than a minute
"Video inside text" or a "Text Mask" is a beautiful eye-catching and a very popular effect. You might have seen it in TV shows and video blogs, because it is a perfect intro for any video project. And the best part is - you'll literally spend less than a minute to create it! Below we'll teach you how to do it. Keep in mind that the "Text mask" works best with short words made of large-size extra-bold letters.
Here is what to do:
- Add a beautiful video you want to be seen through the letters. Bright multicolor videos will look better than monochrome ones.
- Double-click on the video on the timeline - you'll be automatically switched to the next tab.
- Add text to the video. Try to keep it short for a better looking text mask.
- Use the text editing menu at the top to change the size and style as required for your project.
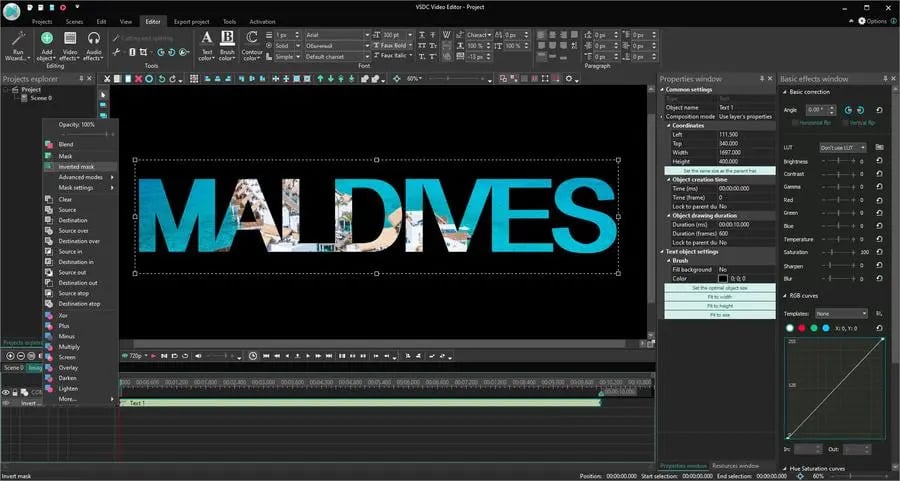
- Apply black color to the text.
- Find the "Composition mode" section in the menu to the left of the timeline. Choose the Inverted mask option as shown on the screenshot below.
- Drag text or video to adjust accordingly.
Create a beautiful clipping mask
The idea behind clipping masks is similar to the "Text mask" effect, although instead of letters you will be using PNG images with transparent background. Think of those images as windows through which the playing video will be visible.
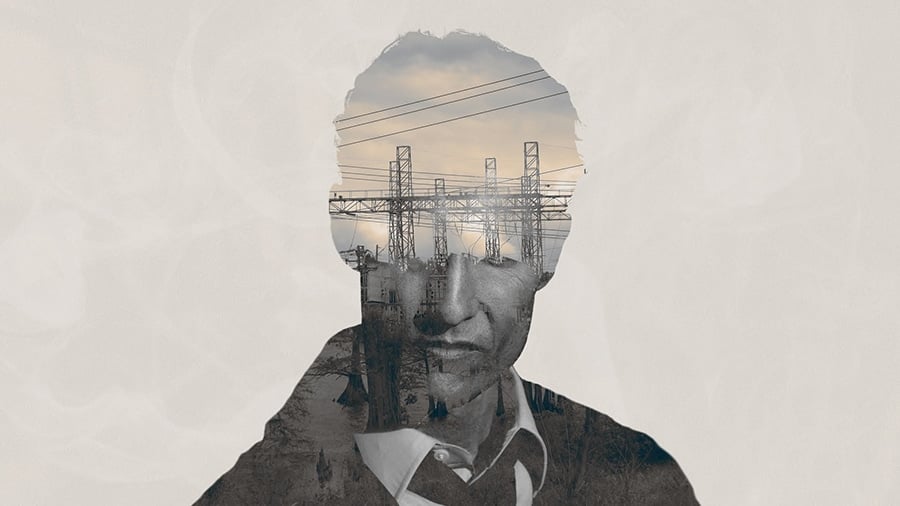
Clipping mask effect may look very artsy. Here is an incredible example of its usage in the True Detective intro, where Louisiana skyline is shown through a silhouette of Matthew McConaughey.
Here is how to apply a clipping mask in VSDC which we are using as a video masking software for this tutorial:
- First, add an image that will be surrounding your clipping mask. In case of the above mentioned True Detective intro, it is a one-tone beige background, but you can choose any image or video for your project accordingly.
- The second step is adding the clipping mask image. Remember, it should be a PNG image with transparent background, otherwise the magic will not happen.
- As you complete step #2, go to Video Effects -> Transparency -> Clipping.
- Double-click on the clipping effect on the timeline - you'll be transferred to the next tab.
- Finally, add a video or an image that should be seen through your clipping mask. Drag it around to adjust the look if necessary.
Although it may sound challenging, applying a clipping mask is easier than you think. Take a minute and watch a detailed video tutorial on how to do it.
Clone yourself in a video
While Hollywood directors use this post-production trick to illustrate twisted storylines, you may want to try it just for fun. Because it is fun indeed!
The concept of the "clone effect" is simpler than you probably think. You just need to blend multiple video records of the same person shot in the same area, but standing/moving in different spots. This way, when you combine two pieces of footage on the timeline using video masking software, it will look as if clones appear in the video simultaneously. If this is your first time trying this slightly complicated composition mode, we recommend shooting in front of an even background - of one color, ideally. Chances are higher, the video will come out more naturally-looking if you do so. Additionally, you'll save time and effort during the editing process if the background is plain and monochrome.
Once you shoot the videos, you'll need to add all of them to the timeline and apply the Inverted mask to the areas where the "clones" are located. Watch the video tutorial below to see how everything works.
Create an object reflection
Finally, if you get really geeky about the details, you can apply video editing magic to create object reflections. Here is how it works. You duplicate an object in the same scene, apply color grading, flip it and set up the right perspective. Below, there is a tutorial about creating a text reflection, but you can certainly use the same approach for creating reflections for other objects as well.
More video masking software effects to try
Once you understand the concept and master the technique, you're only limited by your imagination, because the post-production possibilities are endless. Consider splitting screen in a creative way to show multiple videos playing at the same time. Consider creating a round facecam if you are editing gameplay videos. Or consider blurring your video background by means of the above mentioned Inverted Mask technique.
Masking is indeed one of the most powerful tools a video editing enthusiast may make use of. Not only does it allow to apply color correction to the particular areas of the video, but it is also irreplaceable when it comes to special effects like blurring, adding a reflection or creating an awesome intro - such as the clipping mask or the text mask. Now that you know the secret, we hope you'll be able to benefit from it, and make your clips more eye-catching.
Don't forget to subscribe to our YouTube channel for weekly new post-production tutorials, and share your results on our Facebook page!
Happy editing!
Watch us on YouTube
 / @VSDCFreeVideoEditor
© 2011-2026, www.videosoftdev.com, FLASH-INTEGRO LLC. Privacy policy | Terms of use | About us
All trademarks referenced herein are the sole property of their respective owners.
Copying any materials from this site allowed only with written consent of Site Administration.