Editor Video

L'editor video consente di modificare file e creare video di qualsiasi complessità. Potete applicare effetti video e audio effects ad oggetti modificati, trasformarli, applicare filtri e correzioni d'immagini. Tutti i popolari formati video e audio sono supportati (sia lettura che salvataggio).

Read more about Video Editor...

Convertitore Video

Questo programma serve a convertire video file da un formato ad un altro. Quasi tutti i popolari formati video sono supportati. Inoltre, il programma semplifica drasticamente il compito di convertire video da riprodurre su determinati dispositivi multimedia quali iPhone, Microsoft Zune oppure Archos. Il programma è semplicissimo da usare, dispone di una moderna interfaccia e di tutte le necessarie funzioni per processare i video.

Read more about Video Converter...

Convertitore Audio

Il convertitore audio vi aiuterà a convertire file audio da un formato ad un altro. Tutti i formati audio e codec chiavi sono supportati. Il programma vi consente inoltre di gestire playlist e meta tags, di estrarre audio dai file video e di salvare queste tracce sul vostro computer in qualsiasi formato.

Read more about Audio Converter...

Audiograbber

Questo strumento audio serve a catturare tracce audio dai CD e di salvarle nel computer dell'utente in qualsiasi formato. Quasi tutti i popolari formati e codec sono supportati. Il programma è inoltre in grado di estrarre dettagli di tracce dal server FreeDB al fine di rinominare automaticamente il file e di aggiornare i meta tag.

Read more about Audio CD Grabber...

Versatilità

Versatilità

Più strumenti contemporaneamente per elaborare file video e audio in una singola applicazione.

Alta velocità

Alta velocità

I nostri programmi
impiegano rapidi algoritmi di alta qualità per processori singoli a multipli.

Accessibilità

Accessibilità

I nostri prodotti sono disponibili per essere scaricati gratuitamente su tutti i computer e dispositivi che supportano i sistemi operativi Windows.

How to make a voice over video in VSDC

In the era of YouTube, when online blogging and production of video tutorials on just about anything has become commonplace, it’s vital for aspiring clip makers to master the skill of voice over video. Even if you are not planning to become a YouTuber, you become well aware of those cases when you see that your vacation footage was ruined by chattering crowds, wind gusts, etc. One way to resolve the problem is to replace the defective sound with a nice tune. But what if you want to bring a more personal touch and record your own voice while impressions are still fresh and lively?

Download VSDC Free Video editor that allows you to do so in two ways: an easy one and a free one. Below, we’ll review both, guide you through the main steps, and explain the difference between the two.

How to do voice over video in VSDC: the easy way

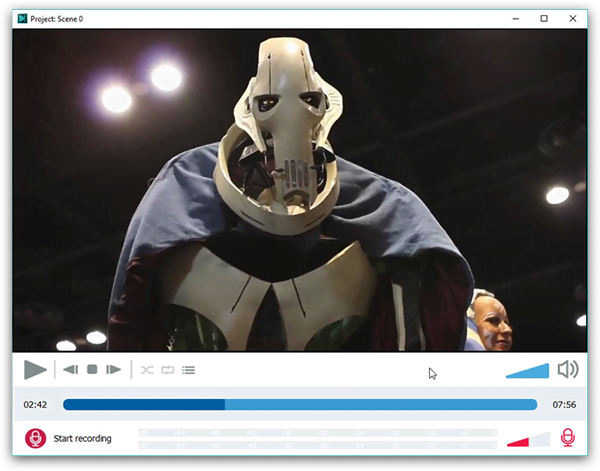
VSDC has an intuitive built-in voiceover tool that allows you to quickly add audio comments to your videos without having to deal with complex settings of any kind. See it for yourself in the video guide below.

Here is what you have to do in a nutshell:

  1. Import your video to the timeline using the “Add Object” dropdown menu.
  2. Click the wrench icon to select the voiceover tool.
  3. Play-pause the video to choose the part that needs audio comments. Use the “Start Recording” button whenever a voice comment needs to be added. Use the “Stop Recording” button to end the recording. Record as many items as necessary. Note: the recording will only start when you hit the play button. When the video is paused – your voice won’t be recorded.

    How to create a voiceover video in VSDC - fast and eaasy

  4. When you are done with your comments, close the voiceover tool window. A pop-up window will appear asking for confirmation to add recorded files to the timeline. Click “Yes”.
  5. Your audio comments will automatically be added to the timeline exactly where you wanted them to be. No manual action needed.
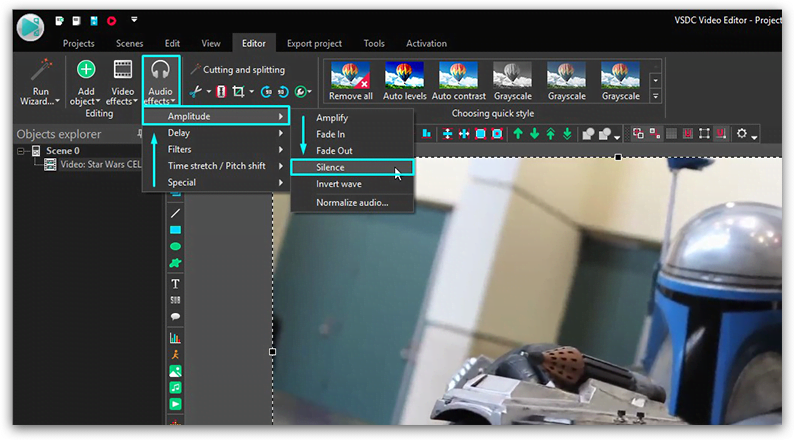
  6. If you want to mute original video soundtrack, right-click your video on a timeline and go to “Audio Effects --> Amplitude --> Silence”.
  7. Double-check the result by clicking the red play button right under the preview window. If everything is fine, complete the process by clicking the red “Export project” button on the same title tab.

Please note, that the voiceover tool is only available with the PRO version of VSDC editor which is offered for $19.99 per year. If you are looking for a free way to record your voice over a video, follow the instructions below.


How to create a voiceover video in VSDC: the free way

VSDC wouldn’t be called a free editor unless it offered a free way to record voice over video. Here is a detailed instruction:

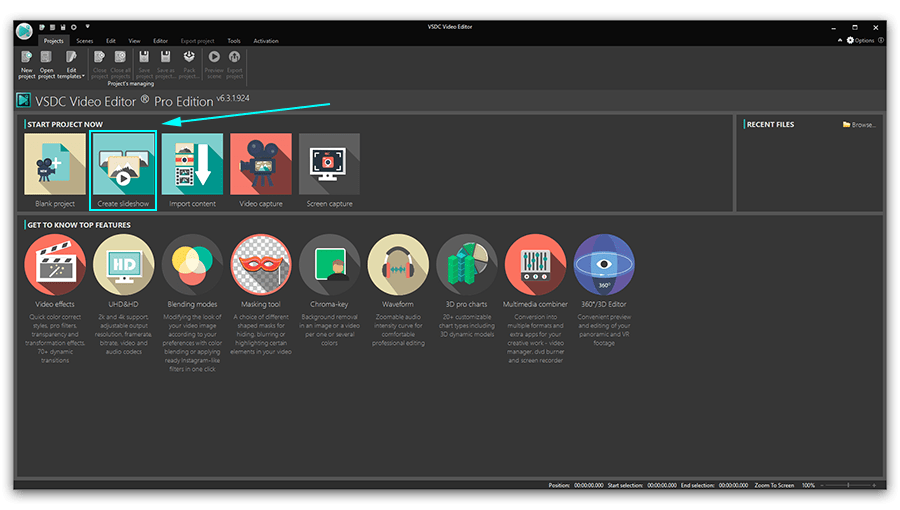
  1. Open VSDC Free Video Editor and click “Import Content” to import the video that you intend to give voice to.
  2. Proceed to the “Tools” tab at the top menu and select the “Voice Recorder” tool. A new window will open.

    Adding voice over video for free in VSDC Video Editor

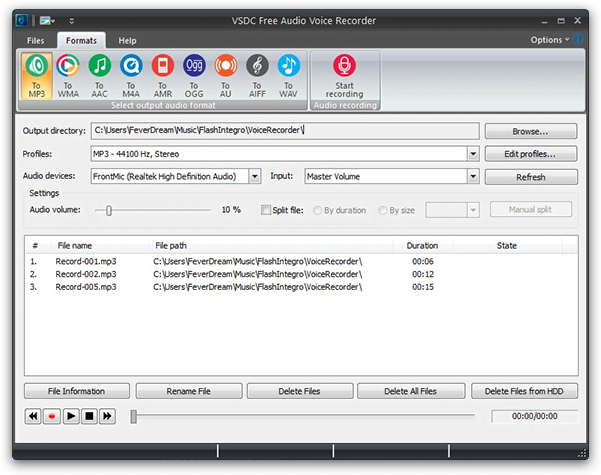
  3. Choose the desired format of your voice recording in the “Formats” tab.
  4. Proceed to the lower sections of the menu to select the output file destination, its quality, and the device you will use for recording.
  5. Place a checkmark in the “split file” section, if you are working with a really long video. This way your output audio will be split into several recordings. It will come in handy during the matching of your recording with the video. Mistiming can’t be fixed with a single audio file in place, so having multiple files will help you perfectly adjust your sound and video tracks.
  6. Select the duration of your audio chunks in the drop-down menu on the right depending on the length of your video.
  7. Press the “Start Recording” button at the top right corner of the screen. Launching your video in a separate window might be a good idea too. You want to know what you are commenting, right? Press “Stop Recording” when you are ready and close the “Voice Recorder” window.
  8. Go back to VSDC video editing window with your imported video. Right-click your video on a timeline and go to “Audio Effects --> Amplitude --> Silence”. This will silence the original soundtrack of your video.

    How to silence the original audio track in VSDC

  9. Go to the “Editor” tab, select “Add Object” and choose “Audio” from the drop-down list. Now proceed to the location on your computer where you saved you recordings, import them to the timeline and use drag-and-drop motion to place them in line with the video segments they are intended for.
  10. Double-check the result by clicking the red play button right under the preview window. If everything is fine, complete the process by clicking the red “Export project” button in the same title tab.

Wrap-up

As you have probably noticed, both methods lead to the same result: your recorded audio files placed beside your video on a timeline in the correct sequence. The only difference is, with a free method, you have to manually record, import and position them. With an easy method, manual work is taken out of the equation, making voice over videos much faster. Which one is better? You tell us :-)

Applicate la correzione del colore con le curve della tonalità e della saturazione al livello professionale

Avete mai notate che lo stesso immagine può essere aperto in modi assolutamente diversi se è elaborato in colori opposti? Lo stesso fatto è vero per video: i colori freddi sono spesso usati per creare un’atmosfera dell’ansietà mentre i colori caldi sono buoni per creare uno spirito dell’allegria, comodità e romanticismo. Entrambi fotografi e videografi usano metodo per trasmettere l’emozione desiderata agli spettatori.

Dalla posizione tecnica potete raggiungere questi effetti con lo spostamento dell’equilibrio del colore in un immagine e in questo articolo vi mostreremo come esattamente fare questo usando VSDC Video editor gratuito.

Opportunità di correggere l’equilibrio del colore tra la lavorazione con i parametri della tonalità e della saturazione sarà utile per ogni appassionato del montaggio del video non solo per i professionali. Infatti questo è a volte un modo unico per salvare un video filmato con le impostazioni dell’equilibrio del bianco sbagliate, fare una foto più vivida o creare un effetto popolare tra la desaturazione del uno o alcuni colori nell’immagine.

Sotto mostreremo cosa è la ruota della tonalità e della saturazione e come usarla. Se siete interessati di esplorare altre tecniche della correzione del video, vi suggeriamo di vedere la nostra guida come lavorare con le curve di RBG per equilibrare la luminosità e il contrasto del vostro immagine.

Prima di cominciare siete sicuri che avete scaricato ed avete installato VSDC Free Video Editor al vostro computer.

Come aprire la ruota della tonalità e della saturazione in VSDC

Quando avete installato e avete lanciato il programma, importate il file con che avete intenzione di lavorare. Può essere un immagine o un video. Poi fate un clic sul file e andate alla tabella della vista in menù in alto. Scegliete l’icona degli effetti basilari - questo aprirà la finestra degli effetti basilari al lato destro dell’editor. Scorrete fino un po’ e vedrete il menù a tendina «Le curve della tonalità e della saturazione». Proprio qui troverete la ruota del colore giusta.

Come lavorare con le curve della tonalità e della saturazione - i principi di base

L’idea di lavorare con la ruota del colore è basata sulla creazione i punti di controllo sul cerchio interno della ruota (è un cerchio bianco illustrato sotto) e sul movimento dei punti più vicino al bordo o al centro della ruota.

Hue Saturation curves

Per creare un punto del controllo dovete fare un doppio clic sull’area del colore con che avete intenzione di lavorare. In altre parole se avete intenzione di lavorare con i toni rossi nell’immagine dovete fare un doppio clic sulla cerchio interno (bianco) esattamente dove i toni rossi sono situati. Questo sarà il vostro punto di controllo e quando lo trascinate più vicino al centro o al bordo crescerete o diminuirete la saturazione del colore scelto. Notate il bordo dello spettro correla con il contrasto massimo, ma il suo centro - il contrario.

Areas of maximum and minimum contrast

Se trasferite un punto di controllo intorno il cerchio, cambierete i toni scelti per la correzione. In altre parole quando trasferite un punto di controllo dal uno settore all’altro, cambiate i toni che saranno equilibrati però non cambiate i colori nel video.

Changing tones of one color on the inner circle

Potete cambiare la posizione dei punti di controllo tra:

  • Trascinamento manualmente usando il mouse
  • Usando le frecce della tastiera

Forse volete correggere il tono del colore speciale nel video senza cambiare il resto dei toni. In questo caso bisogna creare tre punti di controllo: uno nel centro del settore del colore, più due punti a destra e a sinistra. Questi punti aggiuntivi separeranno l’area del colore di che lavorerete sulla ruota - guardate l’immagine sotto.

Setting main three control points

Notate che nel menù della ruota del colore sul lato superiore ci sono 6 tavolozze dei colori. Queste sono i colori principali della ruota: rosso, giallo, vere, blu, blu scuro e viola. Se avete intenzione di correggere qualche dei questi toni nel video, fate un clic e avrete tre punti di controllo automaticamente - solo come illustrato sotto.

Main colors of the color wheel

Se c’è un colore speciale nel video che vorreste correggere e non potete trovarlo sulla ruota usate lo strumento del contagocce. È situato all’angolo superiore destro della finestra con il dialogo della Tonalità e della Saturazione. Fate un clic sull’icona del contagocce e posate il mouse sul colore che volete correggere. Fate un clic sul colore e sarà scelto precisamente sulla ruota con la sere di tre punti.

The eyedropper tool

Nel caso se dopo tutte le manipolazioni con correzione del colore decidete che l’immagine originale sembrava più bello solo fate un clic sull’icona di Annullare all’angolo superiore destro del menù con dialogo. Tutti i movimenti dei punti di controllo saranno cancellati e avrete il video originale di nuovo.

The reset to default button

Come correggere i colori dei video con le curve della tonalità e della saturazione: esempi

Abbiamo qualche pratica, d’accordo? Per darvi l’idea migliore come le curve della tonalità e della saturazione lavorano mostreremo alcune manipolazioni comuni applicate all’immagine. Nell’immagine sotto vedete una foto che abbiamo caricato a VSDC e nella finestra con TS dialogo con la ruota del colore.

Hue Saturation color wheel

Immaginate che avete bisogno di correggere i toni rossi in questo immagine. Per fare questo creeremo un punto di controllo nel settore dei toni rossi sulla ruota. Posteremo altri due punti per separare l’area del tono rosso nello spettro perché non abbiamo intenzione di cambiare il resto dei toni nella foto.

Select red tones for correction

Per fare I toni rossi più saturi avremo bisogno di trascinare il punto di controllo principale più vicino al bordo della ruota del colore - come illustrato sotto.

Make the red tones more saturated

Per diminuire il livello dei toni rossi dovete muovere il punto di controllo principale più vicino al centro dello spettro - come illustrato sotto.

Lower saturation level of the red tones

Se volete desaturare completamente il colore scelto nel vostro immagine o video dovete muovere il punto di controllo alla posizione più interna come illustrato sotto.

Make the color desaturated

Finalmente se vorreste raggiungere l’effetto popolare quando tutto il video è nero e bianco con il colore unico saturo potete fare anche questo. Solo lasciate il punto di controllo nel settore del colore scelto invariato mentre trascinate i due punti di controllo situati ai lati alla posizione più interna. Questo trucco è illustrato sotto e l’unico colore saturo nell’immagine è ovviamente giallo.

Black and white image with only one color saturated

Lavorare con le curve della tonalità e della saturazione è più facile che si può sembrare a prima vista. Anche se non avete mai fatto la correzione del colore in un video potrete migliorare notevolmente alcuna foto o video se solo sei abituato al principio dei movimenti dei punti di controllo.


Potete ricevere più informazione del programma sulla pagina con descrizione di VSDC video editor

Everything you need to know about making a cinemagraph in VSDC

Videos and images are fundamental assets of visual art in the digital era. Each has its own benefits and sometimes it’s hard to choose which format would be more suitable to convey the right emotion to the audience. This is where cinemagraph comes into play, allowing its advocates to make the best of image’s stillness and focus and at the same time enrich it with video dynamics for a more vivid picture.

In this tutorial, we will cover the most practical ways of creating a First things first: find the right softwareFirst things first: find the right software.

How to make a cinemagraph - tutorial from VSDC

First things first: find the right software

Many people choose image editing software as a starting point for making a cinemagraph and end up covered in piles of Photoshop tutorials. We suggest an opposite approach and strongly recommend downloading VSDC Video Editor for three reasons:

  • It is designed to work with motion videos and offers a number of video editing features, so it’s a better fit for cinemagraph than Photoshop;
  • The software has a completely free version that doesn’t impose any limitations for our purposes;
  • It doesn’t require much practice to become good at it.

How to make a cinemagraph: method #1

There are two ways to create a cinemagraph with VSDC. We’ll start with the free option first.

A video tutorial on Method #1 is available here:

  1. Open VSDC Free Video Editor.
  2. Select “Import Content” option in the main menu.
  3. Choose the video intended for cinemagraph from your desktop and click “Finish”. The Video will be added to the timeline.
  4. Use left-mouse click on the timeline to select the right moment in the video that you want to freeze and use as an image.
  5. Proceed to the “Cutting and splitting” tab in the top menu and select and wrench icon. In the drop-down list select the “Create snapshot” option. The image will be added to the resources window (under the “Images” section) on the right-hand side on the screen.
  6. Go back to the timeline and drag the time indicating “needle” to the very beginning of the video. This way the rest of the timeline items will be automatically added to the beginning of the clip.

    VSDC Free Video Editor timeline close-up

  7. Drag the snapshot to the preview area. It will automatically be added to the timeline.
  8. Choose the green “Add free shape” option in the left-hand side menu and press ok.
  9. Add the “Free shape” to the preview section by holding the left mouse button and dragging the mouse over the preview area.
  10. Double-click the “Free Shape” box on the timeline.
  11. Delete all the ShapePoints in the timeline.
  12. Proceed to the top menu, select the “Free Shape” tab and click the “Insert point” option.
  13. Use left mouse clicks to select exactly the area that you want to “come alive” in your cinemagraph.
  14. Go back to “Scene 0” in the left-hand side of the timeline.
  15. Go to the “Properties” tab in the bottom right corner of the screen and select the black color for your free shape. Make sure you select the color under the “Brush” section, not under the “Pen” section.

    Free shape settings window in VSDC

  16. Right click the layer with your video on a timeline and choose “Cut”.
  17. Double-click the “Free Shape” box on the timeline.
  18. Proceed to the top menu, select “Video Effects --> Transparency --> Clipping”. The clipping box will be added to the timeline.
  19. Double-click the “Clipping” box.
  20. Use the right mouse click on the preview area and select “Paste”. You have now inserted the video in your Clipping object.
  21. Click the “Preview” button above the timeline to make sure you like the outcome.
  22. Proceed to the “Export project” tab in the top menu. Select the format and the location on your desktop where you want to place the cinemagraph.
  23. Finish the process by clicking the red “Export project” button in the same title tab.

Here is a graphic description of method #1. Basically, in this method, you are placing a free shape with a video inside it over a static image.

Creating a cinemagraph using a free shape object

How to make a cinemagraph: method #2

Method #2 uses the mask feature. It is an option for cinemagraph, but it requires you to buy the Pro version. A video tutorial on Method #2 is available here:

  1. Repeat the first 6 steps from method #1.
  2. Left click on the preview area. This way you will deselect the video layer on the timeline and ensure that the new objects will be added to the front layer.
  3. Drag the snapshot to the preview area from the resources window. It will automatically be added to the beginning of the timeline.
  4. Double-click the newly appeared Image layer on the timeline.
  5. Choose the green “Add Ellipse” option in the left-hand side menu and press ok. You may also use the Rectangle option for your purposes.
  6. Add Ellipse by holding the left mouse button and dragging the mouse over the preview area.
  7. Place the ellipse in such a way that it covers exactly the area that you want to “come alive” in your cinemagraph.
  8. Go to the “Properties” tab at the bottom right corner of the screen and select the black color for your Ellipse. Make sure you select the color under the “Brush” section, not under the “Pen” section.
  9. On the left-hand side of the timeline menu click the “Blend” button on the ellipse layer and choose the “Mask” option.
  10. Click the “Preview” button above the timeline to make sure you like the outcome.
  11. Proceed to the “Export project” tab in the top menu. Select the format and the location on your desktop where you want to place the cinemagraph.
  12. Finish the process by clicking the red “Export project” button in the same title tab.

Here is a graphic description of method #2. Basically, in this method, you are cutting out a hole in the static image to see the background video through it.

Creating a cinemagraph using masking feature

The major difference between the methods is indicated in the table below.


Method #1 (free version)

Method #2 (Pro version)

How many layers are there on the scene?

Two: Freeshape and Image (screenshot)

Two: Video and Image (screenshot)

What’s in the background layer?

Image (screenshot)

Video

Which layer is edited?

Layer with a Freeshape and a Clipping layer inside it.

Layer with an Image

Which effect is applied?

Inserting a Clipping effect with a video inside of it in a Freeshape

Inserting Ellipse or Rectangle with a MASK in the Image layer


You are all set now. Select a preferable method and get down to cinemagraphing. Good luck!

How to create a slideshow from photos in VSDC Free Video Editor

Assembling media content in a slideshow is a great way to share your experiences with friends and family. However, finding the right tool to do so may be challenging. PowerPoint seems to be one of the easiest options but has a limited set of features and won’t let you work with video files for instance. On the contrary, some video editing software may offer a rich toolset, but would also require its users to dip into the unwanted complexities of multilayer editing.

If you are looking for a sweet spot, download VSDC Free Video Editor with its powerful slideshow wizard. It has a comprehensive set of features packed into an intuitive interface anyone can master in seconds. Sounds too good to be true? See for yourself in this one-minute video guide on how to create a slideshow with VSDC.

Want to get into more detail? Proceed to the step-by-step guide on how to make a video from pictures below.

Step 1. Access the wizard

Upon downloading and installing VSDC, open it and click the “Create Slideshow” button available in the “Start Project Now” section. A new window will pop up. Here you can name your project and choose its parameters like height, width and resolution. Click “Finish” to save selected settings. You will be taken to the “Files sequence wizard” in a separate window.

VSDC Free Video Editor start screen

Step 2. Select the artifacts

In order to import the content for your slideshow, proceed to the green “Add files” button and select the desired media files. Alternatively, you can follow the recommendations of the “Drag and drop media files here” box. After adding the files to the timeline, you can manipulate their placement with the same drag and drop method to make sure you got the right sequence.

Step 3. Apply magic

You’ve probably noticed that your media content is placed in rectangular boxes while the round sections in between with arrows inside remain intact. That’s because they are intended for your transitions – you’ll need them to create an actual video from your pictures. To start, proceed to the top left corner of the window. Here you will find the list of available transition types. Specific transitions of a certain type are located in the middle section. The preview window on the right-hand side allows you to check out the way various transition effects work. Drag and drop preferred transitions from the middle section right to the encircled arrows between your pictures.

Create a video from pictures in VSDC slideshow wizard

Step 4. Add a touch of enchantment

Don’t like the duration of a particular picture? Click the picture on the timeline and go to the “Duration” box above. Set the desired value and click “Enter”. Please note that the values in this box are expressed in 1/1000th of a second. So, in order to make your image last for a second, enter 1000. The same rule is applicable for your transitions too. Also, pay attention to the toolbox on the right from the “duration” section. Here you can cut, crop, rotate your images and apply filters to them, if necessary.

Step 5. Save your charming work

Click “Apply settings” in the bottom right corner of the window to save your slideshow efforts. The wizard window will close. You can always come back to the wizard by clicking the “properties window” on the right side of the screen and selecting the “Edit by using the wizard” button.

Now it’s time to export your project. Proceed to the “Export project” tab in the top menu. Select the format and the location on your desktop where you want to place the slideshow. Complete the process by clicking the red “Export project” button in the same title tab.

How to make a slideshow out of photos

Recap time: how to make a video from pictures

Please use the screenshot above as a reference guide. It indicates all the working areas that we have covered in this tutorial. Good luck with creating slideshows!


You can get more information about the program on Free Video Editor' description page.

How to use VSDC as a 4K video editing software: tips’n’tricks

Shooting ultra HD videos used to be a prerogative of video editing professionals, but those times are over. Nowadays action cameras are eagerly adopting this new format while video hosting services like YouTube are offering its users the ability to upload 4K clips introducing more and more amateurs to this new technology. But where do we stand with 4K video editing software? Is it already available to wide audiences?

According to numerous articles on the Internet if you are planning to work with 4K videos – the money spent on the actual camera is the least of your expenditures. They say that unless you are willing to invest over $2500 on computer upgrades, ultra HD video editing isn’t for you. Fortunately, the Internet is not always right and there are much cheaper ways to edit a 4K video. One of the easiest methods is to find the right software, capable of utilizing even average hardware to the full.  We suggest that you download free VSDC Video Editor. VSDC is known for its comparatively low system requirements and the capability to process 4K footage even on low-end computers with limited memory.

Below, we’ll help you get started with VSDC and provide a few tips on editing 4K videos in particular.

Video import

Upon completing the installation process, launch VSDC and click the “Import Content” button from the top menu. Select your 4K video from the computer. This way your video will be imported to the scene without quality loss and the whole editing scene will be adjusted to your ultra HD video parameters.

Color correction

Now it’s time for the actual editing. 4K videos work as a magnifying glass exaggerating the upsides as well as the downsides of your clips, so attention to detail is necessary.

How to edit 4K video: color correction features in VSDC

Ultra-realistic videos oftentimes deserve color correction to mask either the bad weather or poor lightning. To improve the color spectrum, proceed to the top left corner of the and select “Video Effects” >> “Adjustment”. Choose between available options to enhance contrast, gamma and other visual aspects of your clip.

Video export

When you are done with editing, it’s time to export your full HD video. Proceed to the top menu and select “Export Project” >> “Web” >> “For YouTube”. Choose a name for your file and the location where you want to save it in the “Output file(s)” field. Complete the process by clicking the “Export Project” tab. This may take some time depending on your hardware.

If you still have any questions about exporting you 4k video, please refer to a one-minute video instruction below.

Want to reduce 4k?

If 4k is too cumbersome for you to work with or the video it doesn’t fit on your storage device you can always shrink the size of your clip with VSDC. For this matter import your video, select the “Export Project” tab and proceed to the “Edit Profile” section. Find the “Profile Filter” option to choose the necessary resolution. 1080 (Full HD) or 720 (HD) will most likely be more than enough for the intended outcome. Press “Apply Profile” to save changes and move on with exporting your project from the top menu.

Bonus features

If you are planning to edit many 4K videos you might want to increase the processing speed. This is made possible with the Pro version of VSDC that allows for hardware acceleration. The Pro version leverages the capacity of your video card (if the video card supports it) speeding up 4K video export.

If you purchased the Pro version, make sure you activate hardware acceleration in the program options. Hardware acceleration is not the only bonus you get with a Pro version of VSDC.

If you are shooting videos with an action camera, you will most definitely find video stabilization tool useful. You will find a detailed instruction on how to use it here. If you prefer visual guides, there is a video instruction for your convenience.

Another feature that may come in handy is advanced resizing. When you import a 4K video to the editor and resize it making it occupy only a part of your scene, you normally lose quality. Well, that’s not the case with the Pro version of VSDC. Advanced resizing methods will help you prevent quality loss and enjoy your videos in the best resolution possible. If you want to learn more about resizing and other advanced features of the pro version, feel free to refer to a detailed guide.

That’s it for now. Enjoy your 4K experience!


You can get more information about the program on Free Video Editor' description page.

Notizie

Nuovi modi per aggiungere transizioni, supporto per i file RAW e BRAW e visualizzazione audio gratuita

È giunto il momento: siamo felici di presentarvi l'attesissimo aggiornamento VSDC 9.1! Le funzionalità migliorate della nuova versione accelereranno il montaggio video e renderanno il processo di editing...

VSDC 8.3 - Oltre 100 nuovi modelli, finestra dell'editor di chiavi, AV1 e interfaccia grafica migliorata

Benvenuti all'ultimo aggiornamento di VSDC, la versione 8.3! Abbiamo lavorato sodo e siamo pronti a presentarvi una release ricca di funzioni per farvi scoprire un'entusiasmante serie di oltre 100 nuovi...

I 5 migliori editor video gratuiti del 2023: Liberate la vostra creatività senza spendere troppo

Nel mondo digitale di oggi la creatività regna sovrana. Offre infinite possibilità a individui e marchi di catturare il pubblico e lasciare un'impressione duratura. Con le piattaforme dei social media...

Migliori editor video online 2023: vantaggi e svantaggi

Oggi la popolarità dei contenuti video sta guadagnando terreno e molti utenti si trovano a dover creare video per scopi sia personali che professionali. Nella scelta di un editor video adatto tra le varie...

VSDC 8.2 - Supporto per file proxy, fotogrammi chiave e vettorscopio

Siamo entusiasti di svelare l'atteso aggiornamento 8.2 dell'editor video VSDC. Il nostro team ha lavorato intensamente per garantire che questa versione sia ricca di funzionalità emozionanti e miglioramenti...
 

Screen Recorder gratis

Con questo programma è possibile registrare i video dal desktop e salvarli sul computer in diversi formati. Insieme al video editor è ideale per creare presentazioni e demo.

Read more about Screen Recorder...


VSDC Free Video Capture programma

Il programma serve per catturare video da dispositivi esterni e e per registrarli sul computer in qualsiasi formato video. Potete salvare il video da sintonizzatori video, webcam, schede di acquisizione e vari dispositivi.

Read more about Video Capture...


Reviewed by


"VSDC Free Video Editor is a surprisingly powerful, if unconventional video editor"

- PC Advisor


"This video editor gives you tons of control and editing power"

- CNet


"The editor handles many common formats and boasts a good deal of capabilities when it comes time to alter lighting, splice video, and apply filters and transitions in post production"

- Digital Trends