 User Help Manual
  Learn FAQ
  Send us feedback
 ")


- Published by Amy Shao on June 30, 2026 Meet the new major update ...
- Published by Amy Shao on March 11, 2026 What is the best gift for...
- published Amy Shao 11/19/25 Meet the long-awaited VSDC 10.2 update: a new ve...
- Hi, I'm Mattea Wharton, a travel videographer from Seattle. For three years I ba...
How to create a slideshow from photos in VSDC Free Video Editor
Assembling media content in a slideshow is a great way to share your experiences with friends and family. However, finding the right tool to do so may be challenging. PowerPoint seems to be one of the easiest options but has a limited set of features and won’t let you work with video files for instance. On the contrary, some video editing software may offer a rich toolset, but would also require its users to dip into the unwanted complexities of multilayer editing.
If you are looking for a sweet spot, download VSDC Free Video Editor with its powerful slideshow wizard. It has a comprehensive set of features packed into an intuitive interface anyone can master in seconds. Sounds too good to be true? See for yourself in this one-minute video guide on how to create a slideshow with VSDC.
Want to get into more detail? Proceed to the step-by-step guide on how to make a video from pictures below.
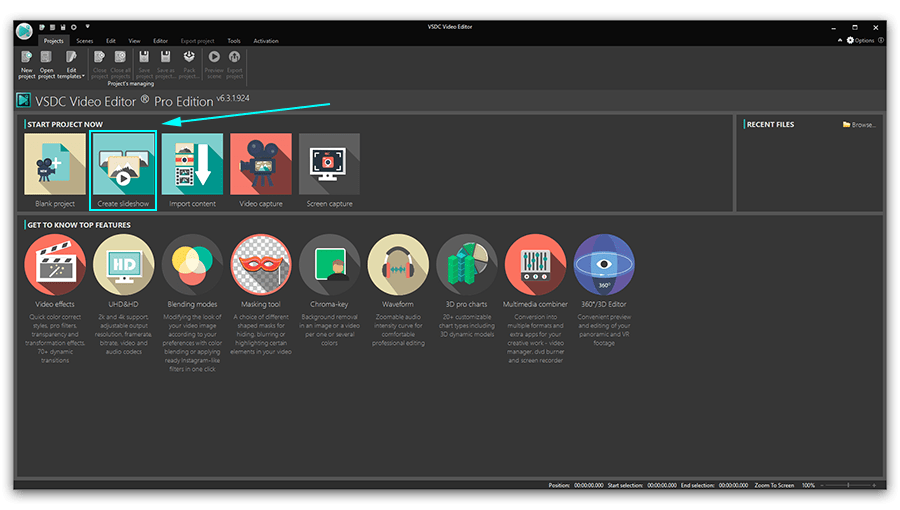
Step 1. Access the wizard
Upon downloading and installing VSDC, open it and click the “Create Slideshow” button available in the “Start Project Now” section. A new window will pop up. Here you can name your project and choose its parameters like height, width and resolution. Click “Finish” to save selected settings. You will be taken to the “Files sequence wizard” in a separate window.
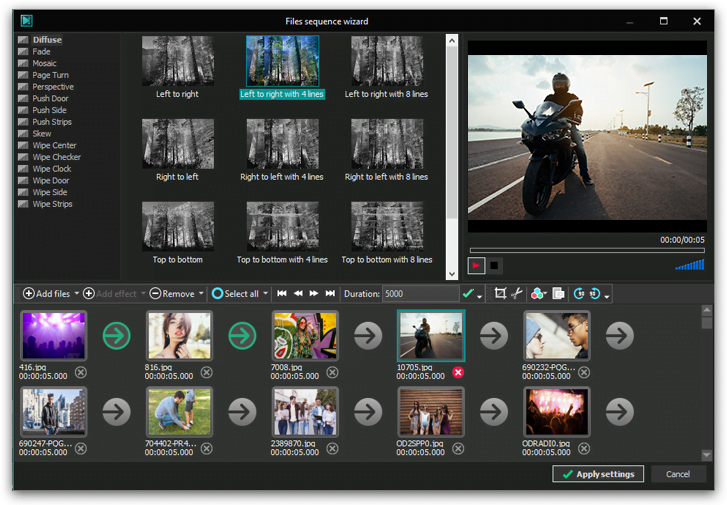
Step 2. Select the artifacts
In order to import the content for your slideshow, proceed to the green “Add files” button and select the desired media files. Alternatively, you can follow the recommendations of the “Drag and drop media files here” box. After adding the files to the timeline, you can manipulate their placement with the same drag and drop method to make sure you got the right sequence.
Step 3. Apply magic
You’ve probably noticed that your media content is placed in rectangular boxes while the round sections in between with arrows inside remain intact. That’s because they are intended for your transitions – you’ll need them to create an actual video from your pictures. To start, proceed to the top left corner of the window. Here you will find the list of available transition types. Specific transitions of a certain type are located in the middle section. The preview window on the right-hand side allows you to check out the way various transition effects work. Drag and drop preferred transitions from the middle section right to the encircled arrows between your pictures.
Step 4. Add a touch of enchantment
Don’t like the duration of a particular picture? Click the picture on the timeline and go to the “Duration” box above. Set the desired value and click “Enter”. Please note that the values in this box are expressed in 1/1000th of a second. So, in order to make your image last for a second, enter 1000. The same rule is applicable for your transitions too. Also, pay attention to the toolbox on the right from the “duration” section. Here you can cut, crop, rotate your images and apply filters to them, if necessary.
Step 5. Save your charming work
Click “Apply settings” in the bottom right corner of the window to save your slideshow efforts. The wizard window will close. You can always come back to the wizard by clicking the “properties window” on the right side of the screen and selecting the “Edit by using the wizard” button.
Now it’s time to export your project. Proceed to the “Export project” tab in the top menu. Select the format and the location on your desktop where you want to place the slideshow. Complete the process by clicking the red “Export project” button in the same title tab.
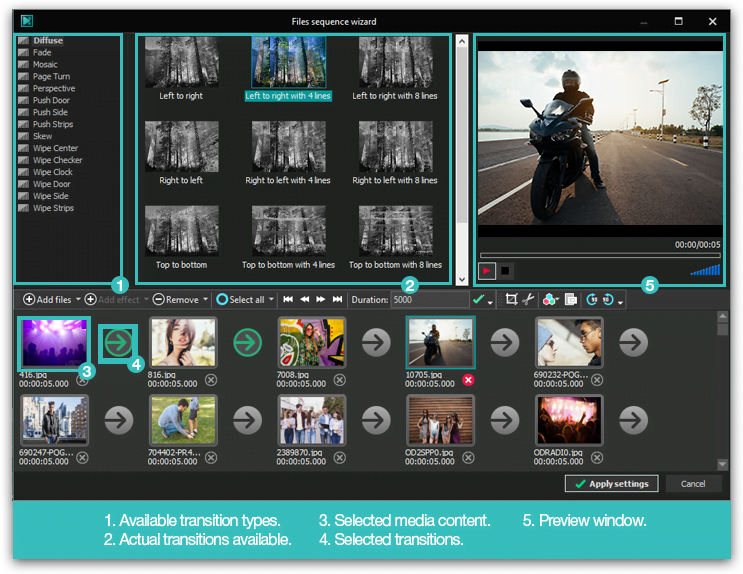
Recap time: how to make a video from pictures
Please use the screenshot above as a reference guide. It indicates all the working areas that we have covered in this tutorial. Good luck with creating slideshows!
Get VSDC Free Video Editor - powerful non-linear editing software with advanced features. Perfect for YouTube creators, social media videos, and professional projects. Learn more about features.
Watch us on YouTube
 / @VSDCFreeVideoEditor
© 2011-2026, www.videosoftdev.com, FLASH-INTEGRO LLC. Privacy policy | Terms of use | About us
All trademarks referenced herein are the sole property of their respective owners.
Copying any materials from this site allowed only with written consent of Site Administration.