")


视频编辑器
使用免费软件制作和编辑从贺卡到公司简介等不同复杂程度的视频。可以剪切和合并视频文件,应用音效和视效,添加滤镜,进行图像校正,创建幻灯片秀、添加背景音乐。使用多彩色色键和高级属性设置可以将视频升级到专业水平。软件支持所有常用的视频和音频格式。
视频转换器
此应用程序针对转换视频文件的格式,支持几乎所有常用的视频格式(读取和保存均可)。此外,程序可以大大简化转码任务,使视频能兼容特殊的多媒体设备,如iPhone、Microsoft Zune或Archos。操作非常简单,软件具有现代化界面以及所有处理视频必须的功能。
CD音频截取器
此音频工具用于从CD截取音频轨迹并存为任何格式。支持几乎所有常用的音频格式。此应用程序也能够从FreeDB服务器中获得音频轨迹的信息,并自动改名及更新文件的标记。
 视频编辑器
视频编辑器 视频转换器
视频转换器 音频转换器
音频转换器 CD音频截取器

多功能
一套免费视频软件包含丰富处理工具的种类。

高速
应用程序采用高速高效算法,适合于单核和多核处理器

实惠
VSDC视频软件可年免费下载到Windows系统操作的PC和笔记本。
News:
- 你好,我是Mattea Wharton,來自西雅圖的旅行影片創作者。整整三年,我一直在與那些會在我影片上加上難看浮水印的編輯軟體鬥爭,直到我發現了VSDC。這款...
- published Amy Shao 6/10/25 等待全新非凡体验的日子终于结束了!这次更新不只是又一个版本——而是VSDC 10.1! V...
- 这个节日季,迎接全新的开始!VSDC视频编辑器带来了最新的9.4版本。我们倾听了您的建议,专注于优化您最常用的工具,同时为明年更多创新功能奠定基础。 增強的...
- 改变就是进步,而这个过程离不开您的参与。在仔细审阅您的反馈后,我们已经解决了多个关键问题,并引入了旨在提升您编辑体验的更新。 150+模板、文本转换工具...
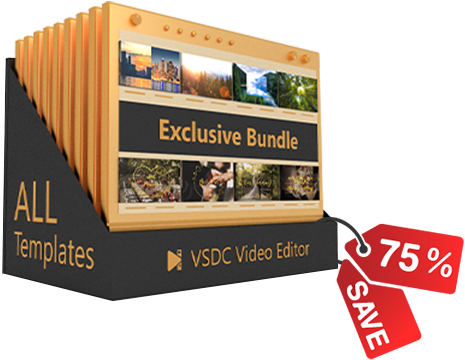
VSDC Template Collection
300 + exclusive templates
Unlock all VSDC transitions and video templates with our Exclusive Bundle Offer and save 75% compared to purchasing single packs!
- Up to 4K Resolution
- 16:9 Aspect Ratio
- 100% Fully Customizable
- Easy to Use
- Detailed Usage Instructions
This Exclusive Bundle includes:
Transition Collections
LUT Packs
Text Effects
Animated Backgrounds
How are animated backgrounds used?
Our animated backgrounds are a great way to create an emotional atmosphere with a touch of creativity. They’re perfect for YouTube, Instagram, audio-driven content or even live performances and presentations. You can also use them for visuals at EDM and VJ shows. Their loops guarantee a polished experience in any setting, which is why they’re worth trying for everyone.
Multi-purpose


"VSDC Free Video Editor is a surprisingly powerful, if unconventional video editor"
- PC Advisor

"This video editor gives you tons of control and editing power"
- CNet

"The editor handles many common formats and boasts a good deal of capabilities when it comes time to alter lighting, splice video, and apply filters and transitions in post production"
- Digital Trends
 / @VSDCFreeVideoEditor