 User Help Manual
  Learn FAQ
  Send us feedback
 ")


- Published by Amy Shao on March 11, 2026 What is the best gift for...
- published Amy Shao 11/19/25 Meet the long-awaited VSDC 10.2 update: a new ve...
- Hi, I'm Mattea Wharton, a travel videographer from Seattle. For three years I ba...
- published Amy Shao 6/10/25 The wait for something new and unusual is finally...
Lens Flare Video Effect in VSDC: Settings Overview
The Lens flare video effect is essential for imitating the sunlight, creating a dreamy atmosphere in a video, and highlighting particular areas or objects in the scene. When used right, it can help you achieve a perfect film look.
In this tutorial, we’ll show you how to apply the Lens flare effect using VSDC Free Video Editor.
Before you get started, download the latest version of VSDC for Windows.
How to add Lens flare effect to your footage in VSDC
VSDC brings quite a versatile feature set that allows you to tailor the Lens flare effect precisely to your needs. To ensure that it looks realistic, the developers have included two levels of settings: one - to imitate the desired light source, and another one - to customize the flares it produces.
Without further ado, let’s see what the effect looks like when applied to footage.
To get started, follow these simple steps:
- Launch VSDC on your computer and import your footage using the Import content button on the start screen.
- Place the cursor at the moment on the timeline when you want the effect to appear in the video.
- Left-click on the video and proceed to Video effects. Then select OpenGL - Lens flare
- In the Object’s position settings window, click OK.
This is the default version of the Lens flare video effect. Once applied, you’ll notice a little cross in the center of the effect. Use it to “grab” the flare and move it around the scene or even out of the frame to achieve the desired effect.
If you’re happy with how your video looks, you might want to leave the effect as is.
If you want to explore the customization possibilities though, keep on reading this tutorial. Below, we’ll show you how to change the size of the flare, its intensity, the light source angle, the color tones, and much more.
Lens flare effect settings overview
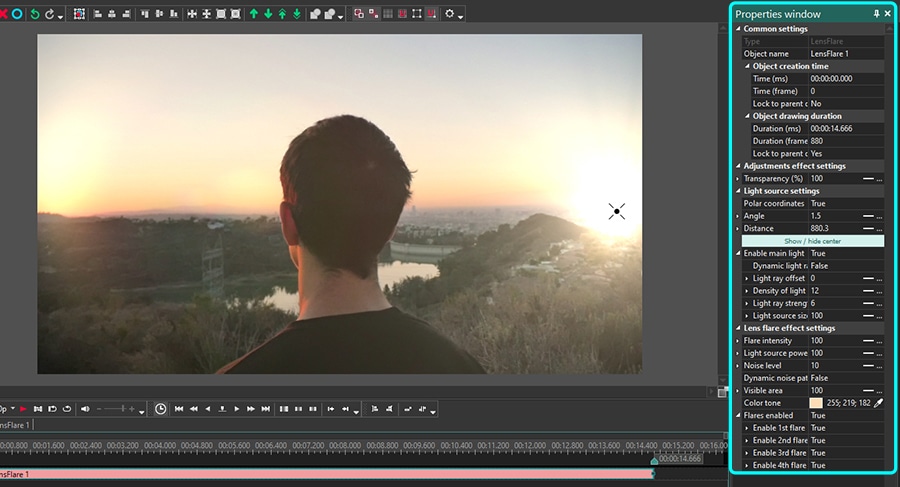
To get started, make a double-click on your footage and left-click on the flare effect layer. Select Properties from the context menu – the Properties window will slide-in from the right-hand side.
In that window, the effect settings are broken down into four groups:
- Common settings
- Adjustment effect settings
- Light source settings
- Effect settings
Let’s take a closer look at each group.
Lens flare effect: common settings
Common settings allow you to add a title to the effect layer, set the moment when the effect will appear in the video (by seconds or by frames), and the duration of the effect (in seconds or frames).
Lens flare effect: adjustment effect settings
Adjustment effect settings enable you to choose the transparency level for the Lens flare effect. You can have the same level of transparency for the entire effect duration or you can have it gradually increase/decrease to the desired level.
For the latter, the Initial value and the Final value of the Transparency parameter should be different. For example, here is what the effect will look like if we set the Initial value at 100% (completely non-transparent) and the Final value at 10%:
Lens flare effect: light source settings
The Light source settings are applied to the artificially added source of light that produces flare we see in the video. The key parameter of this group is called Polar coordinates.
This parameter allows you to use the polar coordinate system to locate the light source more precisely. If you activate Polar coordinates (switch the parameter to True), the pole (point with coordinates 0;0) will be located in the center of the preview window, and you’ll be able to set the Light source angle and the Light source distance.
When you change the light source angle, the produced flares appear in a new location based on where the light comes from.
The Initial value for this parameter will define the angle for the beginning of the video, and the Final value – for the end of the video. That means if the Initial and the Final values are different, the light source angle will be gradually changing over time.
The light source distance defines how far the center of the light source will be shifted from the center of the scene. Note that the light source is shifted toward the angle you’ve set in the previous parameter. For example:
- If the light source angle is 90, the light source will be moving down.
- If the light source angle is 180, the light source will be moving to the left.
- If the light source angle is 270, the light source will be moving up.
- If the light source angle is 360, the light source will be moving to the right.
When the Light source distance parameter is equal to 0, the light source will always be located in the center of the scene.
If you switch Polar coordinates to False (deactivate the parameter), the 0;0 point will be located in the top left corner. In that case, you can set the location of the light source using the X and Y axis. Again, by adjusting the Initial and the Final values, you can set different light source locations for the beginning and the end of the video.
The following parameter is called Enable main light. It activates and deactivates the main light source in the video. If the parameter is enabled (set as True), the main light source will be visible. If you disable it, only flares will be visible in the scene.
In addition, when the main light source is enabled, it activates the following parameters:
- Dynamic light ray offset
- Light ray offset
- Density of light rays
- Light ray strength
- Light source size
The Dynamic light ray offset and the Light ray offset allow for controlling the rotation of the rays around the light source. If you activate the former parameter, the rays will be rotating automatically. If you activate the latter parameter, you’ll be able to set the rotation manually.Light ray offset can only be enabled if the Dynamic light ray offset is switched to False.
Light ray offset maximum value is 100, and that equals to a 360-degree rotation, or full circle.
Density of light rays, as the name suggests, defines how dense the light rays will be spread around the source of light. The higher the value is, the thinner and denser the rays are. If you want the density to gradually change over time, use the Initial and the Final values.
Light ray strength defines how sharp the light rays are. The higher the value of this parameter is, the sharper the rays are.
Light source size allows you to control the size of the light source.
Lens flare effect: effect settings
Now that you know how to achieve the desired light source appearance and the ray movements, it’s time to see how you can adjust the flares. The fourth group of settings – Effect settings – helps you do exactly that. Below are the parameters you can work with, reviewed.
The Flare intensity is the parameter you can use to change the visibility of the flares. If you want the flares to gradually become more visible or less visible over time, use the Initial and the Final values.
For instance, look at the flares becoming more visible during the playback with the Initial value set at 100, and the Final value set at 300.
Light source power defines how powerful the light source is. For instance, this is what happens when at the end of the video the light source becomes five times more powerful than at the beginning of the video.
Now, Noise level should sound self-explanatory and it affects both the look and the visibility of the effect. The higher the noise level is, the less visible the light source becomes, and the more grainy the effect looks. When the Noise level is equal to 100, the light source and the flares are completely invisible.
Dynamic noise pattern, similarly to the Dynamic light ray offset, allows you to set an automatic pattern that will be dynamically changing the noise level as the video progresses.
Visible area is a really interesting feature that helps you change the visibility of the footage. For instance, you may want to gradually increase the visibility of the scene as the size of the light source increases. Basically, it’s a perfect way to create an illusion of a video shot during the night!
In the example below, the Initial value is set at 10, and the Final value is set at 100. Notice how the scene visibility gradually increases.
Moving on to the next set of parameters related to the flare color tones. Sometimes, video creators specifically look for yellow, blue, green, and red lens flare effects or overlays. In VSDC, you can create any of these variations manually.
To do that, find the Color tone parameter in the Effect settings group and change the flare color to the desired one. Note that the selected tone will be applied to both the flares and the original footage.
To control the number of lens flares, use the parameter named Flares enabled located below the Color tone. The maximum number of flares you can have in the scene is 4, and they all are visible by default. You can select Flare 1, Flare 2, Flare 3, or Flare 4 to adjust their parameters individually or disable any of them.
Now, each flare includes three color components: red, green, and blue. You can set up each color component individually and adjust the following parameters:
- Component intensity
- Component distance
- Component size
Component intensity is the parameter that controls the brightness of the selected color component. For example, you can reduce the red tone in the selected flare, and by doing that you’ll automatically increase the blue and green tones for it.
Component distance allows you to decide how far the color component will be shifted from the center of the scene to the selected lens flare. For example, if you set the value for this parameter at 0, the color component will remain in the center of the scene. And if the value equals 100, the color component will be located right over the center of the flare.
In the example below, we gradually relocate the color component for the Flare 1 from the center of the scene to the flare location. In other words, the Initial value for the component distance is 0, and the Final value is 100.
Finally, the parameter named Component size enables you to change the size of the selected color component for a particular flare.
How will you use the Lens flare effect?
There are lots of ideas for using the Lens flare effect. If you pay attention, you’ll notice it in space videos, footage of nature, and even memes!
Need ideas? Then join us on Facebook and subscribe to our YouTube channel for your weekly dose of inspiration.
Watch us on YouTube
 / @VSDCFreeVideoEditor
© 2011-2026, www.videosoftdev.com, FLASH-INTEGRO LLC. Privacy policy | Terms of use | About us
All trademarks referenced herein are the sole property of their respective owners.
Copying any materials from this site allowed only with written consent of Site Administration.