 User Help Manual
  Learn FAQ
  Send us feedback
 ")


- published Amy Shao 6/10/25 The wait for something new and unusual is finally...
- This holiday season embraces new beginnings with the latest update of VSDC Video...
- Change is all about improvement, and this process wouldn't be possible without y...
- Intro In 2024 the options range for creating visual effects is incredibly dive...
How to Mask Videos in VSDC Editing Software
Video masking is an advanced technique used for creating eye-catching effects. Technically, when you apply a mask, you outline an area in the picture you want to modify and work with it independently. If you’ve ever used a graphic editor, you’re surely familiar with the idea.
VSDC Video Editor includes a wide set of tools for creating precise clipping masks, inverted masks, and text masks. In the tutorial below, we’ll show you how to apply an inverted mask. For this scenario, we’ll be pixelating a face of a person as if we needed to hide it from the viewers.
In the second part of this tutorial, we’ll also talk about how to make the mask follow the object’s movements.
Please note that while VSDC is a free video editor, masking is included in the Pro package available for $19,99 per year. If you just need to quickly blur a face in a video, however, you can do it for free following our instructions.
How to mask a video (pixel masking example)
Once you’ve added a video to the scene, go to the Video Effects tab, select Filters and choose “Pixelize”. Your entire scene will get pixelated, but don’t get confused - it’s a part of the process. Use the Properties window on the right to adjust the pixelation level and set up the intensiveness of the mask.
Next, we’ll need to select a masking area. You can do it using pre-designed mask shapes such as ellipse and rectangle, or you can create a custom shape using a tool called “free shape”. For this example, we’ll be using an ellipse shape to cover a person’s face.
Double-click on the “Pixelize” layer and add an Ellipse object to the scene (go to the left-side menu to find the Ellipse icon). You’ll notice that the area inside the borders of the shape is not pixelated anymore, meanwhile, we need it to be the other way around.
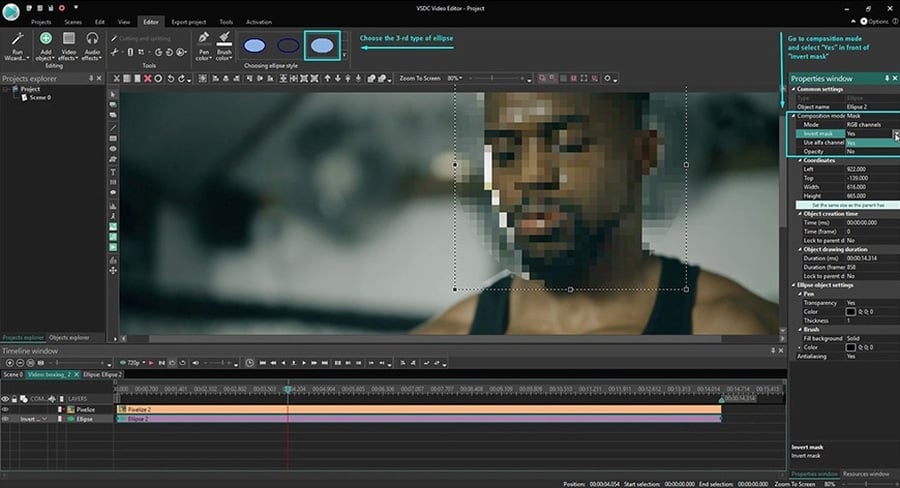
To do that, apply an Inverted Mask:
- Open the Properties window – located on the right. If you don’t see the Properties window, use the right mouse button to click on the Ellipse object on the timeline and select Properties.
- Open the Composition mode dropdown menu and select Mask.
- Then find Inverted mask and switch its mode from No to Yes.
- Once you do that, the face will stay blurred, while the surrounding area will reverse to its original look.
This is it. You’ve just applied a video mask. The same way, you’ll be able to use other effects instead of pixels. The examples are numerous: you can change the color of a certain area in the video, you can cut out an object and replace it, you can create a see-through clipping mask – and much more. Here is a quick link to video masking tutorials on our YouTube channel. Don’t forget to subscribe!
How to make a video mask follow object’s movements
By default, a video mask follows the camera focus and doesn’t move in the scene. In our case, this means if the person moves, they may “lose” the mask. To prevent it, you’ll need to apply motion tracking. This way, the mask will follow the movement of the person and their face will remain hidden.
Here is how to apply motion tracking to the mask:
- Go back to the main timeline tab and right-click on the video. From the context menu, select the option “Create a movement map”.
- In the pop-up window, the program will indicate where on your PC the movement map will be saved and stored. Just click OK.
- Once you do that, the Motion Tracker mode will be activated.
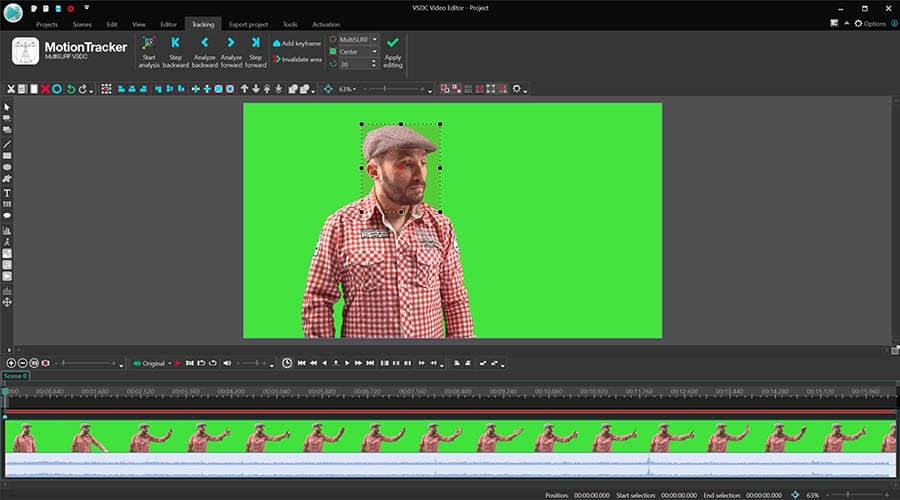
- Place the tracking frame to cover the face completely. Ideally, the red dot should be in the middle of the object you’ll be tracking. Once ready, press Start analysis and watch the software draw the movement map.
- Once ready, click Apply editing. In the pop-up window, select Yes to save the changes in the map.
- You’ll be brought back to the main timeline tab. Double-click on the video layer, then double-click on the Pixelize filter layer to get to the ellipse shape again.
- Double-click on the ellipse shape layer and open the Add object menu at the top. Select Movement -> Movement map.
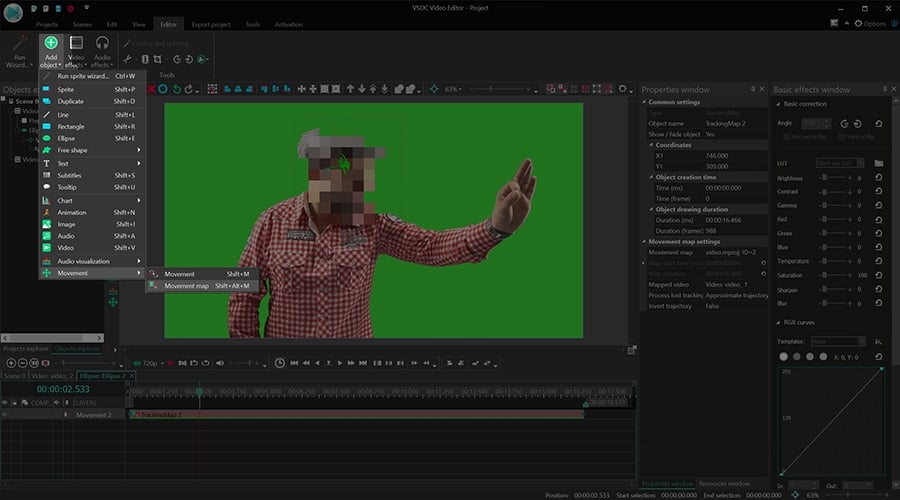
- In the pop-up window, confirm that you want to apply the suggested map (if you have several maps on your PC, you’ll have a list to select from).
- Adjust the position of the mask if needed and hit Preview to see the result. The pixelated mask should be moving along with the face.
If you’re creating a motion-tracked mask, feel free to consult with the following video tutorial. The sequence of actions in the video is different, but the result is the same. See if it works for you:
Other video editing tutorials you may be interested in:
- How to apply blending modes in VSDC Free Video Editor
- How to clone yourself in a video
- How to create a text mask for free within 3 minutes
You can get more information about the program on Free Video Editor description page.
© 2011-2025, www.videosoftdev.com, FLASH-INTEGRO LLC. Privacy policy | Terms of use | About us
All trademarks referenced herein are the sole property of their respective owners.
Copying any materials from this site allowed only with written consent of Site Administration.