 User Help Manual
  Learn FAQ
  Send us feedback
 ")


- Published by Amy Shao on March 11, 2026 What is the best gift for...
- published Amy Shao 11/19/25 Meet the long-awaited VSDC 10.2 update: a new ve...
- Hi, I'm Mattea Wharton, a travel videographer from Seattle. For three years I ba...
- published Amy Shao 6/10/25 The wait for something new and unusual is finally...
How to clone yourself in a video with VSDC
Ever wanted to clone yourself in a video? In this tutorial, we’ll show you how to do it using VSDC Pro - a lightweight video editor for Windows PC.
The clone effect is quite popular among Hollywood movie makers and creative YouTubers. The key feature required for performing this trick is video masking. The problem is, most video editors with a decent masking feature will cost you an arm and a leg, while VSDC Pro is the most affordable and accessible option out there. Its entire feature set is available for just $19.99 per year, and it works even if you have 2GB of RAM on your PC.
Check out the tutorial below to see how easy it is to clone someone in a video, even if you’re not a professional editor.
Ready to replicate the effect? Before getting started, download VSDC to your PC.
Tips for shooting your first clone video
The idea behind cloning someone in a video is really simple. First, you make several shots of the same person in different positions using the same shooting angle. Then you overlap these shots using video masking. As a result, the person appears in multiple positions simultaneously.
For this illusion to work well, it’s crucial to record your footage using the same shooting angle. This means that the camera should remain in the same spot until you finish shooting. In fact, you can follow our example from the video above and record a video in one take so that you don’t even have to touch the camera.
It’s also necessary to keep some distance between the “clones” when they appear simultaneously in the video. Ideally, you want to find some kind of a space separator and keep it in mind while planning where each “clone” will be located. For our example, we used the door as a separator. Notice that when both clones appear in the video, they don’t cross that imaginary border - they stand either to the right or to the left.
If you follow these shooting tips, the montage will be fast and straightforward even if you’re a video editing newbie.
How to clone yourself in a video: step-by-step tutorial
Launch VSDC and upload your footage using the Import content button on the start screen. In our case, it’s a one-shot video, so we’ll need to cut the unwanted pieces first.
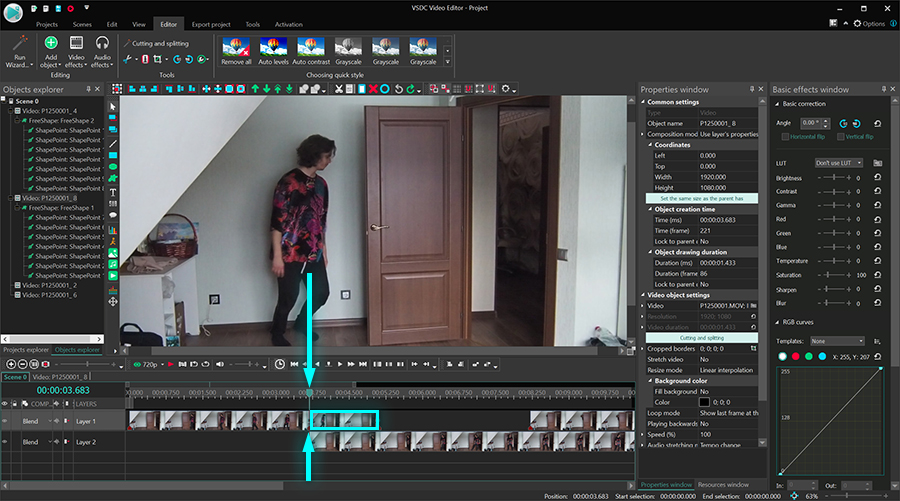
Step 1. Locate the footage on the timeline
The first step is to place the footage on the timeline correctly. We’ll be working with three pieces, but you may have as many as you want. The idea is simple: you need to overlay videos with clones on the timeline.
Notice that each subsequent piece of video containing another clone appearance should be placed one layer below and start before the previous one ends. To get a quick preview of what the result will look like when both clones appear in the video, use the Opacity control at the top.
Step 2. Separate the area with a clone
To make both clones appear in the video, you’ll need to apply an inverted mask to one of them. The easiest way to do that is to mask out the entire area with a clone in it and make it visible through another video. In our case, that’s the area to the left from the door. Remember we told you it’s convenient to have a visual separator in the video? That’s exactly where it comes in handy.
Before you start applying the mask, make a cut right where the videos first overlap because you only want to create a mask for the overlapping piece.
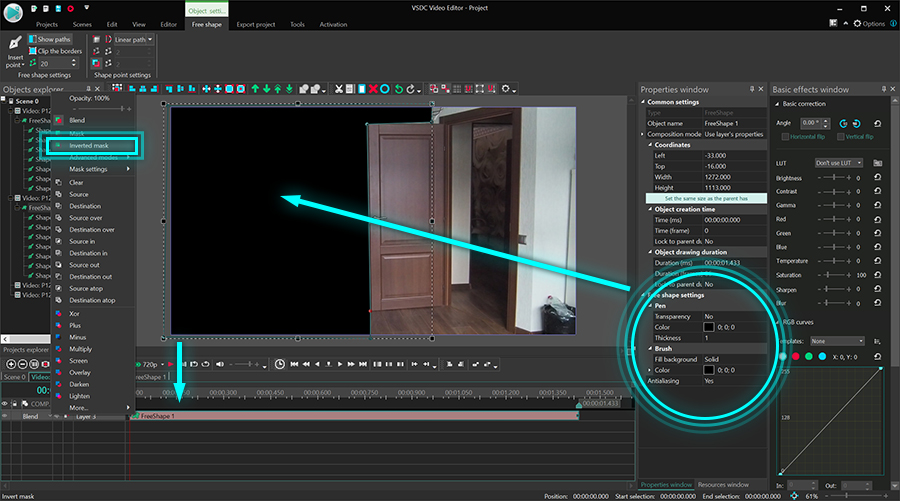
Once you cut out the required piece, make a double click on it. Select the Free shape tool from the menu on the left-hand side and outline the area to the left from the door.
Step 3. Apply video masking
Once you finish, paint the outlined area black and open the Blending mode menu. Select Inverted mask from the list. Then go back to the main timeline tab and for the video fragment you’ve been working on, select the option called Use layer's properties - in the Properties window on the right-hand side.
Use the preview mode to see the result. Then, move on to the second piece of footage located on the same layer. Since the area hasn’t changed, just duplicate the mask you created a minute ago using Ctrl + C and Ctrl + V. Remember to paint the free shape black, apply Inverted mask to it and then select the Use layer's properties option for the masked video.
Repeat your actions as many times as needed.
Cloning yourself in a video is easier than it seems
We recommend starting with just two clones in a video for you to get a grasp on the masking technique. Once you understand the concept of it, you’ll be able to clone yourself in a video as many times as you want.
Bonus tip. If you are absolutely not ready to shell out $19.99 for the Pro version of VSDC, you can clone yourself in a video using the free background remover available in VSDC. Record yourself in front of a green background, then remove the background using Chroma Key, cut the footage into pieces where you’re in different locations in the scene, and overlay them. This approach will take a bit more time and effort from you, but it’s a great zero-budget option.
Ready to continue learning? Check out this free frame clone effect tutorial:
Watch us on YouTube
 / @VSDCFreeVideoEditor
© 2011-2026, www.videosoftdev.com, FLASH-INTEGRO LLC. Privacy policy | Terms of use | About us
All trademarks referenced herein are the sole property of their respective owners.
Copying any materials from this site allowed only with written consent of Site Administration.