Use o editor de vídeo gratuito para criação e edição de vídeos de qualquer complexidade. Corte vídeos, aplique efeitos visuais e de áudio, use filtros e correção de imagem, faça apresentações de slides, adicione uma trilha sonora. Use Chroma Key e outras funções avançadas. Todos os formatos populares são suportados.
Converta vídeo de um formato para outro. Todos os formatos de vídeo mais populares são suportados - AVI, MOV, QT, MP4, M4V, MPEG, WMV, FLV, MKV, RealVideo (RM e RMVB), 3GP e 3G2. Prepare seus arquivos multimídia para reprodução instantânea em qualquer formato e em qualquer dispositivo.
Converta arquivos de áudio de um formato para outro. Todos os principais formatos e codecs de áudio suportados. Você também pode gerenciar listas de reprodução e meta tags, extrair o áudio de arquivos de vídeo e salvar faixas em seu dispositivo em qualquer formato.
Tire faixas de áudio de CDs e guardá-los em qualquer formato no seu PC. Quase todos os formatos e codecs de áudio são suportados. O programa pode remover detalhes da faixa do servidor FreeDB para renomeação de arquivos automática e atualização de meta tags.
How to Make Transitions Smoother Using Bezier Curves
Bezier curves have many uses in video editing, one of which we already explored in our quickguide to drawing shapes. This time, we’ll show you how to use Bezier curves in so-called “easing curves” – the tool allowing you to control how long it takes a transition to kick in or fade out.
Please note that editing transitions along Bezier curves is only available in the Pro version of VSDC.
Step 1: Import your footage and add a transition
Making smooth transitions with the Bezier curve is a simple process. First, import your video file to the project. If you already have a blank project opened, you can just drag the video file onto the timeline. Next, add a transition. For this tutorial, we will be using the Wipe transition, but you can choose any of the ones available in the Templates window.
Step 2: Apply transition curve template
Right-click on the transition effect to open the Properties window. For our example, we’ll be working with Transition levels – the parameter setting the speed of the transition. Right-click on the tiny Parameter change icon next to Transition levels and hover over Templates. Then select “Quad Out.”
There are over a dozen options available in the menu; however, for our example, we need to use a template ending with “Out” because the transition is at the end of the video. Had we placed the transition at the beginning of the video, we would have selected a template ending with “In.”
Step 3: Configure Bezier curve
Once you apply the template, the timeline window will display a graph. The curve on the graph is based on the Transition level values, therefore, by changing this curve, you will be adjusting the pace of the transition.
To get started, find the two control points: one at the beginning of the graph and one at the end of it. These are called “keyframes.” Click on either of the keyframes, and you’ll see a vector. Grab the end of the vector and drag it around: both the length and the angle of the vector change the curve and, thus, the pace of the transition.
To adjust the transition at any specific moment, you can create additional keyframes by double-clicking on the graph. The smoother the curve is, the smoother the transition. The opposite is true: if you create a sharp curve, the pace of the transition will spike accordingly.
Create custom video effects using Bezier curves
Customizing transitions with Bezier curves is easy. You can apply them to any parameter that includes values changing along a curve and achieve outstanding video effects. Furthermore, after creating your ideal transition, you can save it as a template and use it later. Check outa quick tutorial on how to do it.
How to Use Bezier Curves for Drawing Shapes
Bezier curve is a tool that lets you draw odd shapes with precise accuracy. In video editing, it’s one of those rare features that are easy to use and hard not to. Below, we’ll show you how to use Bezier curves in VSDC Free Video Editor for creating shapes you can later use for clipping or inverted masks. For the sake of this tutorial, we’ve selected a heart shape as an example to practice on; once you get the hang of it, you’ll be able to draw any other shape quickly and effortlessly.
Step 1. Launch VSDC Free Video Editor and import your content
First, boot up VSDC Free Video Editor. On the main screen, there are different options for importing your content. You can create a blank project with custom parameters, or you can simply click Import content and select your video files from the computer. If you decide to do the latter, VSDC Free Video Editor will automatically change the project’s parameters to the parameters of your video.
Step 2. Draw the foundation of your shape
Once you access the project’s scene, go to the left-side menu and select the Add free shape tool:
A window called Object position settings will pop up to indicate the position of the shape you’re creating on the timeline – just click OK.
Now, as an easy demonstration of what the Bezier curve is capable of, let’s draw a heart shape. In the previous versions of VSDC, you would have to create up to 100 control points just to draw a smooth-looking heart. However, now you’ll be able to make do with only a couple of control points, even if you have little to no vector drawing experience. The Bezier curves will practically draw the shape for you!
To get started, click anywhere on the scene and while holding the mouse button, drag it to the side. Once you do that, you’ll see two vectors that will start forming the shape. Leave them as they are and repeat your steps to create another control point above the first one: now you have half of the shape! Okay, it may not look like half of a heart shape, but that’s temporary.
Now all you have to do is close the shape before we start turning it into a heart. There are two ways to do that. You can either select the first control point and press the Closed Free Shape button in the Shape Point Settings, or simply hold the Ctrl key and click on your first control point.
Step 3: Adjust the vectors to achieve the desired shape
Vectors determine the shape of your figure; therefore, you can tweak the shape just by dragging them in the desired direction. For instance, to turn the circle into a heart shape, press the Ctrl key and drag one of the vectors at a 45-degree angle. Keep in mind that if you forget to press the Ctrl key, both vectors will be moving along, staying parallel to each other. Once you’re finished with one vector, drag the second one at the same angle but in the opposite direction. Repeat the process with the vectors from the second control point, and voila – you have a heart. You always had.
Make use of your shape
Drawing shapes with the Bezier curve is this easy. You can add as many control points as you want: each will have two vectors to help you form the shape more precisely. Whether you want to create a clipping mask, hide an object behind a shape, or just practice vector drawing – now it’s much easier. We’re excited to see what uses you’ll find for this tool!
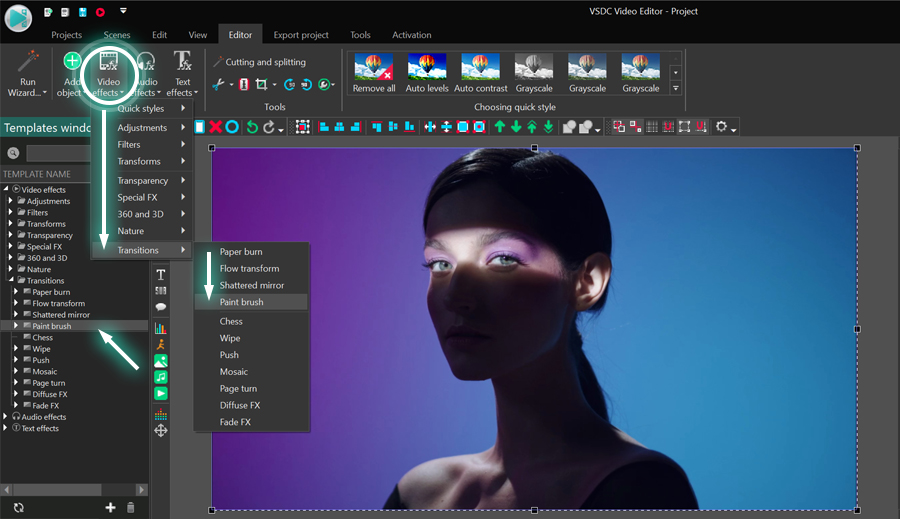
A transição Pincel (Paint Brush) é um efeito popular que imita pinceladas. Você pode usá-lo para mover gradualmente de uma cena para outra cobrindo o vídeo com uma pincelada por pincelada ou revelando a próxima imagem sob uma camada de tinta. Aqui está o que parece:
A partir deste tutorial, você descobrirá como aplicar esse efeito em seus vídeos e adaptá-lo à sua visão. O efeito Pincel está disponível no VSDC a partir da versão 6.8, portanto, certifique-se de baixá-lo antes de prosseguir.
Como aplicar a transição Pincel em VSDC
Depois de baixar o VSDC, inicie-o em seu computador e importe sua filmagem. Recomendamos usar o botão Importar conteúdo, a menos que você queira aplicar parâmetros personalizados ao projeto. Em seguida, selecione o vídeo ao qual deseja aplicar a transição, abra o menu Efeitos de vídeo, prossiga para Transições e selecione Pincel.
A janela de configurações de posição do objeto aparecerá indicando que a transição será adicionada ao final da cena. Clique em OK para prosseguir e visualizar o resultado. Observe que se você quiser esticar a duração da transição, poderá fazê-lo manualmente. Falaremos mais sobre isso na seção a seguir.
Como acessar as configurações de transição do Pincel
Para abrir as configurações do efeito, primeiro clique duas vezes no vídeo ao qual você aplicou o efeito. Você se encontrará em uma nova guia com a camada de efeito chamada Efeito de pintura. Clique com o botão direito do mouse sobre ele e selecione Propriedades. A janela Propriedades deslizará da direita.
A janela Propriedades para a transição do Pincel (Paint Brush) inclui 3 grupos de configurações:
Configurações padrão
Configurações de ajuste
Configurações do efeito Pincel
Vamos examinar cada grupo de configurações.
Configurações padrão
As configurações no primeiro grupo permitem que você renomeie a camada de efeito de transição, digite o momento exato em que a transição deve começar (em segundos ou quadros) e defina sua duração (em segundos ou quadros). Também pode mover e esticar manualmente a camada de efeito diretamente na linha do tempo usando os manipuladores.
Configurações de ajuste
As configurações de ajuste consistem em um único parâmetro, denominado Transparência. A transparência permite ajustar o nível de opacidade das pinceladas. Por exemplo, se você deixar o valor padrão (100%), a pintura ficará completamente não transparente. No entanto, se você diminuir o valor, começará a obter o efeito transparente.
Se você expandir o parâmetro Transparência, você pode acessar os valores iniciais e finais. Esses valores permitem definir o nível de opacidade para o início e o final do efeito Pincel, criando assim uma transição mais suave entre as cenas.
Configurações do efeito Pincel
As configurações do terceiro grupo permitem adaptar o efeito às suas necessidades. Por exemplo, você pode alterar a direção e o ângulo das pinceladas, escolher a largura do pincel e muito mais.
Direto
O primeiro parâmetro neste grupo é denominado Direto e se refere à direção da transição. Se você deixar este parâmetro desativado, o pincel cobrirá gradualmente sua filmagem, traço por traço. Se você ativar este parâmetro, a transição funcionará da maneira oposta e gradualmente revelará o vídeo de uma camada de tinta.
Ângulo do golpe
O parâmetro a seguir permite alterar o ângulo da pincelada. Por padrão, o pincel se move em um ângulo de 45 graus; no entanto, você pode alterar esse valor a seu gosto. Por exemplo, na ilustração abaixo, você pode ver como os traços ficarão se você usar, digamos, ângulos de 90 e 30 graus.
Além do ângulo do golpe, você pode ativar a opção chamada Direção invertida e alterar o lado onde o pincel começa a se mover. Por exemplo, por padrão, o pincel se move da direita para a esquerda. Neste caso, a direção do lado oposto será da esquerda para a direita.
Canto inicial
Este parâmetro define o canto onde o efeito começa. Existem 4 opções autoexplicativas que pode escolher: superior esquerdo, superior direito, inferior esquerdo e inferior direito.
Largura do pincel
Largura do pincel também é bastante autoexplicativa. Este parâmetro define a largura e a espessura das pinceladas e você pode deixar seu valor consistente ou torná-lo dinâmico. Por exemplo, se você definir o valor inicial em 10% e o valor final em 50%, cada pincelada subsequente será mais espessa.
Desfoque
Este parâmetro adiciona desfoque à pintura e torna as pinceladas menos definidas. Quanto mais alto for o valor, mais desfocados serão os traços. Na verdade, se você digitar 100%, o efeito se parecerá com tinta spray.
Direção do movimento do pincel
Direção do movimento do pincel é o padrão de movimento do pincel que define a ordem em que as pinceladas são aplicadas. Existem 5 opções à sua escolha:
Não contínuo - cada pincelada subsequente começará no mesmo lado da cena.
Contínuo - cada pincelada subsequente começa no lado oposto da cena.
Com base na área - a cena é dividida em várias áreas, e cada área é coberta com tinta.
Aleatório (mesmo ângulo) - cada pincelada aparece em um local aleatório na cena sob o mesmo ângulo.
Aleatório (ângulo aleatório) - cada pincelada aparece em um local aleatório na cena sob um ângulo aleatório.
Coeficiente de sobreposição
O coeficiente de sobreposição define a porcentagem de pinceladas que aparecem na cena ao mesmo tempo. Por exemplo, se o número total de pinceladas necessárias para cobrir totalmente a cena for 12 e o coeficiente de sobreposição for igual a 30%, a qualquer momento, você verá 4 pinceladas em vez de apenas uma.
Teste a transição Pincel gratuitamente
O novo efeito de transição Pincel está disponível na versão gratuita do VSDC Video Editor, então se você gostou deste tutorial, vá em frente e baixe o VSDC do site oficial.
Sinta-se à vontade para nos enviar uma mensagem no Facebook e certifique-se de se inscrever em nosso canal no YouTube para uma dose semanal de inspiração na edição de vídeo.
Como criar um efeito realista de vidro quebrado
O efeito Vidro Quebrado (Shattered glass) é um efeito de transição popular que se tornou recentemente disponível no VSDC Pro. Com a configuração adequada, esse efeito o ajudará a adicionar profundidade ao vídeo e obter perspectiva. Você pode usá-lo para criar uma transição suave entre as cenas, terminar um vídeo com um estrondo ou começar sua história.
Neste tutorial, mostraremos como criar um efeito realista de vidro quebrado. No entanto, antes de prosseguir, certifique-se de baixar a versão mais recente do VSDC de nosso site oficial porque o novo efeito não está disponível nas versões anteriores a 6.8.
Como aplicar o efeito de vidro quebrado no VSDC
Para começar, inicie o VSDC e use a opção Importar conteúdo para fazer upload de sua filmagem. O vídeo vai parar automaticamente na linha do tempo e você pode começar seu trabalho.
Para aplicar o efeito Vidro quebrado, abra o menu Efeitos de vídeo na parte superior e prossiga para Transições. Em seguida, selecione Vidro quebrado.
Depois de aplicar o efeito, uma janela pop-up chamada Configurações de posição do objeto indicará que o efeito será adicionado ao final da cena. Posteriormente, você poderá alterar a posição do efeito manualmente.
Use a janela de visualização para ver o resultado e, se você estiver satisfeito com a aparência da transição, vá em frente e exporte o vídeo ou continue trabalhando no resto. Se você, entretanto, deseja ver como pode personalizar o efeito, continue lendo.
Como acessar as configurações de efeito Vidro quebrado no VSDC
Para abrir as configurações do efeito, precisa acessar o efeito na linha do tempo. Para fazer isso, clique duas vezes no vídeo ao qual você aplicou o efeito. A partir daí, clique com o botão direito do mouse na camada de efeito e selecione Propriedades. A janela Propriedades deslizará do lado direito.
Na janela Propriedades, existem três grupos de configurações:
Configurações padrão
Configurações de ajuste
Configurações de efeito Vidro quebrado
Configurações padrão
As configurações comuns permitem que você renomeie a camada de efeito na linha do tempo, defina a duração do efeito e defina o momento exato em que ele deve aparecer no vídeo (em segundos ou quadros).
Configurações de ajuste
As configurações de ajuste incluem dois controles: Transparência do efeito e a opção de Estender os limites das peças quebradas (fragmentos).
O primeiro controle afeta diretamente a opacidade das peças quebradas. Por exemplo, se o valor da transparência for igual a 100%, a imagem se estilhaça enquanto o fundo permanece preto. No entanto, se você diminuir significativamente o nível de Transparência, as peças quebradas se tornarão semi-opacas e, em vez do fundo preto, a imagem original permanecerá visível.
Observe que se você expandir o menu Transparência, notará duas propriedades adicionais: Valor inicial e Valor final. Use esses valores se desejar que o nível de transparência aumente ou diminua com o tempo.
Lembre-se de que você verá os valores inicial e final de muitos outros parâmetros na janela Propriedades. Todos eles funcionam da mesma forma. Torne o valor inicial menor que o valor final, e o valor do parâmetro aumentará conforme a transição progride; faça o oposto e o valor do parâmetro diminuirá à medida que a transição progride.
Outro controle nas configurações de ajuste é denominado Estender os limites. Por padrão, ele está desativado, o que significa que os pedaços de vidro permanecem dentro da moldura do vídeo original, imagem ou qualquer outro objeto ao qual você aplicou essa transição. No entanto, se você ativar este parâmetro, as peças continuarão se movendo livremente fora dos limites do objeto.
Vamos prosseguir e revisar os controles de personalização disponíveis no terceiro grupo de configurações.
Configurações de efeito Vidro quebrado
Neste nível, você pode ajustar o tipo de fratura, o movimento dos fragmentos, a força de impacto e alguns outros parâmetros. Examinaremos rapidamente cada parâmetro abaixo.
Predefinições
As predefinições são suas próprias configurações de efeito salvas na biblioteca. Digamos que, depois de alternar os controles por algum tempo, você tenha obtido um efeito de transição impecável e deseja salvar essa combinação de parâmetros para a próxima vez. Você poderá salvá-lo como uma predefinição e encontrá-lo no menu sempre que precisar.
Direto
Se você deixar este parâmetro ativado, o efeito de transição irá progredir na sequência direta que representa um objeto caindo aos fragmentos. Se você desativar este parâmetro, a transição irá progredir na sequência inversa: pedaços quebrados irão gradualmente formar um objeto.
Aceleração de efeito
Este parâmetro permite que você acelere ou desacelere a transição, dependendo dos valores digitados (você pode digitar números negativos e positivos). Observe que, no menu Aceleração de tempo, também há uma opção para aplicar o chamado "Atraso aleatório". Se você ativá-lo, para alguns pedaços de vidro aleatórios, a rotação do movimento será atrasada.
Fratura
Este parâmetro define o tipo de fraturamento e inclui duas opções: Centrada e Uniforme.
Ambos os cenários têm configurações adicionais que permitem controlar o número de rachaduras, a direção do movimento dos fragmentos, sua forma e outras características. Sem mais delongas, vamos ver como as coisas funcionam.
Fratura centrada
ISe você selecionar o tipo de fratura Centralizado, as rachaduras se formarão em linhas retas provenientes do ponto de impacto, que você pode mover para onde quiser - como mostrado na ilustração abaixo.
A divisão radial é o parâmetro que permite definir o número de fissuras - e, portanto, o número de peças estilhaçadas.
O valor delta define o delta dos ângulos formados pelas fissuras. Por exemplo, sabendo que o valor máximo do grau é 3600, você pode definir o valor Delta em 0 e ter 10 rachaduras, cada uma formando um ângulo de 360. No entanto, se você começar a aumentar o valor Delta, os ângulos irão variar com base no número de fissuras e no deslocamento inicial que define o desvio do ângulo de 00.
Divisão cruzada é o parâmetro que permite adicionar rachaduras nas divisões radiais e quebrar o vidro em pedaços menores. Você pode alterar a distância entre as divisões cruzadas usando o parâmetro chamado valor Delta ou movê-los para mais perto/mais longe do centro usando o parâmetro chamado Multiplicador.
Forma aleatória é um parâmetro que permite que você escolha se deseja que as peças quebradas tenham uma forma aleatória e estranha ou permaneçam na forma correta formada pelas linhas de divisão.
Para aumentar a espessura das peças estilhaçadas, você pode usar os parâmetros chamados Espessura.
Chance de divisão adicional é o parâmetro que cria uma chance para cada pedaço quebrado se quebrar em fragmentos menores. Quanto mais alto for o valor, mais peças aleatórias terão fraturamento adicional.
Para controlar o tamanho dos fragmentos, use o parâmetro denominado Fratura máxima. Quanto menor for o valor, menores serão os fragmentos.
Cor do verso define a cor do outro lado das peças quebradas. Por padrão, o lado posterior é preto, no entanto, você pode selecionar qualquer outra cor, bem como definir seu nível de Opacidade.
Por exemplo, se você definir o nível de opacidade em zero, ambos os lados das peças quebradas refletirão a imagem original. Caso contrário, um lado conterá um fragmento da imagem e o outro lado será da cor de sua escolha. Da mesma forma, você pode definir a cor das bordas dos fragmentos.
Fratura uniforme
Agora vamos ver como funciona a fratura uniforme.
A principal diferença aqui é que se você aplicar este cenário, as fraturas serão espalhadas uniformemente na imagem, sem um único ponto visível de impacto.
Para alterar o número de peças quebradas, use os Pontos no eixo X/Y. Esses parâmetros definem o número de cantos que pertencem às peças quebradas - portanto, quanto maior o número que você usa, mais peças haverá.
Para cada um desses números, você também pode escolher um Valor delta (X/Y). Os valores delta definem o desvio do número de pontos nos eixos X e Y. Por exemplo, se você colocar 5 pontos no eixo Х e o valor Delta for 100%, cada linha horizontal produzirá de 1 a 10 peças estilhaçadas.
Os parâmetros Espessura, Chance de divisão adicional e Cor do verso - são semelhantes aos que já revisamos na seção anterior, então vamos pulá-los e passar para o próximo recurso chamado Posicionamento de fragmentos.
O posicionamento de fragmentos é um grupo de configurações para ajudá-lo a personalizar os fragmentos. O primeiro parâmetro neste menu é denominado Usar deslocamento inicial e é ativado por padrão. Ele cria uma sensação de profundidade no vídeo, enviando alguns dos fragmentos diretamente para o primeiro plano da cena. Se você desativar este parâmetro, as peças se moverão apenas no meio-termo.
Se você usar este recurso, você pode personalizar o movimento das peças quebradas aplicando o deslocamento mínimo e o delta de deslocamento. O primeiro define o deslocamento das peças estilhaçadas de sua posição original para o primeiro plano. Este último define o delta de desvio para o deslocamento mínimo.
Os parâmetros a seguir são chamados de movimento do eixo X, movimento do eixo Y e movimento do eixo Z. Eles ajudam a definir a direção do movimento em torno do eixo para as peças quebradas. Por padrão, todos esses parâmetros são definidos em 0% e é por isso que os fragmentos permanecem no mesmo local. Porém, à medida que você aumenta os valores, as peças começam a se mover na direção indicada.
Velocidade de movimento define a velocidade na qual as peças quebradas se movem até que desapareçam totalmente de cena. Por padrão, este valor é definido em 100%, que é a velocidade máxima. Se você digitar 0% em vez disso, as peças estarão girando em torno de si mesmas sem se moverem para lugar nenhum.
Para tornar o desaparecimento das peças mais dinâmico, os desenvolvedores adicionaram uma opção chamada Reduzir velocidade de movimento. Este recurso reduz a distância de movimento atribuída a certos fragmentos antes que desapareçam de cena. Como resultado, o efeito de fragmentação obtém mais volume e parece mais cinematográfico.
Existem 8 cenários de Redução à sua escolha e todos eles criam um efeito ligeiramente diferente.
Os parâmetros a seguir no menu são chamados de movimento de impacto X/Y e permitem enfatizar o ponto de impacto movendo as peças para longe dele após a divisão. A direção do movimento, neste caso, será definida pelos valores que você atribui para os eixos X e Y.
Por exemplo, se o movimento de impacto X for igual a 0, mas o movimento de impacto Y tiver qualquer valor acima de 0, você verá uma divisão vertical. Se você atribuir qualquer valor acima de 0 a cada eixo, as peças estilhaçadas serão divididas verticalmente e horizontalmente.
Para ajustar a velocidade na qual as peças irão ricochetear no ponto de impacto, use o parâmetro denominado Força de impacto. Essencialmente, significa literalmente a força do impacto. Quanto mais alto for o valor, maior será a divisão e mais rápido as peças se moverão.
No menu Força de impacto, você encontrará parâmetros adicionais que o ajudarão a ajustar o impacto. Por exemplo, você pode Adicionar deslocamento aleatório para permitir que os fragmentos mudem aleatoriamente do ponto de impacto.
Correção de aspecto é o parâmetro que ajusta o movimento das peças quebradas de acordo com o tamanho do vídeo ou do objeto ao qual você aplicou a transição. Se você ativar esta opção, as peças quebradas serão deslocadas uniformemente, independentemente da proporção de aspecto fornecida. Se você desabilitar esta opção, a mudança de movimento será baseada na proporção: por exemplo, se o seu vídeo tiver a proporção de 16: 9, as peças se moverão mais horizontalmente porque a largura do vídeo excede sua altura.
Reduzir a força de impacto é o parâmetro que permite reduzir a força de impacto usando cenários de Redução pré-configurados. Você pode digitar qualquer valor de -99 a 99. Quanto menor o valor, menos visível será o ponto de impacto e a divisão. Depois de definir o valor, você pode abrir o menu Redução e selecionar o cenário de redução. Ignoramos a visão geral desses cenários porque eles são idênticos aos que analisamos anteriormente.
O seguinte grupo de parâmetros denominado rotação do eixo X/Y/Z define o ângulo de rotação das peças. Se o valor do ângulo estiver acima de 360 graus, eles definem o número de voltas que cada peça dá em torno do eixo correspondente.
Fade-out aplica o efeito de fade-out às peças estilhaçadas à medida que atingem um determinado ponto da trajetória.
Projeção em perspectiva é um modo que permite ativar e desativar a perspectiva. Por padrão, está habilitado, o que significa que o espectador tem a impressão de que as peças estão se movendo em direção a eles. Se você desativar a projeção em perspectiva, as peças quebradas se moverão para as bordas da cena.
Baixe a nova versão do VSDC para testar o efeito Vidro quebrado
Esperançosamente, este tutorial o inspirou e deu início a algumas ideias! Se você está pronto para experimentar o efeito Vidro quebrado em seus vídeos, vá em frente e baixe o VSDC 6.8 em nosso site oficial.
Precisa de mais inspiração? Então, certifique-se de se inscrever em nosso canal no YouTube para ser notificado quando publicarmos novos vídeos.
How to Apply test
The Paint Brush transition is a popular effect that imitates brush strokes. You can use it to gradually move from one scene to another by either covering the video with a paint brush stroke by stroke, or revealing the next image from under a coat of paint. Here is what it looks like:
From this tutorial, you’ll find out how to apply this effect in your videos and tailor it to your vision. The Paint Brush effect is available in VSDC starting version 6.8, so make sure to download it before moving one with the tutorial.
How to apply Paint Brush transition in VSDC
Once you download VSDC, launch it on your computer and import your footage. We recommend using the Import content button unless you want to apply custom parameters to the project. Next, select the video you want to apply the transition to, open the Video effects menu, proceed to Transitions and select PaintBrush.
The Object position settings window will pop up indicating that the transition will be added to the end of the scene. Click OK to proceed and preview the result. Notice that if you want to stretch the duration of the transition, you’ll be able to do it manually. We’ll talk more about it in the following section.
How to access Paint Brush transition settings
To open the effect settings, first make a double-click on the video you’ve applied the effect to. You’ll find yourself in a new tab with the effect layer named PaintEffect. Make a right click on it and select Properties. The Properties window will slide-in from the right.
The Properties window for the Paint Brush transition includes 3 groups of settings:
Common settings
Adjustment settings
Chess settings - Paint Brush effect settings
Let’s go over each group of settings and see what they do.
Common settings
The settings in the first group allow you to rename the transition effect layer, type the exact moment when the transition should begin (in seconds or in frames) and set its duration (in seconds or in frames). Keep in mind that you can also manually move and stretch the effect layer right on the timeline using the handlers.
Adjustment settings
The Adjustment settings consist of a single parameter, named Transparency. Transparency enables you to adjust the opacity level for the paint strokes. For example, if you leave the default value (100%), the paint will be completely non-transparent. However, if you decrease the value, you’ll start getting the see-through effect.
If you expand the Transparency parameter, you can access the Initial and Final values. These values enable you to set the opacity level for the beginning of the Paint Brush effect and the end of it, thus creating a smoother transition between scenes.
Paint Brush effect settings
The settings in the third group allow you to tailor the effect to your needs. For instance, you can change the direction and angle of the brush strokes, choose the brush width, and more.
Directly
The first parameter in this group is named Directly, and it refers to the direction of transition. If you leave this parameter deactivated, the paint brush will gradually cover your footage, stroke by stroke. If you activate this parameter, the transition will work in the opposite way and gradually uncover video from a coat of paint.
Stroke angle
The following parameter allows you to change the brush stroke angle. By default, the brush moves under a 45-degree angle, however, you can change this value to your taste. For example, in the illustration below, you can see how the strokes will look if you use a 90-degree and a 30-degree angles.
In addition to the Stroke angle, you can activate the option called Opposite side and change the side where the brush starts moving. For example, by default, the paint brush moves from right to left. In this case, the opposite side direction will be from left to right.
Starting corner
This parameter defines the corner where the effect starts. There are 4 self-explanatory options you can choose from: left-top, right-top, left-bottom, and right-bottom.
Brush width
Brush width is rather self-explanatory as well. This parameter defines how wide and thick brush strokes are, and you can leave its value consistent or make it dynamic. For example, if you set the Initial value at 10% and the Final value at 50%, each subsequent brush stroke will be thicker.
Blur
This parameter adds blur to the paint and makes brush strokes less defined. The higher the value, the more blurred the strokes will be. As a matter of fact, if you type 100%, the effect will resemble spray paint.
Brush movement direction
Brush movement direction is the brush movement pattern defining the order in which brush strokes are applied. The are 5 options you can choose from:
Non-continuous – each subsequent brush stroke will start on the same side of the scene.
Continuous – each subsequent brush stroke starts on the opposite side of the scene.
Area-based – the scene gets divided into several areas, and each area gets covered with paint
Random (same angle) – each brush stroke appears in a random place on the scene under the same angle.
Random (random angle) – each brush stroke appears in a random place on the scene under a random angle.
Overlap coefficient
Overlap coefficient defines the percentage of brush strokes that appear on the scene at the same time. For example, if the total number of brush strokes required to cover the scene entirely is 12, and the overlap coefficient equals 30%, at any given moment, you’ll be seeing 4 brush strokes instead of just one.
Try the Paint Brush transition for free
The new Paint Brush transition effect is available in the free version of VSDC Video Editor, so if you liked this tutorial, go ahead and download VSDC from the official website.
Feel free to message us on Facebook and make sure to subscribe to our YouTube channel for a weekly doze of video editing inspiration.
published Amy Shao 6/10/25
A espera por algo novo e incomum finalmente acabou! A atualização chegou e não é apenas mais uma versão: é o VSDC 10.1!!
VSDC 10.1 Update: HDR avançado, telemetria GPS,...
Nesta temporada de festas, celebramos novos começos com a mais recente atualização do VSDC Video Editor! Ouviu-se suas sugestões e decidimos focar em aprimorar as ferramentas que você mais gosta —...
A mudança é sinônimo de melhoria, e esse processo não seria possível sem a sua contribuição. Após revisar cuidadosamente o seu feedback, resolvemos várias questões importantes e introduzimos...
Introdução
Em 2024, a gama de opções para criar efeitos visuais é incrivelmente diversa e torna-se cada vez mais desafiador identificar as melhores escolhas.
Aqui você pode encontrar um guia para...
O VSDC 9.2 chegou e oferece recursos inovadores, como a nova ferramenta de segmentação alimentada por IA, que permite a remoção precisa de objetos, correção avançada de cores e uma variedade de...
Você é fã de filmes clássicos em preto e branco? Já teve curiosidade de saber como eles ficariam se fossem coloridos? Muitos cineastas já se perguntaram o mesmo, o que fez com que vários filmes...
15 de julho de 2024 publicado por Amy Shao
Atualmente, a popularidade do conteúdo de vídeo está ganhando força, e muitos usuários se deparam com a necessidade de criar vídeos para fins pessoais...
O momento chegou: estamos felizes em apresentar a você a aguardada atualização do VSDC 9.1! A funcionalidade aprimorada da nova versão acelerará a edição de vídeo e tornará o processo de edição...
Bem-vindo à mais recente atualização do VSDC, a versão 8.3! Temos trabalhado muito e estamos prontos para apresentar uma versão repleta de recursos para que você descubra uma variedade empolgante...
7 de maio de 2024 publicado por Tom Shinat
No mundo digital de hoje, a criatividade reina suprema. Oferece infinitas possibilidades para indivíduos e marcas cativarem o público e deixarem uma impressão...
Um programa para capturar vídeo de dispositivos externos. Você pode salvar o vídeo de sintonizadores de vídeo, câmeras web, placas de captura e outros dispositivos.
"VSDC Free Video Editor is a surprisingly powerful, if unconventional video editor"
- PC Advisor
"This video editor gives you tons of control and editing power"
- CNet
"The editor handles many common formats and boasts a good deal of capabilities when it comes time to alter lighting, splice video, and apply filters and transitions in post production"
")


 Editor de vídeo
 Conversor de vídeo
 Conversor de áudio
 Gravador de CD de áudio