 User Help Manual
  Learn FAQ
  Send us feedback
 ")


Making MP4 Files
MP4, or MPEG-4, is a digital multimedia container format utilized for storing audio, video, subtitles, and images. Unlike other formats such as AVI, MOV, FLV, WEBM, and others, MP4 provides efficient compression and broad compatibility, making it a preferred choice for content creators who want to ensure their files are playable on virtually any device or website. For beginners in content creation looking to ensure their files display across various platforms, MP4 is a perfect choice for sharing and streaming. For advanced users, this format can be particularly beneficial as it is compatible with most codecs, including H.264 and H.265.
In this article, we explore the complexities of creating MP4 files, examining the process of making MP4s from the ground up with VSDC Free Video Editor and VSDC Video Converter.
 Download Mp4 Free video Editor
How to Make a MP4 File In a Video Editor
For an easy video conversion, VSDC Free Video Editor is at your disposal. This process of is rather simple:
Variant 1: Making MP4 From a Ready-Made Video
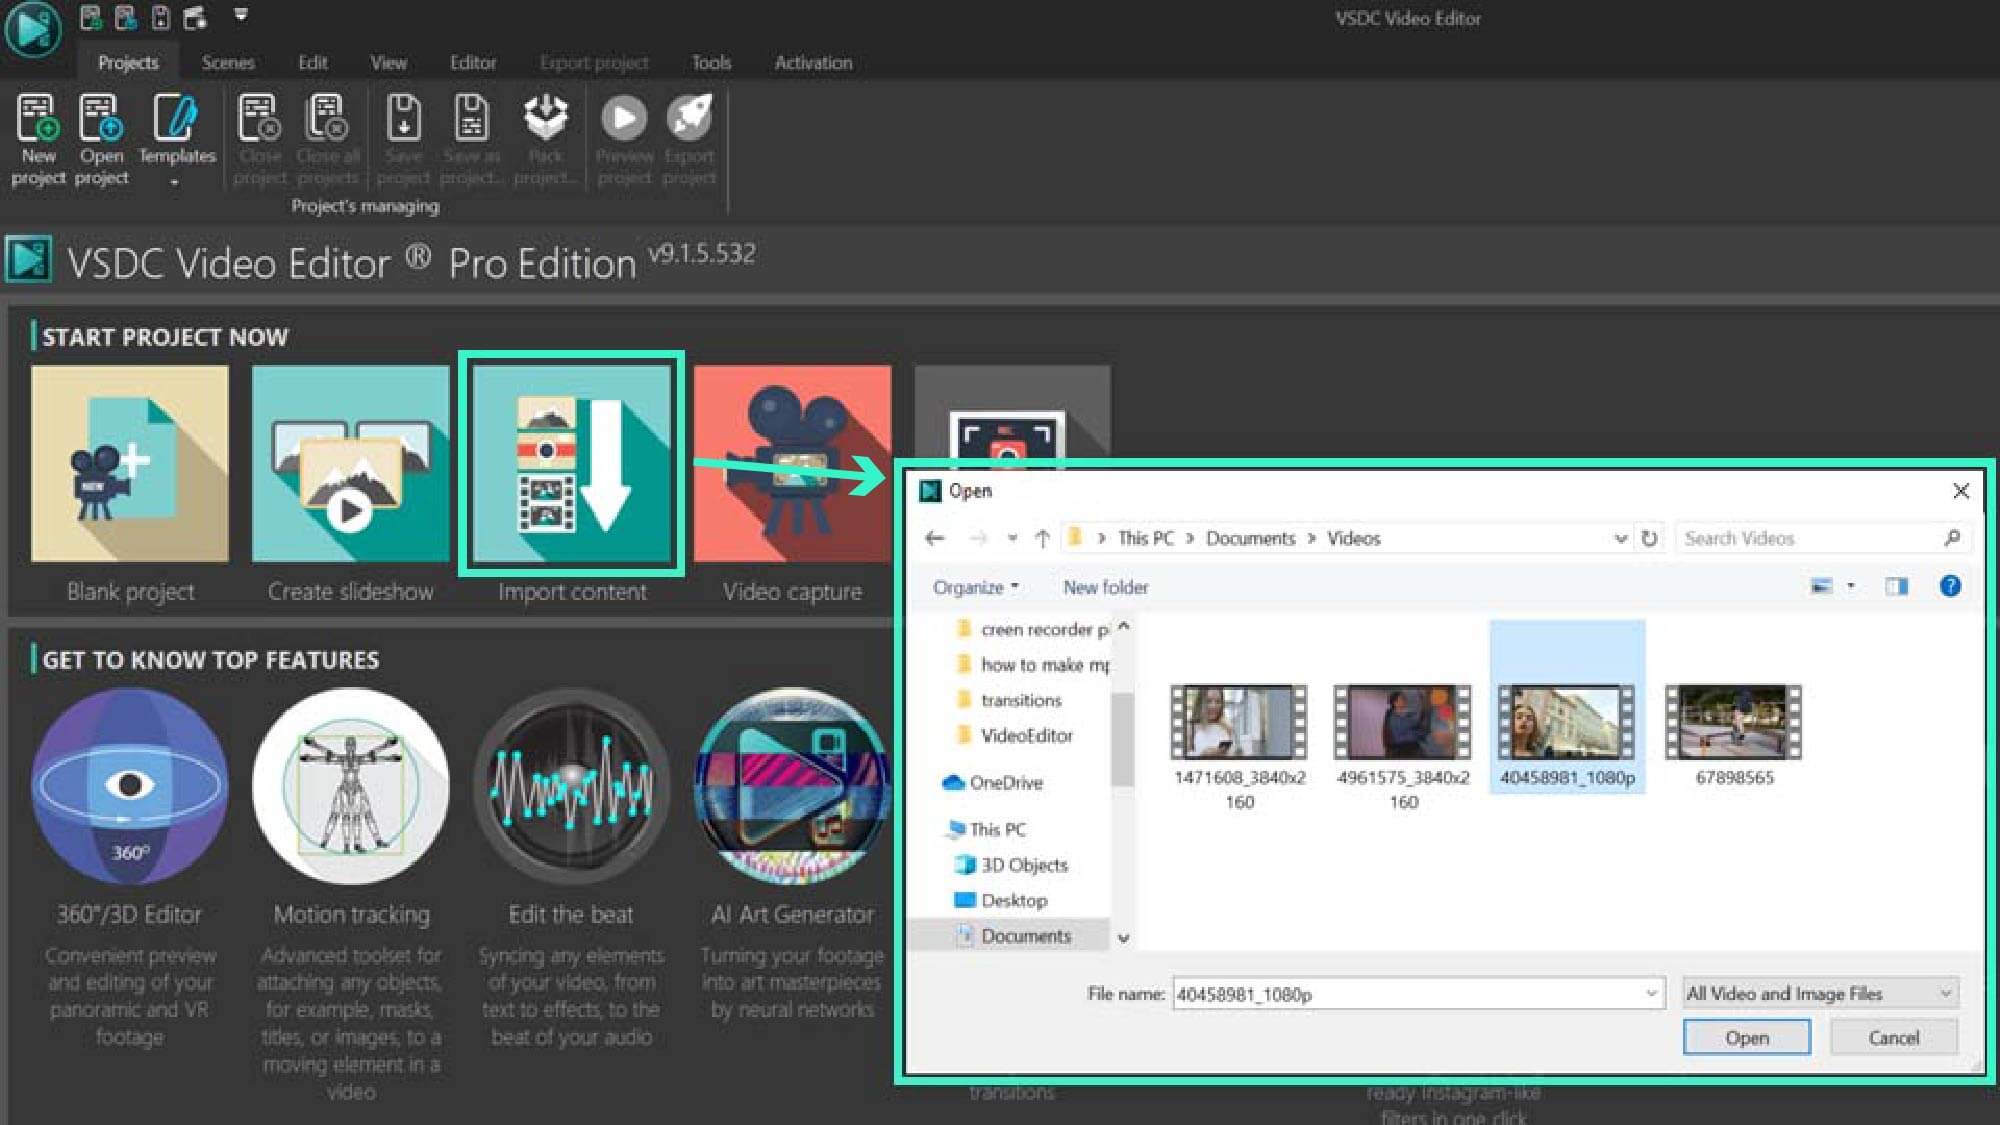
In case you have a ready-made video and simply need to convert it to MP4 format while retaining all the original video parameters such as frame rate, resolution, etc. start VSDC Free Video Editor and select the Import Content option. Navigate through the file explorer to choose your video. Upon selection, the editor automatically generates a project template based on the video's parameters. Verify these parameters and confirm by clicking Finish and proceed to Step 2.
Variant 2: Making MP4 Video From Scratch
In case you need to create a MP4 file from scratch aiming to craft an elaborate video with multiple media files featuring cinematic effects, transitions, animations, or you need to merge files, reduce video size, or adjust resolution, start with the following:
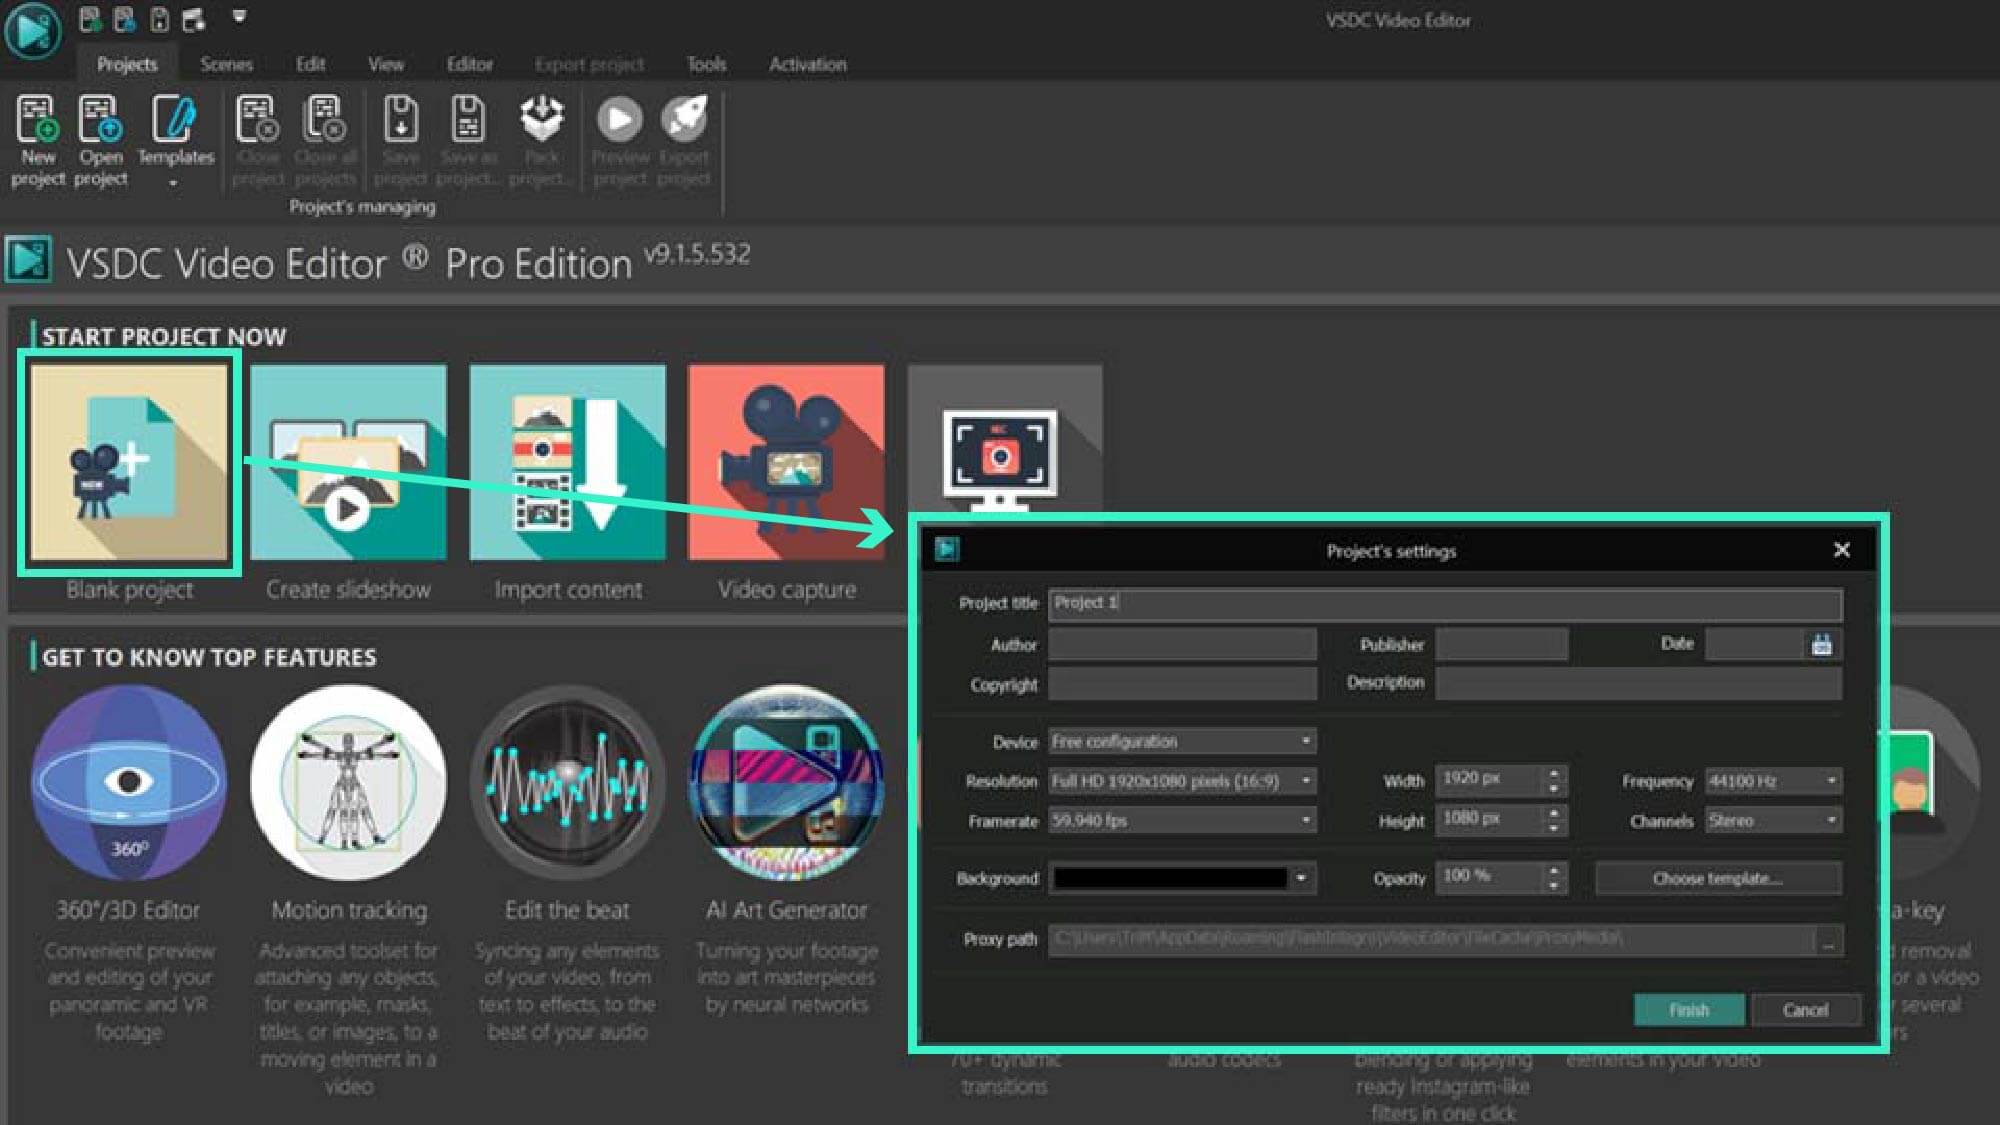
- Open VSDC and choose Blank Project from the startup window. You'll see the Project’s settings window for your new project. Focus on the Resolution and Frame rate settings, as these will significantly impact your video's quality. If your media files have varying resolutions and frame rates, aim for an average value to maintain consistency. Note: mismatching resolutions may lead to black borders in your final video. Alternatively, set these parameters based on your target platform's requirements. Fill in any additional details required for your project and click Finish. Remember, you can modify these settings later if needed.
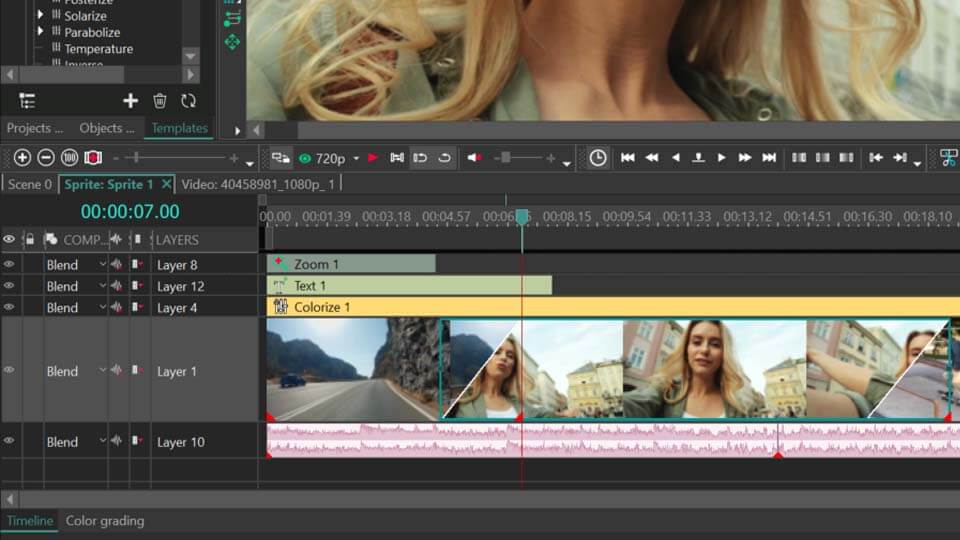
- Drag and drop your files onto the timeline to start editing. You can edit your video as you see fit, for instance:
- Crop unnecessary borders;
- Split or cut files;
- Apply side-by-side or picture-in-picture effects;
- Correct colors;
- Add voiceovers or animations;
- Insert titles and more.
- Preview the result. If you experience lag during video preview, use a proxy for smoother playback.
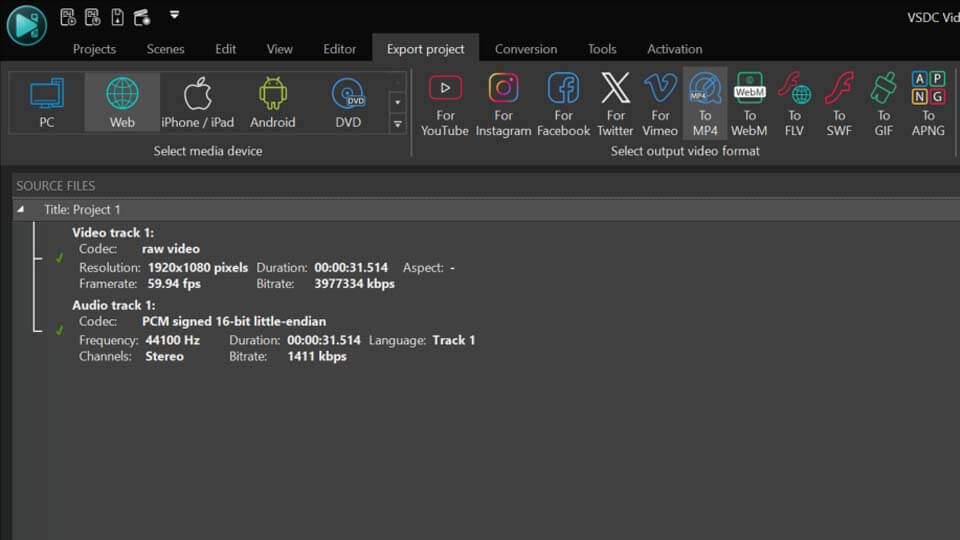
- Navigate to the Export Project tab located at the top of the interface. Here, you'll choose your desired format from the Ribbon.
- MP4 format options are available under PC and Web media devices, with specific presets for platforms like YouTube, Instagram, Facebook, Twitter, and Vimeo, as well as iPhone/iPad and Android devices.
- Сheck the Input and Output parameters at the bottom to ensure they align with your project's needs. Choose where to save your video in the Output file(s) field. If you wish to change this location, opt for the Change Name… function. When your video is ready and doesn't require further adjustments, hit the Export Project button on the Ribbon.
Advanced Settings (Optional): If you need to make more detailed adjustments regarding size, codec, or video quality, refer to the How to Change MP4 Export Settings section below in this article.
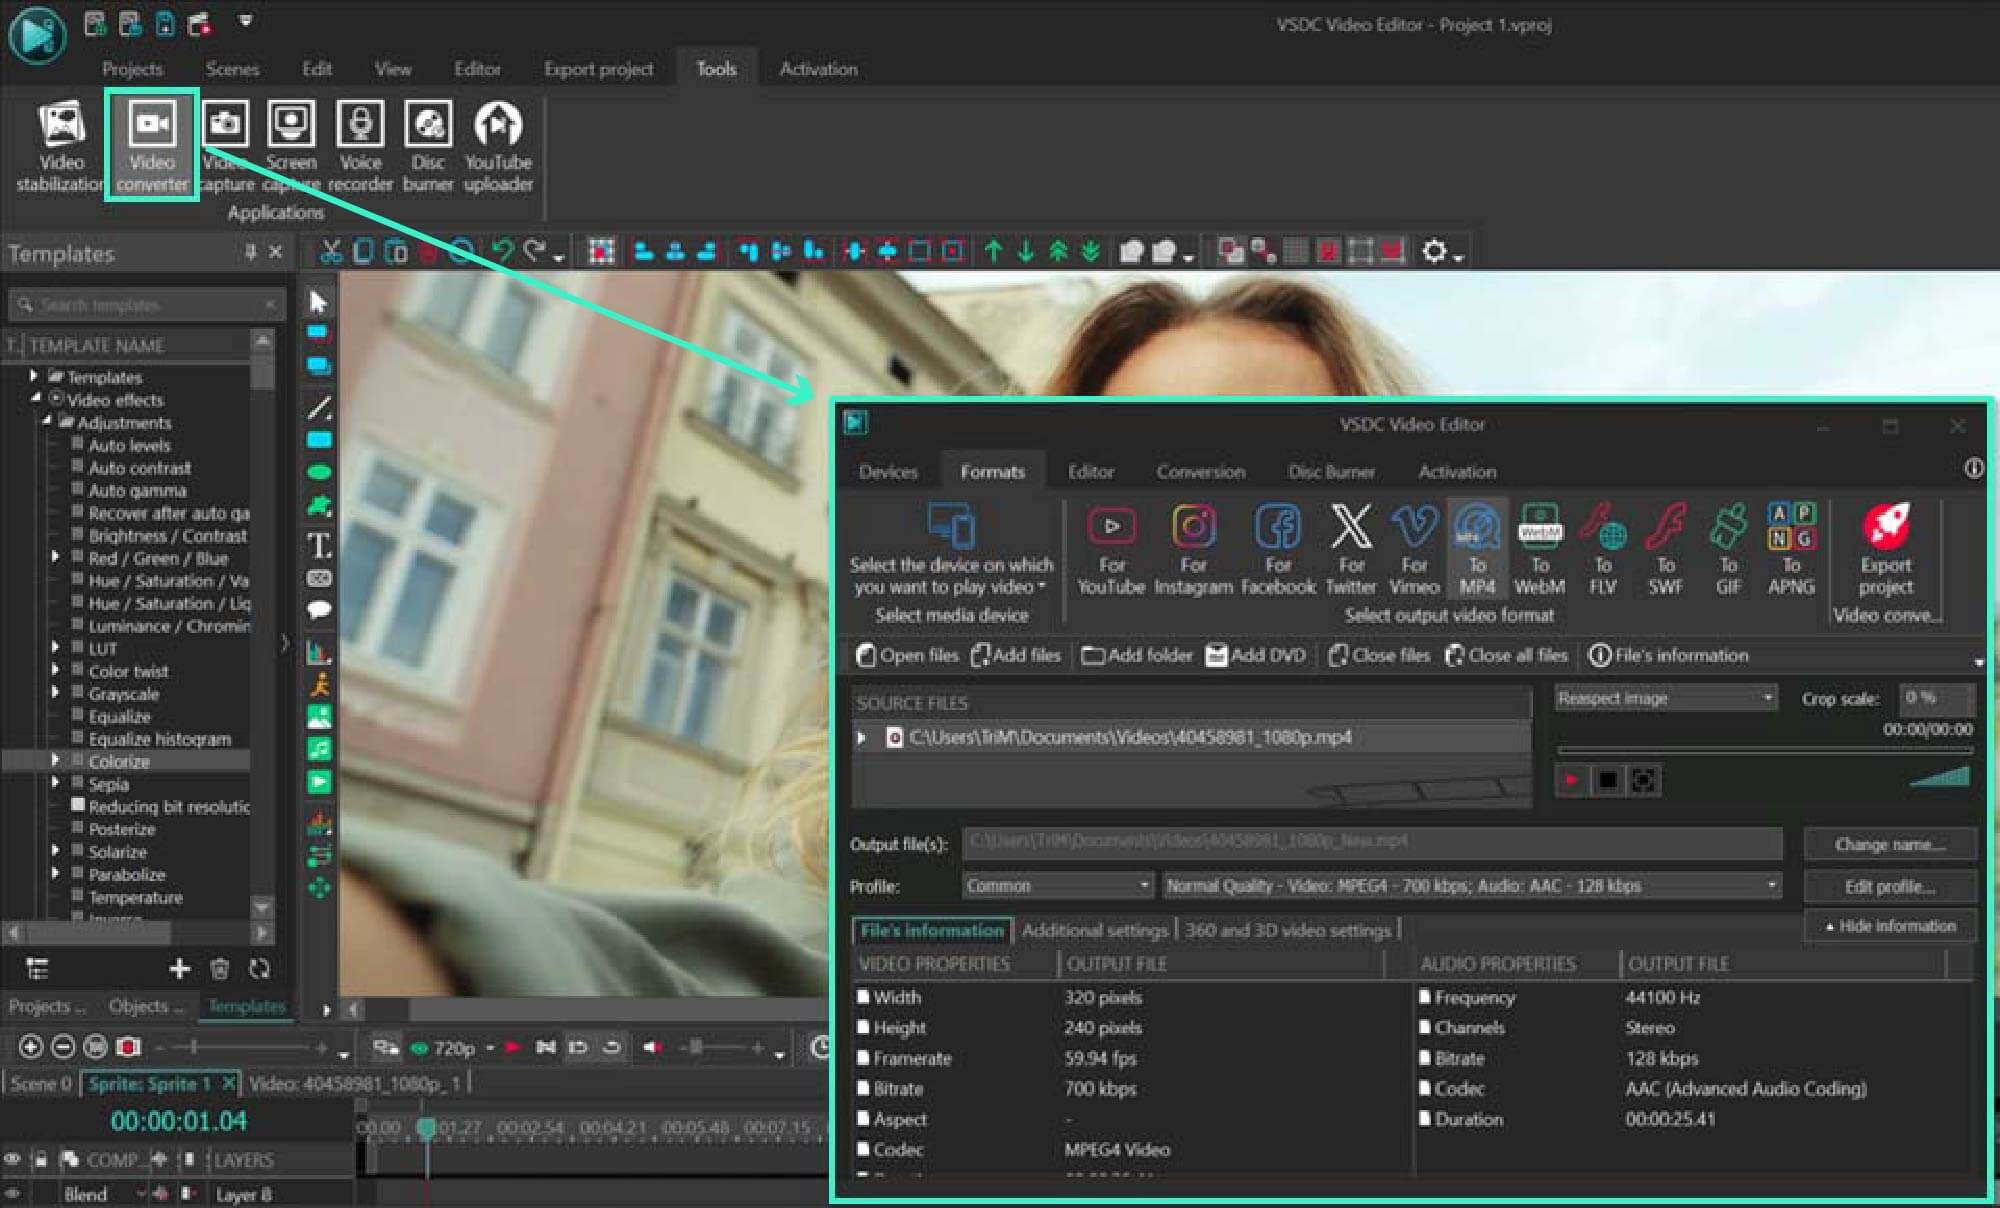
Making a MP4 Video in a Video Converter
Alternatively, using VSDC Free Video Converter offers the advantage of converting multiple files to MP4 simultaneously. Here's how to do it:
- Launch VSDC Video Converter.
- Drag your media file to the Source files area or use the Open files and Add files functions to select it.
- On the Ribbon select the preferred media device (PC or Web) and choose the MP4 format.
- Open the Show Information menu in the bottom right corner to review and adjust the Input and Output settings. If modifications are needed, click Edit Profile… for further options.
- Check the Output file(s) field to see where your video will be saved. To alter this, use the Change Name… function to manually select a destination. Finally, click Export Project on the Ribbon to complete the process.
This method is particularly efficient if you're not planning to alter video settings beyond the format. For those needing to modify video size, resolution, or quality, refer to the How to Change MP4 Export Settings section. This part will delve into the nuances of adjusting settings via the Edit Profile feature, ensuring your video meets your exact specifications.
How to Change MP4 Export Settings
Adjusting the MP4 export settings in VSDC to match your specific needs for video size, resolution, frame rate, and codec is straightforward. Follow this easy step-by-step guide to ensure your video looks exactly how you envisioned it, whether you're aiming for a specific quality, size, or compatibility with various devices and platforms.
- Step 1: Navigate to Export Settings
- After finalizing your video, click on the Export Project tab.
- Go down to the Profile section at the bottom of the window.
- Step 2: Select Your Codec and Quality
- Different presets will appear in the drop-down menu depending on the device you select and the MP4 format for different platforms.
- Choose from available codecs (e.g., MPEG4, H.264, H.265) and quality settings (from 360p to 4K).
- Pro users with compatible graphics cards can enable hardware acceleration here to speed up the video export.
- Step 3: Fine-Tune Your Export Profile
- Then explore the drop-down menu on the right for detailed profile settings.
- Adjust according to your preferences. Changes will reflect in the Output file settings below.
- Step 4: Confirm Output File Settings
- Check the Output file(s) field for where the video will be saved. Change it if needed by using the Change name option.
- When you are satisfied with the result, click Export project on the Ribbon.
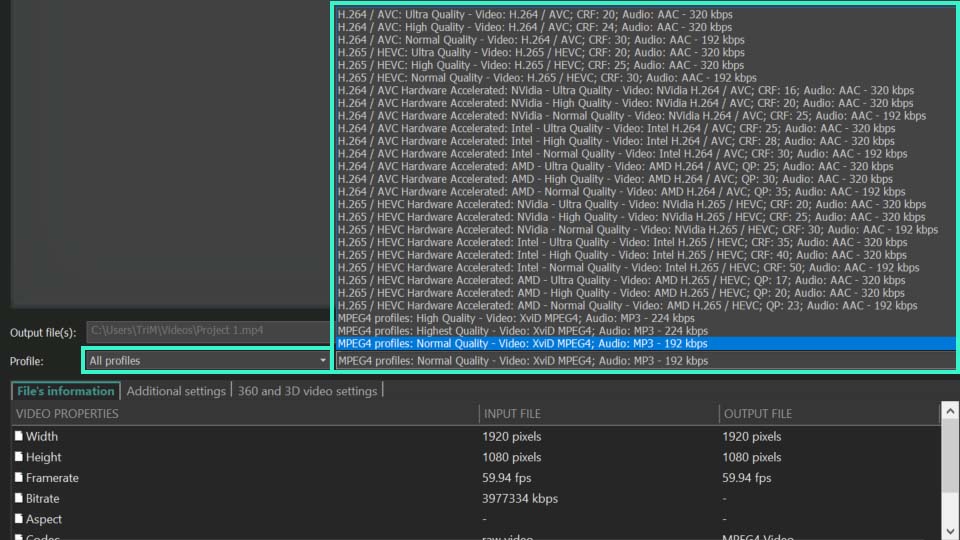
For Advanced Customization: Edit Profile
- If the preset options don’t fit your needs, select Edit profile for more detailed settings.
- At the top of the pop-up window, you'll see the name of the profile you are about to export your video to. Below that, in the Profile field, you'll find pre-set configurations for various codecs and video qualities from which you can choose. If these do not meet your needs, proceed to the Video settings field for custom profile options.
- In the Video settings field, select a codec for the output video depending on its playback destination. For more experienced users, detailed codec customization is available via the Configure… option.
- The Preset field impacts compression efficiency, affecting encoding speed.
- The Resolution, Width and Height parameters allow you to set the desired project resolution upon export. Be aware that setting different values from the original project creation might result in black borders or reduced quality due to video resizing. To prevent black edges, use the Aspect correction >> Reaspect image option, although this may stretch the image if the resolution difference is substantial.
- The Encoder mode adjusts how video compression occurs during export. The parameters Constant rate factor (CRF) and Constant quantizer (QP) influence quality, which is indicated next to the Quality field. Higher quality settings will reduce the encoder's compression, preserving more of the original video quality at the cost of larger file sizes, a principle known as "lossless" compression.
- Another parameter, Average bitrate (ABR), governs the output video's bitrate. The export process typically increases the bitrate compared to the input file, but you can limit it in the Bitrate field. Higher bitrates maintain good quality but result in larger file sizes.
- The Target file size encoder mode allows specifying the desired output file size, which may impact quality if it is too small.
- The final parameter to consider in Video settings is Framerate. You can set a specific value, but if it significantly differs from the project's original setting, video and audio may become desynchronized.
- Move to the Audio settings section to adjust the Audio codec, its bitrate, frequency, and audio channels. Use the Configure option for more detailed codec settings.
- Once adjustments are complete, click Apply profile.
- To save the video to your PC, go to the Ribbon and select the Export project.
A quick tip: If you manually adjust the codec settings, you can save them for use in future projects during export.

Conclusion
This guide simplifies the process of adjusting your MP4 export settings in VSDC, ensuring your video meets your exact specifications for quality, size, and platform compatibility. Whether you're creating a video from scratch with complex effects or simply need a conversion, either in a video editor or in a video converter, we hope we've helped you navigate the settings. If you still have questions, please write to us at This email address is being protected from spambots. You need JavaScript enabled to view it. or reach us through our social media profiles on YouTube, Facebook and Twitter.
Get VSDC Free Video Editor - powerful non-linear editing software with advanced features. Perfect for YouTube creators, social media videos, and professional projects. Learn more about features.
Watch us on YouTube
 / @VSDCFreeVideoEditor
© 2011-2026, www.videosoftdev.com, FLASH-INTEGRO LLC. Privacy policy | Terms of use | About us
All trademarks referenced herein are the sole property of their respective owners.
Copying any materials from this site allowed only with written consent of Site Administration.