- published Amy Shao 11/19/25 Meet the long-awaited VSDC 10.2 update: a new ve...
- Hi, I'm Mattea Wharton, a travel videographer from Seattle. For three years I ba...
- published Amy Shao 6/10/25 The wait for something new and unusual is finally...
- This holiday season embraces new beginnings with the latest update of VSDC Video...
How to merge several video files
This operation is one of the most simple. In order to merge several files you need to add them to the scene and set time when each file will appear so that appearance of files is arranged one by one. For this purpose place the objects on timeline the way that one begins when another ends.

You can achieve the same result using "Set blocks order" button. If you mark these objects on a timeline and click this button, you will automatically place objects sequentially one by one. If you need to set interval between the marked blocks, click "Set order with offset". You may set object position by cursor position clicking "Move blocks to cursor position" and "Align blocks by cursor position".

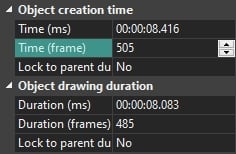
You may also set time of object appearance manually using object properties. For instance if duration of the first object is 343 frames then we shall create scene with sequential objects by setting time of the second object equal to 343 frame.
After these actions both files will be merged in a result file during project export and will follow one the other.
Another method of merging several files is to use "Wizard". For more information refer to section "How to create slide-show: make sequential change of videos or images".
Frequently Asked Questions
1. I dragged and dropped two videos, but they were placed sequentially on the same track, not on different tracks. What did I do wrong and how can I fix it?
When you drag and drop multiple videos simultaneously, the video editor places them sequentially on the same track by default.
To change the position of an already added clip on the timeline, simply hold down the left mouse button and drag it to the desired track.
When you add a new file to a scene that already contains video, the "Object position settings" window will appear. For placement selection pay attention to the "Layer position" section:
- Add Layer places the file on a new layer above all existing ones.
- Insert Layer places the file on a new layer above the currently selected layer.
- Insert into Layer places the file at the end of the currently selected layer.
2. Will the videos be joined directly or will there be some transition between them?
The video files will be joined directly, without any transitions. This means the end of the first clip will be immediately followed by the beginning of the next one.
3. Is it possible to create a smooth transition between clips when merging them?
After you have arranged the clips sequentially on the timeline, you can proceed to set up the transitions between them.
The simplest way to create a transition is as follows:
- Hover your mouse cursor over the border between two clips on the timeline.
- Hold down the Alt key on your keyboard.
- Without releasing the key, drag the edge of one clip over the other, creating an overlap area.
- A white line will appear in place of this overlap, indicating the transition zone.
More detailed information about applying transitions and their types can be found at the link: https://www.videosoftdev.com/how-to-apply-transitions
Also, try the VSDC Premium Transitions: https://www.videosoftdev.com/v-store-catalog
4. What will happen to the sound if one video has loud audio and the other has quiet audio? Will VSDC balance them somehow?
No, the program does not balance the volume automatically. However, you can adjust the volume for each clip yourself. To do this, click on the video clip whose volume you want to change, go to the Properties window for that clip and find the "Volume Level" parameter. Set a suitable value for it.
5. What happens if you merge videos with different frame rates?
The program cannot create a final file that would play back at different frame rates (FPS) simultaneously. All source videos will be converted to a single FPS value, which you select in the export settings when saving the finished project.
6. What will happen if you merge videos of different sizes, for example, one in 4K, another in 720p? What will the final resolution be?
The final project will be converted to a single resolution that you set for the export. The smaller video (e.g., 720p) will be upscaled to the selected resolution, and the larger one (4K) will be downscaled.
It's important to remember: VSDC does not improve the quality of the source files. The key is to choose a final resolution that will minimize quality loss for all the files being merged.
Get VSDC Free Video Editor - powerful non-linear editing software with advanced features. Perfect for YouTube creators, social media videos, and professional projects. Learn more about features.