 User Help Manual
  Learn FAQ
  Send us feedback
 ")


How to Work with Color Keyframes in Effects
Color plays a vital role in establishing the atmosphere and mood of a video. Different color palettes evoke various emotions in viewers, ranging from vibrant and bright to dark and somber. While classic color correction can help create the desired mood, effects can further enhance the impact.
In the latest update 8.2, the VSDC team has expanded the functionality of effects by introducing color keyframes. This new feature allows you to create keyframes and modify colors within effects. It provides you with greater flexibility to experiment with colors according to your preferences and evoke the desired emotions in your audience.
Let's dive into this new feature and explore how it can assist you in adding a unique and memorable style to your videos.
 Download Free Video Editor
Step 1 – Create additional keyframes
To begin, create a project and simply drag the desired media file from the desktop to the timeline. Alternatively, you can use the Add an object option located to the left of the preview window. Next, select the media file on the timeline and apply an effect with color parameters. For instance, let's select the LensFlare effect (Editor - Video effects - Nature).
Click on the effect to select it, and the properties window will appear on the right-hand side. If the properties window does not show up, right-click on the effect and choose Properties. Look for the Color Tone property within the properties window. This is where we will create and adjust the keyframes. To access the keyframe window, click on the three dots next to this parameter.
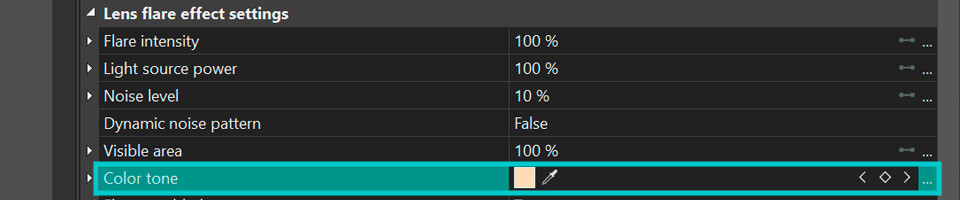
By default, the effect contains two keyframes - the first and the last one. On the timeline, these keyframes are represented as squares of a uniform light brown color. In the properties window, the keyframes are displayed as diamond-shaped icons within the Color Tone parameter. If the diamond icon is filled with color, it means that a keyframe has been created. If you see only the outline of the diamond icon, it indicates that no keyframe is present, and you can create one.

To create a keyframe:
- Place the cursor on the timeline where you want to create a keyframe
- Go back to the properties window to the Color tone parameter and find a diamond-shaped icon
- Click on the icon to create a new keyframe
Add as many keyframes as necessary to achieve the desired effect.
To navigate between frames, use the arrows located to the left and right of the keyframes icon. This allows you to move back and forth between the created keyframes.
If you want to remove a keyframe, simply place your cursor on it and click on the filled diamond-shaped icon. This will delete the selected keyframe from the sequence.
Step 2 – Assign colors to keyframes
After creating keyframes, you can assign different colors to them, thereby adding vibrancy and expressiveness. To select a desired color, follow one of these actions:
- Double-click on a keyframe on the timeline to open the color palette.
- Go to the properties window and click on the small color square that represents the current tone of the keyframe. This will open the color palette.
From the palette, you can choose a color by clicking on it or by specifying its RGB or HEX value. You can also change colors by moving the keyframe up or down on the timeline while holding the Shift key. This allows you to select the desired position.
To select a color from the scene itself, use the Eyedropper tool located in the properties window. Click on the tool and then select a color from the scene. Please note that the Eyedropper tool is only visible when the timeline cursor aligns with a keyframe.
Each keyframe can have a different color, and the algorithm will ensure a smooth transition between them. The gradient line below the keyframes on the timeline will automatically update, showing how the effect color will change during playback.
If you want to adjust when a keyframe appears or disappears in the video, simply move it to the right or left on the timeline while holding the Shift key.
Above the timeline in the keyframe window, you will find a quick access panel for the main keyframe functions. Here, you can create and delete keyframes using the diamond-shaped and bin icons, and configure other keyframe parameters. Let's examine them in more detail.

If you want to assign one color to all keyframes, select the Constant parameter value option. It will remove all previously created keyframes except for the first and the last one. The color of the last keyframe will adapt to the color of the first one.
If you want to create a smooth transition between the colors of the first and the last keyframes, select the Linear parameter change option. You can assign different colors to the first and the last keyframes, and the algorithm will ensure a smooth transition between them.
If you want to go back to the mode with multiple keyframes of different colors, select the Linear parameter change along a trajectory function. All created keyframes except for the last one will be restored.
If you have already achieved the desired result, you can finish the lesson at this step. However, if you wish to change the weight of the color or add another effect, continue following the instructions.
Step 3 – Experiment with the color weight
If you want the color to last longer during the transition between keyframes, you can adjust its weight. Follow these steps:
- Place the cursor on the timeline at the keyframe you want to extend.
- Click on Parameter change along a Bezier curve.
- While holding down the Ctrl button, you can horizontally extend the vectors from the keyframe to the left or right. It's important to note that changing the vertical position of the vectors will not affect the color's weight.
These vectors represent the extension of the color of the keyframe. The longer the vector, the longer the color will remain constant without transitioning to another color. If the vector is not visible, it indicates a smooth transition between keyframes, as both colors have a similar weight.
By adjusting the weight of the color, you can emphasize the importance of a certain color and create the desired effect in your video.
Step 4 – Add effects and synchronize parameters
You can synchronize colors in keyframes when you have several identical effects applied to the object. For example, you can add one or more additional LensFlare effects to the object.
To synchronize the colors of the keyframes, follow these steps:
- Select two or more identical effects on the timeline.
- In the properties window, locate the Color tone parameter and find the synchronize icon. Click on it.
Now, all the keyframes of the second effect will have the same colors as the first one. Therefore, it is important to ensure that the first effect you select is the one from which you want the colors to be copied to the other effects.
Wrapping up
We hope that this lesson has helped you understand the new capabilities of VSDC and has inspired you to experiment with keyframes. Creating a dynamic color palette for your videos can greatly enhance the visual experience and add uniqueness to your projects.
We encourage you to explore and implement your artistic vision in your projects. Use the new tools, play with colors, create stunning transitions, and compose expressive visuals. The possibilities are endless.
If you encounter any issues or need assistance, please don't hesitate to reach out to our support team at This email address is being protected from spambots. You need JavaScript enabled to view it. or through our social media channels on Facebook or Twitter. We are here to help.
Good luck with your artistic projects!
Watch us on YouTube
 / @VSDCFreeVideoEditor
© 2011-2026, www.videosoftdev.com, FLASH-INTEGRO LLC. Privacy policy | Terms of use | About us
All trademarks referenced herein are the sole property of their respective owners.
Copying any materials from this site allowed only with written consent of Site Administration.