- Published by Amy Shao on March 11, 2026 What is the best gift for...
- published Amy Shao 11/19/25 Meet the long-awaited VSDC 10.2 update: a new ve...
- Hi, I'm Mattea Wharton, a travel videographer from Seattle. For three years I ba...
- published Amy Shao 6/10/25 The wait for something new and unusual is finally...
Top Free Chroma Key Software
Removing a green background from video footage requires chroma key software, a tool designed to isolate and eliminate a specific color. This allows for easy replacement of the background with another image or video, or even making it transparent. We've evaluated top intuitive, and beginner-friendly free chroma key software for PC, macOS, and Linux, offering hassle-free solutions for your editing needs.
Key Takeaways
For those diving into the realm of chroma keying, here's a quick rundown of our top recommendations:
- VSDC (Windows) – recommended for PC users
- iMovie (iOS and macOS) – recommended for Apple device users
- Shotcut (Windows, iOS, Linux)
- OpenShot (Windows, iOS, Linux)
- HitFilm Express (Windows, macOS)
Below, you’ll find their brief overview, system requirements, and tutorials on how to edit in green screen, helping you get started with these programs.
What is Chroma Key?
Chroma key software, often referred to as green screen software, empowers you to alter video backgrounds seamlessly. These chroma key applications not only enable timeline editing and trimming but also allow for the addition of custom background colors. With the ability to share and organize footage, good green screen software has become indispensable for video editors.
Best Free Chroma Key Software
The quest for the perfect free greenscreen software can be overwhelming given the vast array of options. This section delves deeper into both renowned and hidden gems among free and paid chroma key software, offering insights into various green screen apps and programs.
1. VSDC Free Video Editor (Windows)
VSDC is a free video editor for Windows that brings a lot of handy add-ons on board. Its toolset includes a desktop screen recorder, a webcam video grabber, a voiceover tool, and a YouTube uploader.
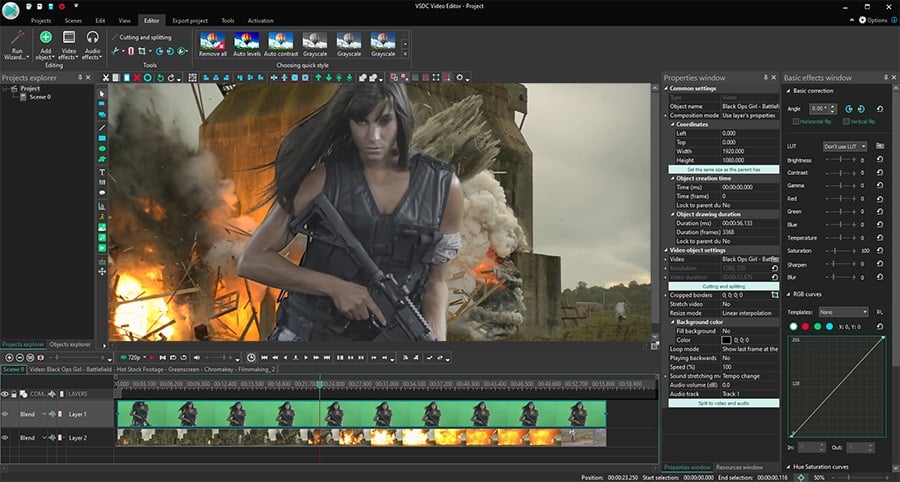
Once you launch VSDC, the chroma key tool will be available in the Video effects menu. To remove a green background from your footage, follow these steps:
- Import your video using the Import content option on the start screen
- Got to Video effects and select Transparency >> Background remover
- If the green background hasn’t disappeared automatically, open the Properties window on the right-hand side
- Find the parameter named Chromakey color and click on the eyedropper. Then click anywhere on the green background to select the color that needs to be removed
If there are any green highlights left around the object, go back to the Properties window and manually change the values of the brightness and chromaticity thresholds. Check out this detailed video tutorial below to see the process for yourself:
Once you remove the background, you can replace it with another image or video. Just drag the new file to the timeline and place it one layer below the original video. The new footage will be seen through the deleted areas that used to be green. If you want, you can export your video with a transparent background, too!
VSDC system requirements: VSDC is very lightweight and runs even on low-end PCs. You’ll need to have 1Gb RAM, at least 300Mb of free disk space, Intel, AMD or compatible processor with the working frequency at 1.5 GHz or higher. It’s always recommended to have the latest Windows OS as well, however, you’ll be able to run VSDC even on Win 7 or XP
2. iMovie (iOS and macOS)
iMovie is a default video editor for iOS and Mac, and the best part about this app is that it works on both the desktop and the mobile devices by Apple.
Just like VSDC, iMovie is a non-linear video editor. This means files can be placed on different layers one under another on the timeline, so you can blend them together. Unlike VSDC though, iMovie allows you to remove both green and blue screens.
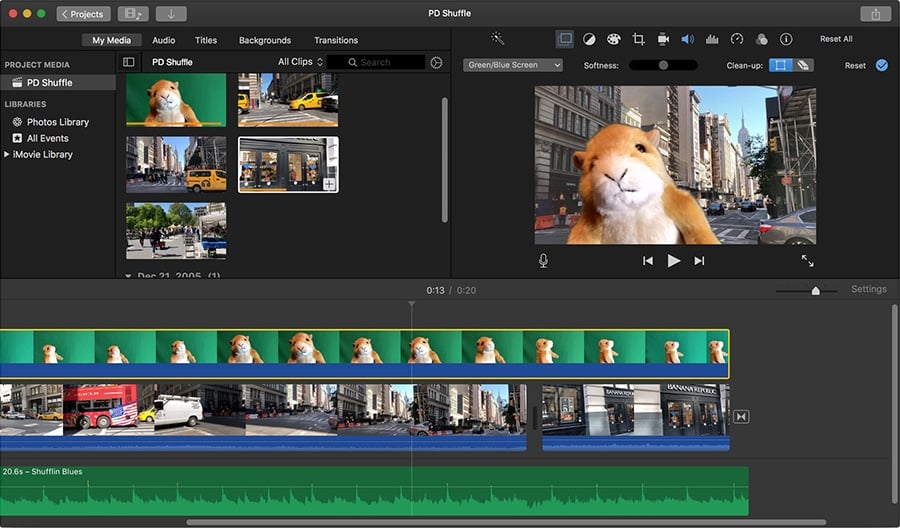
The process goes as follows:
- Place the new background image or video on the timeline
- Then add a green or blue screen video to the layer above it
- Use the Video Overlay Settings button and select Green/Blue screen from the dropdown menu
- Once you perform this action, the chroma key controls, such as Softness and Clean-up, will display on the toolbar at the top. Use them to adjust the effect and brush up any imperfections
For a detailed guide to using the iMovie chroma key feature on iPad and iPhone, check the official tutorial.
iMovie system requirements: if you’re planning to use it on an iPad, iPhone, or iPod touch, you should have iOS 13.4 or later. For Mac, you’ll need macOS 10.14.6 or later, 2GB of RAM (4GB recommended), an OpenCL-capable graphics card.
Download iMovie from the App Store.
3. Shotcut (Windows, macOS, Linux)
Shotcut is an open-source video editor that works on Windows, macOS, and Linux. It’s a powerful software with the chroma key feature available among the list of effects. However, if you’re new to video editing, you might feel slightly overwhelmed by the layout, mainly because it’s quite minimalistic and it’s not always obvious where you can find the required features.
The great part about this program though is the selection of hotkey combinations that will help you speed up the editing process.
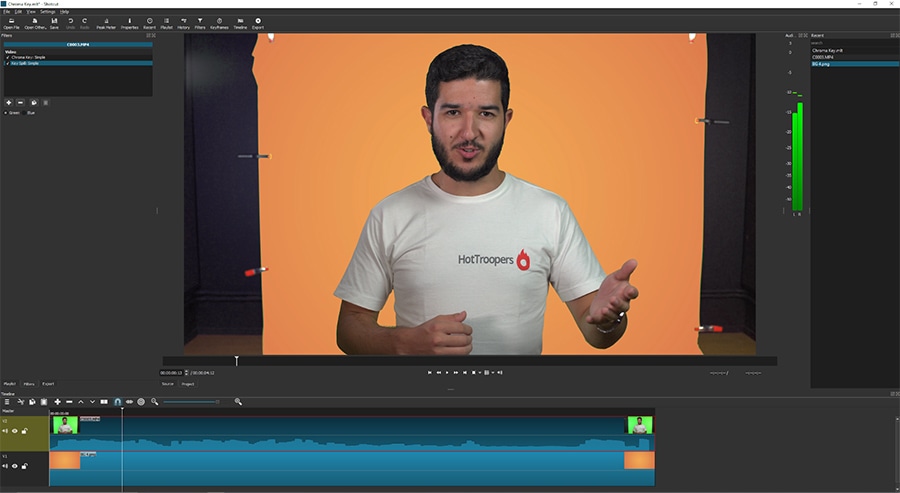
Below is a short guide to removing green screen in Shotcut:
- First, upload the file that will serve as a new background. Next, import the green-screen video (use Ctrl + I to add a new video track to the timeline).
- Make a click on the green-screen video and open the Filters menu from the toolbar at the top.
- Use the “+” icon and search for the option titled Chroma Key: Simple
- Most times, the effect is applied immediately. However, if it didn’t work for you or the green color has disappeared partially, use the eyedropper and/or manually adjust the parameter called Distance.
Shotcut system requirements: x86-64 Intel or AMD; at least one 2 GHz core for SD, 2 cores for HD, OpenGL 2.0, at least 4 GB RAM (8 GB for HD).
Visit the official website to download the software for your OS.
4. OpenShot (Windows, macOS, Linux)
The following chroma key software on the list is called OpenShot. Its interface is way simpler than any other solutions have, and the menu structure makes this tool a great Movie Maker alternative for beginners.
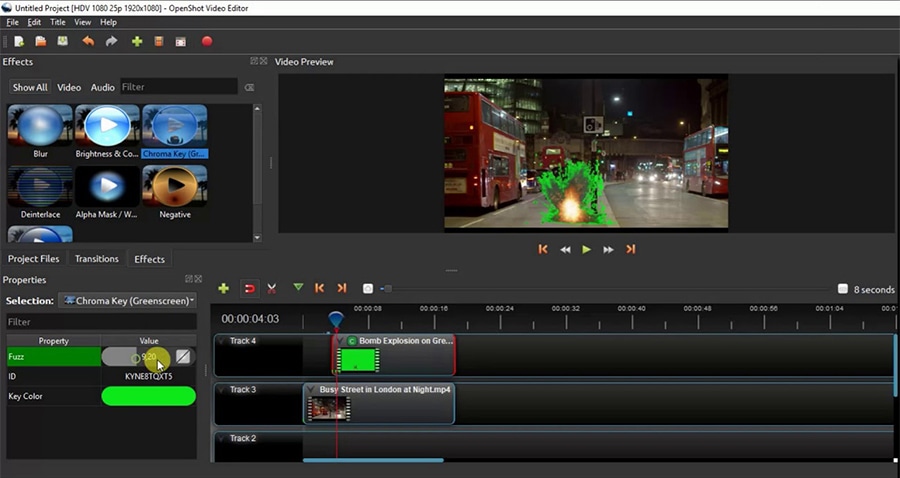
To replace a green background in OpenShot, follow these steps:
- Drag your files (the green-screen video and the new background) to the Project Files tab.
- Place the clips on the timeline following the same order: green-screen video on the top layer, the new background footage – below.
- In the Effects tab, search for Chroma Key and drag the effect to the timeline over the green-screen video.
Once you apply the effect, you’ll notice a “C” icon above the green-screen video on the timeline. It stands for “Chroma Key settings”. Unlike most free chroma key software, OpenShot allows for removing any color and doesn’t limit you to green or blue. However, that adds an extra layer of work because you’ll need to manually pick the color you want to key out.
To do that, right-click on the “C” icon and open the Properties menu. Find the parameter named “Key color” and make a double-click. A color palette window will pop up, and you’ll be able to pick a color for isolation. If you notice that some areas in the video remain green, use a feature called “Fuzz” available in the Properties menu. Want to see everything for yourself? Watch the official tutorial here.
OpenShot system requirements: 64-bit OS, 4GB of RAM (16GB recommended), 500 MB of hard-disk space for installation, Multi-core processor with 64-bit support.
Visit the official developer’s website.
5. HitFilm Express (Windows and macOS)
HitFilm Express is the free version of the premium video editing software by FXhome. The developer company is focused on bringing special effects to amateur filmmakers, so naturally, the green screen and the blue screen removal tool made it to the list of key features.
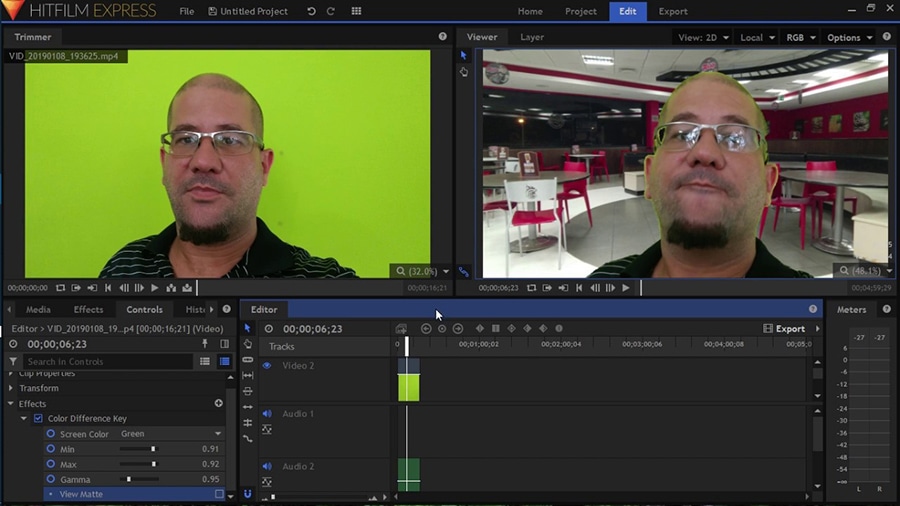
Here is a quick guide to using this chroma key software:
- Upload project files by dragging them to the Media box. Then place them on the timeline with the green or blue-screen video being on the top layer.
- Open the Effects tab and type Green screen, then drag the Color difference key effect to the timeline over the green-screen video.
- Make a double-click on the effect to open additional controls. Toggle the Min, Max, and Gamma settings to achieve the desired level of transparency.
HitFilm Express system requirements: this is probably the most resource-demanding tool on the list. To use it, you’ll need a 64-bit OS, 4th Generation Intel® Core™ Processors or AMD equivalent, at least 4Gb of RAM, and a minimum of 1Gb video memory. Graphic card: NVIDIA GeForce 600, AMD Radeon R5 240, or Intel HD Graphics 5000 (GT3).
Visit FXhome official website.
How to choose the best chroma key software for your computer?
It’s always a good idea to download and test a couple of solutions before making the final decision. Here are the questions that will help you make the right choice:
1. What are the software system requirements?
Here is the thing. When it comes to software, the final say belongs to your computer. And if you have a low-spec machine, perhaps, you should search among video editors for slow computers in the first place.
However, it’s not just the video editor and your computer. The size of the files you’re planning to work with matters a lot, too. This means if you’re planning to edit large or high-quality files, there is always a chance of the software freezing or crashing in the process. With that in mind, make sure to find out how to set the autosave feature (most video editors have it built-in) and how the backup works.
2. Which color is the background in your video?
Some chroma key software can help you remove video background only if it’s green. Other tools are able to key out any color. So, if you need to replace blue, red, or any other color that is different from green, make sure that the software of your choice allows that.
For instance, iMovie allows you to remove green and blue colors only. OpenShot, on the other hand, allows you to key out any color but you’ll have to pick it manually.
3. Will you need any other editing features?
So… what are your plans? Are you here to quickly do one thing and forget all about video editing, or are you on a mission to start your tiny but mighty video production studio? If it’s the latter, you might want to poke around and see other features the tool offers. You also need to check the software developer company’s social media, how-to guides, or any other platforms you’ll be able to resort to, should you have questions.
As a bare minimum, we recommend practicing some basic operations like video splitting and merging, changing the playback speed, importing or removing audio, and adding titles. Make sure these features are intuitive to you. Next, consider sifting through a list of text or video tutorials to get an idea of what else the software is capable of.
Resources for your inspiration
If you enjoy the magic that chroma key software brings, you might want to learn more about it and eventually try more complex tricks. There are plenty of resources at your disposal, both for practicing and inspiration.
We suggest checking out the following links:
Videezy and Videvo – free video stock marketplaces where you can download green screen videos at zero cost to test the new software and practice your skills.
Our green screen software guide – this article includes a few DIY ideas for shooting a green screen video at home.
Cine 24 VPX – a YouTube channel with lots of green screen video hacks and ideas you’ll definitely want to replicate.
Got any questions? Feel free to shoot us a message on Facebook.
Happy editing!