 User Help Manual
  Learn FAQ
  Send us feedback
 ")


- Published by Amy Shao on June 30, 2026 Meet the new major update ...
- Published by Amy Shao on March 11, 2026 What is the best gift for...
- published Amy Shao 11/19/25 Meet the long-awaited VSDC 10.2 update: a new ve...
- Hi, I'm Mattea Wharton, a travel videographer from Seattle. For three years I ba...
How to add moving objects to a video
Making text or pictures move in a video is a lot of fun. And it’s much easier than it may seem at first sight. Moreover, montage experience is really unnecessary as long as you have a clear idea of what you’re trying to achieve.
Such effects are often used in music clips or commercials, and the example we’re going to use below is also quite popular: it’s a paper plane moving around a route map.
To achieve the effect of moving objects, we’re using the latest version of VSDC Video Editor.
 Download Free Video Editor
How to make an object move in a video
For our example, we’ll need an image of a map and a .PNG image of a paper plane with a transparent background. If you don’t have the required files, you can easily find them on free stock multimedia websites.
To start your project, launch VSDC on your PC and use the “Import content” button to add the image of a map. Then use the “Add object” button from the upper menu of the program and add the image of a paper plane to the scene. Place it to the starting position from where the movement will begin.
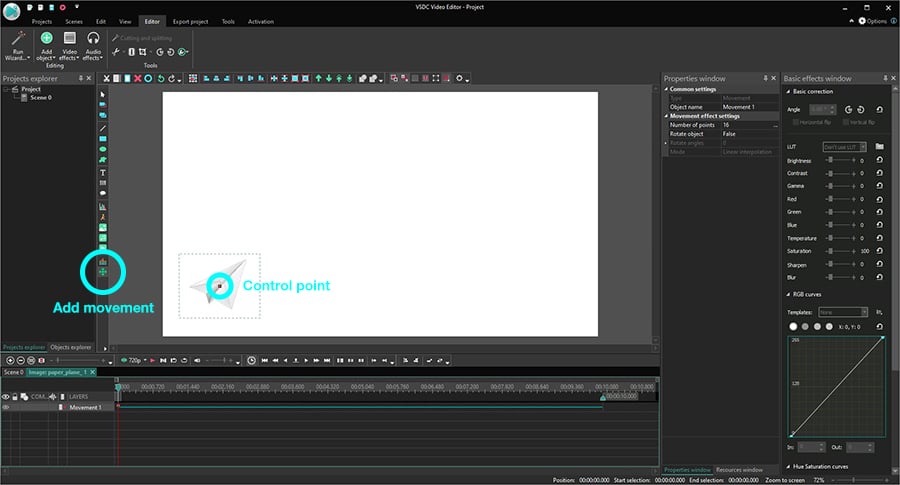
Make a double click on the paper plane file - a new tab will open. Now, go to the left-hand side menu and find a button named “Add movement”  or use the Shift + M hotkey combination. In the “Object position parameters” pop-up window, click “Ok”. A control point will appear in the center of the paper plane. It’s called the path’s start point and it will start the movement trajectory.
Decide where the plane should move next and make a mouse click there. This will be your first movement vector. If you need to move any of these two points, place a mouse over it until the cursor looks like a white cross. Then grab the point and drag it wherever you need.
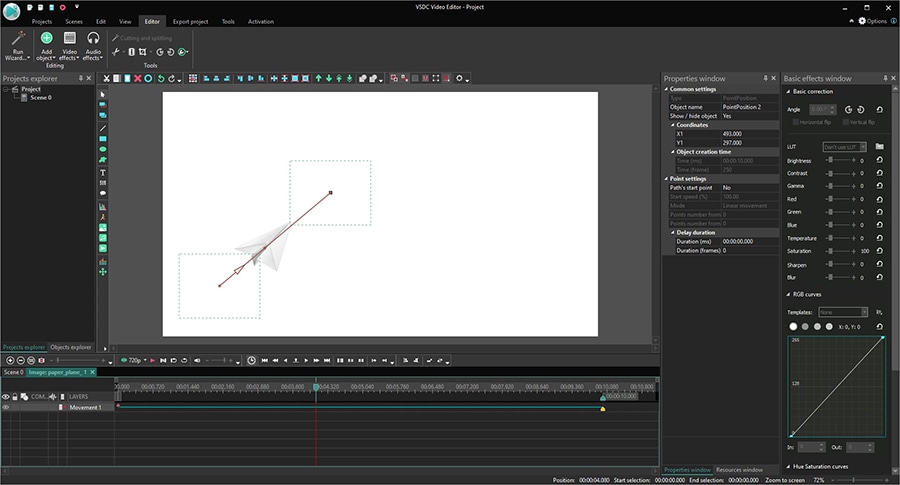
If you only want to move an object from point A to point B, you need just one movement vector. If you’re planning to build a more complex trajectory with 3 control points or more, you’ll need several vectors.
The free version of VSDC allows you to create a one-vector movement path. That is from point A to point B. If a trajectory has 3 points or more, you’ll need VSDC Pro.
To add another movement vector, go back to the left-hand side menu and use the corresponding movement button again. Then click anywhere on the scene to draw a new direction. Repeat as many times as needed to finish the trajectory.
How to fine-tune object movement in a video
Congrats! You’ve mastered the basics of object movement. Now, let’s see how to adjust it by making the trajectory smoother, and the movement more natural-looking. Oh, and you’ll also learn to rotate the object on the go.
First things first. There are two levels of object movement settings in VSDC:
- The trajectory adjustment via control points and passing points
- The object movement style settings
Below, we’ll talk about both.
Understanding control points and passing points
As we’ve mentioned earlier, the movement trajectory consists of control points and passing points. Let’s try to figure out what they are.
Control points (also, path’s start points) define the beginning of any given movement vector. Initially, you only have one control point – it’s the very first one created in the center of an object. The rest of the points are called passing points.
They help correct the movement trajectory.
You can always switch the mode of any given point and make it a control point or vice versa. To do it, select a point you want to change and go to the “Properties window” on the right-hand side. Find the “Point settings” menu and switch to “Yes” in front of the “Path’s start point” parameter.
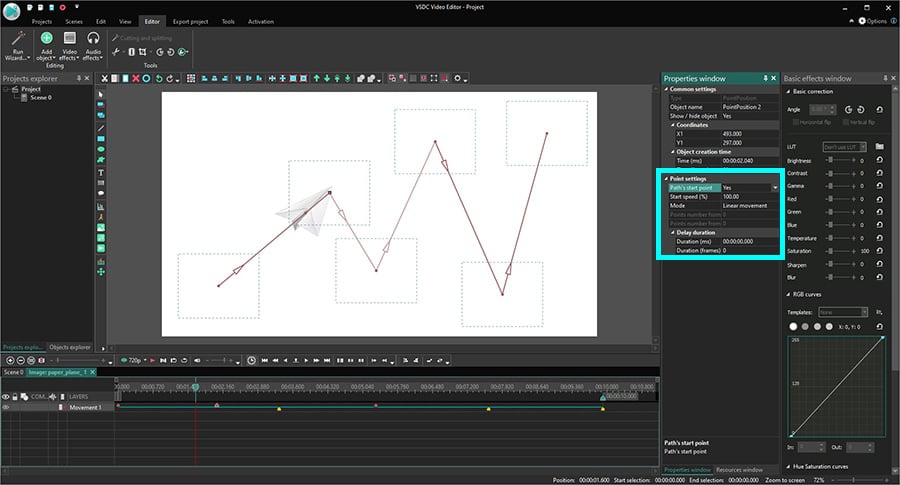
On the timeline, control points are pink, passing points are yellow.
Why would you want to switch a point’s mode and turn one of the passing points into a control point? Great question! The most common reason is separating a piece of the movement path for in-depth editing. For example, if you want the object to move slower on a particular piece of the path, make sure that the points this piece starts and ends with are control points.
How to make an object move smoothly and naturally in a video
Let’s go back to our example. VSDC allows for applying spline movement mode, and that means we can make the paper plane move more naturally in a video – smoothly and even slower at some points.
Spline movement can be achieved within a few easy steps:
- First, click on the second point on your trajectory and go to the Properties window on the right-hand side.
- Make it a control point by switching to “Yes” in the “Path’s start point” field.
- To make the plane’s movement through the selected piece of path slower, reduce the “Start speed %” value. In our example below, we’ve set a 10% starting speed.
- To make the path smooth, find the “Point settings – Mode” parameter and switch from linear to spline movement mode. This setting will only be applied to the piece of the trajectory between the selected point and the next control point.
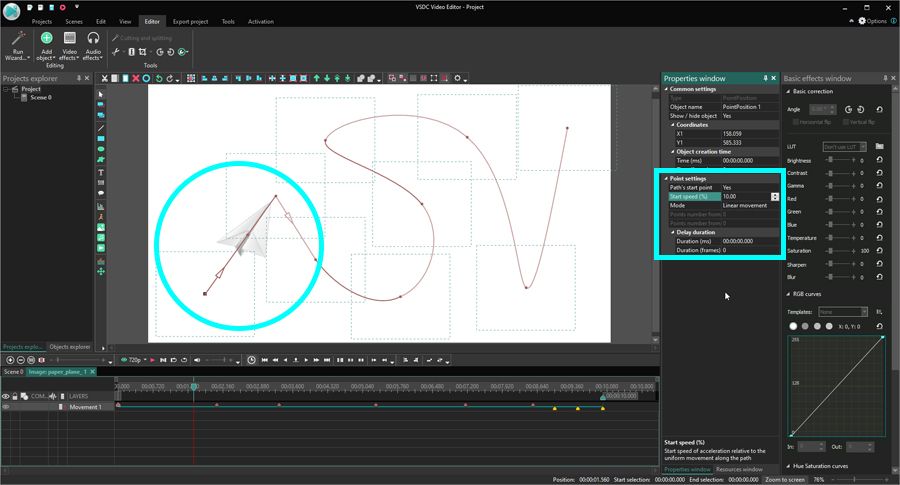
- If you’d like to make the movement path even curvier, go ahead and increase the value for the “Points number from previous/next path” parameters.
- Finally, to make the object linger at the path’s start point, find the “Delay duration” menu. For a 2-second delay, put the «00:00:02:000» value in front of the “Duration (ms)” line.
How to make an object rotate while moving
Ready for the next level?
Now that you know how to change the movement trajectory and the speed of the object, it’s high time you learned about rotation.
Here are the steps you’ll need to take:
- Click on any part of the path to select it and go to the “Properties window”.
- Find the “Rotate object” field and switch to “True” – that will activate the rotation settings menu.
- In the “Rotate angles” field, switch from “Constant parameter value” to “Linear parameter change”. Then set the desired values for the beginning and the end of the movement. For our example, we used 0 and 360 degrees. Check how the rotation looks using preview.
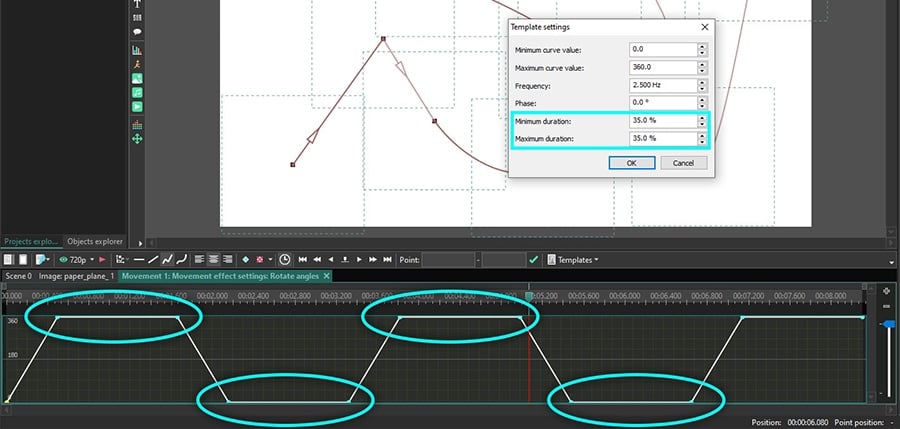
In case you need an even more detailed rotation adjustment, click on the “…” icon in front of the “Rotate angle” field. It will open the trajectory on the timeline with a “Templates” menu above it. Pick any template (we used “ZigZag”), and you’ll see a “Template settings” window pop up.
These parameters will help you set up the rotation more precisely. Let’s take a quick look at them:
- Minimum and maximum curve values. These values define the minimum and maximum object inclination angles relative to the movement trajectory.
- Frequency. This parameter specifies how frequently the rotation direction changes – therefore, how many zigzags there are on the timeline. Note that the rotation direction changes as the object starts moving up or down the zigzag.

- Phase. This setting moves the first control point of the zigzag. In other words, by moving it up or down, you can adjust the initial object inclination angle relative to the trajectory.
- Minimum and maximum duration. By changing these parameters, you define how long the object stays in the highest and lowest points of the zigzag. When the object reaches the maximum or the minimum value zone, it stops rotating until it’s time to resume the movement up or down the zigzag again.
There you have it. Now you can make any object move in a video, plus, you can precisely control its trajectory and even rotation. What’s next? Go ahead and try it for yourself!
If you have questions left, check out this video tutorial below or email us at This email address is being protected from spambots. You need JavaScript enabled to view it.
You can get more information about the program on Free Video Editor' description page.
Watch us on YouTube
 / @VSDCFreeVideoEditor
© 2011-2026, www.videosoftdev.com, FLASH-INTEGRO LLC. Privacy policy | Terms of use | About us
All trademarks referenced herein are the sole property of their respective owners.
Copying any materials from this site allowed only with written consent of Site Administration.