 User Help Manual
  Learn FAQ
  Send us feedback
 ")


- Published by Amy Shao on June 30, 2026 Meet the new major update ...
- Published by Amy Shao on March 11, 2026 What is the best gift for...
- published Amy Shao 11/19/25 Meet the long-awaited VSDC 10.2 update: a new ve...
- Hi, I'm Mattea Wharton, a travel videographer from Seattle. For three years I ba...
How to Make a Tutorial Video for Free in VSDC
Since we’ve launched our YouTube channel, many of you asked us to share tips for making video tutorials. Although it might be challenging to write a one-size-fits-all guide, we’ve decided to describe our methods in the post below.
This guide will be helpful for those who want to produce software tutorials in a video format, but generally, the same sequence of steps will work for any other type of video tutorials.
To get started, you’ll need the following (all tools are free):
- Video editing software – we recommend VSDC Video Editor for PC and iMovie for Mac
- Desktop screen recorder – we recommend VSDC built-in screen grabber or OBS
- Webcam video recorder – we recommend Bandicam or a built-in camera app on your computer
Note that you’ll only need the web camera and webcam video recorder if you want to place a video of yourself in the corner using the picture-in-picture effect. If you’re not planning to make a public appearance, you can record voice commentaries or even make do with subtitles only.
Now, without further ado, let’s review the steps we take when we make video tutorials for our YouTube channel.
How to make a tutorial video, step by step
You may already have an idea of the tutorial you want to record. If you do, jump to Step 2. If you don’t, there are plenty of tools to help you with the research – we’ll mention some of them below.
This is what a typical process of video tutorial creation looks like:
- Search for the idea and inspiration
- Break down the scenario into steps
- Perform a rough rehearsal with that scenario
- Write the final script (below, we share the structure we use for video tutorials)
- Record the video tutorial
- Edit the video tutorial
- Add audio: music, voiceover, or your talking head
- Add intro and outro
- Save and publish your tutorial
Now that you have a general idea, let’s look at this process in detail.
Step 1. How to find an idea for a video tutorial
If you aren’t quite sure what your tutorial should be about, there are plenty of platforms to help you find inspiration.
Let’s suppose you want to make a video tutorial about using GIMP. Instead of creating a long generic overview of the program, it might be better to angle your tutorial and teach viewers something specific. But how do you find out what people want to learn?
First, YouTube search and Google search can be helpful. Just start typing “GIMP how to…” and read the autofill options suggested by the engine. The autofill options are generated based on the most frequent search queries, which means these topics are in demand. Next, when you select any of the suggested topics on Google, scroll down and see the “Searches related to…” section. It may also help you come up with ideas for your video tutorial.
Second, you can use keyword research tools like Keywords.io, Ubersuggest, and Answerthepublic to find the most popular search queries on any given topic.
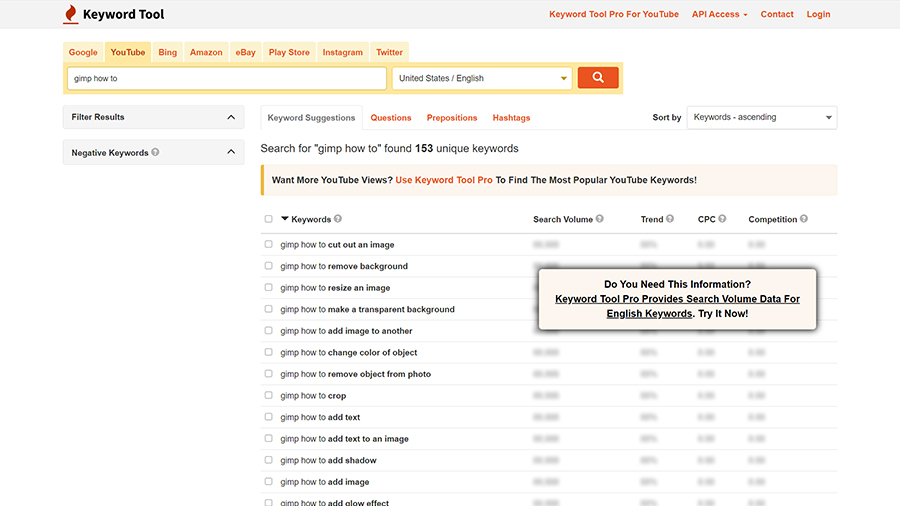
If you choose to use one of these tools, it’s always better to select the searches with a lower volume of queries because there will be less competition for your tutorial in search results after you publish it.
Finally, feel free to get inspired by other bloggers. If you know a better, more efficient way to remove background in GIMP – go for it! If you want to come up with a new angle – go for it! If you can produce a tutorial in another language – go for it!
Step 2, 3, 4. Why you need to prepare a scenario
Here is the thing. You can go ahead and start recording the tutorial right away. But if you want to avoid the “Oh, snap, I forgot that!” moments and minimize editing, we recommend starting with an outline and expanding it to a full-fledged scenario describing what you will be doing and what you will be saying in the video.
Now, what should a video tutorial scenario look like? From our experience, the following structure works well:
- Tell the viewers what this tutorial will be about
- Give them a sneak peek of the result or the process
- Show the tutorial including your commentaries
- Encourage them to subscribe and comment on the video
The sneak peek will help engage the viewers from the beginning of the video, and the call to action at the end of the video will encourage them to connect with you. Want to know more about optimizing videos and growing on YouTube? We recommend learning from Brian Dean and his video marketing hub.
Step 5. How to record a video tutorial
If you know your subject well and you’ve prepared a scenario, this step will be the easiest one. Make sure to mute notifications on your computer, then hit the Record button and start your video tutorial. Don’t worry about bloopers – you’ll be able to cut them out later.
Most screen video recorders allow you to set the desired quality and frame rate. For the best results, we recommend using the following video parameters: 1080p and 60fps.
Another feature most video recorders have is a drawing toolset. The drawing toolset typically includes a highlighter or a pencil and a few shapes or arrows for you to point at the objects you’re talking about in the video. Many beginners try to incorporate these tools while recording the tutorial, but there is no need to do that. When you’re a beginner, they will only slow you down and ruin the flow of the script. If you decide to highlight any object in the video, you’ll be able to do it faster when you start editing.
Note, if you’re planning to record yourself using a webcam, you should do that simultaneously. Place the camera in front of you, connect it to your webcam video grabber, and hit the Record button before you start the tutorial.
Step 6. Video tutorials need very little editing
Most times, editing a video tutorial means cutting out “bloopers” or those seconds when your mouse freezes because you don’t know what to do or what to say next. You also might need to add transitions if your tutorial consists of several parts. Finally, text captions and lines will make your tutorial more informative and easier to understand.
You can easily add these elements using VSDC Free Video Editor. As a non-linear video editor, it allows you to place any object over the main video and fine-tune its appearance precisely.
Step 7. Time to add narration to the tutorial
If you have recorded a voiceover for your tutorial, it’s time to add it and synchronize the narration with the video. You might need to trim or split some parts of the audio, but overall, it’s a relatively easy task even if you have zero experience.
If you have recorded a video of yourself while doing the tutorial, you’ll need to apply a picture-in-picture effect (or a video-in-video effect in that case). Simply import the video of yourself to the editor and place it one track above the main video on the timeline. Next, resize the video of yourself and drag it to the desired spot - usually, the bottom right corner.
Watch the tutorial below to see how it works.
How to make a 'video-in-video' or 'picture-in-picture' effect
Pro tip: if you record yourself in front of a green background, VSDC will help you remove the background from the video and leave it transparent. The result will look something like that:
Step 8. Intro and outro will make your video tutorial complete
Typically, when you make a video tutorial, you want minimum effects because showcasing your editing skills is not the purpose – you want to focus on the content. However, you definitely should add a short intro and an outro at the beginning and the end of the video.
Use intros to highlight the name of your tutorial and talk about the lesson. Your intro can be short and simple – watch the video below to find out how to create one in VSDC:
How to create slide-in text intro for free in VSDC
The outro is the best place to add your call to action. This is where you can insert your website address, display your social media handlers, and encourage viewers to subscribe. If you’re planning to make more video tutorials, it’s a good idea to tell viewers why they should subscribe to your channel and what else you’re planning to publish.
Here is a quick tutorial to adding an animated subscribe button – the essential part of an efficient outro:
How to add custom subscribe button with a bell to your video
Step 9. Save and publish your video tutorial
Once the tutorial is ready, all you need is to publish it on your YouTube channel. Here are some of the best practices to help your video get noticed:
- Include the keyword you’ve found during the research to the video title, the first lines of the description, and tags.
- Select a relevant video category in the More options tab after uploading the video to YouTube. In your case, it will most likely be the “Howto & Style” or the “Education” categories.
- Upload subtitles. You can insert the text from your own script or use the automatic speech recognition tool provided by YouTube. Even if you’re the one narrating, for some people, subtitles will be more convenient - keep that in mind.
- Create a thumbnail using a free tool like Canva. The thumbnail will help your video stand out in YouTube search, so it’s worth investing a few extra minutes to produce one.
- Share your tutorial on social media using hashtags. Even if only a few people – your friends and your mom, of course – watch the entire video, for YouTube it will mean that your content brings value and it’s worth recommending.
Have fun making your video tutorials!
Stressing out about your first video tutorial? We’ve been there. Looking at what you’ve created thinking you could have done it better? We’ve been there. Doubting anyone will ever watch your tutorial? We’ve been there, too! And guess, what? None of these reasons should discourage you.
Video tutorials are a great genre to dive in. People are looking for video tutorials all the time choosing this format over text tutorials. And if you have something you want to teach a bunch of strangers all over the world – now is probably the best time to do that.
So, have fun and enjoy creating!
Got any questions about the video editing part? Shoot us a message on Facebook.
If you want to use tutorials to grow your business, check out this video marketing guide.
Need inspiration? Subscribe to our YouTube channel. We publish short weekly tutorials for video creators of all levels of experience.
Watch us on YouTube
 / @VSDCFreeVideoEditor
© 2011-2026, www.videosoftdev.com, FLASH-INTEGRO LLC. Privacy policy | Terms of use | About us
All trademarks referenced herein are the sole property of their respective owners.
Copying any materials from this site allowed only with written consent of Site Administration.