 User Help Manual
  Learn FAQ
  Send us feedback
 ")


- Published by Amy Shao on June 30, 2026 Meet the new major update ...
- Published by Amy Shao on March 11, 2026 What is the best gift for...
- published Amy Shao 11/19/25 Meet the long-awaited VSDC 10.2 update: a new ve...
- Hi, I'm Mattea Wharton, a travel videographer from Seattle. For three years I ba...
How to split video files with VSDC Free Video Editor
Searching for an intuitive method to split your video seamlessly? VSDC's advanced split tool is here to assist. This option allows you to apply effects to particular fragments of your video, restructure them, cut out unwanted footage together with the Cut out fragment tool, export fragments of your video separately in any format you like (since VSDC provides various options) and tailor the perfect clip.
Depending on your goals, the task of splitting can be performed differently. Do you need extra high precision because you’re trying to catch a particular moment on the footage? Are you planning to export the fragments as separate files? Or are you splitting the footage to just apply different effects to its parts? In this tutorial, we’ll show you how to split a video for any purpose using VSDC Free Editor. Continue reading to master the art of video and audio splitting with VSDC!
 Download Free Video Editor for Windows
Method 1: Split a video file into 2 parts in one click
Here is the simplest way that will suit you if you aren’t looking for high precision.
- To begin, launch VSDC Free Video Editor and create a new project. VSDC provides different options of how to do this. For example, you can use the Import content icon on the start screen when you launch the program. This is an optimal way because VSDC will automatically detect all the parameters of your video and adjust the project parameters accordingly. So, click on the Import content icon, choose a file on your PC and adjust parameters in the pop up window appearing automatically (if necessary). Once ready, hit Finish. If you are new to VSDC and want to learn more about how to get started, we advise you to watch our comprehensive video guide.
- Select the file you want to split by clicking on it either on the timeline or on the scene. This is highly important; otherwise the effect will be disabled.
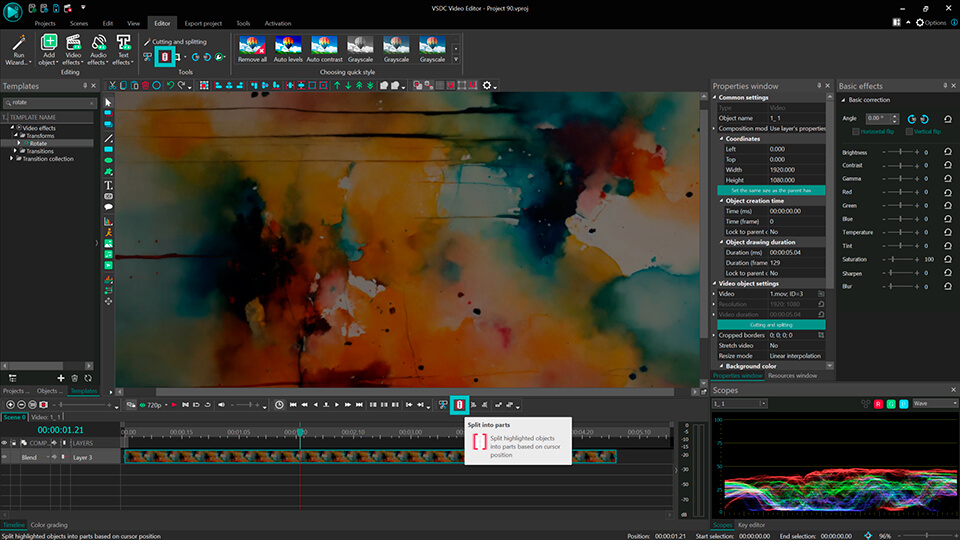
- Place the playhead to the point on the timeline where the first fragment should end, and the second should begin. Then click the Split into parts razor-like looking button. There are several ways to find it:
- Go to the Editor tab. The tool you need is located just above the scene in the Tools section;
- The same tool is also conveniently located just above the timeline;
- You may also use the hotkey combination Ctrl + K.
After that you’ll instantly see how your video file turns into two separate fragments placed one after another on the timeline.
Method 2: Splitting by Using Cutting and Splitting Window
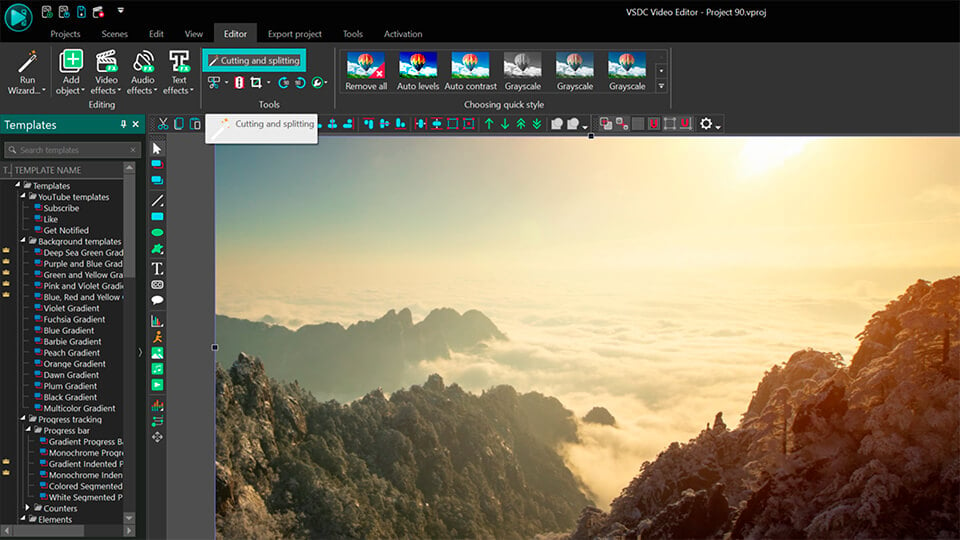
- Start with creating a new project as described above. Then you need to reach the Cutting and Splitting window. It can be done in one of the following ways:
- The Cutting and Splitting option is located in the Tools section above the scene on the Editor tab. Click on it for the corresponding window to appear.
- Select your video file on the timeline and navigate to the Properties window on the right of the scene. Then click on the green Cutting and splitting button.
- Right-click on the video file on the timeline. Then select the Cutting and splitting option from the list.
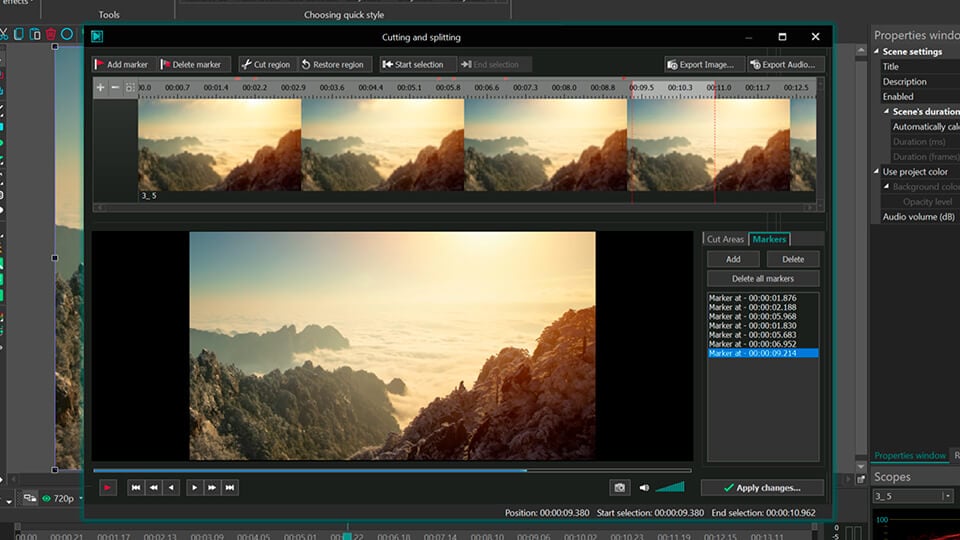
- In the Cutting and splitting window you'll observe a timeline. Click to the point on the timeline where you need to split fragments and use the Add marker button. This way you can set as many markers as you need at the points where you want the file to be split.
- Select Apply changes when ready.
On the main timeline you will notice separate fragments placed one after another divided by red markers.
Method 3: Splitting by Segmentation Markers
Sometimes you may need to split a video into multiple parts after all the effects have been applied to the entire file to get separate video clips. In this case, we recommend using segmentation markers right before exporting.
- After you add a video file to the scene and perform all the editing you were planning to, you need to set segmentation markers. To apply segmentation markers, place the playhead where you want to split the project on the timeline. Then click on the Create maker icon located just above the timeline to set a mark where the project should be splitted while exporting.
- In the pop-up window select Segmentation marker in the Marker type field and click OK to confirm.
- Go to the Export project tab on the ribbon command bar, find the Additional settings tab (bottom menu) and check the Split file(s) By markers box.
- Then adjust the settings of the output file in the same tab (if necessary) and click the Export project button on the ribbon command bar. As a result, you’ll get as many video fragments saved to your PC as you’ve created using markers.
The way this method works is also briefly presented in our Youtube video (section “Segmentation markers”)
Frequently Asked Questions
1. What is the difference between the "Split into parts" tool and the "Cutting and splitting" tool? Which method is better?
The choice of tool depends on the task you need to perform. "Split into parts" is designed for quickly and easily dividing an object into two parts at the point where the cursor is placed on the timeline. If you need to cut a video into three or more parts or remove several unwanted fragments at once, then use the "Cutting and splitting" tool.
2. What to do if I made a mistake and cut the wrong fragment?
Use the Undo button (the green arrow icon located at the top of the interface). Click it until you return to the desired editing stage.
3. Is it possible to cut multiple fragments from one video?
Yes, this can be easily done using the "Cutting and splitting" tool:
- Select the desired video file on the timeline.
- Open the "Cutting and splitting" tool located on the top panel.
- Place the cursor at the beginning of the fragment you want to remove and click "Start selection".
- Move the cursor to the end of this fragment and click "End selection". The area will be highlighted.
- To delete the selected fragment, click "Cut region".
Repeat this for all fragments that need to be cut out. Once editing is complete, press "Apply changes".
4. How to save a project to return to editing later?
To save your project, go to the "Projects" tab and select "Save project" or "Save as project...". We recommend choosing the second option, as it allows you to specify the desired folder and assign a name to the project. The file will be saved with the .vproj extension.
Tip: A standard project save only remembers the location of the source files. If you move or rename media files on your computer, the program may not be able to find them. To save the project with all its files, use the "Pack Project" option.
Wrapping Up
That’s it! Now you have an idea of how to split a video in VSDC Free Video Editor. With employing the video splitter, you are free to enrich your content and make it catching and professional-like. VSDC offers smooth transitions ensuring flawless movement between frames, numerous visual effects, options for creating dynamic animations, injecting voice-overs, thrilling sound filters and even synchronizing video effects with the beat of your audio. To learn more editing tricks for creating amazing video projects, subscribe to our YouTube channel and feel free to message us on Facebook. And if you have questions, our support team is here for you at This email address is being protected from spambots. You need JavaScript enabled to view it..
Here are 3 more tutorials you may be interested in:
- How to crop borders of a video
- How to add text to your video
- How to create a picture-in-picture video effect in a couple of seconds
Get VSDC Free Video Editor - powerful non-linear editing software with advanced features. Perfect for YouTube creators, social media videos, and professional projects. Learn more about features.
Watch us on YouTube
 / @VSDCFreeVideoEditor
© 2011-2026, www.videosoftdev.com, FLASH-INTEGRO LLC. Privacy policy | Terms of use | About us
All trademarks referenced herein are the sole property of their respective owners.
Copying any materials from this site allowed only with written consent of Site Administration.