- Hi, I'm Mattea Wharton, a travel videographer from Seattle. For three years I ba...
- published Amy Shao 6/10/25 The wait for something new and unusual is finally...
- This holiday season embraces new beginnings with the latest update of VSDC Video...
- Change is all about improvement, and this process wouldn't be possible without y...
Getting creative with text for video in VSDC. Beautiful titles, subtitles and more

Most times when you edit a video, you need to add a piece of text to the scene. It can be scene titles, subtitles, opening or closing credits, watermarks, or tooltips. In this tutorial, we’ll show you how to use VSDC Free Video Editor to add text to your clip, make it look stylish and authentic.
Download VSDC Free Video Editor for Windows
Let’s start with the basics. VSDC offers a built-in text editor, a tool to add subtitles from an external text file, and a tool to create tooltips. The latter can be useful if you’re working on a video tutorial and need explanation elements for the viewers. Most times, however, users need to add a short piece of text to their videos, so we’ll cover that first.
How to add text in a video editor
- Launch the program and import your footage. If this is your first time, you can use the round green “Add object” button located in the top menu.
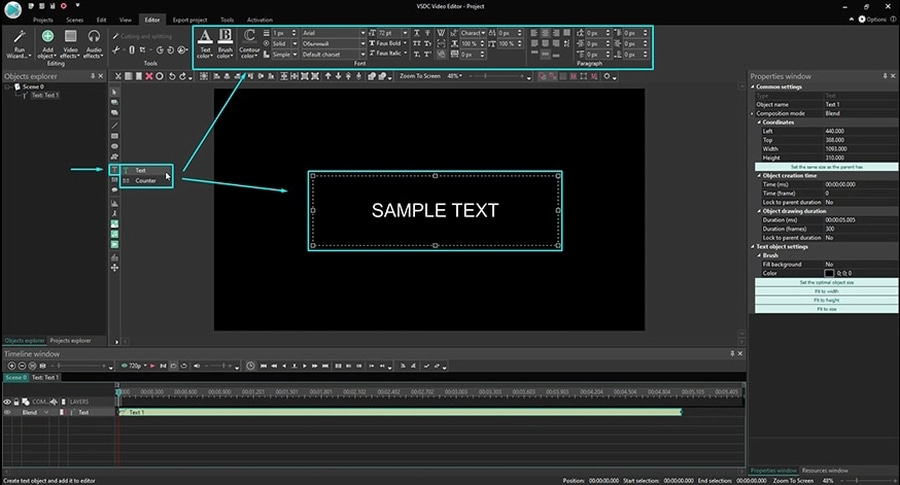
- Select the “T” icon from the left-side menu and choose Text. In the pop-up window click OK to proceed.
- Place the crosshair rectangle where you want the text object to be located. You’ll be able to relocate it any time.
- Double-click inside the rectangle-shaped frame and you’ll see a cursor.
- Type your text. Note, it may look very small, but that what the built-in text editor is for. In the next paragraph, we’ll show you how to make it look exactly the way you want.

How to change the look of the text in a video, make it contoured or transparent
As you may have noticed, as soon as you added the text to the video, a corresponding toolbar appeared at the top of the program. That’s the built-in text editor and it allows you to change anything about your text: font, size, color, thickness, alignment, the level of transparency, and even the contour borderline.
Just play with each feature and see it for yourself.
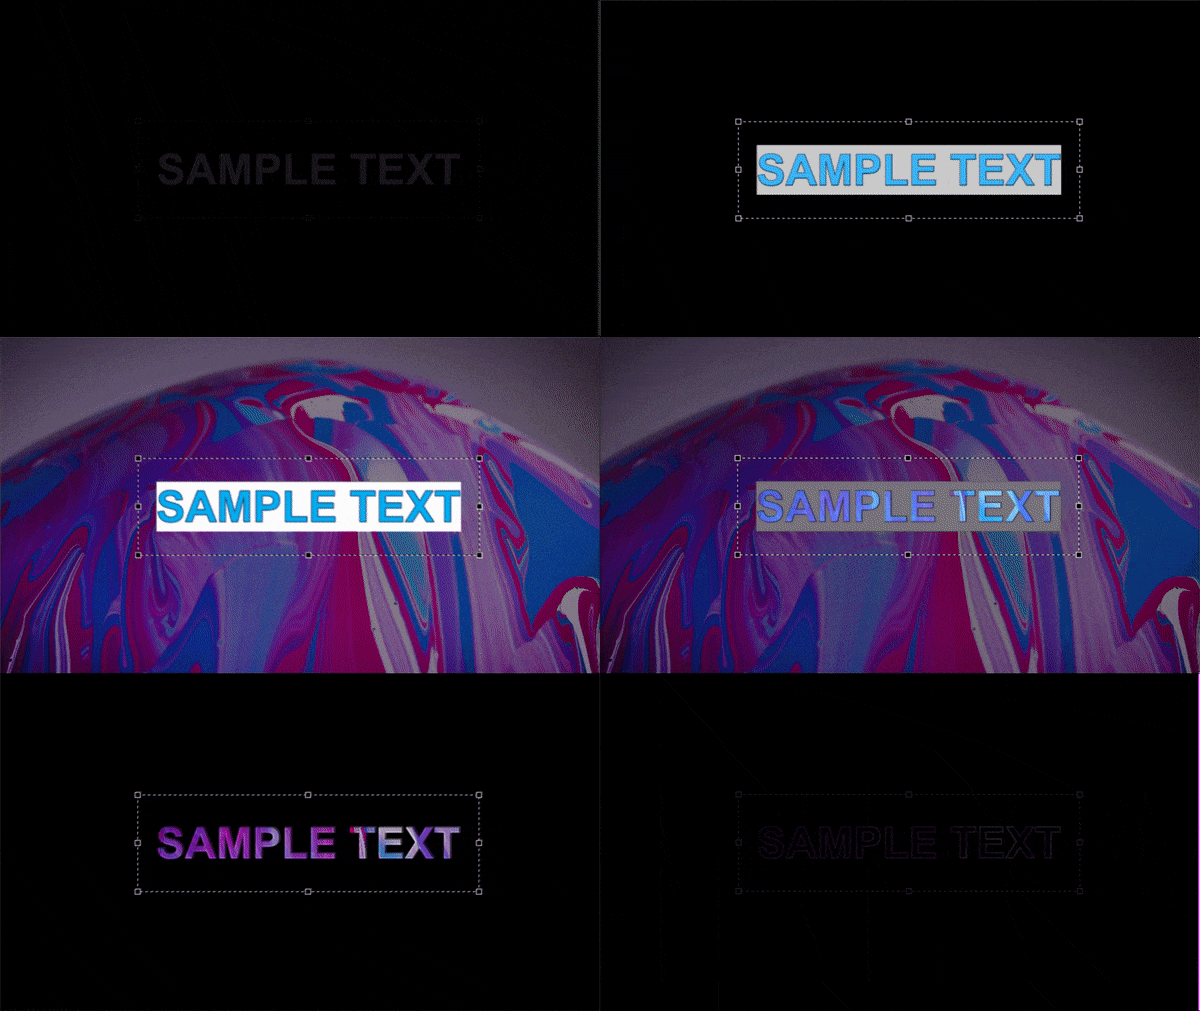
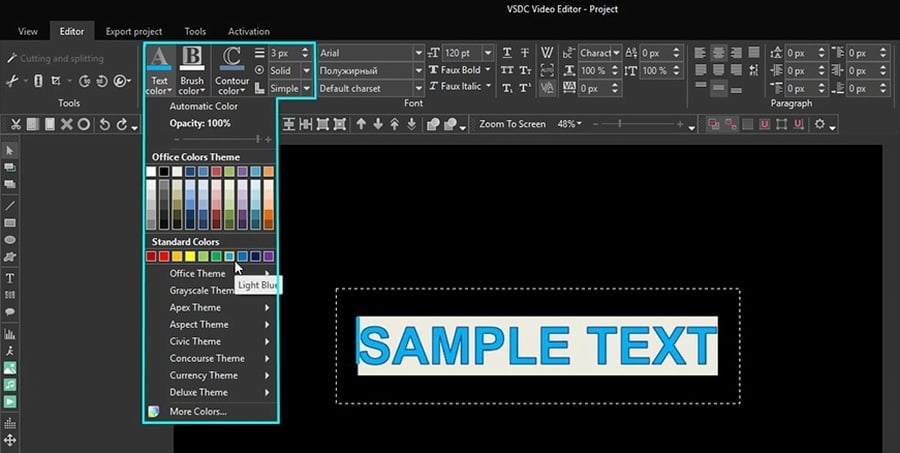
For starters, select your text or a part of it with a mouse and change its color, font, font size, font style. You can underline or cross out your text, use caps and scripts, change horizontal and vertical scale, select an appropriate alignment, specify other paragraph settings if needed. You can make any word or letter transparent. To do that select the symbols with a mouse, open the “Text color” drop-down list and move the “Opacity” slider. As you’ve probably guessed, opacity settings can be used for creating watermarks.
One of the most demanded video text styles is a contoured half-transparent text, and you can apply it in VSDC too.
- Select the text you want to modify.
- Adjust the contour style and its thickness.
- Change the contour color if appropriate.
- Open the “Text color” drop-down menu and move the opacity slider to achieve the desired effect.

How to change the text in video duration and its position on the timeline
Finally, you may want to have the text object to be displayed throughout the entire video, or you may want to have it appear once for a particular moment. Below, we’ll explain to you how to do it.
Go to the timeline and find the green “Text” object there. Place your mouse over it – you’ll notice you can stretch and move it easily. Now, if you want the text to be visible all the time, stretch the “Text” object to the length of your video file on the timeline.
If you need the text to be shown at a particular moment for a selected period of time, use the same stretching and dragging mouse movement to place it on the timeline.

If you need higher precision when it comes to the duration time, click on the text object and open the Properties window on the right. You’ll find “Object creation time” and “Object drawing duration” parameters. The former defines the moment text appears in the scene. You can fine-tune its appearance up to milliseconds. The latter defines the exact period your text in a video will be seen.
Now that you’ve mastered the way to work with simple text in a video editor, you’ll be able to work with tooltips and subtitles too. To add the former, go to the left-side menu and choose the tooltip icon. Place it in the scene and adjust text, font, margins, and style using the Properties window. On how to work with subtitles, we’ll briefly talk in one paragraph.
Note that because you’re working with text in a video editor, you can apply various effects to it including fade-in and fade-out. You can also make it move, create reflections, add new fonts, and more. We recommend checking out our video tutorials on how to use VSDC Video Editor to work with text.
Using VSDC video editor to add text: how to upload subtitles
Technically, there are two ways to add subtitles to your video in VSDC.
The first one involves using a specifically formatted .srt file with the text. Usually, these files are created in subtitle editing software, not manually.
However, if you’re struggling with this task and don’t have lengthy subtitles to upload, you can create subtitles right in the video editor. See the tutorial below to find out how.
Other tutorials you may be interested in checking out:
How to create a picture-in-picture effect
How to add an audio spectrum visualizer
How to create a “video inside text” intro
You can get more information about the program on Free Video Editor' description page.