")


Video Düzenleyici
Aile tebrik kartından şirket sunumuna kadar her türlü karmaşıklıkta videolar oluşturmak ve düzenlemek için ücretsiz video yazılımını kullanın. Video dosyalarını kesin, birleştirin, görsel ve ses efektleri uygulayın, filtreleme ve görüntü düzeltme kullanın, slayt gösterileri yapın ve uygun bir film müziği ekleyin. Videonuza profesyonel bir görünüm kazandırmak için çok renkli Renk anahtarı ve gelişmiş parametre ayarlarını kullanın. Tüm popüler video ve ses formatları desteklenir.
Video Dönüştürücü
Bu program video dosyalarını bir biçimden diğerine dönüştürmek için tasarlanmıştır. Hemen hemen tüm popüler video biçimleri (hem okuma hem de kaydetme) desteklenir. Ayrıca iPhone, Huawei P30 Pro veya Samsung Galaxy gibi belirli multimedya cihazları için videolar oluşturmak da mümkündür. Programın kullanımı son derece kolaydır, modern bir arayüze ve gerekli tüm video işleme fonksiyonlarına sahiptir.
Ses Dönüştürücü
Bir ses dönüştürücü kullanarak ses dosyalarını bir biçimden diğerine dönüştürebilirsiniz. Tüm önemli ses biçimleri ve codec bileşenleri desteklenir. Program ayrıca çalma listelerini ve meta etiketlerini yönetmenize izin verir, ayrıca video dosyalarından sesi dışa aktarmak ve parçaları herhangi bir biçimde bilgisayarınıza kaydetmeniz de mümkündür.
Ses CD’si Yakalayıcı
Bu ses aracı kompakt disklerden ses parçalarını kopyalamaz ve bunları seçtiğiniz herhangi bir biçimde bilgisayarınıza kaydetmek için tasarlanmıştır. Neredeyse tüm popüler ses biçimleri ve codec bileşenleri desteklenir. Program ayrıca dosyaları otomatik olarak yeniden adlandırma ve meta etiketleri güncelleme için parça ayrıntılarını FreeDB sunucusundan ayıklayabilir.
 Video Editor
 Video Dönüştürücü
 Ses Dönüştürücü
 Ses CD’si Yakalayıcı

Çok işlevsellik
Tek bir ücretsiz video yazılım paketinde çok çeşitli multimedya işleme araçları

Yüksek hız
Programlar hızlı, optimize edilmiş çok işlemcili algoritmalar kullanır.

Kullanılabilirlik
VSDC video yazılımı, Windows işletim sistemi tabanlı tüm bilgisayarlarda ve cihazlarda ücretsiz olarak indirilebilir.
News:
- published Amy Shao 6/10/25 Yeni ve sıradışı bir şey için bekleyiş nihayet sona...
- Bu tatil sezonu, VSDC Video Editörü'nün en son güncellemesiyle yeni başlangıçlar...
- Değişim, gelişim demektir ve bu süreç sizlerin geri bildirimleri olmadan mümkün ...
- Giriş 2024 yılında görsel efekt oluşturma seçenekleri son derece çeşitli ve en...
Çok Katmanlı Düzenleme Kullanarak Video Izgarası Efekti Nasıl Uygulanır?
Kılavuzlarımızda doğrusal olmayan video düzenleyicileri kullanmanın avantajlarından çok bahsettik. İçerik üreticiler için en büyük avantajlarından biri, aynı sahneye birkaç parça görüntü yerleştirme ve bunları aynı anda düzenleme yeteneğidir. Video ızgarası efekti buna mükemmel bir örnektir.
VSDC'nin zaman çizelgesi sınırsız sayıda video parçası sağladığından, 4, 9, 16 veya başka herhangi bir sayıda bölümden oluşan bir video ızgarasını kolayca oluşturabilirsiniz. Bu eğitimde, adım adım projeniz için nasıl bir video ızgarası oluşturacağınızı tam olarak göstereceğiz. Bu efekt aynı zamanda video duvarı veya video kolajı olarak da bilinir. Önce eğitim videosunu izleyin ve ardından metin sürümüne geçin.
Adım 1. Gerekli boyutta bir proje oluşturun
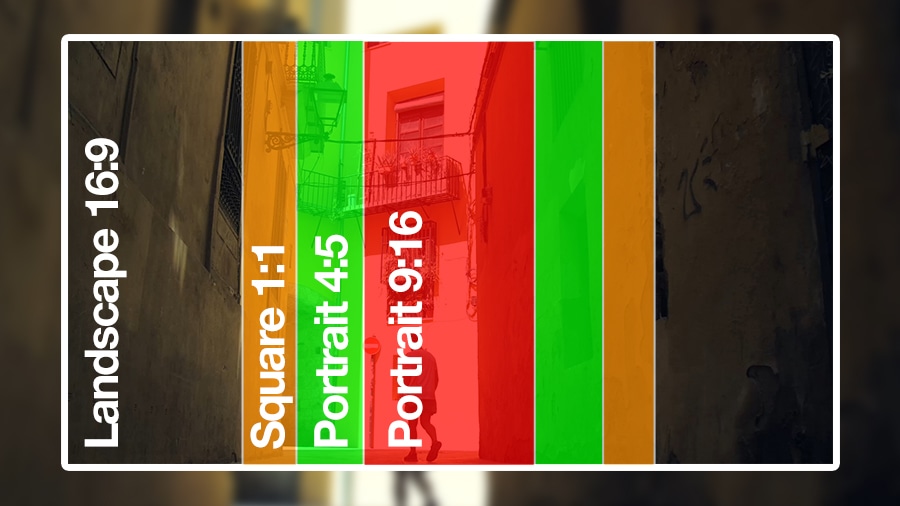
Bilgisyarınızda VSDC’yi başlatın ve yeni bir proje oluşturmak için Boş proje seçeneğini kullanın. 2x2 veya 3x3 video ızgarası için şu proje ayarlarını kullanmanızı öneririz: Full HD 1080p veya UHD 4K çözünürlük ve 16:9 en boy oranı.

İdeal olarak videoların aynı ayarlarla kaydedilmesini istemenize rağmen, sonraki adımda içe aktaracağınız çekim otomatik olarak az önce kurduğunuz en boy oranına uzar. Çekimlerinizin çoğu farklı en-boy oranlarına sahipse (örneğin, dikey videolarınız varsa) ve bunu sürdürmek istiyorsanız, proje için farklı ayarlar kullanmaktan çekinmeyin. Izgara boyutu hesaplamalarınızın örneğimizden farklı olacağını unutmayın.
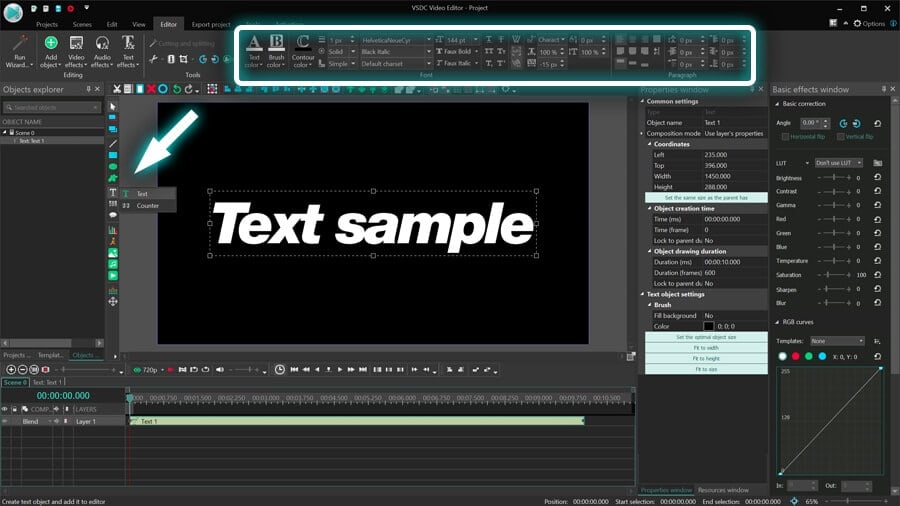
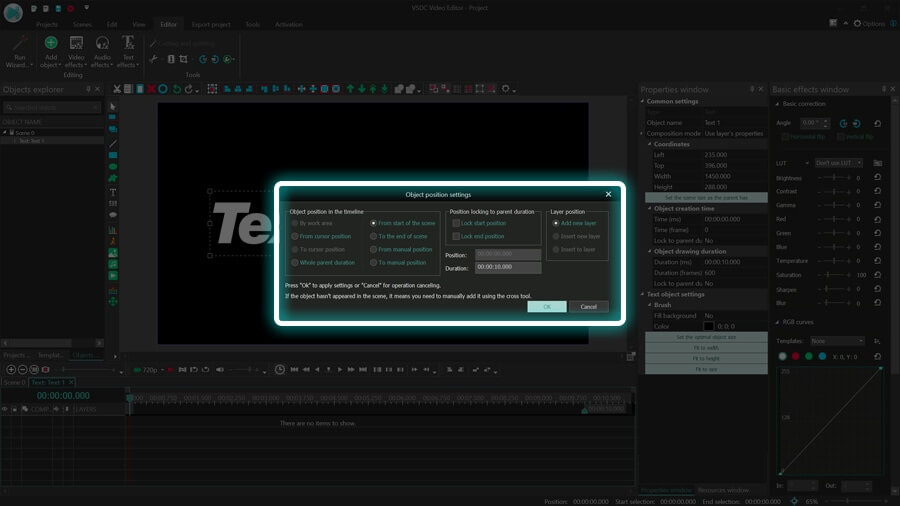
Adım 2. Tüm videolarınızı zaman çizelgesine yerleştirin
Bir sonraki adım, tüm çekimleri (ideal olarak 4 veya 9 dosya) düzenleyiciye aktarmaktır. Önce onu Kaynaklar penceresine ekleyebilir veya her şeyi doğrudan zaman çizelgesine sürükleyebilirsiniz. Hazır olduğunuzda, video dosyalarını birbiri ardına farklı parçalara yerleştirin ve sol tarafa hizalayın.

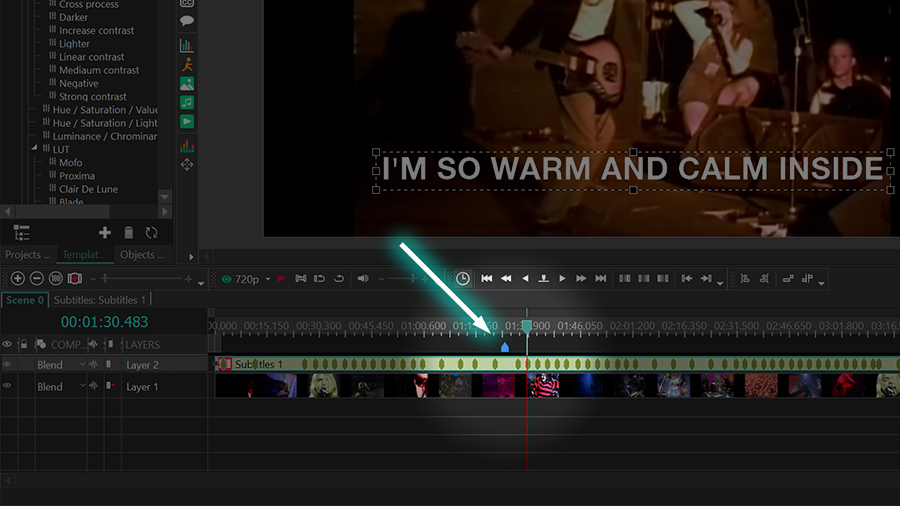
Adım 3. Video süresini ayarlayın (isteğe bağlı
Kılavuzdaki tüm videolar için aynı süreyi ayarlamak için hepsini zaman çizelgesinde seçin ve istediğiniz süreyi Özellikler penceresine manuel olarak yazın veya oynatma kafasını doğru anda yerleştirin, ustura aracını kullanarak bir kesim yapın. üstüne tıklayın ve istenmeyen kısımları silin.
Hızlı ipucu: Kullanabileceğiniz başka bir toplu ayar, renk filtreleridir. Örneğin, kılavuzdaki tüm videoların siyah beyaz olmasını istiyorsanız, bunları zaman çizelgesinde seçin, fareye sağ tıklayın ve Hızlı stiller → Gri tonlama’yı seçin.
Adım 4. Videolara gerekli boyutu uygulayın
Izgara efektini oluşturmaya başlama zamanı.
Zaman çizelgesindeki tüm videoları seçin ve Özellikler penceresine gidin. Koordinatları bulun → Genişlik. 2x2 video ızgarası için 960 yazın; 3x3 video ızgarası için 640 yazın. Ardından, zaman çizelgesinde videoya sağ tıklayın Boyutu Ayarla → Yüksekliği görüntünün en boy oranına göre ayarla'yı seçin. Son olarak, fare veya ok klavye tuşlarını kullanarak her videoyu sahnedeki konumuna sürükleyin.
Izgaradaki kliplerin genişliğini hesaplamak için orijinal sahne genişliğini yatay olarak düzenlenmiş kliplerin sayısına bölmeniz gerekir. Yani dört klibiniz varsa sahne genişliğini 2'ye bölmeniz gerekir; 9 videonuz varsa, sahne genişliği 3'e bölünmelidir; 16 videonuz varsa - 4'e kadar vb.
Bizim durumumuzda sahne genişliği 1920 piksel ve 1920/2 = 960'tır. Proje oluşturma aşamasında başka ayarlar seçtiyseniz, hesaplama yaparken bunları kullanmalısınız.
Hızlı ipucu. Bazı videolarınız orijinal olarak farklı bir çözünürlüğe veya en boy oranına sahip olsa bile, onları zaman çizelgesine eklediğinizde sahnenin varsayılan boyutuna uzarlar. Ancak, bazı videoların kenarlarında siyah çizgiler olduğunu fark ederseniz, bu dosyalara sağ tıklayın ve bunu düzeltmek için Kırpma araçları → Otomatik kırpma seçeneğini seçin.
Adım 5. Anahat efektini ekleyin (isteğe bağlı)
Izgarayı daha açık hale getirmek için sahnedeki her klibe bir çerçeve efekti ekleyebilirsiniz. Bunu yapmak için herhangi bir videoyu seçin, Video Efektleri menüsüne gidin ve Saydamlık → Kenarlıklar efektini uygulayın. Ardından Özellikler penceresindeki ayarları seçin:
- Mod → Sabit
- Konum →Tüm çerçeve
- Kenarlık boyutu → 3 piksel (anahatın ne kadar kalın olmasını istediğinize bağlı olarak daha küçük veya daha yüksek bir değer seçebilirsiniz)
- Renk→Beyaz

Anahatın görünümünden memnunsanız, Kenarlık efektinin katmanını kopyalayın, ızgaradaki sonraki videoyu çift tıklayın ve efekti yapıştırın. Kılavuzdaki tüm videolar için bu adımları tekrarlayın.
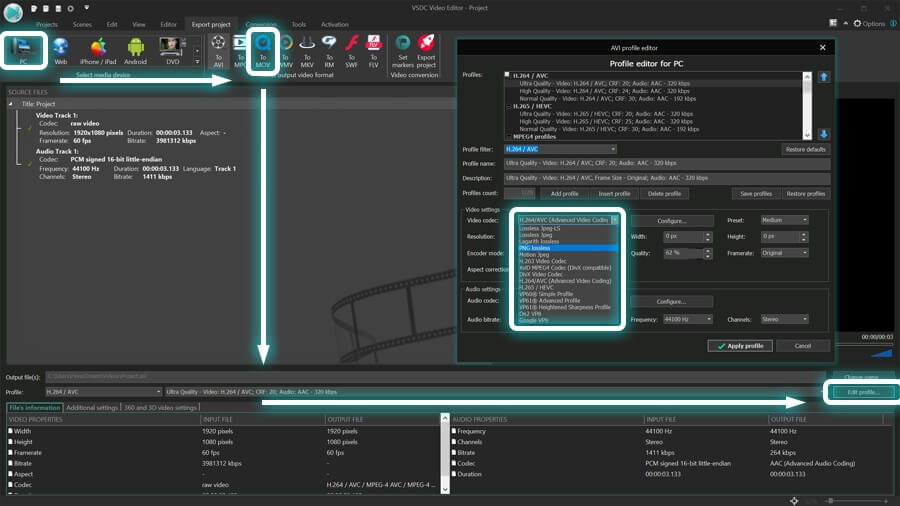
Adım 6. Projenizi dışa aktarın
Düzenlemeyi tamamladığınızda Projeyi dışa aktar sekmesine gidin. Videonun PC'lerde izlenmesi amaçlanıyorsa, PC'yi ve istediğiniz formatı seçin; videoyu çevrimiçi yayınlamayı planlıyorsanız, Web'i ve sosyal medya platformunu seçin.

Codec bileşenini, çözünürlüğü, kare hızını veya diğer parametreleri değiştirmeniz gerekirse, ön izleme penceresinin altındaki Profili düzenle menüsünü kullanın. Her şey hazır olduğunda programın üst menüsündeki Projeyi dışa aktar düğmesine tıklamanız yeterlidir.
Uygulamaya geçme zamanı
Video ızgarası efekti, müzik videolarında, TV şovlarında, reklamlarda ve vlog'larda kullanılan popüler bir efekttir. Biraz hayal gücü ile renk filtreleri ve bozulma efektlerini uygulayarak veya bazı videoların görünmesini veya kaybolmasını geciktirerek daha da ilginç görünmesini sağlayabilirsiniz.
Herhangi bir sorunuz var mı? Bize Bu e-Posta adresi istenmeyen posta engelleyicileri tarafından korunuyor. Görüntülemek için JavaScript etkinleştirilmelidir. adresinden e-posta gönderin, Facebook'tan bize ulaşın veya YouTube'da videoların altına yorumlarınızı paylaşın.


Bu program ile masaüstünüzün video videosunu çekebilir ve bilgisayarınıza çeşitli biçimlerde kaydedebilirsiniz. Bir video düzenleyiciyle eşleştirilmiş program, sunumlar ve demolar oluşturmak için idealdir.

Program, dış aygıtlardan video yakalar ve ücretsiz bir biçimde bilgisayara kaydeder. Video tarayıcılardan, web kameralardan, yakalama kartlarından ve diğer araçlardan da video kaydedebilirsiniz.

"VSDC Ücretsiz Video Düzenleyici her ne kadar alışılmadık bir video düzenleyici olsa da şaşırtıcı derecede güçlü"
- PC Advisor

"Bu video düzenleyici size tonlarca kontrol ve düzenleme gücü veriyor"
- CNet

"Bu video düzenleyici tüm popüler video formatlarını destekler ve çok çeşitli özelliklere sahiptir. Aydınlatma seviyesini değiştirebilir, videoları birleştirebilir, filtreler ve geçişler uygulayabilirsiniz"
- Digital Trends
© 2011-2025, www.videosoftdev.com, FLASH-INTEGRO LLC. Gizlilik politikası | Kullanım koşulları | Hakkımızda
Burada atıfta bulunulan tüm ticari markalar, ilgili sahiplerinin mülkiyetindedir.
Bu siteden herhangi bir materyalin kopyalanmasına yalnızca Site Yönetiminin yazılı onayı ile izin verilir.