 User Help Manual
 ")


- Pubblicato da Amy Shao il 30 giugno 2026 Scopri il nuovo grande a...
- Pubblicato da Amy Shao l’11 marzo 2026 Qual è il regalo migliore pe...
- pubblicato da Amy Shao 19/11/25 Ecco l'attesissimo aggiornamento VSDC 10.2: ...
- Ciao, sono Mattea Wharton, una videomaker di viaggi di Seattle. Per tre anni ho ...
Everything you need to know about making a cinemagraph in VSDC
Videos and images are fundamental assets of visual art in the digital era. Each has its own benefits and sometimes it’s hard to choose which format would be more suitable to convey the right emotion to the audience. This is where cinemagraph comes into play, allowing its advocates to make the best of image’s stillness and focus and at the same time enrich it with video dynamics for a more vivid picture.
In this tutorial, we will cover the most practical ways of creating a First things first: find the right softwareFirst things first: find the right software.
First things first: find the right software
Many people choose image editing software as a starting point for making a cinemagraph and end up covered in piles of Photoshop tutorials. We suggest an opposite approach and strongly recommend downloading VSDC Video Editor for three reasons:
- It is designed to work with motion videos and offers a number of video editing features, so it’s a better fit for cinemagraph than Photoshop;
- The software has a completely free version that doesn’t impose any limitations for our purposes;
- It doesn’t require much practice to become good at it.
How to make a cinemagraph: method #1
There are two ways to create a cinemagraph with VSDC. We’ll start with the free option first.
A video tutorial on Method #1 is available here:
- Open VSDC Free Video Editor.
- Select “Import Content” option in the main menu.
- Choose the video intended for cinemagraph from your desktop and click “Finish”. The Video will be added to the timeline.
- Use left-mouse click on the timeline to select the right moment in the video that you want to freeze and use as an image.
- Proceed to the “Cutting and splitting” tab in the top menu and select and wrench icon. In the drop-down list select the “Create snapshot” option. The image will be added to the resources window (under the “Images” section) on the right-hand side on the screen.
- Go back to the timeline and drag the time indicating “needle” to the very beginning of the video. This way the rest of the timeline items will be automatically added to the beginning of the clip.
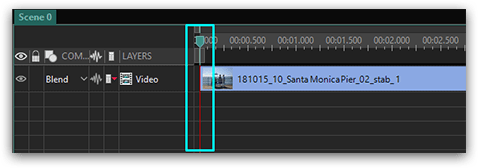
- Drag the snapshot to the preview area. It will automatically be added to the timeline.
- Choose the green “Add free shape” option in the left-hand side menu and press ok.
- Add the “Free shape” to the preview section by holding the left mouse button and dragging the mouse over the preview area.
- Double-click the “Free Shape” box on the timeline.
- Delete all the ShapePoints in the timeline.
- Proceed to the top menu, select the “Free Shape” tab and click the “Insert point” option.
- Use left mouse clicks to select exactly the area that you want to “come alive” in your cinemagraph.
- Go back to “Scene 0” in the left-hand side of the timeline.
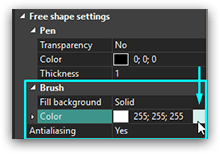
- Go to the “Properties” tab in the bottom right corner of the screen and select the black color for your free shape. Make sure you select the color under the “Brush” section, not under the “Pen” section.
- Right click the layer with your video on a timeline and choose “Cut”.
- Double-click the “Free Shape” box on the timeline.
- Proceed to the top menu, select “Video Effects --> Transparency --> Clipping”. The clipping box will be added to the timeline.
- Double-click the “Clipping” box.
- Use the right mouse click on the preview area and select “Paste”. You have now inserted the video in your Clipping object.
- Click the “Preview” button above the timeline to make sure you like the outcome.
- Proceed to the “Export project” tab in the top menu. Select the format and the location on your desktop where you want to place the cinemagraph.
- Finish the process by clicking the red “Export project” button in the same title tab.
Here is a graphic description of method #1. Basically, in this method, you are placing a free shape with a video inside it over a static image.

How to make a cinemagraph: method #2
Method #2 uses the mask feature. It is an option for cinemagraph, but it requires you to buy the Pro version. A video tutorial on Method #2 is available here:
- Repeat the first 6 steps from method #1.
- Left click on the preview area. This way you will deselect the video layer on the timeline and ensure that the new objects will be added to the front layer.
- Drag the snapshot to the preview area from the resources window. It will automatically be added to the beginning of the timeline.
- Double-click the newly appeared Image layer on the timeline.
- Choose the green “Add Ellipse” option in the left-hand side menu and press ok. You may also use the Rectangle option for your purposes.
- Add Ellipse by holding the left mouse button and dragging the mouse over the preview area.
- Place the ellipse in such a way that it covers exactly the area that you want to “come alive” in your cinemagraph.
- Go to the “Properties” tab at the bottom right corner of the screen and select the black color for your Ellipse. Make sure you select the color under the “Brush” section, not under the “Pen” section.
- On the left-hand side of the timeline menu click the “Blend” button on the ellipse layer and choose the “Mask” option.
- Click the “Preview” button above the timeline to make sure you like the outcome.
- Proceed to the “Export project” tab in the top menu. Select the format and the location on your desktop where you want to place the cinemagraph.
- Finish the process by clicking the red “Export project” button in the same title tab.
Here is a graphic description of method #2. Basically, in this method, you are cutting out a hole in the static image to see the background video through it.

The major difference between the methods is indicated in the table below.
|
|
Method #1 (free version) |
Method #2 (Pro version) |
|
How many layers are there on the scene? |
Two: Freeshape and Image (screenshot) |
Two: Video and Image (screenshot) |
|
What’s in the background layer? |
Image (screenshot) |
Video |
|
Which layer is edited? |
Layer with a Freeshape and a Clipping layer inside it. |
Layer with an Image |
|
Which effect is applied? |
Inserting a Clipping effect with a video inside of it in a Freeshape |
Inserting Ellipse or Rectangle with a MASK in the Image layer |
You are all set now. Select a preferable method and get down to cinemagraphing. Good luck!
Guardaci
 / @VSDCFreeVideoEditor
© 2011-2026, www.videosoftdev.com, FLASH-INTEGRO LLC. Tutela della privacy | Condizioni di utilizzo | Chi siamo
Tutti i marchi citati nel presente documento sono di proprieta esclusiva dei rispettivi proprietari.
La copia di qualsiasi materiale da questo sito e consentita solo con il consenso scritto dell'amministrazione sito.