 User Help Manual
 ")


Editor Video
L'editor video consente di modificare file e creare video di qualsiasi complessità. Potete applicare effetti video e audio effects ad oggetti modificati, trasformarli, applicare filtri e correzioni d'immagini. Tutti i popolari formati video e audio sono supportati (sia lettura che salvataggio).
Convertitore Video
Questo programma serve a convertire video file da un formato ad un altro. Quasi tutti i popolari formati video sono supportati. Inoltre, il programma semplifica drasticamente il compito di convertire video da riprodurre su determinati dispositivi multimedia quali iPhone, Microsoft Zune oppure Archos. Il programma è semplicissimo da usare, dispone di una moderna interfaccia e di tutte le necessarie funzioni per processare i video.
Convertitore Audio
Il convertitore audio vi aiuterà a convertire file audio da un formato ad un altro. Tutti i formati audio e codec chiavi sono supportati. Il programma vi consente inoltre di gestire playlist e meta tags, di estrarre audio dai file video e di salvare queste tracce sul vostro computer in qualsiasi formato.
Audiograbber
Questo strumento audio serve a catturare tracce audio dai CD e di salvarle nel computer dell'utente in qualsiasi formato. Quasi tutti i popolari formati e codec sono supportati. Il programma è inoltre in grado di estrarre dettagli di tracce dal server FreeDB al fine di rinominare automaticamente il file e di aggiornare i meta tag.
 Editor Video
 Convertitore Video
 Convertitore Audio
 Audiograbber

Versatilità
Più strumenti contemporaneamente per elaborare file video e audio in una singola applicazione.

Alta velocità
I nostri programmi
impiegano rapidi algoritmi di alta qualità per processori singoli a multipli.

Accessibilità
I nostri prodotti sono disponibili per essere scaricati gratuitamente su tutti i computer e dispositivi che supportano i sistemi operativi Windows.
Notizie:
- VSDC 9.2 è qui e offre funzionalità rivoluzionarie, come il nuovo strumento di s...
- Lavorare con l'animazione 3D è una delle competenze più impegnative dell'arte co...
- Siete appassionati di film classici in bianco e nero? Vi siete mai chiesti come...
- È giunto il momento: siamo felici di presentarvi l'attesissimo aggiornamento VSD...
Come applicare effetto di Bokeh alla vostra foto o video con VSDC
Bokeh è un effetto visuale splendido che richiede una tecnica di ripresa speciale. Per ottenere lo sfondo famoso dolce sfocato dovrete usare una lente particolare e cambiare le impostazioni della vostro camera per assicurarvi che la luce dietro l’oggetto che state registrando è fuori fuoco.
Sembra facile? Va bene, per quelli con qualche esperienza (e una camera buona) è realizzabile. Però ci sono molte situazioni quando avete bisogno di applicare l’effetto di Bokeh dopo la giornata di riprese è finita. Ad esempio, forse non avete trovato la posizione giusta con la quantità giusta della luce lampeggiante nello sfondo. Forse lottate per trovare le lenti della camera giuste. O forse decidete solo che volete usare l’effetto quando avete già registrato il video.
Non importa quale causa è VSDC è qui per salvare! Vi permette di applicare l’effetto di riflesso di Bokeh rapidamente a qualsiasi video o immagine gratis. Inoltre sarete capaci di personalizzare l’effetto e cambiare la forma, la dimensione, il colore, la densità e i movimenti di riflesso. Vedetelo di persona:
Nella guida sotto vi mostreremo come lavorare con l’effetto di Bokeh in VSDC per raggiungere l’aspetto desiderato.
Senza ulteriori indugi iniziamo subito.
Scaricare VSDC video editor gratis per Windows
Come applicare effetto di Bokeh a un video in VSDC
Per cominciare lancate VSDC, importate il vostro filmato usando il pulsante Importare contenuto sulla schermata iniziale. Poi seguite questi passi:
- Assicuratevi avete postato il cursore all’inizio della cronologia se volete che l’effetto apparisca dall’inizio del video.
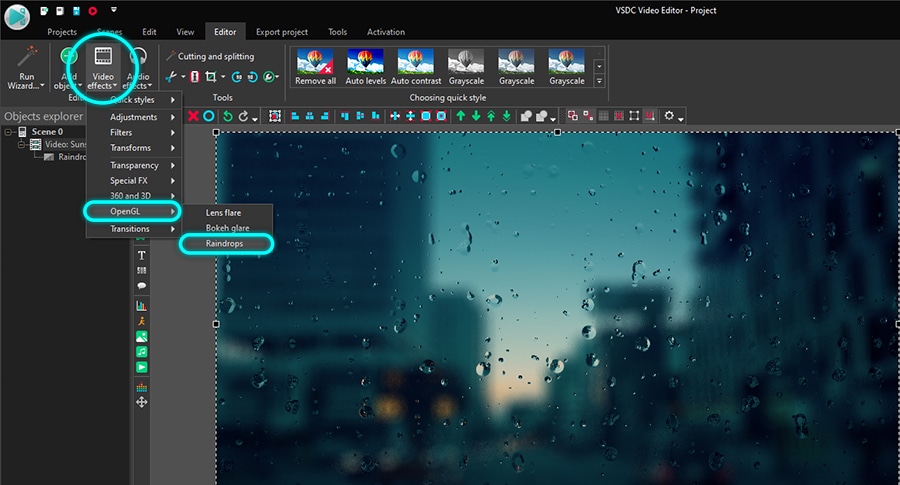
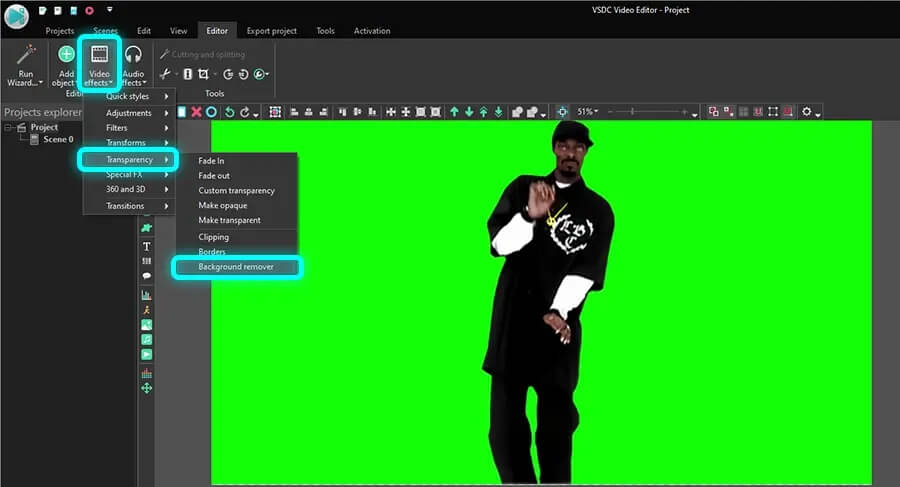
- Fate un clic sinistro al file video e aprite il menù Effetti di video.
- Passate alla categoria AprireGL e scegliete Riflesso di Bokeh.
- Nella finestra Impostazioni della posizione dell’oggetto colpite OK.

Noterete i riflessi di luce ai lati della scena - questo è l’effetto di Bokeh applicato automaticamente (guardate l’immagine sotto). Forse non è denso o luminoso come avete anticipato però questo è solo il punto di partenza.
Adesso vediamo come potete modificare l’effetto per ottenere l’aspetto desiderato dei riflessi.
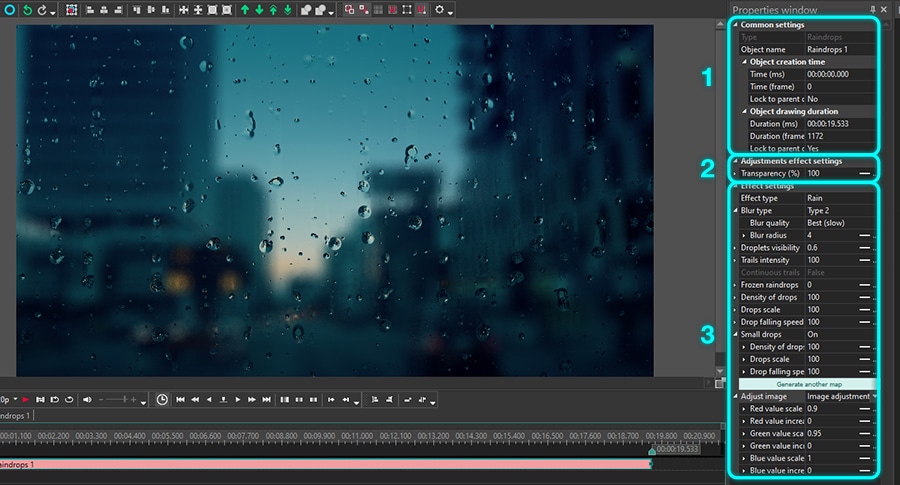
Descrizione della finestra proprietà
Per avere accesso alle impostazioni fate un clic sinistro allo strato dell’effetto e scegliete Proprietà. La finestra Proprietà scivola dal lato destro.
Ci sono quattro gruppi delle impostazioni disponibili per questo effetto:
- Impostazioni comuni
- Impostazioni per regolare effetto
- Impostazioni dell’effetto
- Impostazioni di riflesso

. Idue primi gruppii di parametri sono comuni per tutti gli effetti in VSDC.
Impostazioni comuni vi permettono di aggiungere un titolo allo strato dell’effetto, mettere il momento quando l’effetto apparirà nel video (da secondi o da frame) e la durata dell’effetto (in secondi o in frame).
Impostazioni per regolare effetto vi permettono di scegliere il livello della Trasparenza per l’effetto di Bokeh. Notate che potete mettere lo stesso livello della trasparenza per tutta la durata dell’effetto o potete farlo crescere/diminuire gradualmente al livello desiderato.
Se decidete di prendere la seconda strada il Valore iniziale e il Valore finale del parametro della Trasparenza devono essere diversi. Pensateci come degli effetti di fade-in e fade-out. Ad esempio, ecco qui come sarà se mettiamo il Valore iniziale a 100% (non trasparente completamente) e il Valore finale a 10%:
Gli ultimi due gruppi delle impostazioni nella finestra Proprietà vi permettono di lavorare con gli elementi di Bokeh direttamente. Daremo un’occhiata da vicino.
Descrizione delle impostazioni dell’effetto
Quando applicate l’effetto noterete una croce nel centro della zona libera (l’area nel centro dell’effetto che è libero dai riflessi). Prendete la croce con il mouse e usatela manualmente per cambiare la posizione dell’effetto. Però se volete postarla più precisamente potete farlo con i parametri seguenti.
Coordinati polari è il primo parametro in questo gruppo. Vi permette di regolare la posizione dell’effetto di Bokeh nella scena usando il sistema dei Coordinati polari. Assicuratevi che è cambiato a Vero prima di cambiare le impostazioni e tenete a mente che il polo (il punto con i coordinati 0;0) sarà situato nel centro della scena. Se disattivate i Coordinati polari (cambiate la modalità a Falso) il polo sarà situato nell’angolo sinistro superiore.
Usando i Coordinati polari sarete capaci di regolare i parametri chiamati Angolo e Distanza. In breve Angolo definisce la direzione dove volete spostare la zona libera e Distanza definisce quanto lontano sarà spostata.
Notate che quando la Distanza è uguale a zero, la zona libera rimarrà nel centro della scena senza riguardo l’angolo. Quando il parametro della Distanza è più di zero e cominciate a cambiare l’angolo, la zona libera muoverà in senso orario.
Ad esempio:
- Se l’angolo = 90, la zona libera sposterà giù
- Se l’angolo = 180, la zona libera sposterà a sinistra
- Se l’angolo = 270, la zona libera sposterà su
- Se l’angolo =360, la zona libera sposterà a destra
Forse volete usare gli assi X e Y per cambiare la posizione dell’effetto nella scena. In questo caso cambiate i coordinati polari a Falso e usate i parametri chiamati Centro X e Centro Y.
Il parametro seguente è intitolato Applicare effetto ad aura. Prima di tutto in caso se non avete saputo «aura» è l’area che comincia con il circolo dei riflessi e diffonde ai bordi della scena.
Anche se non contiene necessariamente i riflessi dappertutto è una parte dell’effetto e avete controllo com’è. Specificamente VSDC vi permette di cambiare il raggio e l’aspetto dell’aura. Ad esempio, potete scegliere una delle opzioni seguenti dal menù a discesa Applicare effetto d’aura:
- Copiare - ogni oggetto nel filmato che cade nella zona di ‘aura’ è duplicato
- Sfocare - tutto nella zona di ‘aura’ è sfocato
- Sfocatura radiale - effetto di sfocatura radiale è applicato al filmato nella zona di ‘aura’
- Nessuno - non c’è aura
Potete anche cambiare il Raggio di aura e la Potenza di aura. Il raggio di aura controlla il raggio dell’area dentro l’effetto. Cambiando la sua dimensione cambiate automaticamente il raggio dell’aura.
La potenza di aura aumenta l’effetto che avete scelto un passo prima. Ad esempio, se avete scelto ‘Sfocare’ il valore più alto della Potenza di aura causa più sfocatura.
Aura scura è un parametro che definisce quanta scura l’aura deve essere con il valore massimo a 100.
Se scegliete di scurire l’aura, l’opzione Oscuramento liscio vi permette di ottenere un effetto sfumato che comincia nella zona libera e continua alla fine dell’aura. Il valore più alto causa il gradiente più liscio.
Numero di riflessi è un parametro chiamato appropriatamente che controlla il numero di riflessi di Bokeh nel video. È usato tipicamente insieme con Diffusione minima e Diffusione delta.
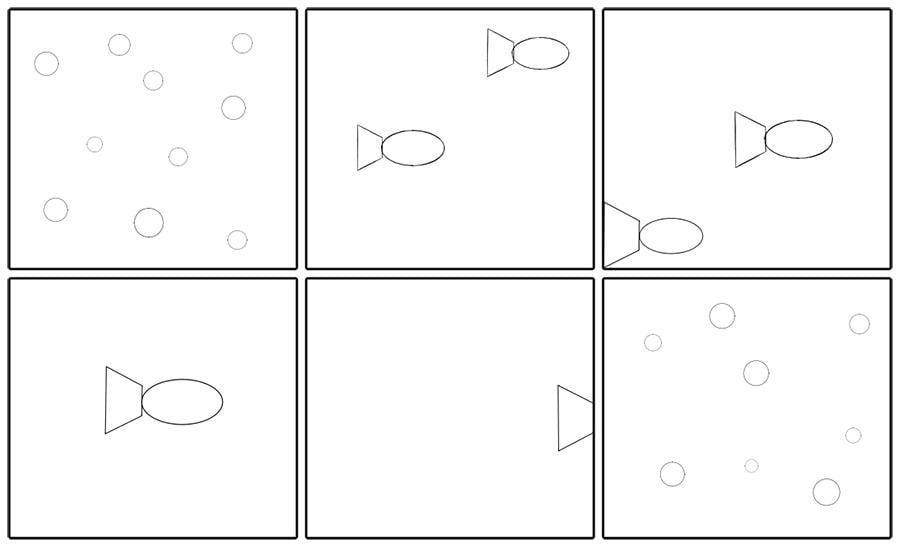
Il parametro della Diffusione minima mette la distanza minima tra la zona libera e i riflessi. Notate come i riflessi muovano più lontano dalla zona libera quando aumentiamo questo valore:
Nel frattempo il parametro Diffusione delta mette la gamma possibile per il valore Diffusione minima. Se la Diffusione delta è uguale a 0, tutti i riflessi saranno situati alla distanza della diffusione minima dalla zona libera. Nell’esempio sotto aumentiamo gradualmente il valore della Diffusione delta. Notate come la densità dei riflessi nella scena diminuisce.
Notate che se volete cambiare il modo come i riflessi sono diffusi potete anche farlo colpendo il pulsante verde chiamato Generare altra mappa.
Il parametro del tipo di rotazione di riflesso fissa la rotazione dei riflessi intorno alla zona libera. Ci sono quattro tipi di rotazione disponibili da scegliere:
- Nessuna rotazione
- Rotazione in senso orario
- Rotazione in senso antiorario
- Direzione casuale
Notate che se scegliete qualsiasi tipo di rotazione potete anche fissare la Velocità di rotazione massima e minima.
Effetto di Bokeh: impostazioni di riflesso
L’ultimo gruppo delle impostazioni vi aiuta di personalizzare l’aspetto dei riflessi. Include una manciata di parametri legati alla dimensione, alla forma, al colore, alla luminosità e ai movimenti dei riflessi. Molti di loro vi permettono di fissare un cambio dinamico dei valori usando la differenza tra il Valore iniziale e il Valore finale.
Noterete anche che molti parametri includono i valori massimo e minimo. La causa è che i riflessi esposti a qualsiasi momento non devono essere uguali. Come il risultato i valori massimo e minimo sono casualmente assegnati ai riflessi e questo produce l’illusione della luce scintillante nello sfondo.
Adesso rivediamo le vostre opzioni una dopo l’altra
Dimensione di riflesso minima/massima - questo parametro deve suonare auto-esplicativo. Vi permette di fissare le dimensioni dei riflessi minime e massime possibili. Questo significa che il vostro effetto di Bokeh includerà i riflessi diversi però nessuno di loro sarà più piccolo del precedente o più grande dell’ultimo.
Ogni riflesso nell’effetto ha la sua durata di vita limitata. Il parametro intitolato TTL minimo/massimo vi permette di difinire la durata minima e massima possibile della vita per ogni riflesso. Quando i riflessi raggiungono il suo limite del tempo scompariscono dalla scena e sono sostituiti con i riflessi nuovi.
La luminosità dei riflessi minima/massima - questo parametro è anche auto-esplicativo. Insieme con il valore che fissate è limitato dal livello della Trasparenza che avete scelto nel gruppo delle impostazioni precedente.
Se volete che tutti i riflessi comincino ad esporre al livello minimo della luminosità (al contrario del livello della luminosità casuale) fissate Vero per questo parametro chiamato Cominciare dal valore minimo.
Allo stesso modo potete decidere se volete che i riflessi siano dello stesso colore quando cominciano ad esporre o di colori diversi. Se fissate Usare colori casuali -> Falso sarete capaci di scegliere il Colore di riflesso e fissare la Deviazione di colore. L’ultimo parametro definisce quanto lontano il colore può deviare dal tono originale.

Se non vi piacciono i riflessi esagonali automatici ci sono tre opzioni della Forma di riflesso per voi: un circolo, un cuore e una stella. La forma della stella è più personalizzabile. Se scegliete questa forma potete anche fissare i parametri seguenti:
- Numero dei punti della stella
- Raggio di stella esterno
- Raggio di stella interno
Oltre al colore e alla forma potete scegliere di riempire i riflessi in modi diversi. Ci sono quattro Tipi per riempire disponibili: solido, liscio, centro e punto. Solo cambiate tra i tipi per riempire disponibili e guardate i risultati nella finestra d’anteprima.
La Potenza di fade out è una scala da 0 a 100 che vi permette di applicare l’effetto di fade-out liscio ai riflessi. Quando è uguale a 0, l’effetto di fade-out è assente. Quando aumentate il valore, la fonte di luce dentro i riflessi muove dal centro e crea un effetto di dissolvenza.
Finalmente l’ultimo parametro è chiamato la Nitidezza di riflesso. Quando lo cambiate potete cambiare la forza della nitidezza della fonte di luce dentro i riflessi. Come il risultato quando il valore è più alto il raggio di luce diventa più grande.
Effetto di riflesso di Bokeh non è solo per i video romantici
Adesso sapete i dettagli come applicare l’effetto di Bokeh ai video, tenete a mente che è più versatile che avete pensato. Non limitatevi con il genere romantico.
Ad esempio anche se è considerato tradizionalmente un effetto per una giornata di riprese notturna, può essere un’aggiunta perfetta al video o al foto di giorno. Non è solo gli sfondi! Provate di ridurre la luminosità del riflesso e usate l’effetto anche come il primo piano.
Permettete la vostra creatività di rilevare ed sperimentare con lo strumento nuovo. Avete bisogno di qualche ispirazione? Guardate il nostro canale su YouTube. Pubblichiamo settimanalmente le guide per tutti i livelli d’esperienza e certamente troverete molte idee.


Altri articoli...
- Come montare video di gioco. Guida passo dopo passo, pratiche migliori e video editor per gioco gratis esaminati
- Come sincronizzare video effetti a beat di musica in VSDC Pro
- Superate effetto di transizione della pagina voltata con VSDC video editor gratis
- Come creare un effetto di ombreggiatura per il testo o per gli oggetti in video

Con questo programma è possibile registrare i video dal desktop e salvarli sul computer in diversi formati. Insieme al video editor è ideale per creare presentazioni e demo.

Il programma serve per catturare video da dispositivi esterni e e per registrarli sul computer in qualsiasi formato video. Potete salvare il video da sintonizzatori video, webcam, schede di acquisizione e vari dispositivi.

"VSDC Free Video Editor is a surprisingly powerful, if unconventional video editor"
- PC Advisor

"This video editor gives you tons of control and editing power"
- CNet

"The editor handles many common formats and boasts a good deal of capabilities when it comes time to alter lighting, splice video, and apply filters and transitions in post production"
- Digital Trends
© 2011-2024, www.videosoftdev.com, FLASH-INTEGRO LLC. Tutela della privacy | Condizioni di utilizzo | Chi siamo
Tutti i marchi citati nel presente documento sono di proprieta esclusiva dei rispettivi proprietari.
La copia di qualsiasi materiale da questo sito e consentita solo con il consenso scritto dell'amministrazione sito.