- pubblicato da Amy Shao 19/11/25 Ecco l'attesissimo aggiornamento VSDC 10.2: ...
- Ciao, sono Mattea Wharton, una videomaker di viaggi di Seattle. Per tre anni ho ...
- published Amy Shao 6/10/25 L'attesa per qualcosa di nuovo e straordinario è ...
- Questa stagione festiva inaugura nuovi inizi con l'ultimo aggiornamento di VSDC ...
How to make a voice over video in VSDC
In the era of YouTube, when online blogging and production of video tutorials on just about anything has become commonplace, it’s vital for aspiring clip makers to master the skill of voice over video. Even if you are not planning to become a YouTuber, you become well aware of those cases when you see that your vacation footage was ruined by chattering crowds, wind gusts, etc. One way to resolve the problem is to replace the defective sound with a nice tune. But what if you want to bring a more personal touch and record your own voice while impressions are still fresh and lively?
Download VSDC Free Video editor that allows you to do so in two ways: an easy one and a free one. Below, we’ll review both, guide you through the main steps, and explain the difference between the two.
How to do voice over video in VSDC: the easy way
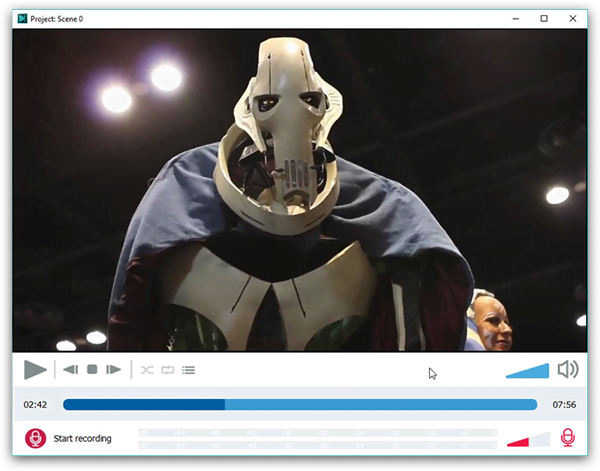
VSDC has an intuitive built-in voiceover tool that allows you to quickly add audio comments to your videos without having to deal with complex settings of any kind. See it for yourself in the video guide below.
Here is what you have to do in a nutshell:
- Import your video to the timeline using the “Add Object” dropdown menu.
- Click the wrench icon to select the voiceover tool.
- Play-pause the video to choose the part that needs audio comments. Use the “Start Recording” button whenever a voice comment needs to be added. Use the “Stop Recording” button to end the recording. Record as many items as necessary. Note: the recording will only start when you hit the play button. When the video is paused – your voice won’t be recorded.

- When you are done with your comments, close the voiceover tool window. A pop-up window will appear asking for confirmation to add recorded files to the timeline. Click “Yes”.
- Your audio comments will automatically be added to the timeline exactly where you wanted them to be. No manual action needed.
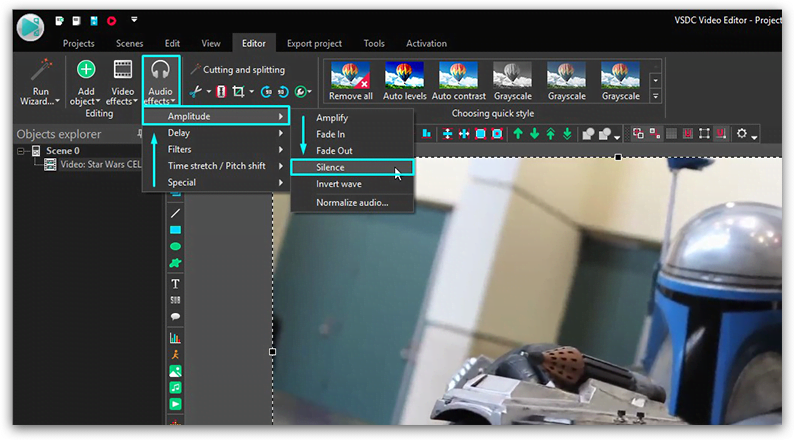
- If you want to mute original video soundtrack, right-click your video on a timeline and go to “Audio Effects --> Amplitude --> Silence”.
- Double-check the result by clicking the red play button right under the preview window. If everything is fine, complete the process by clicking the red “Export project” button on the same title tab.
Please note, that the voiceover tool is only available with the PRO version of VSDC editor which is offered for $19.99 per year. If you are looking for a free way to record your voice over a video, follow the instructions below.
How to create a voiceover video in VSDC: the free way
VSDC wouldn’t be called a free editor unless it offered a free way to record voice over video. Here is a detailed instruction:
- Open VSDC Free Video Editor and click “Import Content” to import the video that you intend to give voice to.
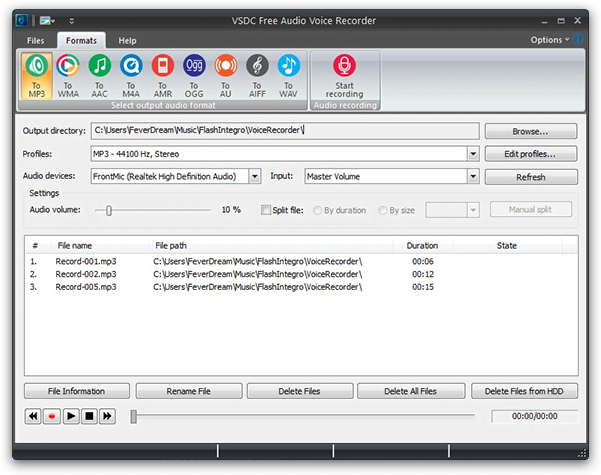
- Proceed to the “Tools” tab at the top menu and select the “Voice Recorder” tool. A new window will open.

- Choose the desired format of your voice recording in the “Formats” tab.
- Proceed to the lower sections of the menu to select the output file destination, its quality, and the device you will use for recording.
- Place a checkmark in the “split file” section, if you are working with a really long video. This way your output audio will be split into several recordings. It will come in handy during the matching of your recording with the video. Mistiming can’t be fixed with a single audio file in place, so having multiple files will help you perfectly adjust your sound and video tracks.
- Select the duration of your audio chunks in the drop-down menu on the right depending on the length of your video.
- Press the “Start Recording” button at the top right corner of the screen. Launching your video in a separate window might be a good idea too. You want to know what you are commenting, right? Press “Stop Recording” when you are ready and close the “Voice Recorder” window.
- Go back to VSDC video editing window with your imported video. Right-click your video on a timeline and go to “Audio Effects --> Amplitude --> Silence”. This will silence the original soundtrack of your video.

- Go to the “Editor” tab, select “Add Object” and choose “Audio” from the drop-down list. Now proceed to the location on your computer where you saved you recordings, import them to the timeline and use drag-and-drop motion to place them in line with the video segments they are intended for.
- Double-check the result by clicking the red play button right under the preview window. If everything is fine, complete the process by clicking the red “Export project” button in the same title tab.
Wrap-up
As you have probably noticed, both methods lead to the same result: your recorded audio files placed beside your video on a timeline in the correct sequence. The only difference is, with a free method, you have to manually record, import and position them. With an easy method, manual work is taken out of the equation, making voice over videos much faster. Which one is better? You tell us :-)