 User Help Manual
  Learn FAQ
  Send us feedback
 ")


- Published by Amy Shao on March 11, 2026 What is the best gift for...
- published Amy Shao 11/19/25 Meet the long-awaited VSDC 10.2 update: a new ve...
- Hi, I'm Mattea Wharton, a travel videographer from Seattle. For three years I ba...
- published Amy Shao 6/10/25 The wait for something new and unusual is finally...
The ultimate guide to working with Glitch effect in VSDC
Glitch effect is one of the hottest videography trends right now. It’s widely used in music videos, video games, movies – you name it. And it’s not surprising given how cool distorted videos look!
Digital distortion makes a video more dynamic and creates an illusion of ephemerality. But not all glitch effects are created equal. Sometimes you may not achieve the desired result just by applying a standard filter. First, there are many distortion variations – and each one creates its own unique effect. Second, sometimes you might want to customize the effect by switching the glitch type and adjusting its intensiveness.
If you’re serious about learning the art of digital distortion, VSDC is the best free video editor for that purpose. Not only will you be able to quickly add a glitch effect to a video, but you’ll also be able to adjust the distortion manually. In the tutorial below, we’ll show you exactly how to do it.
Download VSDC Free Video Editor
So, the Glitch effect typically imitates software errors or a bad signal, and results into picture tearing, static noise, etc. Usually, it looks like:
- Wavy image distortion.
- Frozen frames.
- Inverted colors.
Let’s take a closer look at how the Glitch effect works in VSDC.
How to apply a glitch effect to a video in VSDC
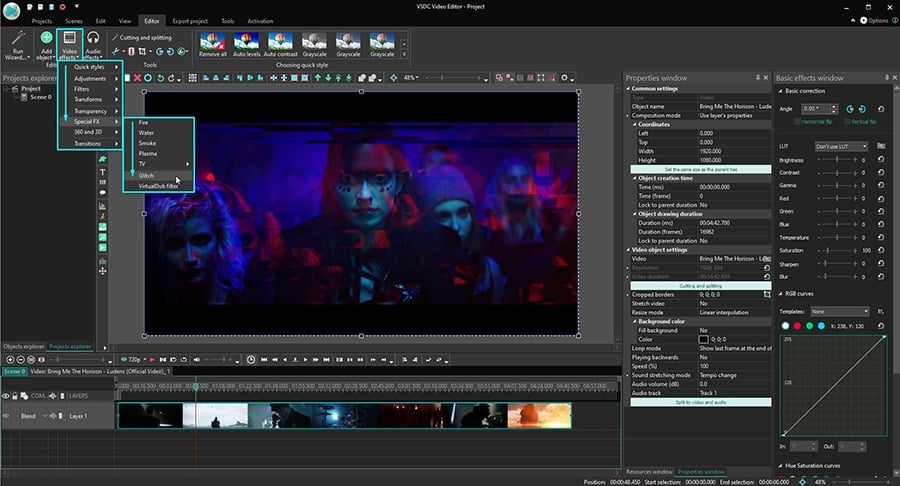
Once you’ve downloaded and launched the editor, import the video you want to distort. To apply the Glitch effect, follow three easy steps:
- Open the “Video Effects” menu.
- Go to the “Special FX” section and select “Glitch”.
- In the “Object position settings” pop-up window, press OK.
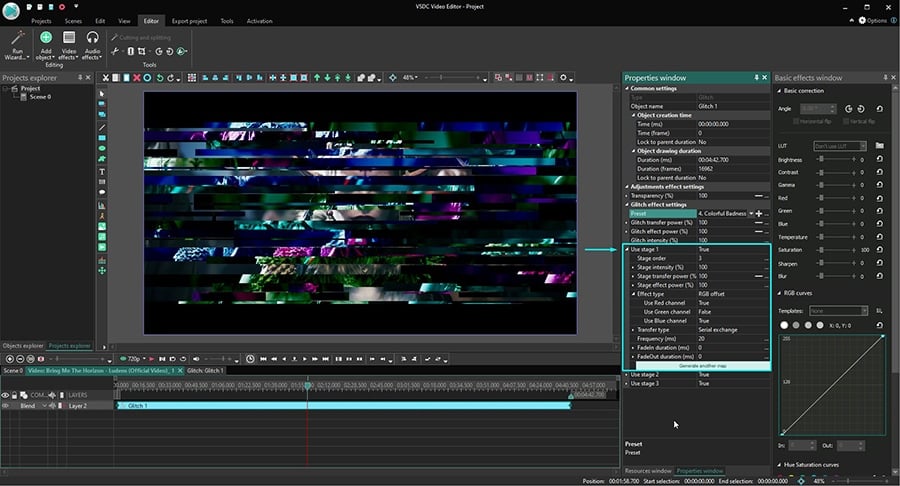
This way, you’ve just applied one of the default glitch presets to a video. VSDC has 8 different presets – each one creates a unique effect. To choose another one, go to the Properties window on the right-hand side and find the “Glitch effect settings” window. Select any preset and check the preview window for a real-time result. You can always tweak the parameters and create your own custom preset.
For instance, this is how the same video may look when you apply different default Glitch presets to it:
If you’re happy with the result, just go ahead and save the video using the “Export project” tab.
However, if you want to precisely adjust the effect, we will show you how to do it below. You’ll learn what every Glitch effect parameter is responsible for, and how to adjust the distortion by changing its type and intensiveness.
Glitch effect settings in VSDC: getting started
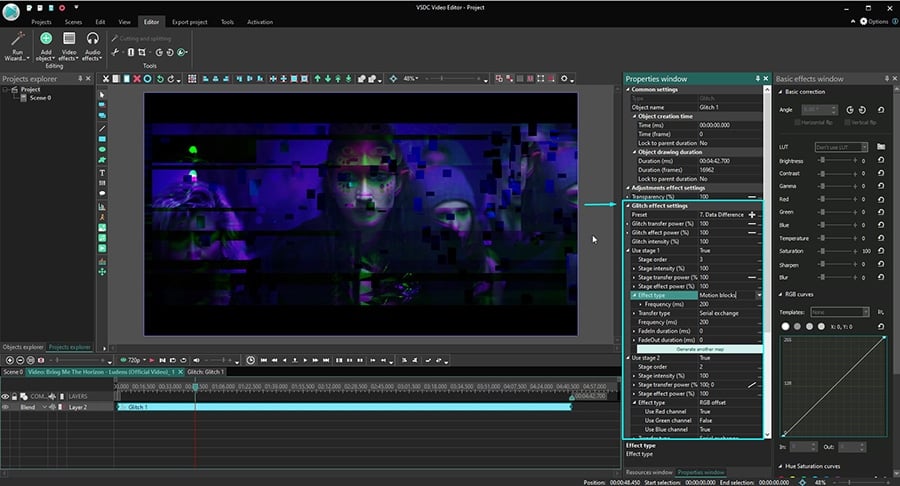
To get started, make a right mouse click on the Glitch effect layer on the timeline and select “Properties” from the menu.
Go to the “Properties window” on the right-hand side and find the “Glitch effect settings” menu. Apart from the above-mentioned presets, you’ll see 6 parameters:
- Glitch transfer power (%)
- Glitch effect power (%)
- Glitch intensity (%)
- Use stage 1
- Use stage 2
- Use stage 3
In this context, a stage means the processing stage, and every processing stage contains a one distortion effect type. Distortion types include RGB offset, motion blocks, pixels shift, and more. You’ll find all the options in the dropdown menu titles “Effect type”. And if a stage can only include one distortion effect - Glitch is actually a combination of stages.
In other words, a Glitch effect in VSDC is a unique composition of various distortion types.
Glitch effect can include from one to three processing stages - each containing a unique distortion. Those distortion effects can be applied to a video simultaneously or one after another. Note, that if you change any Glitch parameter (Glitch transfer power, Glitch effect power, Glitch intensity), you consequently apply the adjustment to all stages.
Common effect settings
If you’re an aspiring creator, VSDC is a great choice for many reasons. One of them is the ability to fine-tune almost every single parameter manually. For example, VSDC allows you to set up the moment the effect appears in the video as well as the duration of the effect.
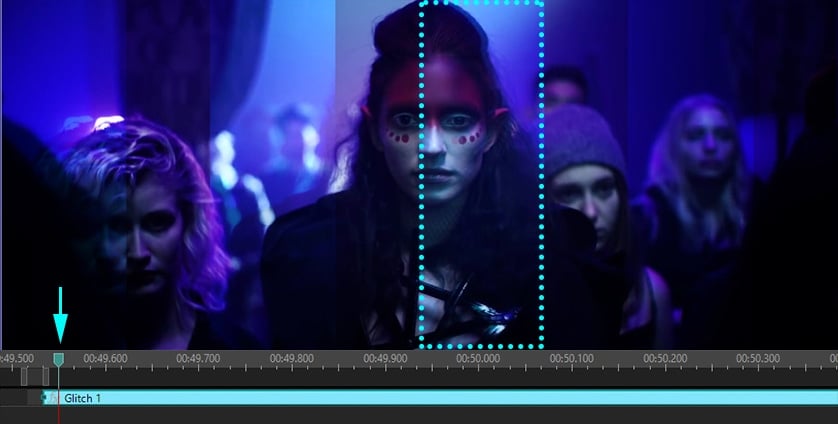
To do that, use the “Common effect settings” in the Properties window. The “Object creation time” parameter enables you to define the appearance of the effect precisely by frames or milliseconds. And the “Object drawing duration” parameter helps select the duration of the effect.
Glitch effect parameters reviewed in details
Time to go back to the Glitch effect. As we’ve mentioned earlier, there are eight ready-to-use presets and the ability to create your own. As soon as you change any default parameter, you create a new preset that gets named by its order number – Glitch 9, Glitch 10, etc. Later, you’ll be able to save and rename it.
Before we start reviewing the parameters, let’s break down the video distortion process in VSDC and see how exactly it works.
When you apply the Glitch effect to a video in VSDC, the software breaks every video frame into segments or blocks. Think of them as reflection blocks because every block reflects some element in the video frame. By altering the distance between blocks, changing their number and the level of opacity, you can control the way distortion looks.
Going back to the Glitch effect parameters, there are three of them in the main menu:
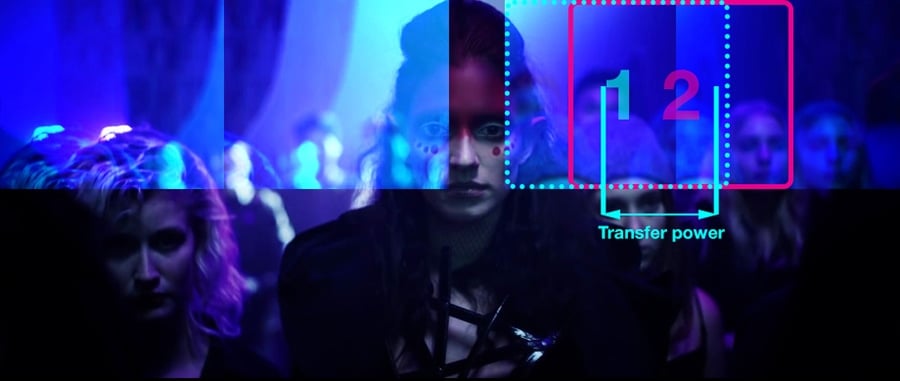
- Glitch transfer power (%) either shifts blocks closer to the elements they reflect or moves them further away from each other. The higher the value – the further blocks are. If the value for this parameter is 100%, the distance between the blocks and the elements is maximum and equal to ¼ of the frame width.
- Glitch effect power (%) defines the level of opacity applied to the reflection blocks. If its value is 0%, blocks are absolutely transparent. If the value is 100%, blocks are completely non-transparent.
- Glitch intensity (%) sets the number of blocks appearing in the frame. When the intensity is 100%, the maximum possible number of blocks are displayed. If the intensity value is 0%, none of the blocks will be displayed.
By playing with these parameters, you can fully control the number of reflection blocks, their level of opacity, and how far they are placed from the reflected elements.
Moreover, you can apply a dynamic change to any of these parameters. That means that the value will gradually change as the video is playing. For example, blocks can be a bit more transparent at the beginning of the video, and non-transparent – at the end of it. To achieve dynamic change, the “Initial value” and the “Final value” parameters in the menu should be different.
How to work with Glitch effect processing stages
The next level of settings is “stages”. You’ll find three processing stages in the menu, and each contains a distortion effect: RGB offset, random color filling, pixels shift, and others. You can use up to three different stages in one Glitch effect and create a unique composition that will be available as a custom preset.
By default, the “Use stage 2” and “Use stage 3” parameters are checked as “False”. That means the effect currently uses only one processing stage. If you want to add stages, simply switch “False” to “True”.
At the stage level, you get to work with the following parameters:
- Stage order
- Stage intensity (%)
- Stage transfer power (%)
- Stage effect power (%)
- Effect type
- Transfer type
- Frequency
- Fade in duration
- Fade out duration
Let’s take a close look at each parameter.
Stage order allows you to change the order of processing stages by applying order numbers to them. This setting is relevant only if you’re using more than one stage. If the stage order value is “0”, the stages will go one after another in default order: stage 1, stage 2, stage 3.
Stage intensity (%) defines the number of reflection blocks in a frame. Stage intensity is calculated as a percentage of Glitch intensity. In other words, if Glitch intensity is 50%, and Stage intensity is 50%, then the number of blocks will be 25% from the maximum – because 50% х 0,5 = 25%.
Delta value here is an interval between the minimum and maximum possible number of blocks. This parameter defines the stage intensity that will be randomly selected at different moments throughout the playback. When the delta value is zero, the minimal and the maximum stage intensity values are equal.
The calculations of the minimum and maximum go as follows:
Max. value = Stage intensity value;
Min value = Stage intensity - (stage intensity x delta value).
For instance, if Glitch intensity is 50%, stage intensity is 50%, and delta value is 20%, during the playback you’ll see between 20% and 25% reflection blocks from the maximum possible number.
Here are the calculations for this example:
Max. stage intensity = 50%
Min. stage intensity = 50%-(50%*0.2) = 40%
Max. Glitch intensity = 50%*0.5 = 25%
Min. Glitch intensity = 50%*0.4 = 20%
Stage transfer power (%) defines how far the blocks are shifted from the elements they reflect.
Stage transfer power is calculated as a percentage of Glitch transfer power. For instance, if Glitch transfer power is 50%, and stage transfer power is 50%, the distance between reflection blocks and the element they reflect will be 25% from the maximum – where the maximum is ¼ of frame width.
Stage transfer power has three additional parameters:
- Initial value
- Final value
- Delta value
The initial value defines the distance between reflection blocks and reflected elements for the beginning of playback. Final value – as the name suggests – defines the distance for the end of playback. Delta value sets up the interval between the maximum and the minimum possible block shift that will be happening randomly during the playback.
The maximum value here is equal to the value you set for the “stage transfer power” parameter. The minimum value can be calculated with the following formula:
Stage transfer value – (Stage transfer value x Delta value)
Stage effect power (%) enables you to set the desired level of opacity for reflection blocks.
Stage effect power is calculated as a percentage of Glitch effect power. For instance, if the Glitch effect power is 50%, and Stage effect power is 50%, then the level of opacity will be 25% (because 50% of 50% is 25%). 0% would mean that blocks are absolutely transparent, and 100% would mean that they are completely non-transparent.
Just like with the stage transfer power settings, VSDC allows you to set the opacity of reflection blocks differently for the beginning and the end of playback.
Effect type is a dropdown menu with 12 distortion effect types you can choose from.
Transfer type defines the way reflection blocks are placed in the frame. It includes four options:
- Serial exchange – blocks appear in plain sequence one after another based on their size and the distance between them.
- Symmetric exchange – blocks are displayed symmetrically based on their parameters.
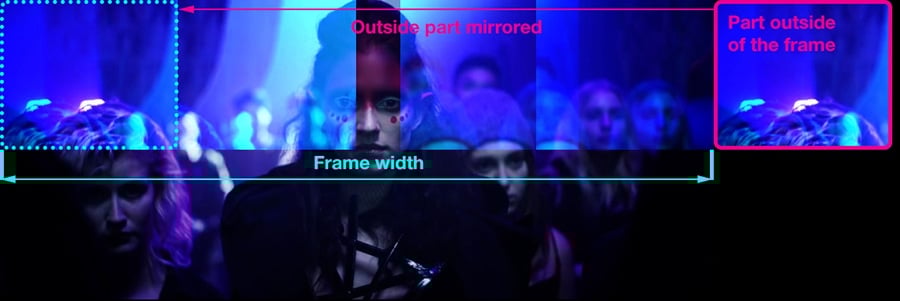
- Copy with mirror edges – blocks are mirrored. If a part of any block falls outside of the frame, that part is copied and displayed on the opposite side of the frame:
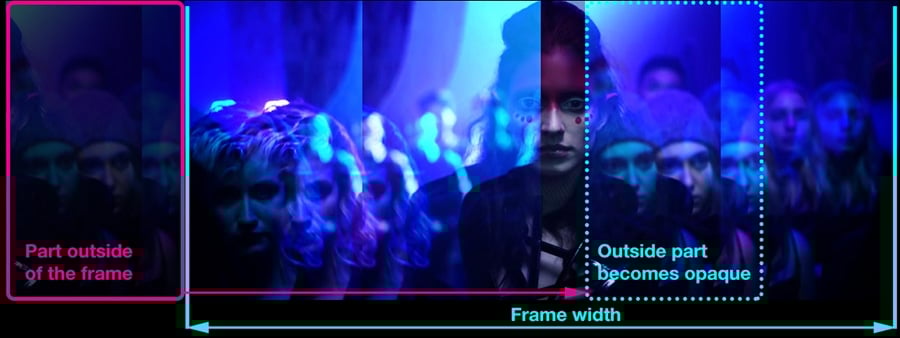
- Copy with transparent edges – the part of a block that falls outside of the frame is not mirrored on the opposite side but becomes fully opaque.
To adjust the transfer type even more precisely, you can use the following parameters available in the menu:
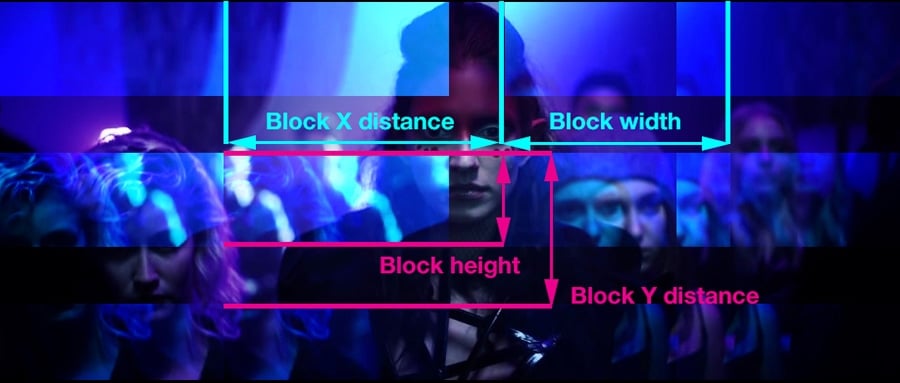
- Block width (%) – block width, calculated as a percentage of the frame width.
- Block height (%) – block height, calculated as a percentage of the frame height.
- Block X distance (%) – the horizontal distance between the beginning of the first block and the beginning of the following block, where 100% is the frame width.
- Block Y distance (%) – the vertical distance between the beginning of the first block and the beginning of the following block, where 100% is the frame height.
- Start offset (%) – horizontal distance between the very first block and the top left corner of the frame.
Frequency (ms) – this parameter defines how frequently blocks change in one millisecond. In other words, if the frequency value is 0, blocks will be still during the entire playback. If the frequency value is equal to 10, you’ll see 10 block combinations change over a millisecond.
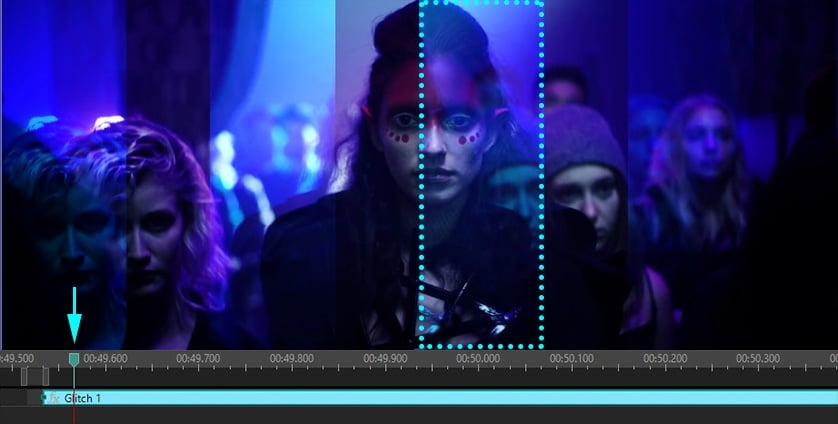
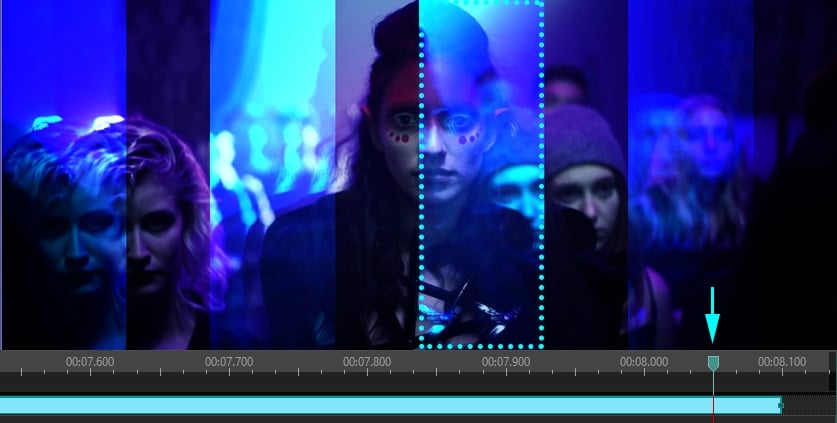
Fade in duration (ms) – the gradual appearance of the effect in the video. If the value is 0, the position and the intensity of the blocks will be defined by Glitch effect power and Stage effect power.
If it’s anything different from zero, the gradual appearance of the blocks will be stretched to the period defined in milliseconds. For instance, if the fade-in duration value is 100, you’ll see the original video in the first frame, and the distortion effect gradually appearing in the next 100 milliseconds.

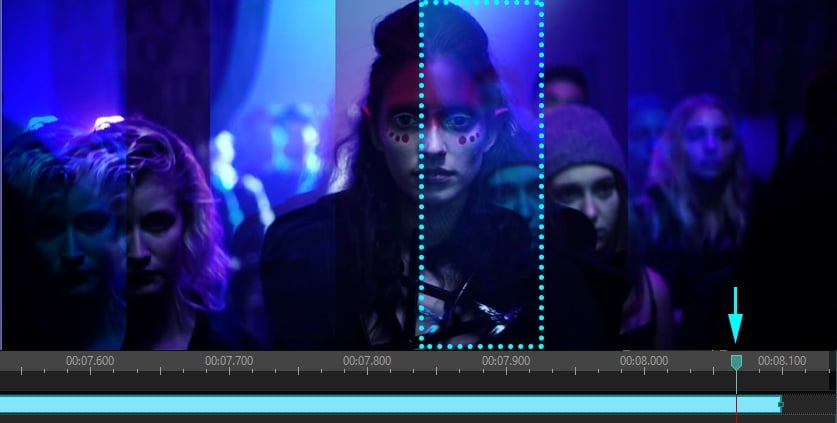
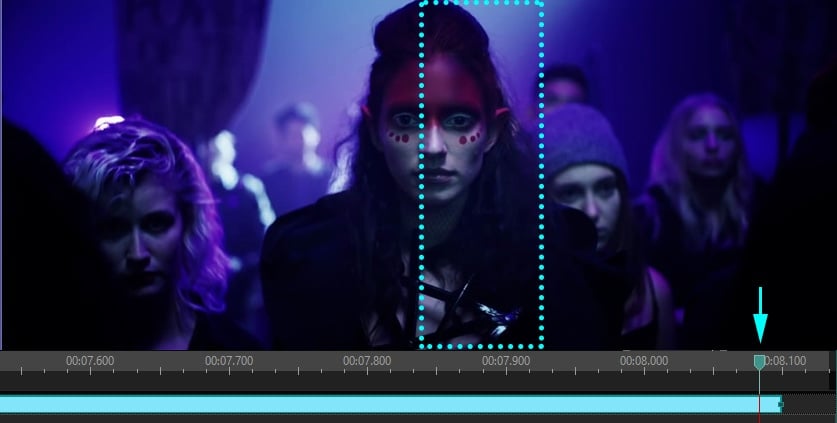
Fade out duration (ms) – similarly, this is the parameter that sets up gradual disappearance of the effect at the end of its playback.
If the fade-out duration value is zero, at the end of the effect playback, the position and the intensity of the blocks will be defined by Glitch effect power and Stage effect power. If the fade-out duration value is 100, for example, that means the effect will be gradually disappearing during the last 100 milliseconds of its playback.
And that’s the end of our tutorial. Are you ready to start using the Glitch effect in your videos?
Then download VSDC to your PC and start with the tricks described in this guide.
And if you’re keen on video editing, subscribe to our YouTube channel – we publish easy-to-follow video tutorials weekly!
Watch us on YouTube
 / @VSDCFreeVideoEditor
© 2011-2026, www.videosoftdev.com, FLASH-INTEGRO LLC. Privacy policy | Terms of use | About us
All trademarks referenced herein are the sole property of their respective owners.
Copying any materials from this site allowed only with written consent of Site Administration.